You are using an out of date browser. It may not display this or other websites correctly.
You should upgrade or use an alternative browser.
You should upgrade or use an alternative browser.
iSpindle - DIY Electronic Hydrometer
- Thread starter LBussy
- Start date

Help Support Homebrew Talk:
This site may earn a commission from merchant affiliate
links, including eBay, Amazon, and others.
Stand
Well-Known Member
Ordered. Now I'll just wait patiently. blech
Well, having started this project nearly two years ago, I finally picked up a 3D printer to start iterating a carrier to hold the Adafruit Huzzah and perfboard. After 10 revisions I got the specs and shape nailed down, so I set to work soldering everything together. However, after plugging in the battery my Huzzah gave up it's magic smoke! Back to gathering new components, will try again in a few weeks. I did put together a custom PCB and sent that off to have a few printed for me; that should make the assembly a bit easier.
Last edited:
I've tried grabbing that smoke and pushing it back it - it never works.
I just finished my spindel build. I am a Apple Computer user and don't know how to flash the board. Can anyone offer some advice about using this with a MAC? I would appreciate any help. Thanks.
I'm in the same situation as you. Did you ever get any help or figure out how to flash your spindel? I would appreciate any help.
Thanks
Look up ESPTool. It is a python program that you run through Terminal.I'm in the same situation as you. Did you ever get any help or figure out how to flash your spindel? I would appreciate any help.
Thanks

$44.99
$49.95
Craft A Brew - Mead Making Kit – Reusable Make Your Own Mead Kit – Yields 1 Gallon of Mead
Craft a Brew

$176.97
1pc Commercial Keg Manifold 2" Tri Clamp,Ball Lock Tapping Head,Pressure Gauge/Adjustable PRV for Kegging,Fermentation Control
hanhanbaihuoxiaoshoudian

$76.92 ($2,179.04 / Ounce)
Brewing accessories 1.5" Tri Clamp to Ball Lock Post Liquid Gas Homebrew Kegging Fermentation Parts Brewer Hardware SUS304 Brewing accessories(Gas Hose Barb)
chuhanhandianzishangwu

$7.79 ($7.79 / Count)
Craft A Brew - LalBrew Voss™ - Kveik Ale Yeast - For Craft Lagers - Ingredients for Home Brewing - Beer Making Supplies - (1 Pack)
Craft a Brew
![Craft A Brew - Safale S-04 Dry Yeast - Fermentis - English Ale Dry Yeast - For English and American Ales and Hard Apple Ciders - Ingredients for Home Brewing - Beer Making Supplies - [1 Pack]](https://m.media-amazon.com/images/I/41fVGNh6JfL._SL500_.jpg)
$6.95 ($17.38 / Ounce)
$7.47 ($18.68 / Ounce)
Craft A Brew - Safale S-04 Dry Yeast - Fermentis - English Ale Dry Yeast - For English and American Ales and Hard Apple Ciders - Ingredients for Home Brewing - Beer Making Supplies - [1 Pack]
Hobby Homebrew

$33.99 ($17.00 / Count)
$41.99 ($21.00 / Count)
2 Pack 1 Gallon Large Fermentation Jars with 3 Airlocks and 2 SCREW Lids(100% Airtight Heavy Duty Lid w Silicone) - Wide Mouth Glass Jars w Scale Mark - Pickle Jars for Sauerkraut, Sourdough Starter
Qianfenie Direct

$53.24
1pc Hose Barb/MFL 1.5" Tri Clamp to Ball Lock Post Liquid Gas Homebrew Kegging Fermentation Parts Brewer Hardware SUS304(Liquid Hose Barb)
yunchengshiyanhuqucuichendianzishangwuyouxiangongsi

$20.94
$29.99
The Brew Your Own Big Book of Clone Recipes: Featuring 300 Homebrew Recipes from Your Favorite Breweries
Amazon.com

$719.00
$799.00
EdgeStar KC2000TWIN Full Size Dual Tap Kegerator & Draft Beer Dispenser - Black
Amazon.com

$22.00 ($623.23 / Ounce)
AMZLMPKNTW Ball Lock Sample Faucet 30cm Reinforced Silicone Hose Secondary Fermentation Homebrew Kegging joyful
无为中南商贸有限公司

$49.95 ($0.08 / Fl Oz)
$52.99 ($0.08 / Fl Oz)
Brewer's Best - 1073 - Home Brew Beer Ingredient Kit (5 gallon), (Blueberry Honey Ale) Golden
Amazon.com

$53.24
1pc Hose Barb/MFL 1.5" Tri Clamp to Ball Lock Post Liquid Gas Homebrew Kegging Fermentation Parts Brewer Hardware SUS304(Gas MFL)
Guangshui Weilu You Trading Co., Ltd

$479.00
$559.00
EdgeStar KC1000SS Craft Brew Kegerator for 1/6 Barrel and Cornelius Kegs
Amazon.com

$58.16
HUIZHUGS Brewing Equipment Keg Ball Lock Faucet 30cm Reinforced Silicone Hose Secondary Fermentation Homebrew Kegging Brewing Equipment
xiangshuizhenzhanglingfengshop
Look up ESPTool. It is a python program that you run through Terminal.
I found an app called NodeMCU-PyFlash that is supposed to do the same thing, except self contained. Do I need to be connected to the spindel via USB to use one of these?
I found instructions on the Brewer's Friend website https://docs.brewersfriend.com/devices/ispindel#configuration that says you can load firmware over wifi. I can connect to it as an access point but when I try to go to 192.168.4.1 as instructed it won't open anything.
Yes.I found an app called NodeMCU-PyFlash that is supposed to do the same thing, except self contained. Do I need to be connected to the spindel via USB to use one of these?
It's likely because there's no firmware loaded yet. There needs to be an "application" to receive and apply the flash. Pretty sure that the stock card doesn't have that capability. I've been wrong, but it seems to be correct given your experience so far.I found instructions on the Brewer's Friend website https://docs.brewersfriend.com/devices/ispindel#configuration that says you can load firmware over wifi. I can connect to it as an access point but when I try to go to 192.168.4.1 as instructed it won't open anything.
Note that "large" firmware loads will preempt OTA updates if they occupy more than half the available memory. eg: the esp32-CAM modules cannot do OTA updates with the camera code loaded as it occupies 3/4 of the storage...
Cheers!
Cheers!
Thanks for the info. I've tried using the NodeMCU-PyFlash but it doesn't appear to be working. It looks like it starts; light on the spindel flashes and dots go across the screen of the app and then both stop. No response after that. I'm new to the Arduino and Raspberry Pi stuff, so I guess I have more to figure out.
Well, I had another Wemos D1 mini and decided to try it without soldering anything to it, or removing diodes. Plugged it to USB and ran the NodeMCU-PyFlash I mentioned before. It worked exactly as it should. Firmware is loaded and I've gotten into config menu. Maybe I damaged the first one or it was DOA. Thanks for the input.
Correct size tubes now available on Amazon. I received mine in 2 days.
https://www.amazon.com/gp/product/B07MBR556W/ref=ppx_yo_dt_b_asin_title_o00_s00?ie=UTF8&psc=1
https://www.amazon.com/gp/product/B07MBR556W/ref=ppx_yo_dt_b_asin_title_o00_s00?ie=UTF8&psc=1
Stand
Well-Known Member
I'm having an issue flashing D1 Mini. Flashing goes well with the ESP8266 Flasher, but after it's done and I reset the D1 Mini it flashes 6 times and stops. I saw the instructions about resetting it and re-flashing, and I've tried that as well. Can't seem to get it to work. Any thoughts? It won't show up over Wifi either, so it's not just the light.
Cheers!
Cheers!
Stand
Well-Known Member
Just tried both suggestions. Also triple pressed, quadruple, Morse coded SOS, and did a little dance. No dice.
It does a little stuttered flash like this: 1...2...3.4...5...6
I think it's trying to communicate!
It does a little stuttered flash like this: 1...2...3.4...5...6
I think it's trying to communicate!
Last edited:
Stand
Well-Known Member
I think there is something weird about the latest update. When I flash it with an earlier version it seems to work, so I did that. I then went in and updated it to 6.0.5 from maintenance, and I got the same problem again.
Update: Back to older versions now I'm able to access the web portal and configure the network, but it doesn't seem to connect properly. Link to confirm it works loads indefinitely. I reset to enter web portal again it says it has no network configured and makes me enter everything again. I don't get it.
Also, do I still need to modify the chip by ripping off the diode if I'm using the 4.0 PCB? The guide doesn't say.
Last edited:
Stand
Well-Known Member
I got it to work and temperature reporting with version 5.8.6, but I couldn't get it to report gyro angle, so I updated. As soon as I updated I was no longer able to save configuration info, and it stopped communicating temperature to Fermentrack.
I'm not sure if I'm doing something wrong. Are people removing the green light from gyro? I think that might be my problem. Anybody done the PCB version (4.0) that can give some guidance?
I'm not sure if I'm doing something wrong. Are people removing the green light from gyro? I think that might be my problem. Anybody done the PCB version (4.0) that can give some guidance?
Stand
Well-Known Member
Fixed the problem. My soldering was bad. Now I am in business!
ro_florence
Member
- Joined
- May 29, 2018
- Messages
- 5
- Reaction score
- 1
Does anyone have a link for the 3x4cm PCB? Can’t seem to find any that size. Otherwise, what else can I use?
Cheers in advance!
Cheers in advance!
Does anyone have a link for the 3x4cm PCB? Can’t seem to find any that size. Otherwise, what else can I use?
Cheers in advance!
Are you referring to this board on pcbs.io? I Believe it is approx. 3cm x 4 cm.
BreeBrew
Well-Known Member
I ordered there, very nice pcb's, lack of communication there, but they do arrive after a while. And I ordered the V2 instead of the v2.1, as shown in the first pic which I tried to alter but they just didn't reply to my emails.Are you referring to this board on pcbs.io? I Believe it is approx. 3cm x 4 cm.
I also ordered here https://www.pcbway.com/project/shareproject/W229678ASF3_iSpindle_V21.html You'll get $ 5 off of your first order if you'll sign up for the first time, so I got 10 for $11 including shipping. You can track the entire production process and you can allways check where your pcb's are:

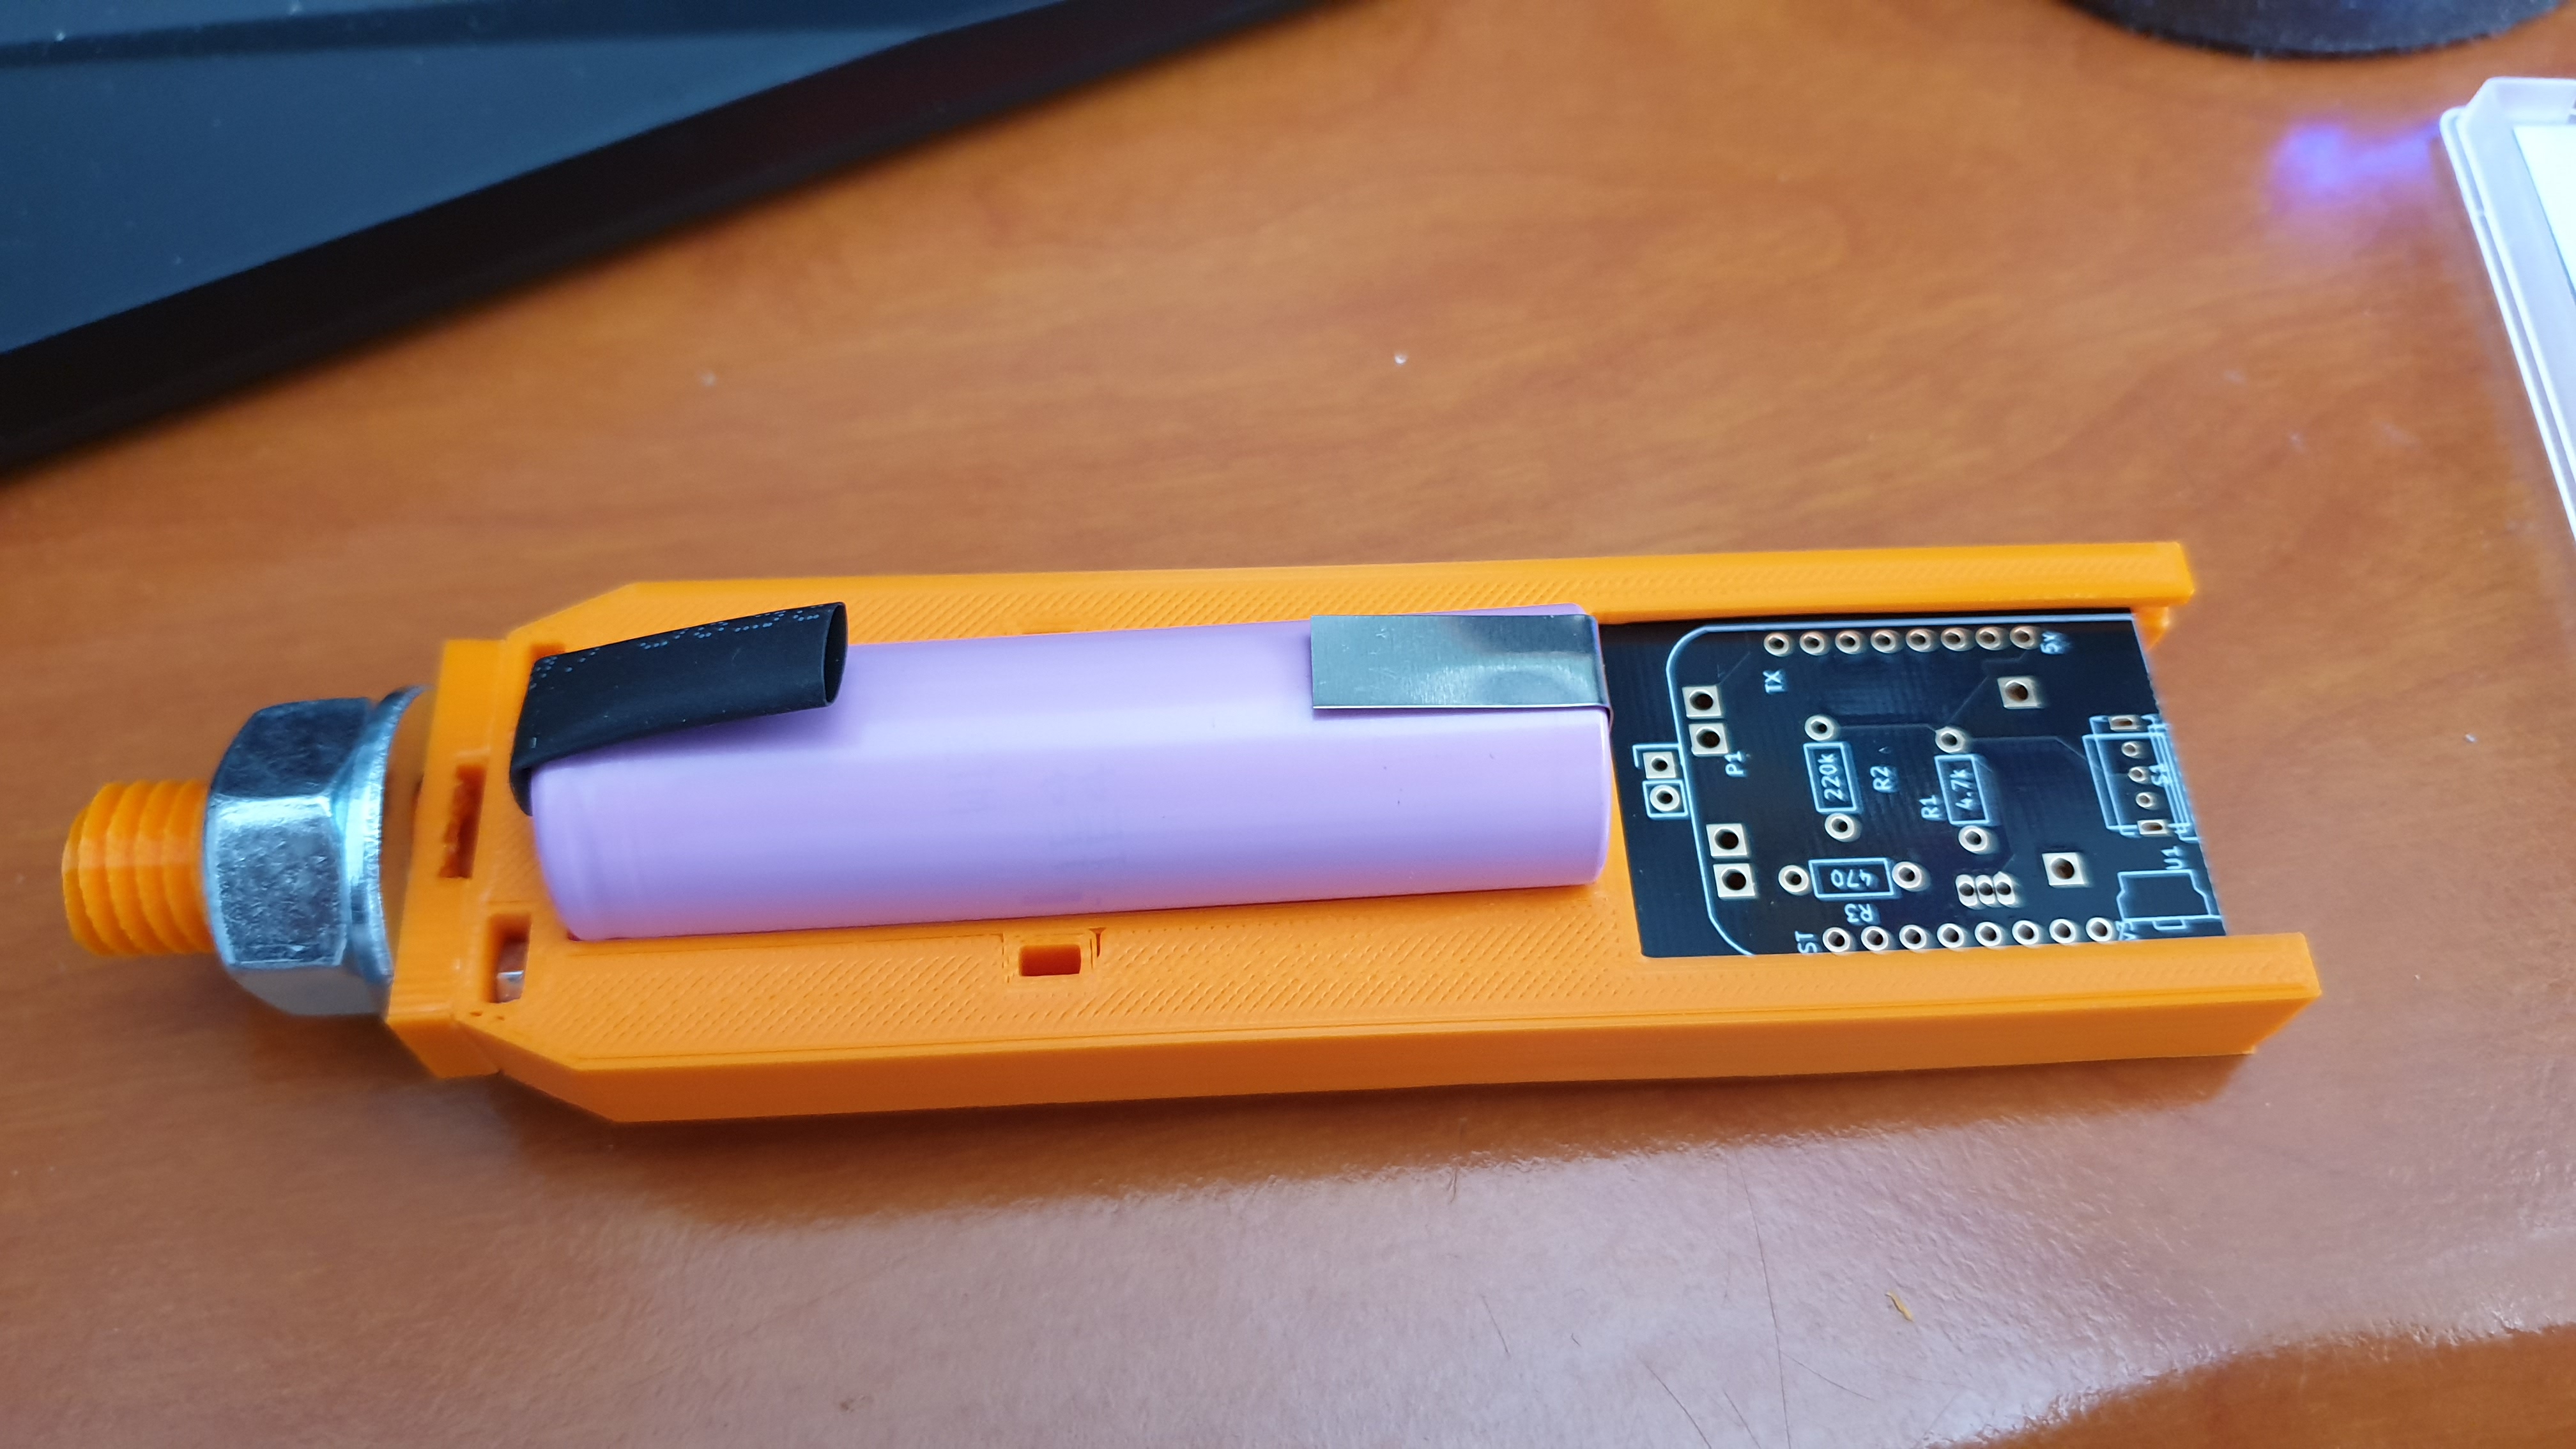
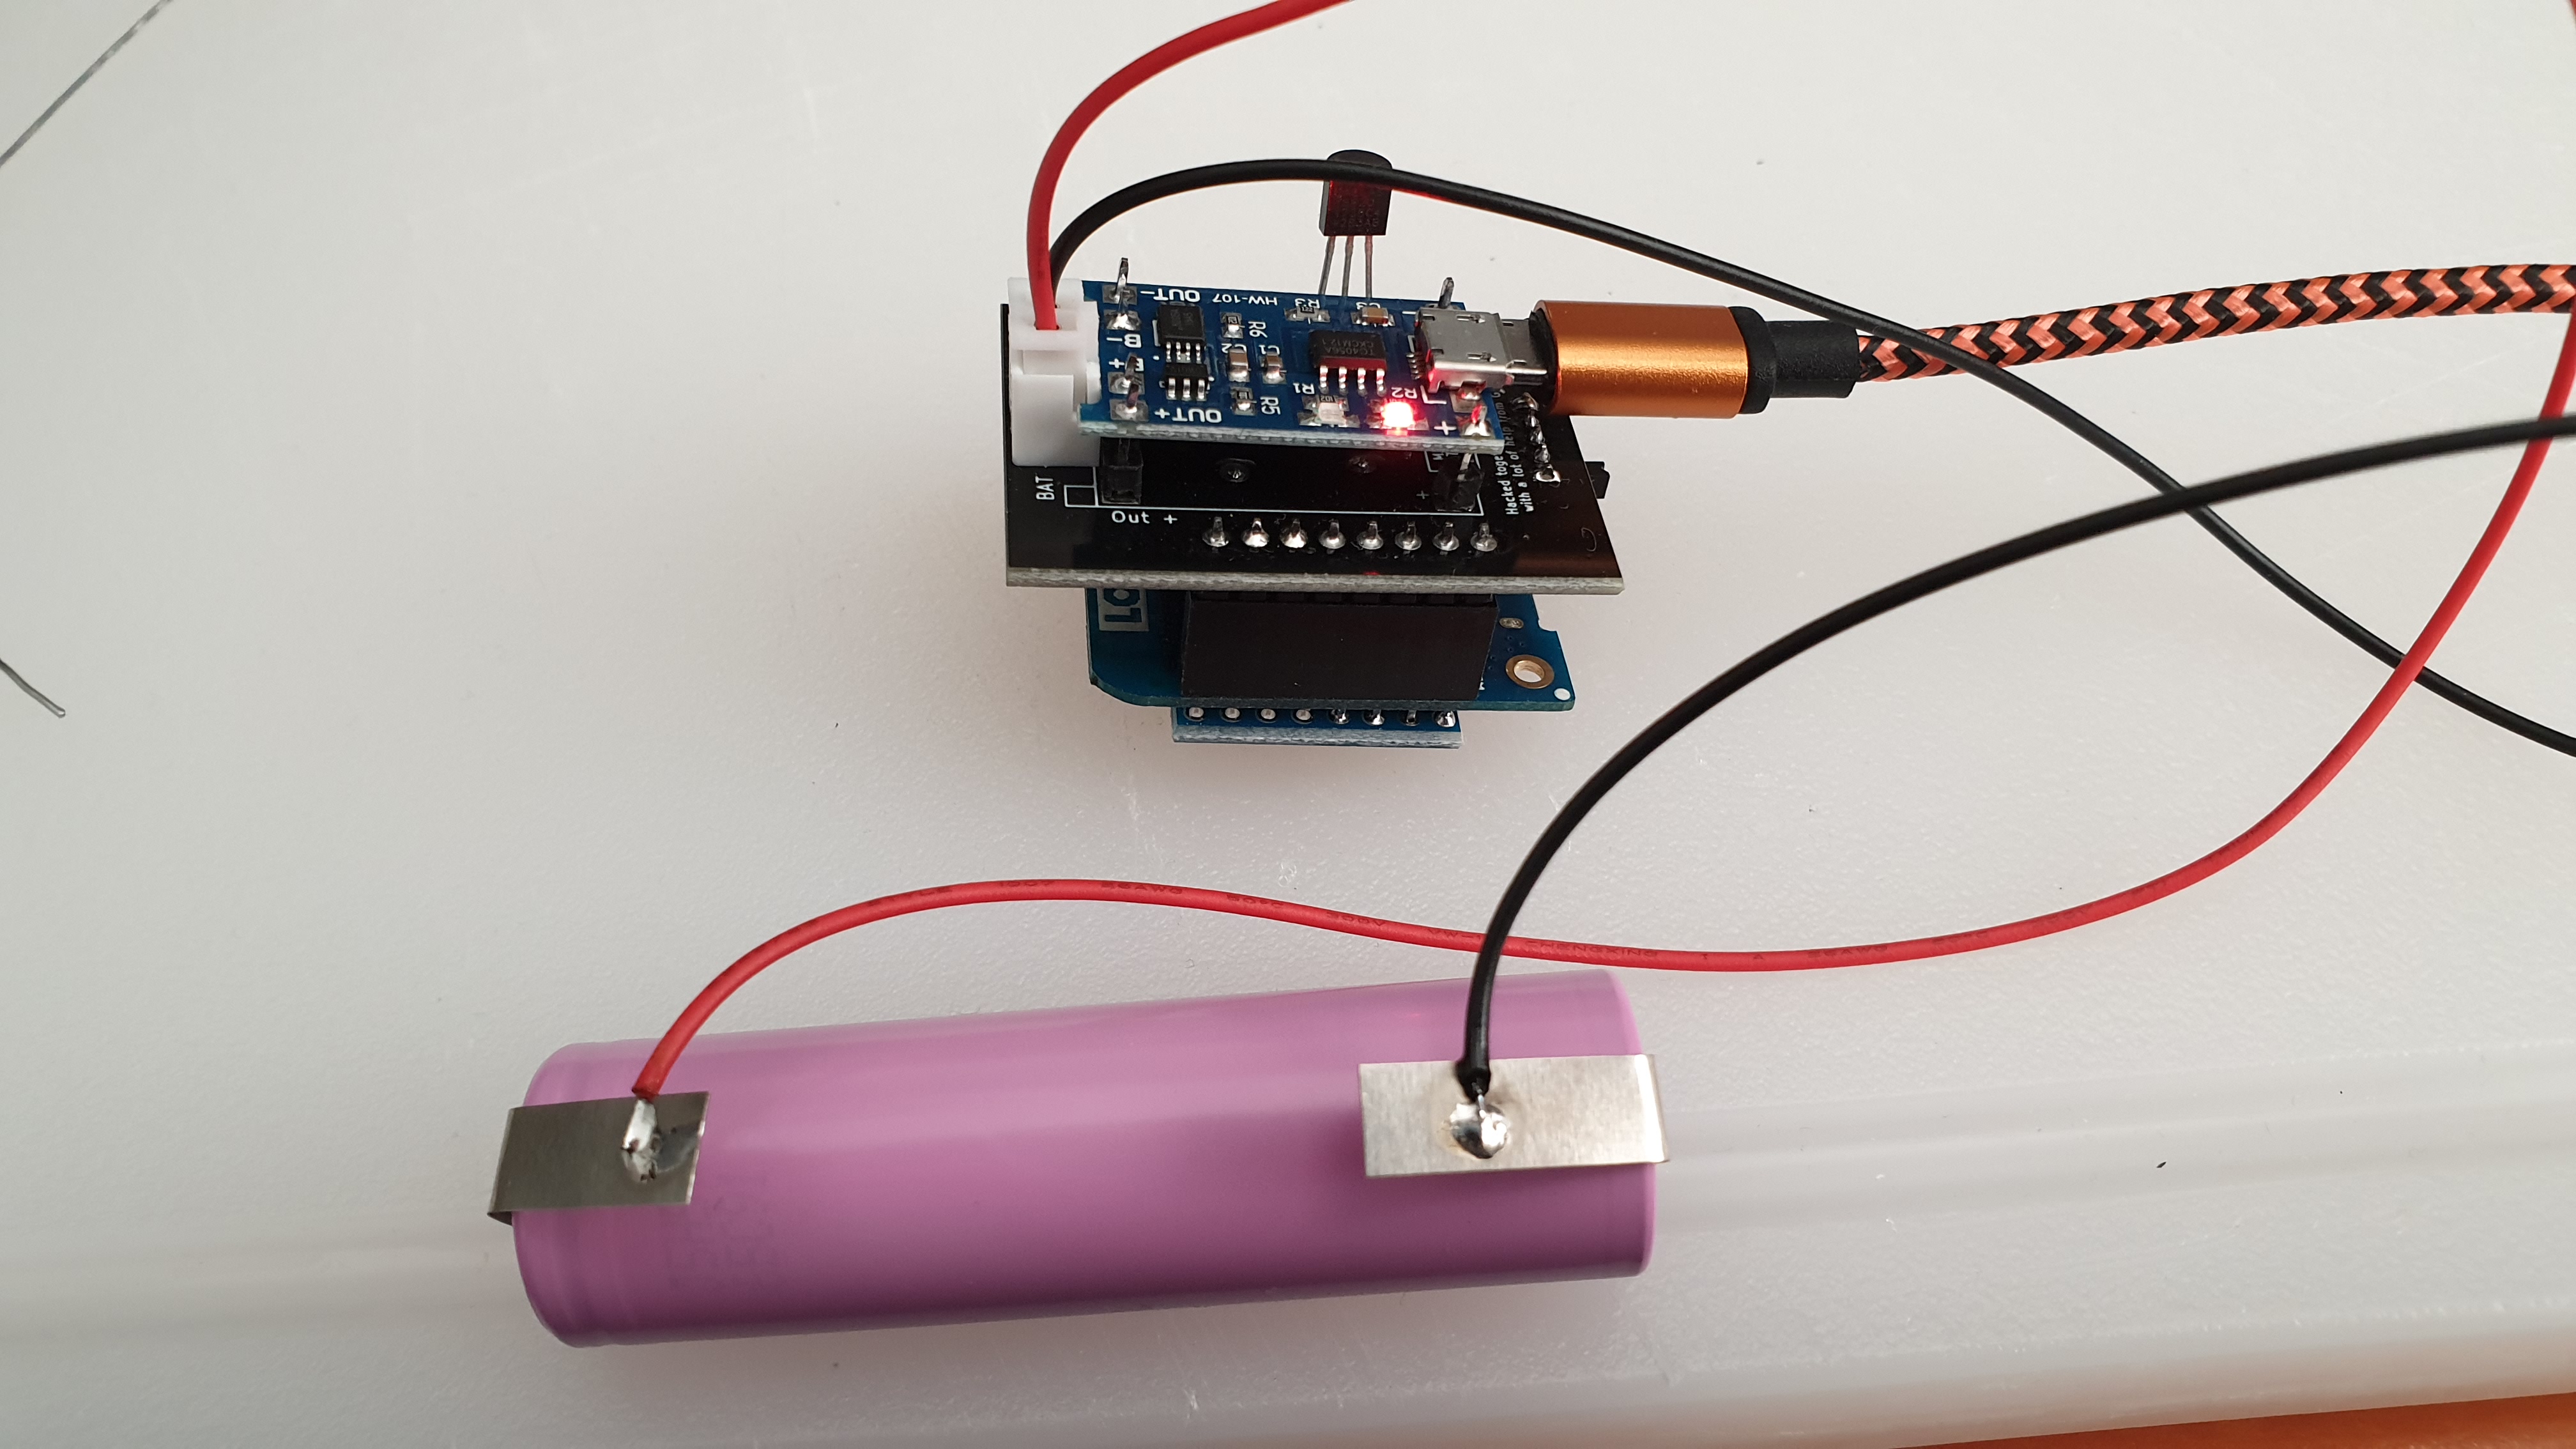
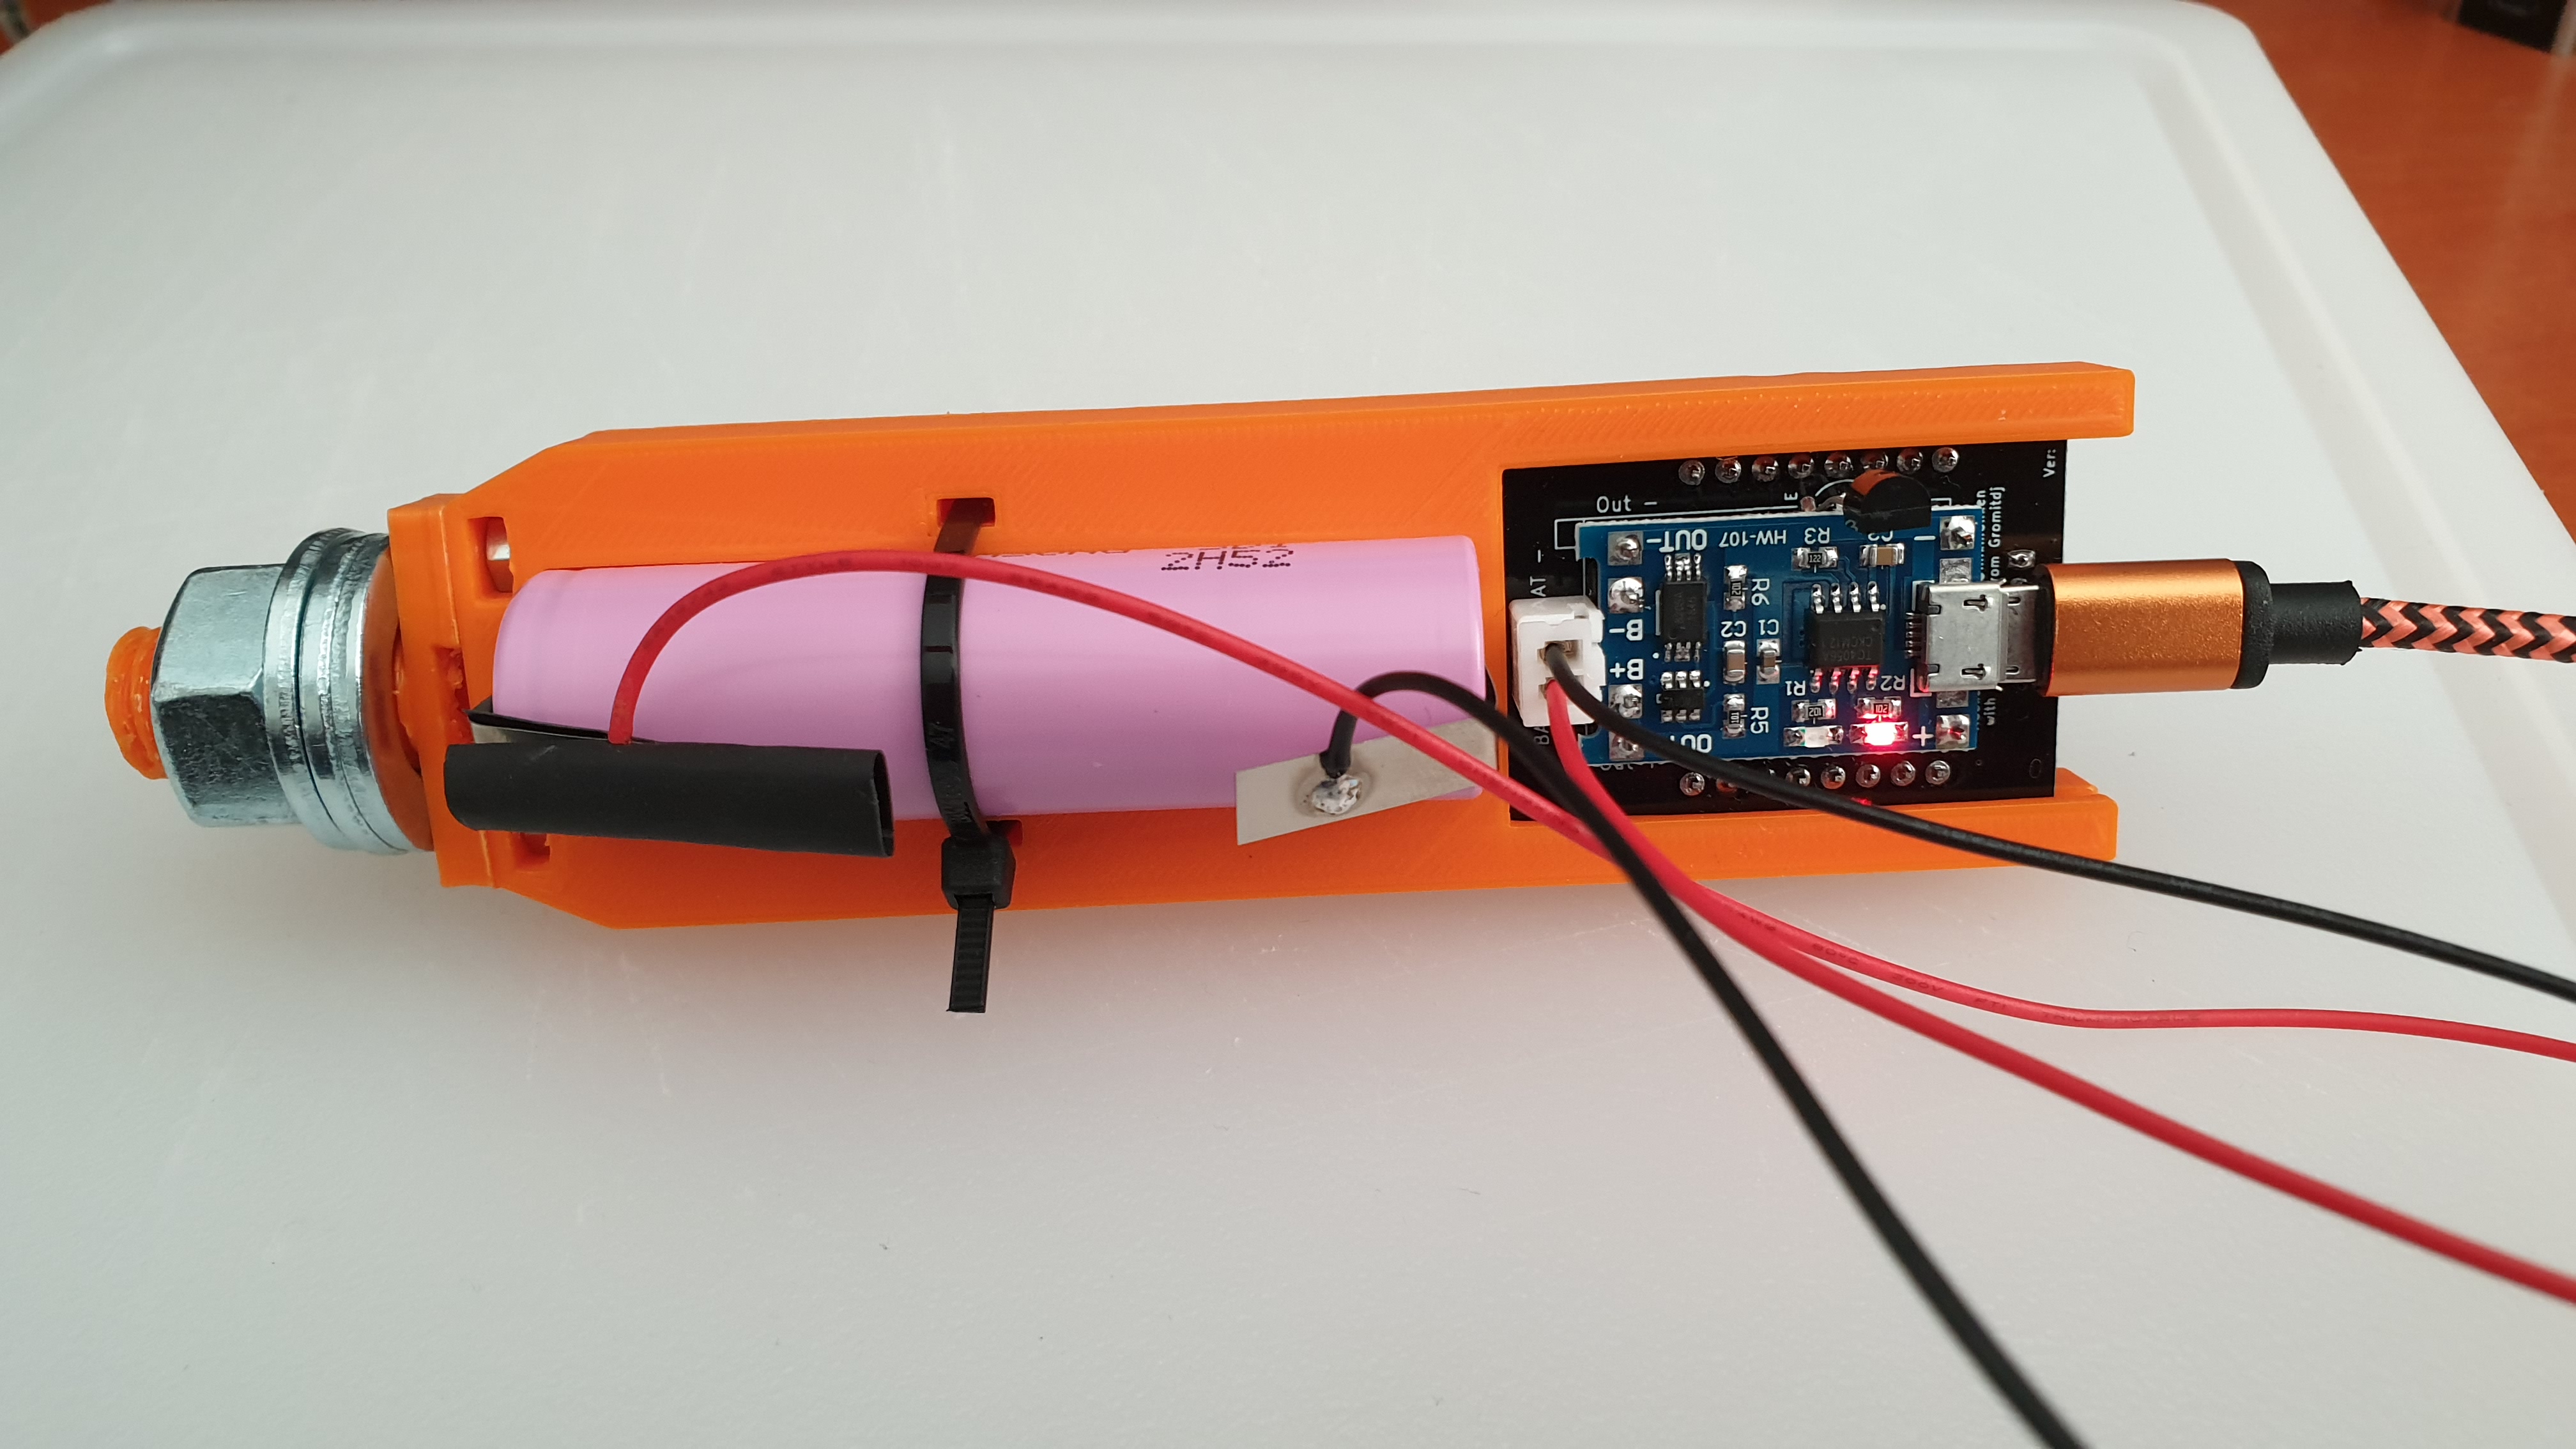
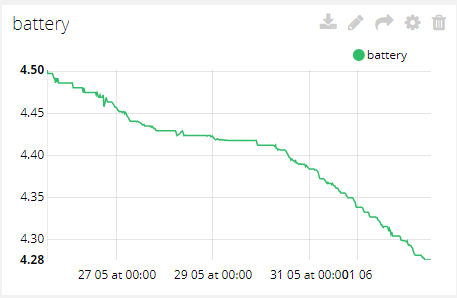
I also see people worrying about the green led that has to be removed according to the build instructions, I didn't remove the led nor the input diode(I just have to remember to disattach the battery when flashing over usb) I use a Samsung 3500mah battery which is in a fermenting sugar solution for the past almost 8 days with an update interval of 2 minutes, I am confident that this configuration will hold in a fermenting beer for 2 weeks with an update interval of 15 minutes, and my beers up to now are ready fermenting in a week max. Result of the battery:
Last edited:
ro_florence
Member
- Joined
- May 29, 2018
- Messages
- 5
- Reaction score
- 1
I ordered there, very nice pcb's, lack of communication there, but they do arrive after a while. And I ordered the V2 instead of the v2.1, as shown in the first pic which I tried to alter but they just didn't reply to my emails.
I also ordered here https://www.pcbway.com/project/shareproject/W229678ASF3_iSpindle_V21.html You'll get $ 5 off of your first order if you'll sign up for the first time, so I got 10 for $11 including shipping. You can track the entire production process and you can allways check where your pcb's are:
View attachment 629497
View attachment 629491 View attachment 629492 View attachment 629493
I also see people worrying about the green led that has to be removed according to the build instructions, I didn't remove the led nor the input diode(I just have to remember to disattach the battery when flashing over usb) I use a Samsung 3500mah battery which is in a fermenting sugar solution for the past almost 8 days with an update interval of 2 minutes, I am confident that this configuration will hold in a fermenting beer for 2 weeks with an update interval of 15 minutes, and my beers up to now are ready fermenting in a week max. Result of the battery:
View attachment 629495
Cheers @BreeBrew !
I thought from the most recent build/part instructions on ispindel.de that you use a standard 3x4cm PCB rather than one of the purpose made printed ones?
I’ve got all the other parts on the way but is the customer PCB what I am missing?
Thanks again!
BreeBrew
Well-Known Member
@ro_florence It is so much easier with a custom pcb. You don't have to think about what goes where because it is all printed on there.
I ordered there, very nice pcb's, lack of communication there, but they do arrive after a while. And I ordered the V2 instead of the v2.1, as shown in the first pic which I tried to alter but they just didn't reply to my emails.
I also ordered here https://www.pcbway.com/project/shareproject/W229678ASF3_iSpindle_V21.html You'll get $ 5 off of your first order if you'll sign up for the first time, so I got 10 for $11 including shipping. You can track the entire production process and you can allways check where your pcb's are:
I also see people worrying about the green led that has to be removed according to the build instructions, I didn't remove the led nor the input diode(I just have to remember to disattach the battery when flashing over usb) I use a Samsung 3500mah battery which is in a fermenting sugar solution for the past almost 8 days with an update interval of 2 minutes, I am confident that this configuration will hold in a fermenting beer for 2 weeks with an update interval of 15 minutes, and my beers up to now are ready fermenting in a week max. Result of the battery:
The only difference between v2 and v2.1 is that I increased the spacing on the leads for the temp sensor. Making it a little easier to solder. The pcbs.io and the pcbway boards are identical. I put them on pcbway after a European user requested it for easier shipping.
Cheers @BreeBrew !
I thought from the most recent build/part instructions on ispindel.de that you use a standard 3x4cm PCB rather than one of the purpose made printed ones?
I’ve got all the other parts on the way but is the customer PCB what I am missing?
Thanks again!
The original build instructions included assembly on a perfboard. @Mikmonken created the original custom pcb (v2) in order to make the build easier. I recommend the custom PCB, since it does make it quite a bit easier to asssemble. Just make sure that you orient the diode in the correct direction if you use the diode instead of the resistor. I should probably update the silkscreen to show the diode instead, since the resistor orientation doesn't matter if it's used.
shambolic94
Member
I used a 3x7 perfboard from Ali Express (https://www.aliexpress.com/item/32813767534.html?) and just cut it in half. If you score it well with a razor, it will easily snap in half.
As someone with limited soldering experience, this was a difficult project with a perfboard. I have no doubt the custom PCBs are much easier to put together.
As someone with limited soldering experience, this was a difficult project with a perfboard. I have no doubt the custom PCBs are much easier to put together.
BreeBrew
Well-Known Member
My first build I did with the V2.1 and now that this came out pretty nice I am confident enough to do my second build with the V2, although the holes of the temp sensor are pretty close together so I hope the solder doesn't flow from one hole to anotherThe only difference between v2 and v2.1 is that I increased the spacing on the leads for the temp sensor. Making it a little easier to solder.
Identical in the sense of layout, not in the sense of material. The pcbs.io PCB's finish is ENIG (Lead Free Gold), the PCB's of pcbway finish is HASL with lead. Not that I care but someone mightThe pcbs.io and the pcbway boards are identical. I put them on pcbway after a European user requested it for easier shipping.
I am an European user and the only difference between the two is that from America it takes about a month to get here(NL) without any notifications from pcbs.io.I put them on pcbway after a European user requested it for easier shipping.
From China it took about 2 weeks and the whole process is very transparent which I like. Next time I would opt for China again, if that ever occurs because I have 16 V2 and 10 v2.1
Last edited:
My first build I did with the V2.1 and now that this came out pretty nice I am confident enough to do my second build with the V2, although the holes of the temp sensor are pretty close together so I hope the solder doesn't flow from one hole to another
If you get a couple of solder bridges, they are really easy to clean up with the tip of your iron. Or a little solder wick will do the trick if they are bad.
Identical in the sense of layout, not in the sense of material. The pcbs.io PCB's finish is ENIG (Lead Free Gold), the PCB's of pcbway finish is HASL with lead. Not that I care but someone might
Sorry I wasn't more clear. Board layout is all that I was referring to.
I am an European user and the only difference between the two is that from America it takes about a month to get here(NL) without any notifications from pcbs.io.
From China it took about 2 weeks and the whole process is very transparent which I like. Next time I would opt for China again, if that ever occurs because I have 16 V2 and 10 v2.1
All the same reasons the other gentleman gave when asking for a version to be placed on PCBWay.
BreeBrew
Well-Known Member
Thanks for the tipIf you get a couple of solder bridges, they are really easy to clean up with the tip of your iron. Or a little solder wick will do the trick if they are bad.

DuncB
Well-Known Member
First post and sending thanks for all the great info on the Ispindel.
First build all went well. Configured and software working. Yet to setup fermentrack but this is the aim.
Just waiting for the petlings to arrive now ( post to NZ takes a while). Wish I'd ordered the bottles when I ordered the electronic parts from china.
Will be trying to get the wireless charging option going. Everyone seems to use a reed switch and a magnet.
Can't see examples of anyone using a mercury switch ( or is this madness?) but they are cheap and easy.
Big thanks to all for the great advice throughout this thread.
There's already a sensor in the board which could go to low power mode. Whether the developer will implement that or not is up to them. A mercury switch sounds good in theory, but something about mercury (however thoroughly enveloped) near my brew makes me wonder.
Lalo_uy
Well-Known Member
How will you use the mercury SW.
May be sitting the iSpindle on the cup to turn it off.
You can do the same with a ball switch and no hazardous metal.
https://www.adafruit.com/product/173
or
https://www.aliexpress.com/item/Fre...25-4927-931c-107ac0134fd5&transAbTest=ae803_4
May be sitting the iSpindle on the cup to turn it off.
You can do the same with a ball switch and no hazardous metal.
https://www.adafruit.com/product/173
or
https://www.aliexpress.com/item/Fre...25-4927-931c-107ac0134fd5&transAbTest=ae803_4
Thinking through this ... the tilt switch (or mercury switch) would potentially have the disadvantage of turning the unit off when calibrating at 90°. To work well, you would want it to only turn off when when sitting absolutely upside-down; therefore you would want to invert the circuit where a connection at the switch would turn off the board. Just spit-balling here but that would require a transistor (and create a small drain while "off") or a latching relay which there's not much room for.
Hopefully that makes sense. typing this while at work listening to other things.
Hopefully that makes sense. typing this while at work listening to other things.
Seems to me an Hg switch tube shaped in a semi circle would make that easier. Or maybe not. Hmmm....
Cheers!
Cheers!
DuncB
Well-Known Member
Having not got my spindel in water yet ( no petling ), I had assumed that it was at an angle and didn't spin on it's axis ( due to a keel effect of the battery). If that was the case I could just angle the switch to be on at 90 and all the way thru to 25 degrees. However if it spins clearly that wouldn't work. Nor the ball switch ( I was ignorant of these).
Maybe stick to the tried and tested reed switch and a magnet then.
Re the mercury and brewing. Not that long ago that we stuck mercury in glass in our mouths (other orifices also!).
Also amalgam fillings have metal in them.
Something to chew on!
Maybe stick to the tried and tested reed switch and a magnet then.
Re the mercury and brewing. Not that long ago that we stuck mercury in glass in our mouths (other orifices also!).
Also amalgam fillings have metal in them.
Something to chew on!
Lalo_uy
Well-Known Member
Thinking through this ... the tilt switch (or mercury switch) would potentially have the disadvantage of turning the unit off when calibrating at 90°. To work well, you would want it to only turn off when when sitting absolutely upside-down; therefore you would want to invert the circuit where a connection at the switch would turn off the board. Just spit-balling here but that would require a transistor (and create a small drain while "off") or a latching relay which there's not much room for.
Hopefully that makes sense. typing this while at work listening to other things.
Look, just bend it up. will keep on in all working angles.
Calibrate cup up. or for 20° in water
https://www.sunrom.com/p/sw520d-sw-520d-tilt-sensor
Not exactly following that sir. I tried to Google up such a thing and ended up with jack and squat.Seems to me an Hg switch tube shaped in a semi circle would make that easier. Or maybe not. Hmmm....
People used to take Calomel for syphilis too ... While mercury fillings are proven to release only minute amounts of mercury, there's a large difference between pure/liquid mercury and an amalgam. Also, mercury switches are prohibited from equipment that processes food (although I've seen them as tilt alarms in vending machines). Mercury switches are also RoHS restricted. Sure we don't have to follow the rules, but there's reasons to have those rules. It's sealed in glass, sealed (we hope) in plastic I guess, but I'd just prefer not to have it in my fermenter I guess.Re the mercury and brewing. Not that long ago that we stuck mercury in glass in our mouths (other orifices also!).
Also amalgam fillings have metal in them.
Don't get me wrong, I like the idea of being able to shut off the iSpindel by turning it upside-down.
So when that's on it's side (that first calibration) it will switch off:Look, just bend it up. will keep on in all working angles.
Calibrate cup up. or for 20° in water
https://www.sunrom.com/p/sw520d-sw-520d-tilt-sensor

So the following orientation should work in all instances except possibly at high gravities. I'll have to see if I downloaded any of my past fermentations data to see what the maximum angles were.
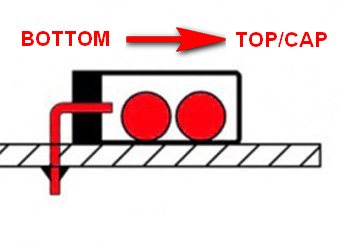
If there seems to be enough interest, I can make the revisions to the PCB to include the switch. I suppose if the switch wasn't desired, a jumper could be soldered in it's place.
Does anyone know what the power requirements of such a switch would be? I haven't looked into it, honestly.

If there seems to be enough interest, I can make the revisions to the PCB to include the switch. I suppose if the switch wasn't desired, a jumper could be soldered in it's place.
Does anyone know what the power requirements of such a switch would be? I haven't looked into it, honestly.
After a really quick look on mouser, the only 45° operable unit I could find has the following graphic. which would mean that it is only good for about a 10° swing in our use without figuring a way to bend the switch.
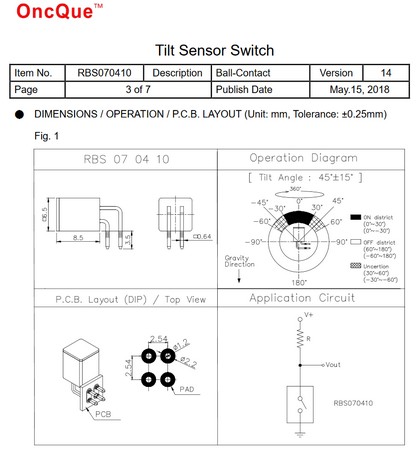

Similar threads
- Replies
- 33
- Views
- 8K
- Replies
- 3
- Views
- 1K


