Here she is. I got it just a tad bit too tall so I the lid to the kettle rests on top of the basket so if you decide to go this route allow for more room than you think when it comes to height of the basket. It doesn't really effect anything really it's just a little tall. Also don't spend the money on the press plate, you can just go to webstaueantstore.com and buy a stainless steel pan lid that works just as good and is less than half the price of the press plate they offer.Would you mind attaching a pic of your custom basket? I'm also going the route of ditching the Spike basket and was planning on the whole false bottom + brewbag... Never even considered a different basket.
You are using an out of date browser. It may not display this or other websites correctly.
You should upgrade or use an alternative browser.
You should upgrade or use an alternative browser.
Spike Solo Owner's Thread
- Thread starter RichardU
- Start date

Help Support Homebrew Talk:
This site may earn a commission from merchant affiliate
links, including eBay, Amazon, and others.
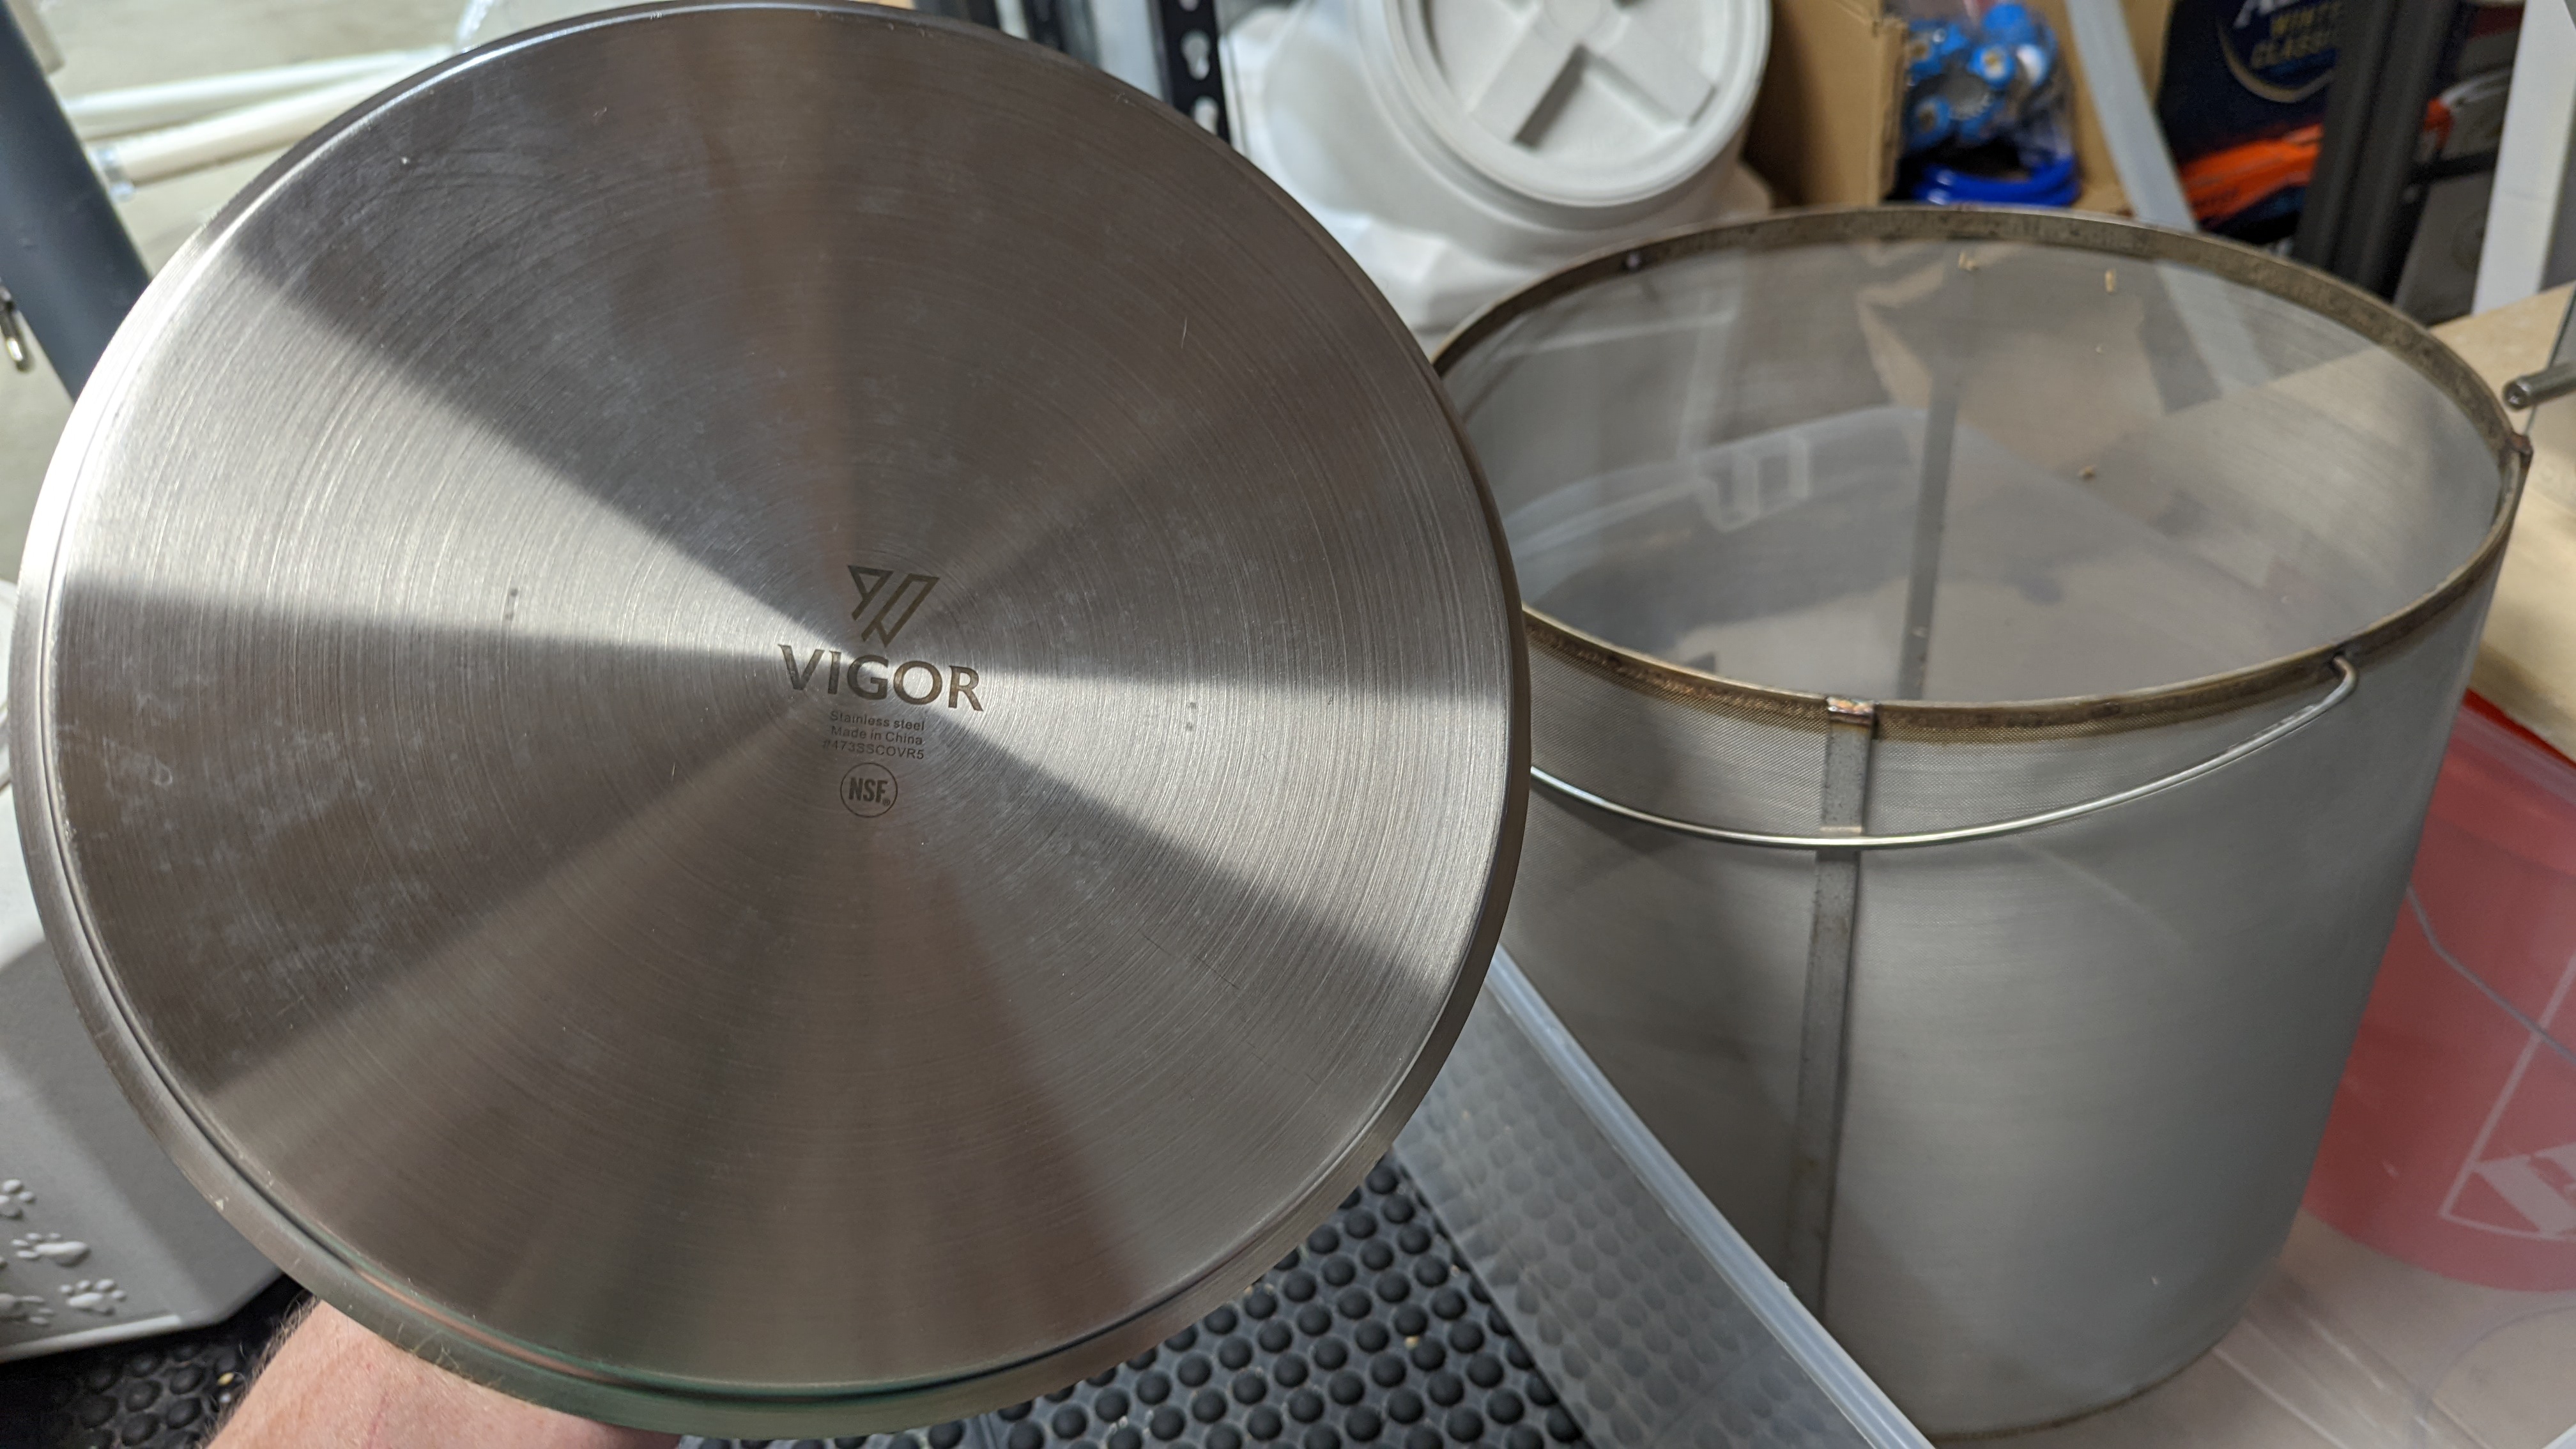
Very interesting. Do you have any issues with clarity or do you get sufficient flow through the grain bed to end up with clear wort? That would be my only concern with the technique, but if you've got that figured out and are getting consistent extraction over 80% then kudos!Here she is. I got it just a tad bit too tall so I the lid to the kettle rests on top of the basket so if you decide to go this route allow for more room than you think when it comes to height of the basket. It doesn't really effect anything really it's just a little tall. Also don't spend the money on the press plate, you can just go to webstaueantstore.com and buy a stainless steel pan lid that works just as good and is less than half the price of the press plate they offer.
I use whirlfloc in the boil but otherwise I rack borderline crystal clear wort to the fermenter. I even pull this basket out before boil and use a big stainless steel frying pan lid to squeeze as much out of the basket as I can. This is a much more enjoyable and more consistent brew process compared to the Spike basket. Did the Spike basket work? Absolutely! Is this method easier, less time intensive, more efficient, and allows me to use the full potential of my 15g kettle (no dead space) IMHO 1000% yes.Very interesting. Do you have any issues with clarity or do you get sufficient flow through the grain bed to end up with clear wort? That would be my only concern with the technique, but if you've got that figured out and are getting consistent extraction over 80% then kudos!
Oceangrace24
Well-Known Member
Word to the wise.. don't use fresh pumpkin in a spike solo 20gal mash. ask me how I know...
Ok...we need pictures. ")


$7.79 ($7.79 / Count)
Craft A Brew - LalBrew Voss™ - Kveik Ale Yeast - For Craft Lagers - Ingredients for Home Brewing - Beer Making Supplies - (1 Pack)
Craft a Brew


$33.98
DYKWSWYX Heavy Duty Brewing Gloves (1 Pair) - 55CM Long Chemical Resistant Plastic Gloves for Beer & Wine Making, Cleaning, Homebrew Equipment Protection
wuhanshijiayangzhiyimaoyiyouxiangongsi


$44.99
$49.95
Craft A Brew - Mead Making Kit – Reusable Make Your Own Mead Kit – Yields 1 Gallon of Mead
Craft a Brew


$49.95 ($0.08 / Fl Oz)
$52.99 ($0.08 / Fl Oz)
Brewer's Best - 1073 - Home Brew Beer Ingredient Kit (5 gallon), (Blueberry Honey Ale) Golden
Amazon.com


$53.24
1pc Hose Barb/MFL 1.5" Tri Clamp to Ball Lock Post Liquid Gas Homebrew Kegging Fermentation Parts Brewer Hardware SUS304(Liquid Hose Barb)
yunchengshiyanhuqucuichendianzishangwuyouxiangongsi


![Craft A Brew - Safale S-04 Dry Yeast - Fermentis - English Ale Dry Yeast - For English and American Ales and Hard Apple Ciders - Ingredients for Home Brewing - Beer Making Supplies - [1 Pack]](https://m.media-amazon.com/images/I/41fVGNh6JfL._SL500_.jpg)
$6.95 ($17.38 / Ounce)
$7.47 ($18.68 / Ounce)
Craft A Brew - Safale S-04 Dry Yeast - Fermentis - English Ale Dry Yeast - For English and American Ales and Hard Apple Ciders - Ingredients for Home Brewing - Beer Making Supplies - [1 Pack]
Hobby Homebrew


$53.24
1pc Hose Barb/MFL 1.5" Tri Clamp to Ball Lock Post Liquid Gas Homebrew Kegging Fermentation Parts Brewer Hardware SUS304(Gas MFL)
Guangshui Weilu You Trading Co., Ltd


$176.97
1pc Commercial Keg Manifold 2" Tri Clamp,Ball Lock Tapping Head,Pressure Gauge/Adjustable PRV for Kegging,Fermentation Control
hanhanbaihuoxiaoshoudian


$20.94
$29.99
The Brew Your Own Big Book of Clone Recipes: Featuring 300 Homebrew Recipes from Your Favorite Breweries
Amazon.com


$172.35
2 Inch Tri Clamp Keg Manifold With Ball Lock Posts, Pressure Gauge, PRV (0-30 PSI) – Homebrew, Fermentation, Kegging System
wuhanshijiayangzhiyimaoyiyouxiangongsi


$58.16
HUIZHUGS Brewing Equipment Keg Ball Lock Faucet 30cm Reinforced Silicone Hose Secondary Fermentation Homebrew Kegging Brewing Equipment
xiangshuizhenzhanglingfengshop


$719.00
$799.00
EdgeStar KC2000TWIN Full Size Dual Tap Kegerator & Draft Beer Dispenser - Black
Amazon.com


$76.92 ($2,179.04 / Ounce)
Brewing accessories 1.5" Tri Clamp to Ball Lock Post Liquid Gas Homebrew Kegging Fermentation Parts Brewer Hardware SUS304 Brewing accessories(Gas Hose Barb)
chuhanhandianzishangwu


$22.00 ($623.23 / Ounce)
AMZLMPKNTW Ball Lock Sample Faucet 30cm Reinforced Silicone Hose Secondary Fermentation Homebrew Kegging joyful
无为中南商贸有限公司

$479.00
$559.00
EdgeStar KC1000SS Craft Brew Kegerator for 1/6 Barrel and Cornelius Kegs
Amazon.com


$33.99 ($17.00 / Count)
$41.99 ($21.00 / Count)
2 Pack 1 Gallon Large Fermentation Jars with 3 Airlocks and 2 SCREW Lids(100% Airtight Heavy Duty Lid w Silicone) - Wide Mouth Glass Jars w Scale Mark - Pickle Jars for Sauerkraut, Sourdough Starter
Qianfenie Direct


Oceangrace24
Well-Known Member
Oh, there are no pictures. But let's just say next time I will put the pumpkin in a bag. Worst stuck mash ever, ended up stirring almost the entire time to keep from scorching my element, which I did a little. Way too mush grain then got through. Mash temp no where close to set temp I assume due to all the stirring. Missed OG by 10 points. I did this same recipe before in an igloo cooler without any issues. Then I added liquid chocolate in the the conical after fermentation was complete. Another mess. I had this big glob of pumpkin/chocolate in the bottom. LOL. if this beer ends up drinkable, it will be a miracle.
Tobin Bottman
Member
- Joined
- May 5, 2022
- Messages
- 15
- Reaction score
- 5
But I bet it will! My buddy and I made a completely experimental holiday warmer with Kveik yeast and juniper berries but then left it to sit in a second use 5 gallon bourbon barrel for two weeks. Well fast forward 52 weeks later and we thought we better finally get it out of the barrel. We thought there was no way it would be drinkable. Well, it is one of the most complex, well balanced Oud Bruin-style beers I have ever experienced. So have faith! As long as your fermentation is clean, you are probably going to be pleasantly surprised.
But thanks for the heads up with the pumpkin/Solo issue - noted!
On a side note, that 5 gallon barrel had evaporated to about 3.75 gallons, but the gravity read the same on a hydrometer as when we racked to the barrel a year ago. What is the effect on the what was 9.2% ABV? Is there a way to calculate the gain? Or did the alcohol evaporate too?
I thought I would share this little ditty about storage options for the larger kettles:
I am a new owner of a 20 Gal Spike kettle and have built a compact brewing rig on wheels that I pull into the center of the shop, brew, and roll back against the wall for storage. One issue I wanted to resolve is a good way to cover the kettle to keep dust out while not in use. I didn't want to do a trash bag since it's so flimsy (although this would work fine). Previously I had purchases those cheap, durable, reusable bags like what Ikea uses to cover my shop tools. I thought maybe I could find something along those lines big enough to cover the 20 Gal kettle. (this is a bit of a challenge since the pump and valves extend from the kettle making it pretty wide).
Searching in Amazon for '72-Gallon Reusable Garden Waste Bags' I found very large heavy bags that turned out to be a very good cover for the kettle.
Everyone in amazon is essentially selling the same cheapo bag so I just found the cheapest price and committed to buying a 3 pack for $17 (I only needed the one but decided I could use the extras at the house anyway)
Not exactly an engineering feat, but it might help somebody.
Ciao,
- Joined
- Aug 17, 2020
- Messages
- 18
- Reaction score
- 2
Thanks for sharing the pictures, I am going to order one for my Wort Hog / Spike Solo set-up, and try to sell the spike basket. Would you please answer a few questions?Here she is. I got it just a tad bit too tall so I the lid to the kettle rests on top of the basket so if you decide to go this route allow for more room than you think when it comes to height of the basket. It doesn't really effect anything really it's just a little tall. Also don't spend the money on the press plate, you can just go to webstaueantstore.com and buy a stainless steel pan lid that works just as good and is less than half the price of the press plate they offer.
1. How do you recirculate the wort over the grain bed with this system? I use the port on the basket now.
2. How much clearance between the kettle and the basket did you leave?
3. Related to 2, did you add the resting feet, or just use some Z clips like the Clawhammer basket?
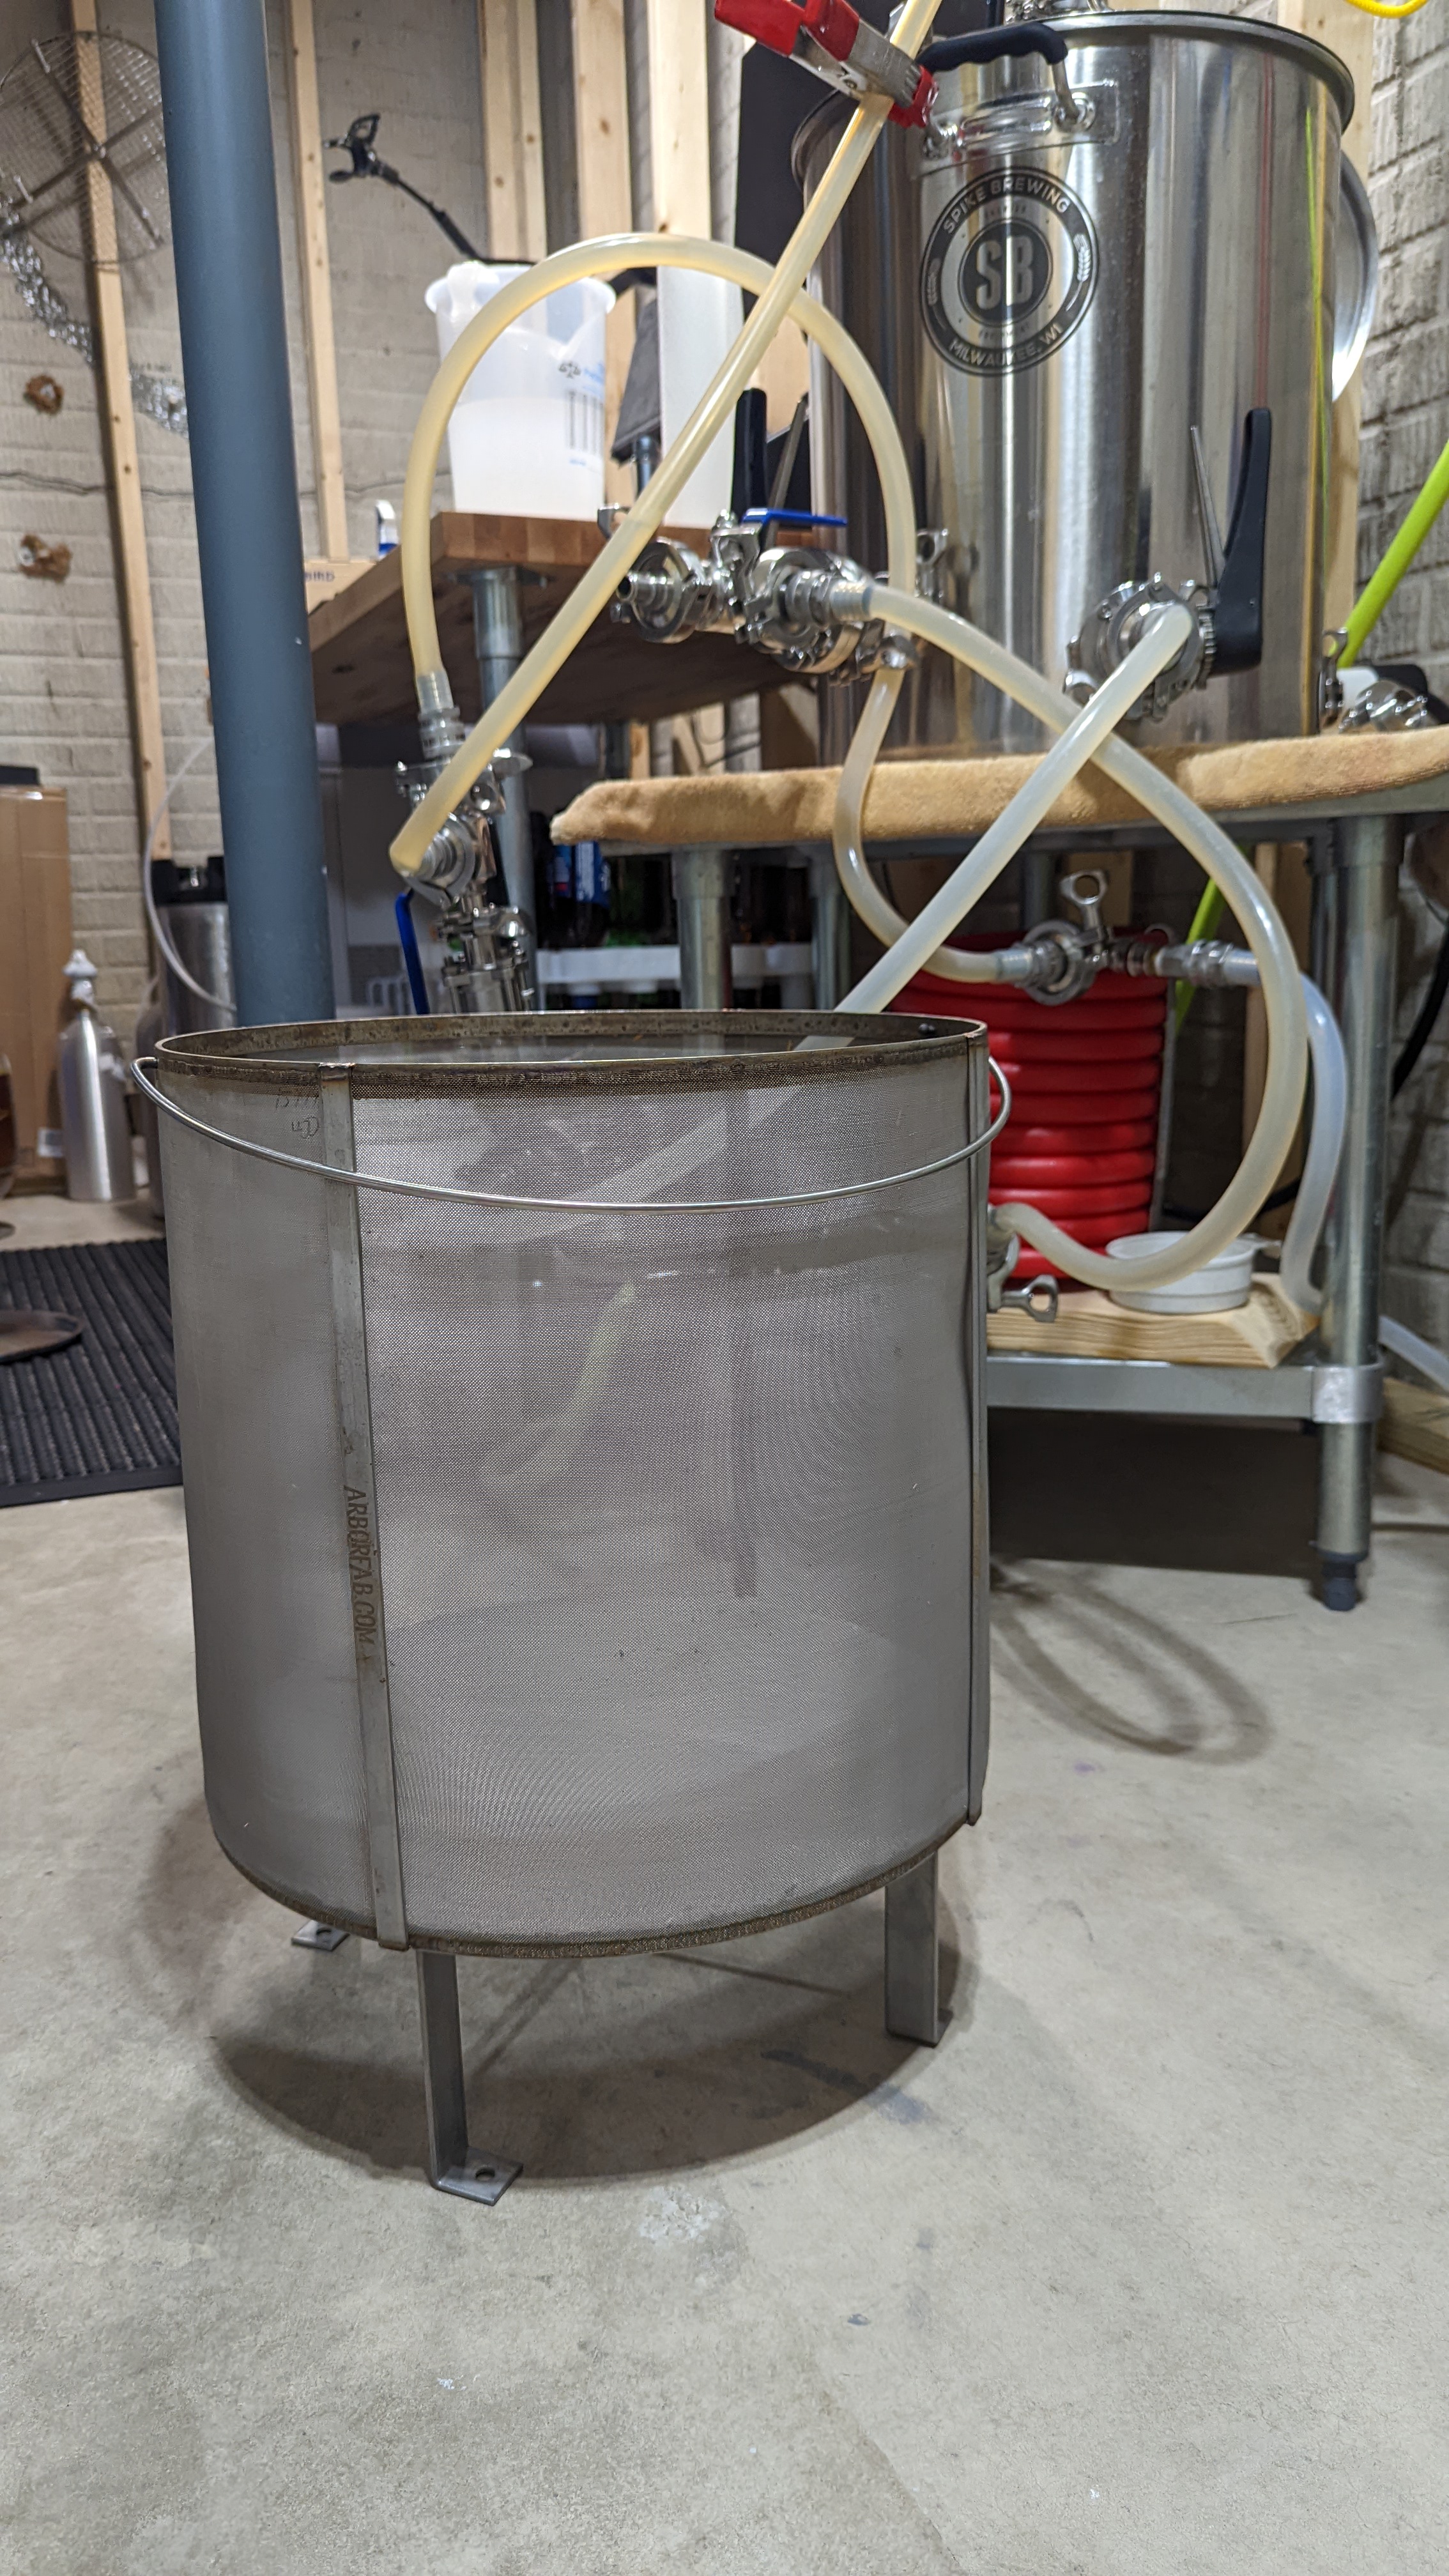
I have a Blichmann boil coil so my legs will need to be different. This is my set-up.


Nice custom build you've got there! Here's my answers to your questions:Thanks for sharing the pictures, I am going to order one for my Wort Hog / Spike Solo set-up, and try to sell the spike basket. Would you please answer a few questions?
1. How do you recirculate the wort over the grain bed with this system? I use the port on the basket now.
2. How much clearance between the kettle and the basket did you leave?
3. Related to 2, did you add the resting feet, or just use some Z clips like the Clawhammer basket?
I have a Blichmann boil coil so my legs will need to be different. This is my set-up.
View attachment 808024View attachment 808025
View attachment 808023
1. How do you recirculate the wort over the grain bed with this system? I use the port on the basket now.
I have the Spike steam lid and I have it play double duty and use it during the mash as well. I bought a Tri-clamp to female NPT fitting and bought some loc line tubing ( Loc-Line | The Original Modular Hose ). It's super modular so you can build it out however you want. See pics below
2. How much clearance between the kettle and the basket did you leave?
Honestly just enough room for water to spill out incase I have a stuck mash. That was my main concern/complaint about the Spike basket in that if you end up with a stuck mash, the wort has nowhere to drain back down to the element. It happened once to me and I scortched the element and that was the day I started shopping for a mesh basket. I guess you could potentially drill some overflow holes in the spike basket but that limits the amount of grain you can then put in it. The dimensions I ordered were: 15in Diameter, 14in Height, 5in Feet (with rubber bumpers) and the 400micron screen size. It works fantastic and only think I'd have changed was probably do height of 12-12.5 because with the rubber bumpers the basket sits well above top of my kettle, and with the bumpers off It's barely above it. Doesn't affect my brewday at all except maybe a little heat loss during mash, but since I'm recirculating I don't care. If anything it allows me to completely max out the amount of grain I can put in the mash if I ever want to (I won't want to lol).
3. Related to 2, did you add the resting feet, or just use some Z clips like the Clawhammer basket?
No resting feet. I have a big game pully system similar to yours. I usually just hoist the basket like 2 inches above surface of the wort and let it drain then just pully it the rest of the way out and slide a big rubbermade container under it and bring it to the ground. Then let it continue to drain while I start to bring the wort to a boil and if I haven't hit my pre-boil volume I bought a 14" Stainless frying pan lid from webstaurantstore.com and I use it as a press plate to press the grain bed and get as much wort out of it as I can, then dump that into my kettle to hopefully hit my pre-boil volume.
Attachments


- Joined
- Aug 17, 2020
- Messages
- 18
- Reaction score
- 2
Thank you for the very helpful reply. I think I will add a port to my Spike Solo lid. I am not has worried about scorching the burner since I added the 'T" valve to the outlet port on the pump.Nice custom build you've got there! Here's my answers to your questions:
1. How do you recirculate the wort over the grain bed with this system? I use the port on the basket now.
I have the Spike steam lid and I have it play double duty and use it during the mash as well. I bought a Tri-clamp to female NPT fitting and bought some loc line tubing ( Loc-Line | The Original Modular Hose ). It's super modular so you can build it out however you want. See pics below
2. How much clearance between the kettle and the basket did you leave?
Honestly just enough room for water to spill out incase I have a stuck mash. That was my main concern/complaint about the Spike basket in that if you end up with a stuck mash, the wort has nowhere to drain back down to the element. It happened once to me and I scortched the element and that was the day I started shopping for a mesh basket. I guess you could potentially drill some overflow holes in the spike basket but that limits the amount of grain you can then put in it. The dimensions I ordered were: 15in Diameter, 14in Height, 5in Feet (with rubber bumpers) and the 400micron screen size. It works fantastic and only think I'd have changed was probably do height of 12-12.5 because with the rubber bumpers the basket sits well above top of my kettle, and with the bumpers off It's barely above it. Doesn't affect my brewday at all except maybe a little heat loss during mash, but since I'm recirculating I don't care. If anything it allows me to completely max out the amount of grain I can put in the mash if I ever want to (I won't want to lol).
3. Related to 2, did you add the resting feet, or just use some Z clips like the Clawhammer basket?
No resting feet. I have a big game pully system similar to yours. I usually just hoist the basket like 2 inches above surface of the wort and let it drain then just pully it the rest of the way out and slide a big rubbermade container under it and bring it to the ground. Then let it continue to drain while I start to bring the wort to a boil and if I haven't hit my pre-boil volume I bought a 14" Stainless frying pan lid from webstaurantstore.com and I use it as a press plate to press the grain bed and get as much wort out of it as I can, then dump that into my kettle to hopefully hit my pre-boil volume.
I also recirculate to above and below my basket with the pump to keep temps more realistic. I don't like waiting for wort to have to go all the way through the grain bed and then land if a pool of basically barely moving wort when my temp probe is on one side of the kettle. The mini "whirlpool" in the bottom during mash I think helps with that as well as ensure no scorched element as well.Thank you for the very helpful reply. I think I will add a port to my Spike Solo lid. I am not has worried about scorching the burner since I added the 'T" valve to the outlet port on the pump.
- Joined
- Feb 20, 2011
- Messages
- 395
- Reaction score
- 92
What does your game rack attach to on the basket? Photo? Is the basket handle strong enough to lift the weight of the grain?Nice custom build you've got there! Here's my answers to your questions:
1. How do you recirculate the wort over the grain bed with this system? I use the port on the basket now.
I have the Spike steam lid and I have it play double duty and use it during the mash as well. I bought a Tri-clamp to female NPT fitting and bought some loc line tubing ( Loc-Line | The Original Modular Hose ). It's super modular so you can build it out however you want. See pics below
2. How much clearance between the kettle and the basket did you leave?
Honestly just enough room for water to spill out incase I have a stuck mash. That was my main concern/complaint about the Spike basket in that if you end up with a stuck mash, the wort has nowhere to drain back down to the element. It happened once to me and I scortched the element and that was the day I started shopping for a mesh basket. I guess you could potentially drill some overflow holes in the spike basket but that limits the amount of grain you can then put in it. The dimensions I ordered were: 15in Diameter, 14in Height, 5in Feet (with rubber bumpers) and the 400micron screen size. It works fantastic and only think I'd have changed was probably do height of 12-12.5 because with the rubber bumpers the basket sits well above top of my kettle, and with the bumpers off It's barely above it. Doesn't affect my brewday at all except maybe a little heat loss during mash, but since I'm recirculating I don't care. If anything it allows me to completely max out the amount of grain I can put in the mash if I ever want to (I won't want to lol).
3. Related to 2, did you add the resting feet, or just use some Z clips like the Clawhammer basket?
No resting feet. I have a big game pully system similar to yours. I usually just hoist the basket like 2 inches above surface of the wort and let it drain then just pully it the rest of the way out and slide a big rubbermade container under it and bring it to the ground. Then let it continue to drain while I start to bring the wort to a boil and if I haven't hit my pre-boil volume I bought a 14" Stainless frying pan lid from webstaurantstore.com and I use it as a press plate to press the grain bed and get as much wort out of it as I can, then dump that into my kettle to hopefully hit my pre-boil volume.
Basket handle is def strong enough. It's solid stainless steel. I just slide the game rack through the basket handle and lift. Pics attached.What does your game rack attach to on the basket? Photo? Is the basket handle strong enough to lift the weight of the grain?
Attachments


- Joined
- Feb 20, 2011
- Messages
- 395
- Reaction score
- 92
Big help. I’ll probably get one too. Had one on my previous system before upgrading to the 20 gallon Solo. Solo basket works great under 1.050 and I don’t have to babysit the recirculation. But brewed a 1.065 IPA yesterday and it’s a constant babysitting battle to make sure it doesn’t overflow.Basket handle is def strong enough. It's solid stainless steel. I just slide the game rack through the basket handle and lift. Pics attached.
So after reading all 336 posts, seems that the basket that comes with the Solo should be swapped out for a custom fine mesh and then you're golden.
There was one post that I really agreed with which was about how dang expensive it all is when compared to a Clawhammer setup once the basket because wall art. I'm in the researching phase and we're looking to upgrade from a Frankenstein-esq propane setup with the neighbors (we have fun but I'm over propane). The Spike Solo is sexy as hell and I'm pretty sold on a 15G as to be versatile when it comes to a big beer but it's a lot of money.
There was one post that I really agreed with which was about how dang expensive it all is when compared to a Clawhammer setup once the basket because wall art. I'm in the researching phase and we're looking to upgrade from a Frankenstein-esq propane setup with the neighbors (we have fun but I'm over propane). The Spike Solo is sexy as hell and I'm pretty sold on a 15G as to be versatile when it comes to a big beer but it's a lot of money.
- Joined
- Aug 17, 2020
- Messages
- 18
- Reaction score
- 2
While my system is not the "Solo" it is effectively the same, with the controller coming from High Gravity, and the pump and heater from Blichmann, so a high quality system, however I do miss my Grainfather G30, the brew days were much more relaxing, and less messy.So after reading all 336 posts, seems that the basket that comes with the Solo should be swapped out for a custom fine mesh and then you're golden.
There was one post that I really agreed with which was about how dang expensive it all is when compared to a Clawhammer setup once the basket because wall art. I'm in the researching phase and we're looking to upgrade from a Frankenstein-esq propane setup with the neighbors (we have fun but I'm over propane). The Spike Solo is sexy as hell and I'm pretty sold on a 15G as to be versatile when it comes to a big beer but it's a lot of money.
I realize there are many advantages to the component system, but never expected to put off brew days, because they just are not as fun. If you are coming from propane you should really enjoy the Solo, or a similar system.
I am considering selling my system (post #330), but hate to take such a loss after so few brews.
- Joined
- Apr 7, 2021
- Messages
- 56
- Reaction score
- 48
Matt, you are getting some real bad advice here. There a a few (very few) brewers who have trouble with the Solo. Their process is bad and they are unwilling to learn how to use this system. Almost all Solo owners have no issues. No rice hulls. No bags. No extra plumbing. No gadgets. No different basket. Just successful brewers using an out-of-the-box Solo system. They hit their numbers and have zero issues. Yes, this system is really expensive. Yes, there is a learning curve. But if you are willing to learn and become a better brewer, it’s worth the money. Good luck and brew on.So after reading all 336 posts, seems that the basket that comes with the Solo should be swapped out for a custom fine mesh and then you're golden.
There was one post that I really agreed with which was about how dang expensive it all is when compared to a Clawhammer setup once the basket because wall art. I'm in the researching phase and we're looking to upgrade from a Frankenstein-esq propane setup with the neighbors (we have fun but I'm over propane). The Spike Solo is sexy as hell and I'm pretty sold on a 15G as to be versatile when it comes to a big beer but it's a lot of money.
So after reading all 336 posts, seems that the basket that comes with the Solo should be swapped out for a custom fine mesh and then you're golden.
There was one post that I really agreed with which was about how dang expensive it all is when compared to a Clawhammer setup once the basket because wall art. I'm in the researching phase and we're looking to upgrade from a Frankenstein-esq propane setup with the neighbors (we have fun but I'm over propane). The Spike Solo is sexy as hell and I'm pretty sold on a 15G as to be versatile when it comes to a big beer but it's a lot of money.
I did the same research. and ended up buying one of Bobbys' systems from brewhardware.. I think those spike kettles are used a lot because they are a very heavy duty kettle. I ended up going with a bag over a basket because of ease in cleaning, cheaper etc. I was wondering if I would miss a basket like the clawhammer versus a bag.. I think I would have been happy with either. Slightly less cleanup with the bag.. but thats not a huge deal.
I too went big to be able to do a double batch.. I have yet to do one.. but its really nice having the headroom when brewing.. and I dont have to worry about wishing I had more volume down the line.
SpikeBrewing
Well-Known Member
Matt, you are getting some real bad advice here. There a a few (very few) brewers who have trouble with the Solo. Their process is bad and they are unwilling to learn how to use this system. Almost all Solo owners have no issues. No rice hulls. No bags. No extra plumbing. No gadgets. No different basket. Just successful brewers using an out-of-the-box Solo system. They hit their numbers and have zero issues. Yes, this system is really expensive. Yes, there is a learning curve. But if you are willing to learn and become a better brewer, it’s worth the money. Good luck and brew on.
This.
What's the timeline on pumps? I'm bout ready to pull the trigger on a Solo bottom-drain 15GThis.
Mac MacFarlane
Well-Known Member
- Joined
- Apr 22, 2020
- Messages
- 82
- Reaction score
- 57
Since I have started milling my own grains, adding rice hauls and waiting 10min before recirculating I’ve had zero problems with using the grain basket. Probably don’t even need the rice hauls but they are cheap insurance.
SpikeBrewing
Well-Known Member
The next batch of Flows should go live any day now. Be sure to sign up for the back in stock notification on the site. Be aware they will most likely sell out fast. If you’re buying a system you should be good as systems have priority.What's the timeline on pumps? I'm bout ready to pull the trigger on a Solo bottom-drain 15G
- Joined
- Feb 20, 2011
- Messages
- 395
- Reaction score
- 92
How fast are you recirculating to the top of the grain bed? i.e. Like a quart per minute? I’m adding Bobby’s method to split the recirculation to help temperature stability. But my only complaint with the Solo basket is on the bigger beers, you can get a “slow” sparge and not necessarily a stuck one. Which leads to no new heat flowing through the grain. And I have to stand there and babysit it to not overflow. I use a SStech recirc manifold and realized after reading on here I may be going faster than what’s needed.Matt, you are getting some real bad advice here. There a a few (very few) brewers who have trouble with the Solo. Their process is bad and they are unwilling to learn how to use this system. Almost all Solo owners have no issues. No rice hulls. No bags. No extra plumbing. No gadgets. No different basket. Just successful brewers using an out-of-the-box Solo system. They hit their numbers and have zero issues. Yes, this system is really expensive. Yes, there is a learning curve. But if you are willing to learn and become a better brewer, it’s worth the money. Good luck and brew on.
I’m using the Solo out of the box, condition and crush my own grain, and let the mash sit for 5 minutes before starting the recirculation.
Mac MacFarlane
Well-Known Member
- Joined
- Apr 22, 2020
- Messages
- 82
- Reaction score
- 57
Wagon have you tried waiting 10-15min before recirculating.
I also use Bobby’s method of splitting the recirculating seems to help with temps.
I also use Bobby’s method of splitting the recirculating seems to help with temps.
- Joined
- Feb 20, 2011
- Messages
- 395
- Reaction score
- 92
I haven’t waited that long before, worried about not getting heat on top. I need a couple more pieces before I can split the recirculating. Willing to give that a try and play with the recirculation rate. I’m also biased to the full mesh baskets, had one before on my 5 gallon system before upgrading to the 20 gallon Solo. Which is also where my aggressive recirculation is coming from.Wagon have you tried waiting 10-15min before recirculating.
I also use Bobby’s method of splitting the recirculating seems to help with temps.
- Joined
- Apr 7, 2021
- Messages
- 56
- Reaction score
- 48
Wagon 6, I don’t have an exact flow rate since I never measured it. Here’s my process: Turn off the pump. Gently mash in stirring only the top couple of inches. Cover and let the mash sit for 10 minutes. Then stir the mash just enough to loosen it up. Avoid scraping the bottom of the basket with the paddle. Turn on the pump and adjust to about 1/4 flow. Then check the liquid level every few minutes and reduce the flow if the liquid is rising. Once things stabilize, check the level about every 10 minutes. At the end of the mash, give the mash one last stir, raise the basket, and Vorlauf for 15 minutes. Turn off the pump and let it drain. You’re right about big, sticky brews. Those have to be throttled back. Brew on.How fast are you recirculating to the top of the grain bed? i.e. Like a quart per minute? I’m adding Bobby’s method to split the recirculation to help temperature stability. But my only complaint with the Solo basket is on the bigger beers, you can get a “slow” sparge and not necessarily a stuck one. Which leads to no new heat flowing through the grain. And I have to stand there and babysit it to not overflow. I use a SStech recirc manifold and realized after reading on here I may be going faster than what’s needed.
I’m using the Solo out of the box, condition and crush my own grain, and let the mash sit for 5 minutes before starting the recirculation.
How long is the power cable for the 240V Solo? I plan to use my 14-50R then an adapter down to the 14-30P but I don't want to be setup too close to the garage wall. I saw this on Spike's website, 6ft power cable?
https://spikebrewing.freshdesk.com/...trical-requirements-for-the-spike-solo-system
If it's a longer cable then this should do the trick
https://www.amazon.com/Welding-Charger-Adapter-Connector-Connecter/dp/B07LGKHXTV
Seems there's plenty of 10ft NEMA 14-50P to 14-30R cables
https://www.amazon.com/CircleCord-14-30P-Charger-Adapter-Extension/dp/B095LJPF3S
I feel like I have to defend myself on this statement. I've used the spike basket many times with lots of success. I have a process for that basket that works just fine. My issue with the basket is it takes way more work to get an equivalent brew to my all mesh basket. I can be doing lots of other things during the mash (further shortening my brew day) with my mesh basket. With the spike basket I have to babysit it so that I know mash bed temps are where they should be, I don't have a stuck mash, etch. Also, I can stir the **** out of my mash when using the mesh basket and not have to worry about grain in my wort and it nets me roughly 7-10% higher efficiency (again another win as that's money and time saved). When mash is complete, I also don't need to vorlauf, further saving me another 10-15 minutes. The stirring during the mash and faster recirculation of the mash basket also lets me mash for 30 minutes or less and still hit my numbers.Matt, you are getting some real bad advice here. There a a few (very few) brewers who have trouble with the Solo. Their process is bad and they are unwilling to learn how to use this system. Almost all Solo owners have no issues. No rice hulls. No bags. No extra plumbing. No gadgets. No different basket. Just successful brewers using an out-of-the-box Solo system. They hit their numbers and have zero issues. Yes, this system is really expensive. Yes, there is a learning curve. But if you are willing to learn and become a better brewer, it’s worth the money. Good luck and brew on.
I think it's quite rude to say people giving advice or sharing experiences is due to bad processes. As mentioned, I didn't have a "bad process" with my spike basket, it just had too many inefficiencies that I wasn't able to live with it for the way that I brew beer. For my current lifestyle (busy job and a 16 month old child) my time is quite limited so it was worth it to me (~$180) to go the mesh basket route to shave at least 60, if not 90 minutes off a brew day.
Well I finally received my 15 gallon Spike Solo last week and was able to do a brew day with the neighbors today. Went pretty well. We did a dry run (wet run? just water) yesterday, learned that the ball valve was full open, water everywere yay! Messed with an old furniture dolly as a stand, upgraded it's casters for more height, bolted the pump to it, made some "cup coasters" for the feet, probably going to make a PID stand off to the right of it via pipe within the next couple weeks. Beyond that the auto-tune took about 30-ish minutes, ran some PBW through it for quite a while then rinsed and set it for Sunday.
Brewed a Brewdog - Punk IPA clone via Brewfather. Hit all our numbers with the exception of having .5 gallons less than called for at the end which I'm not mad about since we didn't do a boil-off test yesterday (3400ft of elevation). Need to learn how to release the air from the pump, I'm sure there's a YT video. We're not huge fans of the recirc tub via the basket... I we ended up using our previous propane homemade sparge arm. I need to go through this thread again for some ideas but I kind of like this arm but ugh, more parts, The Ultimate Sparge Arm | MoreBeer.
All in all pretty happy! Brewhouse efficiency per Brewfather is saying 55% which we'll take as it was our first go. I'm sure we can do better in more than a few areas. This was our first brew day actually hitting "play" on Brewfather via a laptop we finally remembered to bring (it's really just to have fun in the garage and bbq, like the Spike ad!). I'm happy I made the jump, it's so nice to just pick a temp and watch it go/hold.
Pictures because what would this post be without pictures!
Attachments


For sparge arm/recirc solution, here is what I did:Well I finally received my 15 gallon Spike Solo last week and was able to do a brew day with the neighbors today. Went pretty well. We did a dry run (wet run? just water) yesterday, learned that the ball valve was full open, water everywere yay! Messed with an old furniture dolly as a stand, upgraded it's casters for more height, bolted the pump to it, made some "cup coasters" for the feet, probably going to make a PID stand off to the right of it via pipe within the next couple weeks. Beyond that the auto-tune took about 30-ish minutes, ran some PBW through it for quite a while then rinsed and set it for Sunday.
Brewed a Brewdog - Punk IPA clone via Brewfather. Hit all our numbers with the exception of having .5 gallons less than called for at the end which I'm not mad about since we didn't do a boil-off test yesterday (3400ft of elevation). Need to learn how to release the air from the pump, I'm sure there's a YT video. We're not huge fans of the recirc tub via the basket... I we ended up using our previous propane homemade sparge arm. I need to go through this thread again for some ideas but I kind of like this arm but ugh, more parts, The Ultimate Sparge Arm | MoreBeer.
All in all pretty happy! Brewhouse efficiency per Brewfather is saying 55% which we'll take as it was our first go. I'm sure we can do better in more than a few areas. This was our first brew day actually hitting "play" on Brewfather via a laptop we finally remembered to bring (it's really just to have fun in the garage and bbq, like the Spike ad!). I'm happy I made the jump, it's so nice to just pick a temp and watch it go/hold.
Pictures because what would this post be without pictures!
View attachment 813766
Bought one of these: 1.5'' TC to Male Ball Lock Quick Disconnects (BLQD) with Interior 1/2'' FNPT
one of these: Loc-Line - 51837 Coolant Hose Circle Flow Nozzle Kit, 16 Piece, 1/2" Hose ID: Cutting Tool Coolants: Amazon.com: Industrial & Scientific
And one of these: https://www.amazon.com/Loc-Line-Coo...e7-ae7e-9e04404c83f8&pd_rd_i=B006R9OFGS&psc=1
This has worked wonderfully though there could be cheaper options out there. I also end up using this to "Clean in Place" when I'm done brewing to recirculate PBW in the kettle, I just aim the nozzles to that they are hitting the walls of the kettle. 10/10 would buy again.
Alright, here's the latest setup. The neighbor added some square steel to it so we've got the panel and the CFC within arms reach at all times. First trial run will be tomorrow for a Yeti Imperial Stout (21Lb grain bill in the 15g sys). Don't mind the mess on top of it, moving stuff around for brew day.
Attachments


cvbrewer
Member
Biggz - I would really like to talk with you about your experiences with the Solo system. Would you message me to start a converation? I am unable to do that directly for some reason. Thanks!For sparge arm/recirc solution, here is what I did:
Bought one of these: 1.5'' TC to Male Ball Lock Quick Disconnects (BLQD) with Interior 1/2'' FNPT
one of these: Loc-Line - 51837 Coolant Hose Circle Flow Nozzle Kit, 16 Piece, 1/2" Hose ID: Cutting Tool Coolants: Amazon.com: Industrial & Scientific
And one of these: https://www.amazon.com/Loc-Line-Coo...e7-ae7e-9e04404c83f8&pd_rd_i=B006R9OFGS&psc=1
This has worked wonderfully though there could be cheaper options out there. I also end up using this to "Clean in Place" when I'm done brewing to recirculate PBW in the kettle, I just aim the nozzles to that they are hitting the walls of the kettle. 10/10 would buy again.
For those using a bag instead of the Solo basket, when lifting the bag do the whirlpool arms or pickup tubes get in the way and snag the bag?
For the custom basket, is there enough clearance in the kettle for whirlpool arms etc? From the pics, it doesn’t look like there’s a pickup tube and whirlpool arm.
For the custom basket, is there enough clearance in the kettle for whirlpool arms etc? From the pics, it doesn’t look like there’s a pickup tube and whirlpool arm.
Mac MacFarlane
Well-Known Member
- Joined
- Apr 22, 2020
- Messages
- 82
- Reaction score
- 57
I just take my mash paddle and push the bag away as I lift with my hoist.
cvbrewer
Member
Tied to the question above from ShaLaH - Is it possible to rotate the whirlpool arm, while the kettle is filled? In case we had a basket or bag that wasnt original equipment and needed added clearance?
Shout out to Biggz1313 for helping me out with other questions!
Shout out to Biggz1313 for helping me out with other questions!
- Joined
- Sep 1, 2019
- Messages
- 206
- Reaction score
- 101
I just grabbed this from brewers hardware. The arm is one piece and the TC with bushing is another. Hoping to try it soon.For sparge arm/recirc solution, here is what I did:
Bought one of these: 1.5'' TC to Male Ball Lock Quick Disconnects (BLQD) with Interior 1/2'' FNPT
one of these: Loc-Line - 51837 Coolant Hose Circle Flow Nozzle Kit, 16 Piece, 1/2" Hose ID: Cutting Tool Coolants: Amazon.com: Industrial & Scientific
And one of these: Amazon.com
This has worked wonderfully though there could be cheaper options out there. I also end up using this to "Clean in Place" when I'm done brewing to recirculate PBW in the kettle, I just aim the nozzles to that they are hitting the walls of the kettle. 10/10 would buy again.

Here's the latest version of what the neighbors and I have tried. We did a couple SMaSH's, one with the bag (just slice a small slit/hole in the the bag) in the basket and one just the bag, didn't like either in the end so we're sticking with the basket. BUT we are keeping the arm with the diffuser on the end via tubing. We've got a few different lengths that we swap to depending on the grain bill size/etc.
And before everyone freaks out, I know the diffuser should be below the wort line... that lesson has been learned.
The parts below keep everything TC but Nor Cal Brewing Solutions has a bunch of options if you want to play around, just search "arm" on their site.
Diffuser plate
https://www.norcalbrewingsolutions.com/store/Sparge-Diffusion-Plate-Half-Inch-Barbed.html
Arm
https://spikebrewing.com/collection...s/spike-pickup-tube-center?var=12257695367227
Attachments


Similar threads
- Replies
- 6
- Views
- 506
- Replies
- 2
- Views
- 495
- Replies
- 10
- Views
- 2K
- Replies
- 1
- Views
- 2K
