You are using an out of date browser. It may not display this or other websites correctly.
You should upgrade or use an alternative browser.
You should upgrade or use an alternative browser.
Results from juice, yeast and sugar experiments
- Thread starter CvilleKevin
- Start date

Help Support Homebrew Talk:
This site may earn a commission from merchant affiliate
links, including eBay, Amazon, and others.
- Status
- Not open for further replies.
OP
OP
CvilleKevin
Well-Known Member
Would you mind sharing the recipe you mentioned for a raspberry cider using safale-05?
I dont really have recipes. Its really more of a process with a few variable steps for different ciders (one of which is adding fruit like raspberries). Since I get a lot of questions about this, I thought it might be helpful to pull together some of the process info that is scattered around this thread:
The overall process is for semi dry to sweet ciders in the 1.004 to 1.020 range, and consists of a few basic steps:
- Sourcing good (preferably low nutrient) juice
- (optional) Add other fermentables and/or sulfite
- Pitch a yeast that works for the style you want and crashes reliably
- Ferment the cider in a cool place, tasting to determine point to stop
- (optional) Add fruit or any secondary flavoring right before the crash
- Cold crash the cider at desired residual sweetness
- (optional) Room temp bulk storage, for clearing and to insure ferment stopped
- Force carbonation and serving from keg
- (optional) Bottling from kegs as needed
Sourcing the juice
Just like any other brewing endeavor, start with the best ingredients you can find/afford. See the post on juice a page or two back for further details. For most folks, your time is going to be the biggest investment, and IMHO its not worth the effort if its not going to be better than a commerical hard cider - so look for a good taste/cost ratio and dont just shop for juice on cost. Keep in mind that using low nutrient juice is key for successful cold crashing, so try to find an orchard that doesn’t use a lot of fertilizer on their trees (ie one that is growing for taste vs weight/volume)
Adding fermentables and sulfite
For the yeasts I use, cold crashing seems to be more reliable if the starting SG is at least 1.060 and preferably 1.065. For the first few pressings of the season, the apples don’t yet have so much sugar, so I will add some sugar to raise the sg to 1.065, with 2/3 tubinado, 1/3 dextrose mix. This mix leaves the closest to an apple taste IMHO, but if you don’t have that on hand table sugar works OK. Honey also works well, as does straight turbinado, brown sugar, etc., all of which leave more of their own tastes.
I use new bags of sugar when I add it – because I just add it right into the carboys and roll the carboys around until its all mixed. One of the handy things about better bottles is that after adding sugar or honey, you can just jam a rubber stopper real hard into the top so that it wont come out, and roll the carboy(s) on the floor with a stick for a few minutes.
After adding and stirring in fermentables, I’ll add sulfite to any batches as needed. If the batch is planned for long term storage, I’ll add sulfite. Also for WLP005 and Wy3068, I’ll always add sulfite. If the juice is tart, I use 1/8 tsp in just under 6 gal. For less tart juice, I use1/6 tsp.
All of the carboys in the pic above have had sugar added. The two carboys in front also had 1/6 tsp of k-meta added, which makes the juice lighter in color. Other than fermentables and sulfite, I don’t add anything. I’ve tried pectic enzyme and anti-foamer, but haven’t seen any benefit from it.
Pitching yeast
I usually take the yeast out of the fridge a few hours before I’m planning to pitch, let the Wyeast and White Labs warm up a bit before I smack/shake them for the first time and then pitch everything together when the Wyeast packs are swollen (2-3hrs later).
For dry yeast, I just sprinkle just enough yeast on the surface of the cider so that it spreads out in a film across the top. Usually that’s about 1/3 to ½ of the pack at a time. When the first round of yeast sinks, pitch a bit more, then a bit more until the packet is done. That makes sure that the yeast get a nice even rehydration. I don’t recommend making a starter first, but if you do, use the juice, the yeast will work better if they rehydrate in the same environment where they are going to live for a while.
Before adding sugar, I’ll pour out enough juice from each carboy to make the appropriate headspace for the yeast. Ale yeasts generally need about 1 to 1.5 quarts of headspace. Wheat yeasts need about 2 to 2.5 quarts.
Dry ale yeast should produce visable airlock activity within about 8 hours. With the Wyeast yeasts, it’s a little more varied. If it’s a fresh pack and swells quickly after smacking, there will usually be airlock activity in 8-12 hours. Worst case, it could be 24 hours. The White Labs vials seem to take the longest. A fresh vial, warmed up to room temp and shaken a few times before pitching, will generally take 18 to 36 hours to start producing airlock activity.
Fermenting
A long cool fermentation works well for a semi sweet to sweet cider. For the juice and yeasts I use, a steady temp of about 60 is ideal. That results in ~3wks to get to 1.010 or so, depending on the yeast. Early in the season, my average temps are usually 65, which ferments a lot faster and makes it harder to crash. Late season temps can go to average 55 degrees for 4-5 wk fermentation times.
Most ale yeasts don’t kick up a lot of krausen and you can use a simple airlock without needing a lot of headspace. Wheat yeasts and batches with honey added tend to kick up a lot more krausen, in which case its better to start the ferment with a blowoff tube for at least the first week or so, until the krausen dies down. Its good to use a fairly tall bottle for the blowoff bubbler – so that it builds more air pressure in the carboy and keeps krausen down. You may need to change the water in the blowoff bottle a few times to keep foam from appearing in the blowoff bottle and keep fruit flies away.
If you are fortunate enough to have scored some ‘brew balls’ before the company that made them stopped selling them, these work great for monitoring a ferment. They tend to hang out by the side of the carboy, so are easy to spot. For a cider with target of 1.010, I’ll generally use a 1.018 and a 1.012 ball. The time between the first and 2nd ball dropping tells me how fast the ferment is going. After the 2nd ball drops, I’ll have a taste, see how the balance is and decide how much longer to let it go (if at all) before stopping.
If you don’t have something like the brew balls, then you’ll just need to take some samples to see how the fermentation is progressing. As a rule of thumb, you’ll want to do this shortly after the main fermentation has peaked and is starting to slow down. See the section on yeast a few posts back for typical times for various yeasts given various ambient temps. A hydrometer is handy for getting repeatable results, but your tastebuds are the final arbiter of where to stop.
When the cider is still fermenting, it will usually taste a little drier and more alcoholic than it will after the crash, when the yeast is gone. So if you are going by taste, its good to let the cider go just a little bit further than what tastes like the ideal balance, as the crash will generally increase the perception of sweetness.
Late ferment additions
A good time to add fruit like raspberries, blackberries, etc, is right before crashing. That way the flavor doesn’t get lost during the primary fermentation and you will get all of the pulp and seeds out during the crash. Depending on how fast the cider is fermenting, I will generally add fruit a day or two before crashing. For fresh picked berries, I use about a pound for 5 gal of cider, a pound and a half of store berries. If you add the fruit when the SG is about where you want it, then adding fruit will generally bump the sg by a few points and you will have another day or two for the sg to drop back to the target. Be careful when adding fruit or any sort of fermentables to an active ferment, because the fermenting cider will want to foam. Have a solid stopper handy, add a little bit of fruit at a time, and if it starts to foam, slap the solid stopper on, to keep everything in the carboy.
Cold crashing
To cold crash:
1) rack the juice from the primary fermenter into a clean vessel. This removes most of the yeast and nutrient from the juice.
2) Put a stopper in the newly filled vessel and put it in the fridge for 2 to 5 days, at as close to freezing temperature as possible. This causes remaining yeast and nutrient to drop out of suspension
3) Rack the juice a second time, into a clean vessel, making sure not to pick up any of the yeast from the bottom. By this time there should be a neglible amount of yeast and nutrient in the juice. If you start with 5.5 gallons of cider and leave a quart behind on each rack, you should be able to top off a 5 gallon carboy, with very little head space. You can save the trub that you leave behind and let it settle in a gallon jug to recover most of the cider.
4) Let the cider come up to room temperature and clear for a few more weeks. If the fermentation starts back up, refrigerate and then rack the juice again.
If you cold crash successfully, you can store the cider indefinitely at room temperature afterwards. However cold crashing successfully is not easy to pull off the first time. You need to start with low nutrient juice - ie old standard trees that havent been fertilized in a while, or juice from an organic orchard. You need to use a strain of yeast that flocs at low temps, be careful when you rack, and keep an eye on the carboy after you rack in case it starts back up.
Sometimes, if the apples have a high pectin content, the juice wont clear well during the crash, and this can make the yeast difficult to precipitate out. If the yeast refuses to drop out of suspension, and the fermentation starts back up after more than 2 crashes, the easiest way to handle this is usually to simply keg the cider, force carbonate it and keep it cold until consumed.
Kegging and Force carbonation
If you cold crash successfully, there will be no viable yeast left in the juice after the crash to carbonate the cider, so you must force carbonate. The easiest way to do this is to keg the cider, and give it 25psi of CO2 for a couple of days.
I think that covers the basics. If you are looking for details, you can just search this thread, where most of these steps have been covered in detail in one place or another. Cheers!
schwiz
Well-Known Member
- Joined
- Dec 2, 2013
- Messages
- 148
- Reaction score
- 17
Wow thanks for all of the great info on your process. I thought I was a big boy for stepping up to 20+ gallons this season. Looks like you are doing 200 at a time! Amazing. I will definitely have to attempt this method although now all I have done is dry ciders which I really enjoy.
Impressive setup! I am also in Charlottesville and this is my second year making cider. My favorite style are the dry or off-dry ciders that are being made at Albemarle Cider Works, Castle Hill, and Foggy Ridge, so I am attempting to make something similar to that.
I have 3 carboys (15 gallons total) this year all filled with Winesap, Stayman, or Pippin apples that I ground and pressed myself. :cross: I am fermenting with a couple different Champagne yeasts (I had good results with Pasteur Champagne last year).
I am attempting to keep my house as cold as I can stand it but it has been about 60-65F, hoping that doesn't affect the quality too much. Luckily I have one room that seems to always be frigid.

$53.24
1pc Hose Barb/MFL 1.5" Tri Clamp to Ball Lock Post Liquid Gas Homebrew Kegging Fermentation Parts Brewer Hardware SUS304(Liquid Hose Barb)
Guangshui Weilu You Trading Co., Ltd

$28.98
Five Star - 6022b_ - Star San - 32 Ounce - High Foaming Sanitizer
Great Fermentations of Indiana

![Craft A Brew - Safale BE-256 Yeast - Fermentis - Belgian Ale Dry Yeast - For Belgian & Strong Ales - Ingredients for Home Brewing - Beer Making Supplies - [3 Pack]](https://m.media-amazon.com/images/I/51bcKEwQmWL._SL500_.jpg)


$22.00 ($623.23 / Ounce)
AMZLMPKNTW Ball Lock Sample Faucet 30cm Reinforced Silicone Hose Secondary Fermentation Homebrew Kegging joyful
无为中南商贸有限公司


$76.92 ($2,179.04 / Ounce)
Brewing accessories 1.5" Tri Clamp to Ball Lock Post Liquid Gas Homebrew Kegging Fermentation Parts Brewer Hardware SUS304 Brewing accessories(Gas Hose Barb)
chuhanhandianzishangwu


$159.50 ($26.58 / Count)
3M High Flow Series System BREW120-MS, 5616001, For Brewed Coffee and Hot Tea, Valve-in-Head Design
Amazon.com

$53.24
1pc Hose Barb/MFL 1.5" Tri Clamp to Ball Lock Post Liquid Gas Homebrew Kegging Fermentation Parts Brewer Hardware SUS304(Liquid Hose Barb)
yunchengshiyanhuqucuichendianzishangwuyouxiangongsi


$176.97
1pc Commercial Keg Manifold 2" Tri Clamp,Ball Lock Tapping Head,Pressure Gauge/Adjustable PRV for Kegging,Fermentation Control
hanhanbaihuoxiaoshoudian


$719.00
$799.00
EdgeStar KC2000TWIN Full Size Dual Tap Kegerator & Draft Beer Dispenser - Black
Amazon.com

$44.99
$49.95
Craft A Brew - Mead Making Kit – Reusable Make Your Own Mead Kit – Yields 1 Gallon of Mead
Craft a Brew


$33.99 ($17.00 / Count)
$41.99 ($21.00 / Count)
2 Pack 1 Gallon Large Fermentation Jars with 3 Airlocks and 2 SCREW Lids(100% Airtight Heavy Duty Lid w Silicone) - Wide Mouth Glass Jars w Scale Mark - Pickle Jars for Sauerkraut, Sourdough Starter
Qianfenie Direct


$7.79 ($7.79 / Count)
Craft A Brew - LalBrew Voss™ - Kveik Ale Yeast - For Craft Lagers - Ingredients for Home Brewing - Beer Making Supplies - (1 Pack)
Craft a Brew


$479.00
$559.00
EdgeStar KC1000SS Craft Brew Kegerator for 1/6 Barrel and Cornelius Kegs
Amazon.com


$58.16
HUIZHUGS Brewing Equipment Keg Ball Lock Faucet 30cm Reinforced Silicone Hose Secondary Fermentation Homebrew Kegging Brewing Equipment
xiangshuizhenzhanglingfengshop


$20.94
$29.99
The Brew Your Own Big Book of Clone Recipes: Featuring 300 Homebrew Recipes from Your Favorite Breweries
Amazon.com

$10.99 ($31.16 / Ounce)
Hornindal Kveik Yeast for Homebrewing - Mead, Cider, Wine, Beer - 10g Packet - Saccharomyces Cerevisiae - Sold by Shadowhive.com
Shadowhive


Newbie cold crashing questions... Am I correct that you need to use a plastic carboy because the vessel will collapse in on itself? Do I need to use a DryTrap airlock or can I get by with using a couple of wraps of parafilm over the mouth?
OP
OP
CvilleKevin
Well-Known Member
Am I correct that you need to use a plastic carboy because the vessel will collapse in on itself?
No, you can use glass for cold crashing. I like using the better bottles as primaries because they are easy to handle. Also if you jam a rubber stopper in them, it will stay tight while the fermentation is shutting down. Sometimes the stoppers will pop out of a glass carboy during the first few hours while the fermentation is still active. A couple wraps of film should work fine, as long as its not fermenting hard enough to blow the seal when you start the crash. If you have a Dry Trap airlock, that would be a good option, or you can use an S type airlock and replace it with a stopper when the bubbling slows. Dont use an airlock that could suck back water because if the fermentation stops before the cider is completely cold, the carboy will have negative pressure as it continues to cool.
mattmmille
Well-Known Member
@CvilleKevin You have provided seriously excellent information to those of us who try to knock out a few small batches to several large batches per year! Thanks! Now, my question is: How do you go through the volume of hard cider that you produce? I have trouble using up 5 to 10 gallons in a year!Where does it all go?! 
OP
OP
CvilleKevin
Well-Known Member
Where does it all go?!
Ha! - Sometimes I wonder that myself when August rolls around and I only have a few kegs left. Mostly it goes to parties. Last Saturday we had a pretty good one. We floated 7 kegs and made a decent dent in 3 more (plus a whole lot more homemade beer, cider and wine that friends brought. Many, many thanks to all those good folks). I do that 3-4 times a year. If a friend is having a party, I'll sometimes bring a keg or a growler or two. There are a few annual community events like Homebrew for Hunger where I'll bring a keg or two. Growlers are handy for taking to potlucks. I come from an Irish/German family, so thats a few kegs over the course of a year for family get togethers. And I suppose a decent amount of drinking (for science) on my own part.
OP
OP
CvilleKevin
Well-Known Member
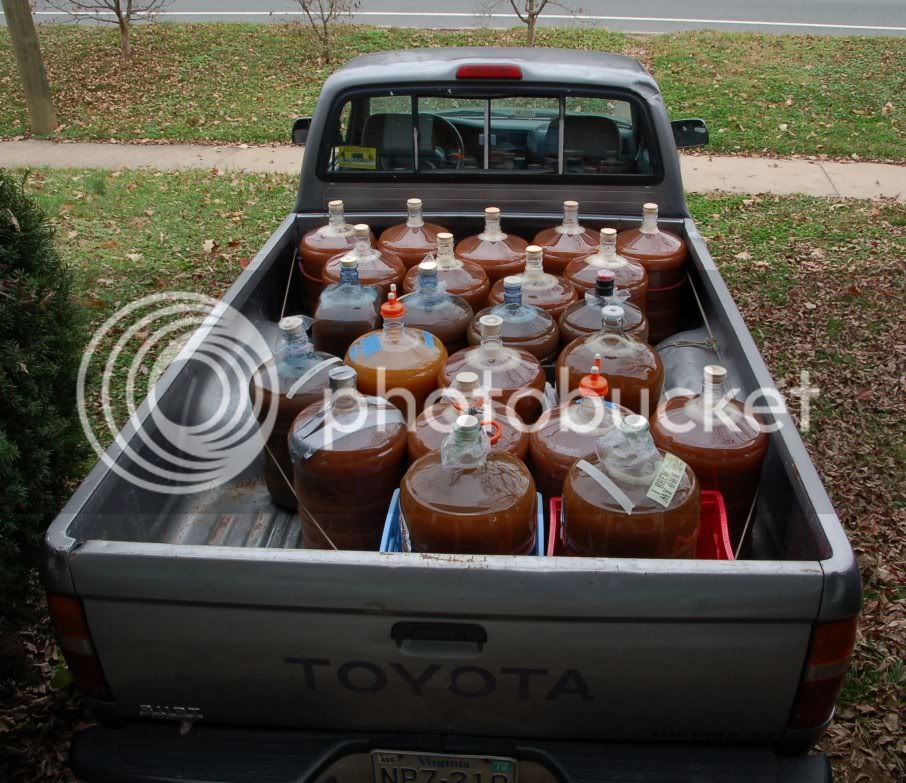
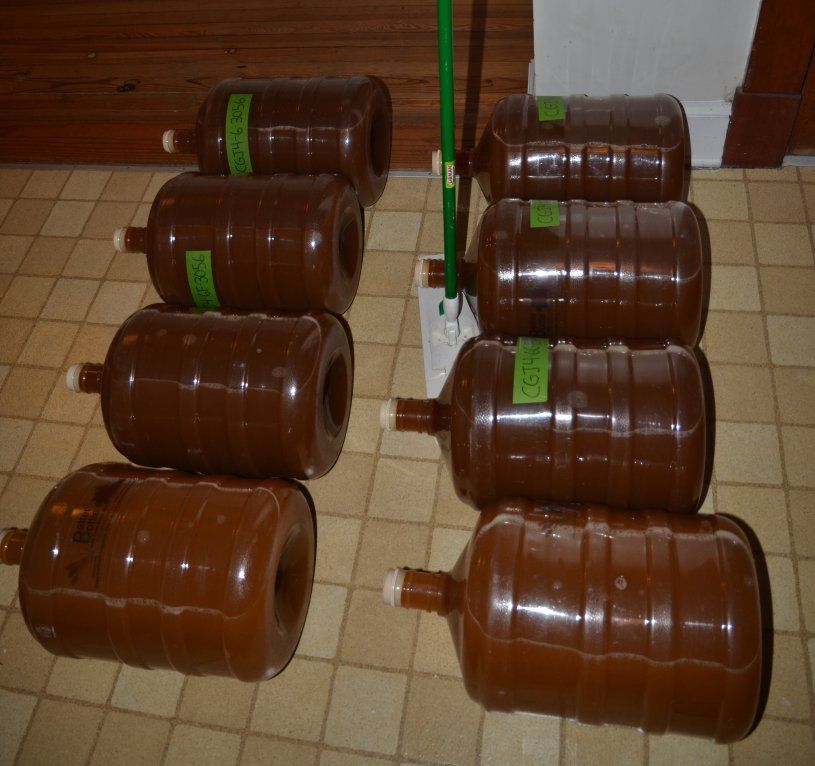
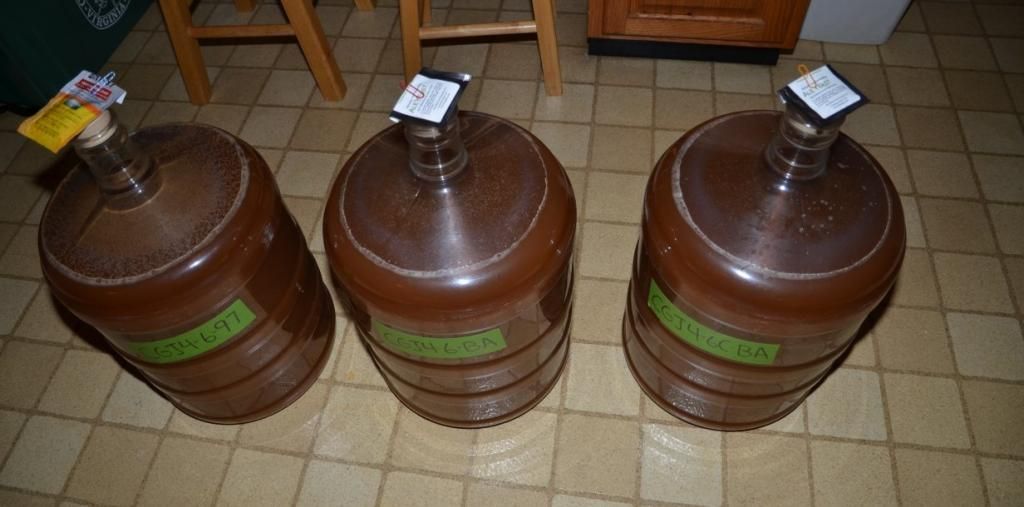
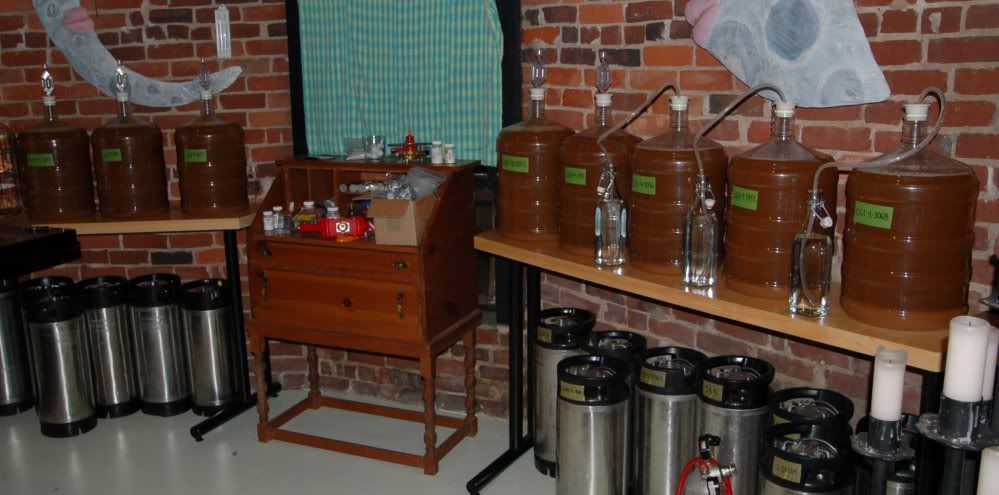
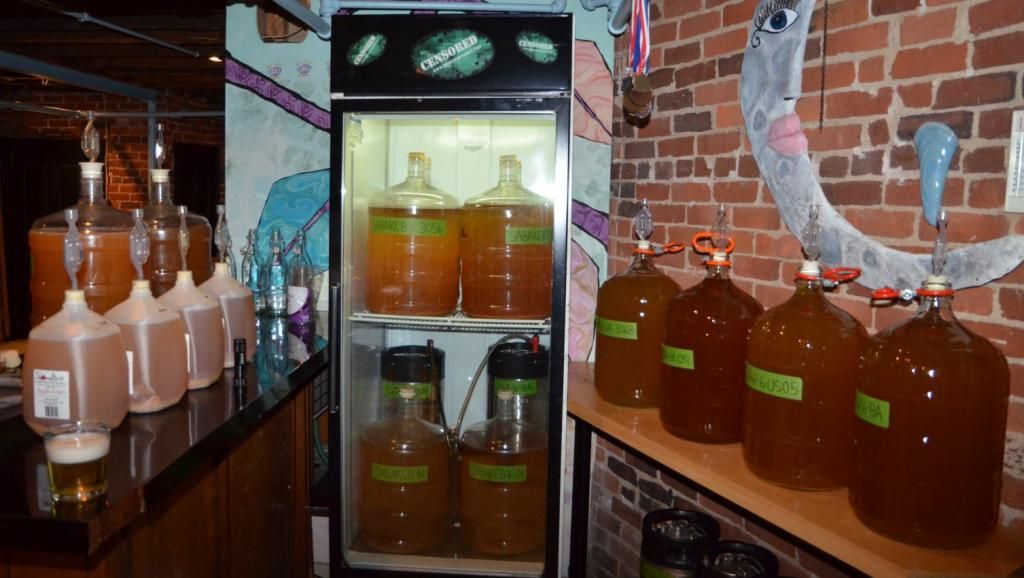
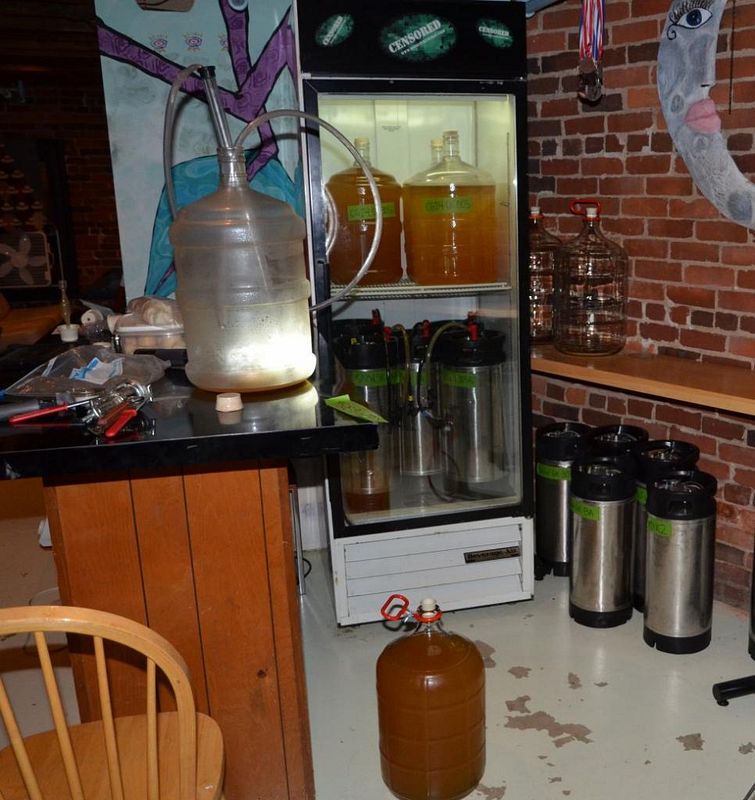
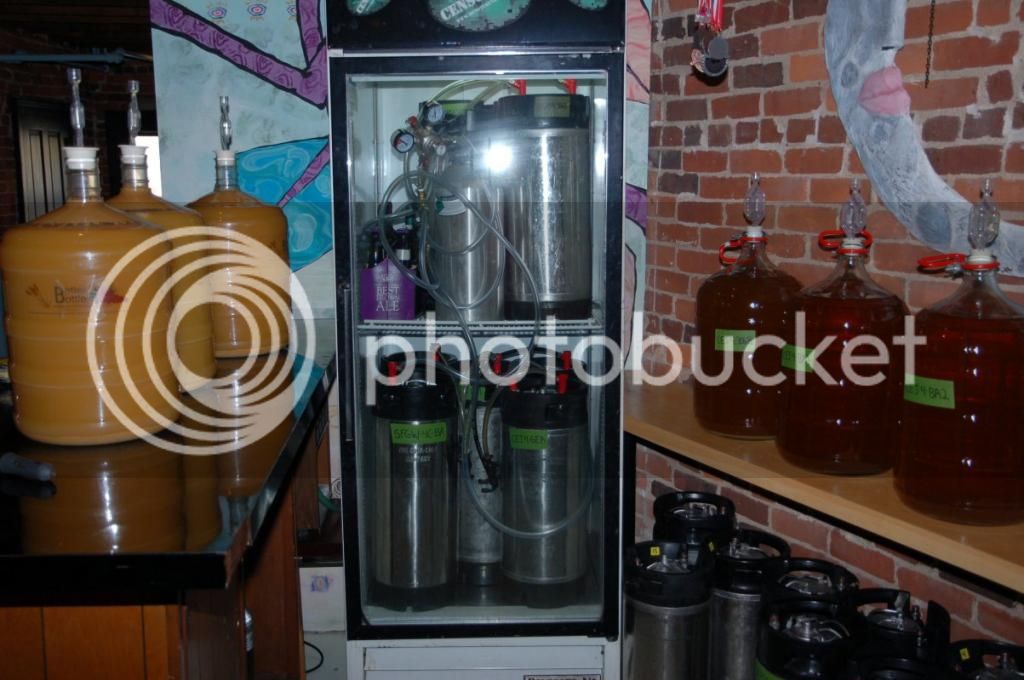
Here are the latest few batches of cider in progress:
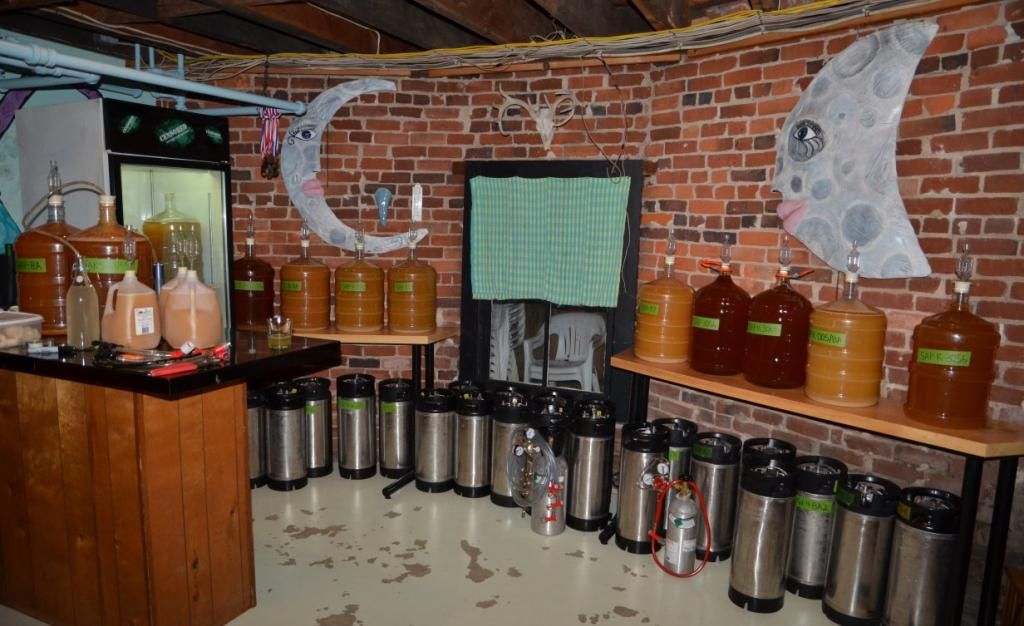
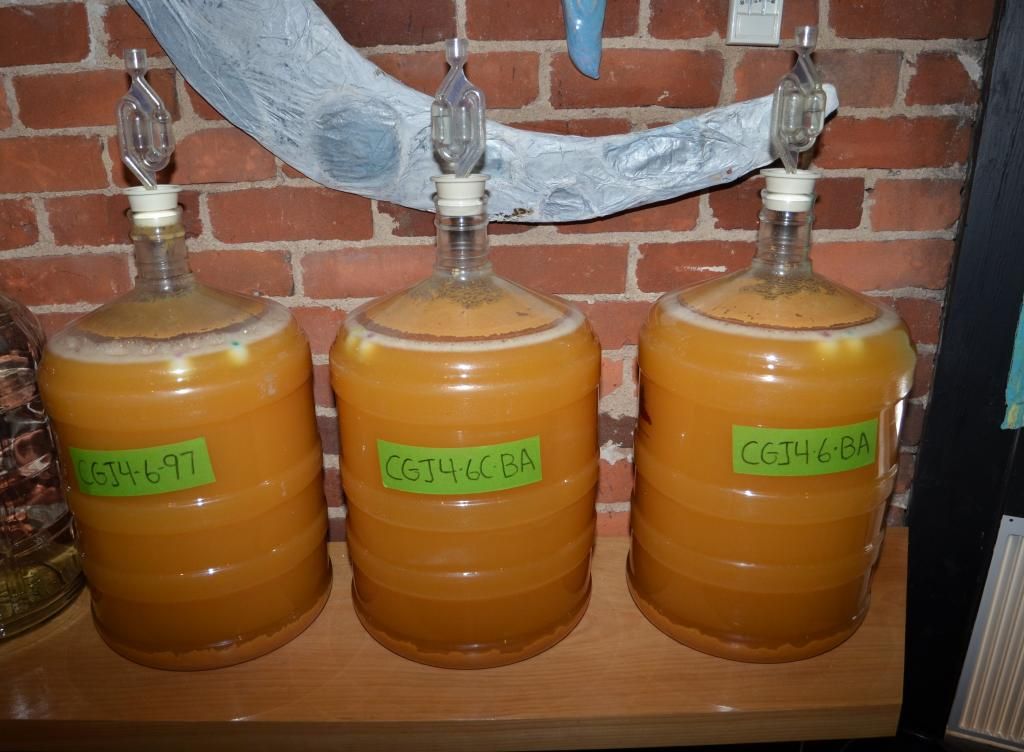
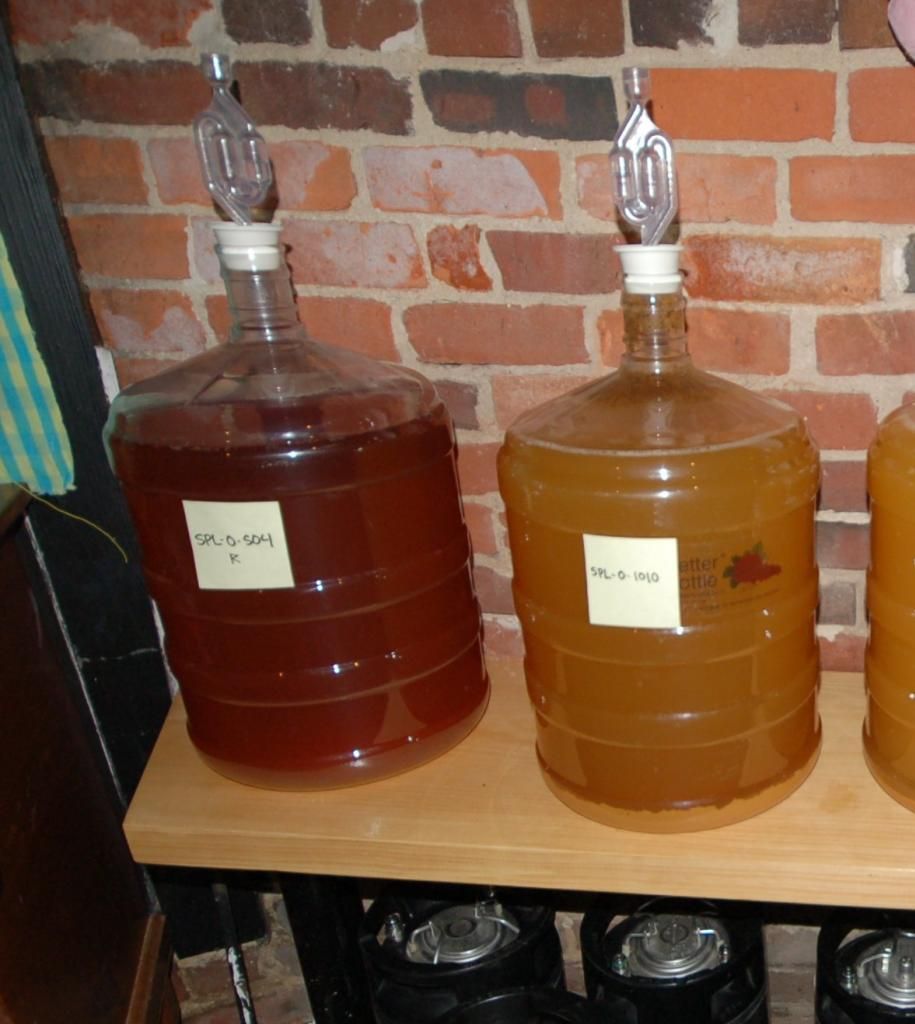
On the bar are two carboys and three gallon batches from a pressing that Old Hill Cider did last weekend for Cider Week. The blend was Ashmead's Kernal, Stayman, Albemarle Pippen and Winesap. The juice had been pressed the day before and was super clear going into the jugs. Sg was 1.060, so I didnt add any sugar. I didnt sulfite any of these batches. The two carboys are Brupaks and BRY97. The three gallon batches are Cider House Select, Montrachet and Safbrew Abbaye. The Montrachet and Abbaye are both a little stinky, but the Cider House Select smells great. These all have a while to go.
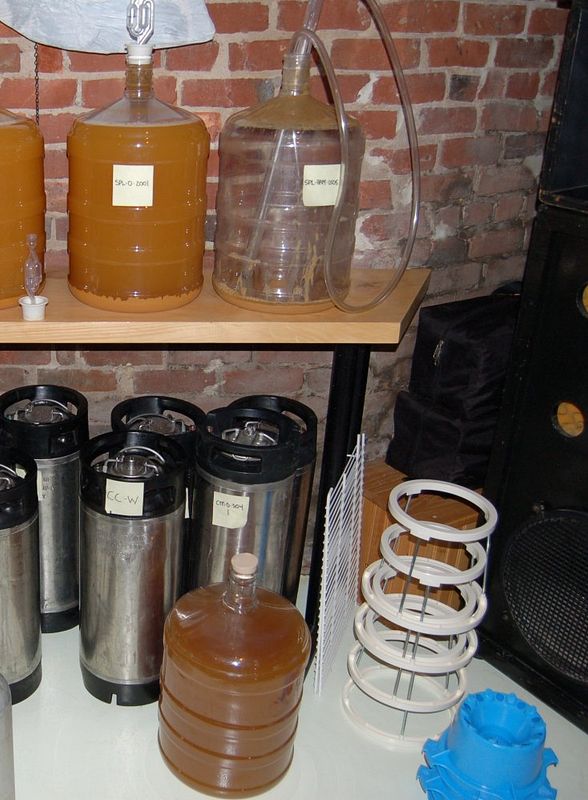
On the back wall, on the far left is a batch from the first pressing (Cortland, Gala, Jonathan), fermented to 1.010 with Brupaks and a quarter oz of French Oak chips added in the secondary. I soaked the oak chips in rye for a day beforehand to kill the wild yeast (I skipped this step on a batch a couple years ago, and the cider took off fermenting again after I added the chips). The chips have been in for almost a month and it tastes great. I'll probably be putting this on tap soon.
Next to the oaked batch is a batch from a cider pressing party last month. We got a mixed bin of Stayman, Pippen and Winesap #2s, and I think they might have been a bit under ripe because the sg was only 1.040. The nutrient level must have been really low in these apples, because this batch is taking forever to ferment. Its been over a month and the 1.018 ball still hasnt dropped yet. Its still chugging along and smells pretty good.
The seven carboys to the right and the one in the fridge are all from a Stayman, Pippen and Winesap pressing earlier this month. SG was 1.060, so no sugar added to these either. As you can see I've crashed 3 of these already and 4th is crashing in the fridge now. I added sulfite to four (Brupaks, Wy3056, Wy3068 and WLP005) and no sulfite four (Brupaks, Wy3056, BRY97 and Notty). Temps have mostly been 58-60, so these have been moving slow. It was almost 3 weeks in when I crashed the first one (Wy3056). The only incident I had with these is that the WLP005 batch did not start after 48hrs. The expiration date on the vial was December 2014, so it was getting close to expriration, but it was the only one that LHBS had left, so I used it. After 48 hrs of no activity, I pitched an extra pack of Brupaks, which is probably the dominant yeast strain now. Time will tell whether it tastes more like Brupaks or WLP005 when it is done.
On the bar are two carboys and three gallon batches from a pressing that Old Hill Cider did last weekend for Cider Week. The blend was Ashmead's Kernal, Stayman, Albemarle Pippen and Winesap. The juice had been pressed the day before and was super clear going into the jugs. Sg was 1.060, so I didnt add any sugar. I didnt sulfite any of these batches. The two carboys are Brupaks and BRY97. The three gallon batches are Cider House Select, Montrachet and Safbrew Abbaye. The Montrachet and Abbaye are both a little stinky, but the Cider House Select smells great. These all have a while to go.
On the back wall, on the far left is a batch from the first pressing (Cortland, Gala, Jonathan), fermented to 1.010 with Brupaks and a quarter oz of French Oak chips added in the secondary. I soaked the oak chips in rye for a day beforehand to kill the wild yeast (I skipped this step on a batch a couple years ago, and the cider took off fermenting again after I added the chips). The chips have been in for almost a month and it tastes great. I'll probably be putting this on tap soon.
Next to the oaked batch is a batch from a cider pressing party last month. We got a mixed bin of Stayman, Pippen and Winesap #2s, and I think they might have been a bit under ripe because the sg was only 1.040. The nutrient level must have been really low in these apples, because this batch is taking forever to ferment. Its been over a month and the 1.018 ball still hasnt dropped yet. Its still chugging along and smells pretty good.
The seven carboys to the right and the one in the fridge are all from a Stayman, Pippen and Winesap pressing earlier this month. SG was 1.060, so no sugar added to these either. As you can see I've crashed 3 of these already and 4th is crashing in the fridge now. I added sulfite to four (Brupaks, Wy3056, Wy3068 and WLP005) and no sulfite four (Brupaks, Wy3056, BRY97 and Notty). Temps have mostly been 58-60, so these have been moving slow. It was almost 3 weeks in when I crashed the first one (Wy3056). The only incident I had with these is that the WLP005 batch did not start after 48hrs. The expiration date on the vial was December 2014, so it was getting close to expriration, but it was the only one that LHBS had left, so I used it. After 48 hrs of no activity, I pitched an extra pack of Brupaks, which is probably the dominant yeast strain now. Time will tell whether it tastes more like Brupaks or WLP005 when it is done.
OP
OP
CvilleKevin
Well-Known Member
After you crash do you ever add sulphites?
Not in a while. I've experimented with adding before and after and it seems like before is usually more effective, probably because any tendency to get acidic over time is mostly due to brett and maybe some acetobacter in the juice from the beginning, and not so much from being introduced via handling. This season I might sulfite a couple both before after the crash and see how that compares to only before.
Also - there are a few yeasts like S23 and BRY97 which get really stinky if sulfited beforehand. I might sulfite a couple of these after crashing this season to see how they hold up over time vs no sulfite


What a fantastic wealth of info on this thread. I want to ask what my best coarse of action would be in my position.
I have 5.5 gallons of unpasteurized fresh cider that I would like to bottle and carb. I was reading this thread and it makes a lot of sense cold crashing at your desired sweetness to keep the apple flavor. It seems like following this process CvilleKevin has perfected isnt easily adjusted for bottle carbing.
If I cold crash when I have my desired gravity into a new vessel and then pull it out and allow it to clear. I can then no longer have a carbed beverage it would be still.
So is my best/only option is to rack into a bottling bucket at my desired gravity and sweetness and pasteurize with no secondary at all and just let them age in the bottles?
Or should I just skip the cold crash all together and just ferment all the way then back sweeten?
Edit:
Ive searched this thread and read a few people mention trying it but then I never see anyone report back how it went.
I guess if I want to keep a semi sweet cider my best bet without kegging is to keep it still.
Then I can decide if kegging is something I want to invest in.
Last edited:
Bearclaw215
Well-Known Member
- Joined
- Sep 20, 2013
- Messages
- 167
- Reaction score
- 12
Check out the stovetop pasteurization thread in the cider forum its got a sticky. You bottle just above the desired fg and then kill off the yeast once you carb enough. It's pretty simple, just a little time consuming but a good tool for those without keg systems
Check out the stovetop pasteurization thread in the cider forum its got a sticky. You bottle just above the desired fg and then kill off the yeast once you carb enough. It's pretty simple, just a little time consuming but a good tool for those without keg systems
Thanks for the reply bearclaw but unless I read it incorrectly CvilleKevin said racking, then cold crashing, and then racking again at your desired gravity will/should kill all yeast.He then lets it sit for a few weeks to be sure it doesnt ferment any further. If it does start he cold crashes it again.
If this is the case then there is no chance of carbing up once bottles so there would be no reason to pasteurize bottles.
I am correct on this? Or am i misunderstanding?
OP
OP
CvilleKevin
Well-Known Member
Check out the stovetop pasteurization thread in the cider forum its got a sticky. You bottle just above the desired fg and then kill off the yeast once you carb enough.
Yep, that's the way to go if you want to bottle carb a sweet cider. If you want, you can use a lager yeast like S23 or WLP810, because these usually dont shut down when you crash them. That way you can clear up the cider quite a bit with a crash, but there will still be some viable yeast left to carb your bottles - it will just take a little longer. Use one plastic bottle so you know when the rest are carbed. Read the sticky for details on the process
The other option is to use an ale yeast and instead of pasteurizing, put them all in the fridge when they are carbed. That is assuming you have space in your fridge for a couple cases of bottles.
Kegging equipment is pretty cheap if you can take your time and wait for a good deal to come up on craigslist or ebay. If you bottle the first couple batches, that will give you an idea of how much time you are saving, plus you will have a good stash of bottles to tide you over until you can find a good deal on kegs and a regulator.
If this [cold crashing] is the case then there is no chance of carbing up once bottles so there would be no reason to pasteurize bottles.
That is correct - unless you want the bottles carbonated. Still cider is still pretty good, although most people prefer it carbed. When I'm doing experimental batches, I just do gallon batches, crash them and bottle them still. A good cider is a good cider whether it is carbed or not. But if something works out, I'll scale it to 5gal and carb it in a keg the the next time.
If this is your first time, and you dont mind drinking the first few bottles still, you might just want to split the 5 gal into individual gallons and try different yeasts, as the best yeast to use is very much a matter of personal preference. Plus gallon batches are easier to crash. Once you've dialed in your favorite recipe, you can scale up and decide whether to get some kegs.
]Yep, that's the way to go if you want to bottle carb a sweet cider. If you want, you can use a lager yeast like S23 or WLP810, because these usually dont shut down when you crash them
Well Im already 4 days in and used Notty. Currently sitting between 60-64 all day in the basement. My plan was to rack and cold crash at 1.010 or slightly lower because i want to keep some apple flavor. I do have space for a few cases of beer in the fridge.
The other option is to use an ale yeast and instead of pasteurizing, put them all in the fridge when they are carbed. That is assuming you have space in your fridge for a couple cases of bottles
So after fermenting till 1.010 or so just bottle and carbonate to my liking and then throw them in the fridge? No secondary at all? Just let them condition in the bottle for a few weeks and go.
In your opinion which one would be the better product? Still cider thats semi sweet or 2-3 weeks in the primary and then bottling once it hits 1.010 and gravity then letting it carb up then pasteurize?
I guess what I am saying is I just want a good product out the gate. If going still is the path of least resistance then it makes more sense.
This is my first cider and I want to make sure this is something I will continue to do before I start getting to deep in. Kegging while saving time wouldnt make sense unless I really enjoy this hobby and plan to continue it. If I can produce a drinkable beverage then kegging would be my next step.
If this is your first time, and you dont mind drinking the first few bottles still, you might just want to split the 5 gal into individual gallons and try different yeasts, as the best yeast to use is very much a matter of personal preference. Plus gallon batches are easier to crash. Once you've dialed in your favorite recipe, you can scale up and decide whether to get some kegs.
This would have been the smart move on my part but like most people here I have read I jumped in head first.
I thought I had a good plan and wrote it all out and followed this thread along with others. I just missed the part that the yeast would be dead after cold crashing and no longer carb up.
Sometime I miss the small details.

OP
OP
CvilleKevin
Well-Known Member
I guess what I am saying is I just want a good product out the gate. If going still is the path of least resistance then it makes more sense.
My advice would be to cold crash your cider for a few days, but then instead of racking back to a clean carboy after the crash and letting it sit for a couple weeks to make sure the ferment doesnt start back up, just go straight to bottles after the crash.
The point of letting cider sit for a couple weeks after the crash is to get some extra clearing and make sure that doesnt start back up fermenting again. But Notty usually gets pretty clear after 3-4 days in the fridge and doesnt need a lot of extra shelf time to clear. And in your case, if the cider does start fermenting after you bottled it, that would be a bonus because now your bottles are carbed, and since you have space in the fridge you can just put them all in the fridge until you drink them. You just need to make sure you drink a bottle every couple of days or so, so if they do start carbonating after the crash, you will catch them in time and can chill them down before the carb gets strong enough to burst a bottle. If the bottles never carb, then they are still going to taste pretty good, and you will know that you were able to successfully cold crash (which can be tricky to pull off the first time)
BTW - the yeast wont be dead after the cold crash. They will just be (hopefully) be eliminated because they will all floc to the bottom. You need to be careful not to pick up any yeast with your racking cane when you get down to the bottom. I usually leave about a quart behind. Also, give your carboy a couple of raps on the side when it is in the fridge before you bottle, so that any yeast that is on the sides of the carboy knocks loose and has time to float down to the bottom before you rack.
I'm not convinced. Cold crash, rack, and bottle. Even if it was stable for weeks. If the amount of residual sugar is more than the amount needed to produce 2-3 vol.s of carb. I think there is still a chance of fermentation restarting, even slowly, and over pressurizing the bottles. With organisms there seems to always be a way to overcome the odds.
OP
OP
CvilleKevin
Well-Known Member
Even if it was stable for weeks. If the amount of residual sugar is more than the amount needed to produce 2-3 vol.s of carb. I think there is still a chance of fermentation restarting, even slowly, and over pressurizing the bottles.
That is why you want to drink a bottle every couple of days or so and chuck them all in the fridge if the carb starts building up. You cant get away with this with every yeast, but Notty will completely shut down in the fridge.
I've got bottles in the basement that are 2-3 years old and at 1.010 or higher. You do have to be careful with racking and use low nutrient juice. I wouldnt recommend letting cases of bottles that were bottled at high gravity just sit around for months unless you have been doing it for a long time and have the process down, but as long as you are frequently sampling, you can stay on top of any potential problems.
I will post my results once i finish this batch.
Great! good luck
Late ferment additions
A good time to add fruit like raspberries, blackberries, etc, is right before crashing. That way the flavor doesnt get lost during the primary fermentation and you will get all of the pulp and seeds out during the crash. Depending on how fast the cider is fermenting, I will generally add fruit a day or two before crashing. For fresh picked berries, I use about a pound for 5 gal of cider, a pound and a half of store berries. If you add the fruit when the SG is about where you want it, then adding fruit will generally bump the sg by a few points and you will have another day or two for the sg to drop back to the target. Be careful when adding fruit or any sort of fermentables to an active ferment, because the fermenting cider will want to foam. Have a solid stopper handy, add a little bit of fruit at a time, and if it starts to foam, slap the solid stopper on, to keep everything in the carboy.
If I were to get some frozen berries would I need to thaw and/or crush them before adding or just toss them in? Since it will be just a day or two before I rack and cold crash. I know getting berries in the small neck of the carboy will be tough. I suppose thawing and smashing would be the best option but i didnt know if there is anything else I need to worry about at that point as far as introducing "foreign" substances.
I have a big funnel for my carboy. I throw the berries in than squish them through with the handle of my stir spoon. I do rinse the berries first in star San while they are still frozen.
If they are packaged frozen then there shouldnt be a need for sanitizing or washing is there? I mean bacteria cant live freezing temperatures.
OP
OP
CvilleKevin
Well-Known Member
If they are packaged frozen then there shouldnt be a need for sanitizing or washing is there? I mean bacteria cant live freezing temperatures.
I'm not sure whether acetobacter and other bacteria would survive freezing or not. My guess is that they wouldnt be active, but would probably survive. I've had good good results using frozen raspberries, but these were all grown and picked by friends, so the handling was probably a lot better than store berries. I did have one batch that I made with store bought fresh raspberries that got a little vinegary - I probably should have sanitized those. Frozen berries from the store probably do have less chance of picking up bacteria along the distribution chain, so if I use store berries again, I'll probably try using frozen and see how that works out. I've always just let the frozen berries thaw, then run them in the blender, which makes them easy to pour into the carboy (just need to watch for foam)
Bearclaw215
Well-Known Member
- Joined
- Sep 20, 2013
- Messages
- 167
- Reaction score
- 12
If they are packaged frozen then there shouldnt be a need for sanitizing or washing is there? I mean bacteria cant live freezing temperatures.
Freezing will actually kill some bacteria, but cannot be relied upon. Freezing, often does cause lysing of the cells, but doesn't always do this, and the cell simply is suspended until it thaws out. Bacterial cultures are often frozen in glycerin stocks to keep them in perpetuity. So even though they are susceptible to death by freezing, they can survive the temperatures, so you can't rely on it.
- Status
- Not open for further replies.
