
Kevin kombat Swan
New Member
- Joined
- Oct 2, 2015
- Messages
- 2
- Reaction score
- 3
In my previous article Wort Canning To Save Time, one commenter questioned where the time savings were. Well, ask and ye shall receive! In this article, I'll show you how I use pre-canned starter wort to make preparing a yeast starter an extremely quick process.
As I mentioned in the previous article, the problem with yeast starters is that they're time-constrained; you generally have to prepare them a set number of days prior to your brew day to ensure the maximum freshness and viability of the yeast. I usually brew on the weekend, which generally means I have to prepare my starter on Wednesday night. This is still true using the pre-canned method, but most of the work has already been done. Instead of boiling and chilling, I only need to pop a few lids open. It used to take me about 30 minutes to just make the wort. With pre-canned starter wort, making a starter only takes about 10 minutes from start to finish.
The required materials for this task are very minimal, and are shown below.

Caption: Materials for making a yeast starter from canned wort
You will need:
Some liquid yeast
A flask
A funnel
Something to cover the mouth of the flask (I use aluminum foil)
A stir plate and stir bar (optional)
A bottle opener
And of course, some pre-canned starter wort
I take my yeast out of the fridge and smack it as soon as I get home from work, then go about my Wednesday night as normal. By ten minutes before bed time, my yeast pack is nice and swollen and I set to work making my starter.

Buckets of PBW and StarSan
First, I fill a bucket with some hot PBW to throw my jars in after I've opened them. I also throw my stir bar, funnel, and a piece of aluminum foil into a bucket of StarSan.

Sanitizing the flask
Next, I pour a couple of quarts of StarSan into my 5L Erlenmeyer flask using my funnel, and give it a good shake to make sure all inner surfaces are good and sanitized. I usually use my 5L flask, as I rarely prepare a starter smaller than 2L, and my 2L flask would be too tight a fit for such an amount. In this example, I'm making a starter for a 5 gallon batch of Czech Pilsner, so I need a 5L starter.

Opening the jars of canned starter wort
After dumping the StarSan out of the flask and putting the funnel back in place, I open my jars of pre-canned starter wort one by one and add them to the flask. Another commenter on my previous article expressed concern about the lids popping off with simple handling. If you've canned them properly, this will not be a concern. My fingernails would come off before the lid would, if trying to open by hand. Fortunately, a bottle opener makes the perfect tool for prying the lids off of the canning jars.

Add the wort to the flask
Next, I pour the starter wort into the flask. Using a funnel helps minimize the mess, as I'm sure I don't have to tell you how sticky and messy wort can be. The jars will have some break material in them " I always try to get as much liquid as possible out of the jars, leaving the trub behind. In addition, the jars don't quite hold a full liter when allowing room for foam during canning. This is why you see 6 jars of starter wort in the first photo, for a 5L starter.
Time for the yeast to chow down
As I empty each jar, I throw the lid in the garbage (they're not reusable) and the empty jars into the bucket of PBW to soak overnight.
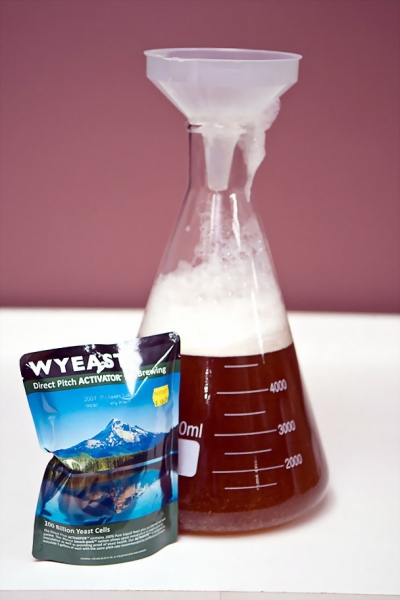
Next I sanitize the pouch of yeast, carefully tear it open, and pour it into the flask using the same funnel. I take the sanitized foil, folded it over onto itself, and cover the mouth of the flask. I then give it a good shake for a minute or so to really aerate it well.

Yeast, wort, flask, and stir bar on a stir plate
Finally, I drop in my sanitized stir bar and place the flask on my stir plate. I place a little square of that foam non-skid material on the stir plate to help keep the flask from slipping. This is simply that foam material you can buy at the hardware store, intended to line your kitchen drawers and prevent slipping.

A helpful reminder
One little trick I learned early on is to add some sort of reminder to the flask to help prevent you from dumping your stir bar into your carboy (at best) or down the drain (at worst). I slip a little reminder tag under the elastic band. It's obvious that the flask contains a stir bar while you see it sitting on a stir plate, but remember that you'll likely be cold-crashing the starter for a day or so before you actually pitch it, and when taking a flask out of the fridge, it's far less obvious that it contains a stir bar. You might think it's overkill- so did I, until I lost my first stir bar down the drain of my utility sink.

Success! Happy yeast, feasting and multiplying
Twelve hours later, my yeast is obviously happy, producing tons of CO2 and multiplying like crazy. After 48 hours on the stir plate, I move the whole thing into the fridge to cold-crash for a day. On brew day, I take it out to let it gently warm up while I brew, then I decant most of the spent starter wort, swirl up the yeast with the remaining bit, and pitch it into the main batch.
Preparing the yeast starter shown in the pictures took me about 20 minutes, but I was taking pictures throughout the entire process. Without that overhead, this process should take you no more than 10 minutes.
I hope you enjoyed this pair of articles on how I optimize my yeast starter process. Another comment I saw on the previous article suggested creating double-strength starter wort during the canning process (by using twice as much DME/LME), then diluting each jar with some sanitized water as you prepare the starter. This is a great suggestion, as it would allow your stash of canned starter wort to go twice as far, as you'd only need half as many jars to produce the same amount of 1.040 gravity starter wort.

As I mentioned in the previous article, the problem with yeast starters is that they're time-constrained; you generally have to prepare them a set number of days prior to your brew day to ensure the maximum freshness and viability of the yeast. I usually brew on the weekend, which generally means I have to prepare my starter on Wednesday night. This is still true using the pre-canned method, but most of the work has already been done. Instead of boiling and chilling, I only need to pop a few lids open. It used to take me about 30 minutes to just make the wort. With pre-canned starter wort, making a starter only takes about 10 minutes from start to finish.
The required materials for this task are very minimal, and are shown below.
Caption: Materials for making a yeast starter from canned wort
You will need:
Some liquid yeast
A flask
A funnel
Something to cover the mouth of the flask (I use aluminum foil)
A stir plate and stir bar (optional)
A bottle opener
And of course, some pre-canned starter wort
I take my yeast out of the fridge and smack it as soon as I get home from work, then go about my Wednesday night as normal. By ten minutes before bed time, my yeast pack is nice and swollen and I set to work making my starter.
Buckets of PBW and StarSan
First, I fill a bucket with some hot PBW to throw my jars in after I've opened them. I also throw my stir bar, funnel, and a piece of aluminum foil into a bucket of StarSan.
Sanitizing the flask
Next, I pour a couple of quarts of StarSan into my 5L Erlenmeyer flask using my funnel, and give it a good shake to make sure all inner surfaces are good and sanitized. I usually use my 5L flask, as I rarely prepare a starter smaller than 2L, and my 2L flask would be too tight a fit for such an amount. In this example, I'm making a starter for a 5 gallon batch of Czech Pilsner, so I need a 5L starter.
Opening the jars of canned starter wort
After dumping the StarSan out of the flask and putting the funnel back in place, I open my jars of pre-canned starter wort one by one and add them to the flask. Another commenter on my previous article expressed concern about the lids popping off with simple handling. If you've canned them properly, this will not be a concern. My fingernails would come off before the lid would, if trying to open by hand. Fortunately, a bottle opener makes the perfect tool for prying the lids off of the canning jars.
Add the wort to the flask
Next, I pour the starter wort into the flask. Using a funnel helps minimize the mess, as I'm sure I don't have to tell you how sticky and messy wort can be. The jars will have some break material in them " I always try to get as much liquid as possible out of the jars, leaving the trub behind. In addition, the jars don't quite hold a full liter when allowing room for foam during canning. This is why you see 6 jars of starter wort in the first photo, for a 5L starter.
Time for the yeast to chow down
As I empty each jar, I throw the lid in the garbage (they're not reusable) and the empty jars into the bucket of PBW to soak overnight.
Next I sanitize the pouch of yeast, carefully tear it open, and pour it into the flask using the same funnel. I take the sanitized foil, folded it over onto itself, and cover the mouth of the flask. I then give it a good shake for a minute or so to really aerate it well.
Yeast, wort, flask, and stir bar on a stir plate
Finally, I drop in my sanitized stir bar and place the flask on my stir plate. I place a little square of that foam non-skid material on the stir plate to help keep the flask from slipping. This is simply that foam material you can buy at the hardware store, intended to line your kitchen drawers and prevent slipping.
A helpful reminder
One little trick I learned early on is to add some sort of reminder to the flask to help prevent you from dumping your stir bar into your carboy (at best) or down the drain (at worst). I slip a little reminder tag under the elastic band. It's obvious that the flask contains a stir bar while you see it sitting on a stir plate, but remember that you'll likely be cold-crashing the starter for a day or so before you actually pitch it, and when taking a flask out of the fridge, it's far less obvious that it contains a stir bar. You might think it's overkill- so did I, until I lost my first stir bar down the drain of my utility sink.
Success! Happy yeast, feasting and multiplying
Twelve hours later, my yeast is obviously happy, producing tons of CO2 and multiplying like crazy. After 48 hours on the stir plate, I move the whole thing into the fridge to cold-crash for a day. On brew day, I take it out to let it gently warm up while I brew, then I decant most of the spent starter wort, swirl up the yeast with the remaining bit, and pitch it into the main batch.
Preparing the yeast starter shown in the pictures took me about 20 minutes, but I was taking pictures throughout the entire process. Without that overhead, this process should take you no more than 10 minutes.
I hope you enjoyed this pair of articles on how I optimize my yeast starter process. Another comment I saw on the previous article suggested creating double-strength starter wort during the canning process (by using twice as much DME/LME), then diluting each jar with some sanitized water as you prepare the starter. This is a great suggestion, as it would allow your stash of canned starter wort to go twice as far, as you'd only need half as many jars to produce the same amount of 1.040 gravity starter wort.

![Craft A Brew - Safale BE-256 Yeast - Fermentis - Belgian Ale Dry Yeast - For Belgian & Strong Ales - Ingredients for Home Brewing - Beer Making Supplies - [3 Pack]](https://m.media-amazon.com/images/I/51bcKEwQmWL._SL500_.jpg)


