Closed-system pressurized fermentation technique!

Homebrew Talk - Beer, Wine, Mead, & Cider Brewing Discussion Forum

Help Support Homebrew Talk - Beer, Wine, Mead, & Cider Brewing Discussion Forum:

This site may earn a commission from merchant affiliate links, including eBay, Amazon, and others.

What do you guys think about pressure fermentations? Time for a poll.

  • I've done it and I liked it just fine!

  • I've done it, nothing wrong with it, but prefer normal fermentation techniques.

  • I've done it, hate it, and never will do it again!

  • I've never done it, but it is on my list!

  • I've never done anything. I only brew beer in my mind.


Results are only viewable after voting.
This was a 5 gallon IPA that we had about 8 oz of hops total, mostly late/flameout additions since we were determined to get some aroma after brewing several IPA's that were lacking. I put 2 ounces of Willamette pellets (it was just laying around) into a french press, boiled water, poured in about 2 or 3 cups, let it sit for about two minutes, and added it to the bottling bucket with the priming sugar.

The beer turned out VERY bitter, even for an IPA. The hops were out of balance toward bittering rather than aroma, though I think we did 1 oz at 60 min, 1 ounce at 30 and the rest at 10 min, 5 min, and flameout, plus the hop tea at bottling. After initial tasting, I all but made peace with the fact that I'll never make a really aromatic IPA, but as it has aged, the bitterness subsided and it's actually more aromatic with fresher hop smells and tastes now that it's a few months in the bottle.

Though you should take this with the grain of salt that is the fact I live in Alaska, and have never been able to get hops that are less than a year old. It's been a struggle with the IPA's and hoppy styles.
 
Whew, 3days and 77 pages later I think I feel educated enough to jump into this.

House keeping before I get started, Thank you so much to all the contributors, especially wortmonger, not only for starting the thread, but also for sticking with it for the past couple YEARS! The various points brought up throught this thread have been invaluable & whether or not P-fermenting ends up working for me, I feel like a Spunding valve setup will be a great investment for Counter-pressure transfers or natural carbonation as Teri Fahrendorf's article so eloquently describes.

Questions,

1) Seems like the popular spunding valve on this thread is McMaster #99045k46 Polysulfone Adjustable Pressure-Maintaining Relief Valve. I believe people have been using the 0.5-30psi gauge, question is why not the 0.5-60 psi. I think Wortmonger upgraded to this a while back? And dstar26t's recent post over at The Brewing Network also spec'd the 0.5-30 valve.

Is 60psi just too high or too far out of the range? I know some of you p-fermenting have gauges to 60psi since a couple of batches in this thread have posted hitting above 30psi, but is it worth controlling the pressure over 30psi. Also would the valve itself maybe start to have less accuracy when controlling pressures at the lower range as the valve has to cover a larger span? What's up?

2) For a catch-tank, I was looking at the pentek 1/4"NPT Slim Line It has the same fittings as the majority of the spunding valve setup. But I saw a post a few pages back about how you would have to rig it up backwards. Being as I don’t have one in my hand, I'm assuming the ports on each side do not line up with each other inside, any clarification on this would be great, for ~20 shipped I think it would be a relatively cheap & "clean-looking" solution that already has the right fittings, can handle the pressure & should be fairly easy to clean. I would be looking at using this housing without a filter and possibly with some Ferm-cap sitting in the bottom. Comments?

3)Stir-plate idea. You have suggested this a few times wortmonger, your "current" process sounds a little too labor intensive with the shaking, rolling, etc every time you walk by. My ferm cabinet isn’t exactly the easiest to pull a corny out of, unhook, then roll around the apt every time I get a chance, not to mention it’s a full sankey in your case. I do like the idea of rousing the yeast more often though. Did you ever make any progress on this, I saw your posts over here, just wondering if you ever did any further research/testing.

Thanks again for such a great concept, and constantly evolving thread.
 
tsb22 said:
Whew, 3days and 77 pages later I think I feel educated enough to jump into this.
Yeah, sorry about that. I admit is is a very long thread, but as you have seen there are a lot of different things going on and being discussed that all revolve around the idea.
tsb22 said:
House keeping before I get started, Thank you so much to all the contributors, especially wortmonger, not only for starting the thread, but also for sticking with it for the past couple YEARS! The various points brought up throught this thread have been invaluable & whether or not P-fermenting ends up working for me, I feel like a Spunding valve setup will be a great investment for Counter-pressure transfers or natural carbonation as Teri Fahrendorf's article so eloquently describes.
Thank you very much. I have taken this up as my "cause," even though I did not come up with the idea. You are right about the spunding valve. It comes in very handy in the brewhouse.

tsb22 said:
Questions,
1) Seems like the popular spunding valve on this thread is McMaster #99045k46 Polysulfone Adjustable Pressure-Maintaining Relief Valve. I believe people have been using the 0.5-30psi gauge, question is why not the 0.5-60 psi. I think Wortmonger upgraded to this a while back? And dstar26t's recent post over at The Brewing Network also spec'd the 0.5-30 valve.

Is 60psi just too high or too far out of the range? I know some of you p-fermenting have gauges to 60psi since a couple of batches in this thread have posted hitting above 30psi, but is it worth controlling the pressure over 30psi. Also would the valve itself maybe start to have less accuracy when controlling pressures at the lower range as the valve has to cover a larger span? What's up?
I like the "to 60 psi gauge" because sometimes I need a little more than 30 psi for carbonation. I used to have the lesser psi, and I had to do things like crash cool to get in workable range for setting my carbonation volumes because of it. The is not a lot of accuracy with any of the spunding valves. I always have to dial in mine on every batch I do. I always set it higher than needed by a few psi, so I can then vent off the excess more accurately later on. IMHO, go with the .5-60 psi and you won't have any problems like I ran into.
tsb22 said:
2) For a catch-tank, I was looking at the pentek 1/4"NPT Slim Line It has the same fittings as the majority of the spunding valve setup. But I saw a post a few pages back about how you would have to rig it up backwards. Being as I don’t have one in my hand, I'm assuming the ports on each side do not line up with each other inside, any clarification on this would be great, for ~20 shipped I think it would be a relatively cheap & "clean-looking" solution that already has the right fittings, can handle the pressure & should be fairly easy to clean. I would be looking at using this housing without a filter and possibly with some Ferm-cap sitting in the bottom. Comments?
The housing would work great. I have not done this yet, but have one to look at. The "in" port comes in off center of the lid so liquid to be filtered is on the outside of the filter cartridge, and the "out" port is dead center of the lid inside the raised area that holds the filter centered so liquid has to go through the filter and up and out. Running it backwards, with something in place like a tube to lower the entry point, allows bubbles and what-not to "hopefully" not make it out of the other port. Fermcap is a good idea to break bubbles up.
tsb22 said:
3)Stir-plate idea. You have suggested this a few times wortmonger, your "current" process sounds a little too labor intensive with the shaking, rolling, etc every time you walk by. My ferm cabinet isn’t exactly the easiest to pull a corny out of, unhook, then roll around the apt every time I get a chance, not to mention it’s a full sankey in your case. I do like the idea of rousing the yeast more often though. Did you ever make any progress on this, I saw your posts over here, just wondering if you ever did any further research/testing.

Thanks again for such a great concept, and constantly evolving thread.
I would love to try this out, but alas... I have not attempted it still to this day. Rolling my keg is easy enough right now with my room temperature fermentation tests. If it was in a fridge... then I would be in trouble and not be able to rouse the yeast without gas or something. Big breweries use CO2 shot in the bottom of the fermentor to rouse the yeast in the uni-tanks.
 
Alrighty, that confirms my thinking that the 60psi gauge would be better. I realize that none of these gauges are great at being accurate, but it sounds like this is the best we have to work with.

Good to know about the filter housing that sounds like it will work perfectly with that hose, and worse case scenario, can always throw an actual filter in there & use for clarifying.

As for the rousing, it seems like the consensus around HBT with using a stirrer, would be to mount on the bottom as usual, but working with a larger/stronger magnet & motor. The second thing would be what they describe as a dumbell stir-bar.

That c02 shot in the bottom sounds intriguing. With all the c02 we are saving from not force carbing, why couldnt we blast some c02 down the dip tube & do the exact same thing. If you cut your tubes, you may actually end up not stirring up the gunk in the bottom. In the case with cornies i would think this would work fine as you can leave the spunding valve on the gas out side & connect c02 to the gas in as usual, as you pump co2 down the dip tube, the spunding valve would make sure your pressure stays to what you said it. Dunno if you can do that with a Sankey valve tho.

It does bring up another interesting idea though on how to accurately set your gauge in the first place. You would just pump c02 into the keg and adjust the spunding valve as needed. I think the reason i originally liked this thread was its similarities to large scale brewing, would be great if yet another thing the big guys did could be scaled down to our level.
 
Is the rousing just to clean it up a bit faster?

I understand that there's a bit less surface area for the yeast to work with in a corny versus a carboy, but I don't think it's a big deal.

Just be sure to use a good sized starter.

//been pressure fermenting without shaking, rolling, etc just fine and hitting FG's just fine.

////CO2 shot down the dip tube seems like it would work really well if you feel the need.
 
I "downgraded" from the 60 to the 30. Once, I went up to 35 PSI, but I won't again since I want to harvest healthier yeast and can easily top it off with the tank, but thats my OP.
 
Is the rousing just to clean it up a bit faster?

I understand that there's a bit less surface area for the yeast to work with in a corny versus a carboy, but I don't think it's a big deal.

Just be sure to use a good sized starter.

//been pressure fermenting without shaking, rolling, etc just fine and hitting FG's just fine.

////CO2 shot down the dip tube seems like it would work really well if you feel the need.

Yes, I think the original goal of constant rousing was similar to that of pressure fermenting a lager, just achieving quicker attenuation and with constant suspension, the yeast are more easily able to clean up all the bad stuff.

Reading up a little more on professional brewing techniques, it sounds like this co2 blasting is moreso another technique beyond proper pitching, proper temperature, and proper oxygenation. Since pro-brewers cant very well shake or roll a uni-tank, this is one of the few options they have to help along stubborn attenuations. Obviously with cornies or sankeys we have this option. Of course with larger batches, or in my case the matter of access, & lifting kegs to shake/roll daily, this use of co2 represents a nice option.

That's actually the .5-60 psi regulator listed there if I'm not mistaken.

My bad Dstar, i must have gotten confused as its only the last 2 digits of the part that change. #9045K44 being the 0-30 and #99045K46 for the 0-60.

I "downgraded" from the 60 to the 30. Once, I went up to 35 PSI, but I won't again since I want to harvest healthier yeast and can easily top it off with the tank, but thats my OP.

I agree operating at higher pressures could mutate/stress the yeast, seems like the consensus on this thread is the 0-15 range is reasonable for yeast to operate, but over that you may be stressing them depending on strain.

Out of curiosity why did you downgrade rather than just operating the 0-60 valve in the 0-30 range (or whatever you use)?

Because for some odd reason -no idea-, my 60 PSI glycol filled SS pressure gauge (a.k.a the 'nice' ones) stopped working. And since McMaster Carr is the best company in the world, I can swap it out and send mine back, so I got a 30 PSI valve to go with it just for kicks. I'll like having the finer adjustable control.

The beer makes fine at high pressure, but as per Chris White, if you wish to harvest many times (as in a pro brewery) will mutate faster or more if taken above 15 PSI. I can't say that I'm reusing yet at that level, since I'm still in the 'trying to brew every style I can' phase, but it's good to know. My 35 PSI Jamil Wit turned out yummy, though.
 
I have had no problems reusing yeast 3-4 times under pressures as high as 32 psi at 72*F. I am not saying it would be the best practice to reuse yeast in a big brewery under those conditions, but I am not seeing any at this level. I am about to start top cropping for the best yeast possible, so we will see how many re-pitches I get to before I see a difference.
 
I have only made a few batches this way, but if I spring for another spunding valve I'll go with a fixed relief valve around 7-8psi.

I am still working in Corny's only, I don't own any Sanke kegs. But, I have pressure tested my cornies to 80psi.

The adjustable spunding valve I built when I lived in Texas (early 2008?) is a great brewhouse tool, but I don't need all that flexibility to make the pale ales I mostly brew. And it is hard to clean.

I have mostly been filling the primary fermenter Corny to about 4.5 Gallons, with a jump tube from the grey post on the primary to the black post on a second Corny with a bit of water in the bottom, perhaps a quart, and then putting the spunding valve on the grey post of the second Corny.

That's harvested yeast in Corny number two, at three generations I am happy. Once primary has settled down I tend to push the 4.5 gallons out of Corny number one onto a half gallon of water in Corny number three, no spunding valve, just let it build pressure as it finishes.

Once it is done, two-three weeks or so from pitch it is ready to chill, tap and enjoy.
 
Well, the APA is ready to drink. I waited until last night to dry hop the serving keg with Gerard's Tea. I used 1oz of Columbus and 1oz of Summit. I autoclaved my filter cartridge, French press pieces, and my addition water. Then, I allowed my addition water to cool to 170*F and added my hops to that. It sat for 20 minutes with me keeping it stirred and then I pressed it. I got about a cup of liquid and added that to my serving keg (which had been sealed and purged with CO2.

After the addition, I charged to the same pressure as the fermentor and hooked up the filter. I purged the filter while filling it with beer from the fermentor with the built in pressure relief. After the keg was full, I placed it back into the kegerator and poured me a glass.

I had more hop aroma during fermentation, so hop tea is a bust for me. Good beer, but the Munich malt is shining through a bit to much for me on an APA. I have to say though, I have really liked my experiments so far with Munich and can really taste the difference when using it even in small amounts. Vienna is next on the recipe experiments, but I think my next beer is going to be a golden ale... chilled prior to fermentation and aerated like I normally do. I can taste no bad effects from the no-chill, but something seems just a bit off. Time will tell, but this is not my best for an APA that is for sure.
 
I'd like to make a wiki request: That there be the two additional types of spunding valve images in the actual wiki (Mcmaster's black valve style and the Granger brass ends, both of which I believe I've seen in two people's images on sankey kegs) to ease a bit of confusion when purchasing or building a valve. My bad for going by the picture and getting the wrong one, despite reading the thread and the recommendations on valves, but it'd be useful to view the picture to compare which one will work better.

I accidentally got the on/off one when I was at a store, so have been waiting to be able to get an adjustble pressure spunding valve. Probably a second valve since there really isn't that much of a cost difference between buying one at my LHBS vs replacing the on/off with an adjustable including shipping. (LHBS didn't have the valve on its own unfortunately.)

In the meantime, with my last corny keg batch, I was trying to use it to do a secondary natural carbonating step, but since I'm only home twice a day, it means I'm venting down to 5 before I leave, but when I get home or wake up, it's up at 50 psi. I'm sure I heard the pressure relief valve go off in the middle of the night when I first started, now that I think of it. I've made a number of other mistakes on this one anyways, but it's drinkable so far, even if it's not completely finished.
 
With the wiki article on spunding, pictures change so much they end up as red x's. The idea is clearly written, and talks about adjustable and the on/off types. My view on the procedure, as with closed-system fermentation, is to not be overly specific with equipment since so much will work. The idea is there and parts we use are listed, but it is left to the individual to think what would work best for them. This thread has "overly" documented all of our experiences with all the different devices. I don't plan on changing the information to much more on the wiki, because of the conversation that happens when people don't understand completely. People complain about this thread being too long, and yet... they ask questions that are answered in it. We happily answer anything that is in question, but also recommend you read the whole combined experiences so that you too may have another idea to add, or another tweak to the process we can all start implementing in our process. I don't want you to think I am just on you, I just want everyone to realize it is a broad area of discussion and ideas packed into a neat little box. I mean, it's not like there are 30 threads about this with information spread all over the forum. Your post is a prime example of what I want from my wiki articles and thread. Now, moving on to your discussion added to this monster of a thread, lol. :)

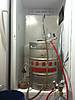
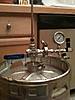
I am sorry you bought the on/off type, but it is still very useful. I am glad you are swapping it for an adjustable though. I have had many similar experiences (wait until your valve gets gunked up with krausen and spray paints what's next to it, lol). Adjustables are where it is at, but I highly recommend a buffer for the valve (like the filter housings we have been discussing).

I am confused about your last paragraph. You say you are doing a secondary natural carbonation step. Can you explain more about what you did? I am unable to recommend anything with the limited information. Did you move it from primary to secondary to do this step? I am just concerned you are getting so much psi that I have to ask more. Please fill us in on what your process has been so far.

Now, my newest recommendations from my experiments:
First off, lower pressures (2-15psi) during the growth phase is better for the yeast and will allow for top cropping during the high krausen period for the best yeast... in most cases. I will be changing the wiki to display all this newer information I have found.

Second, I don't like no-chill.

Third, my room temperature fermentation experiments have proven to me that it is do-able, makes a drinkable product, but I know I can do much better with more control. Duh, given, but had to be tried to see. Style dictates this more than anything though. Example, my brown was my best beer ever... this APA leaves a lot to be desired.

Fourth, I like to over-pressure a little bit for the carbonation stage. It is so much easier to drop down to wanted pressure for volume when you are at 68*F than when you are at 35*F.

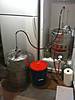
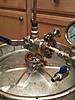
Fifth, I love my filter for keg to keg transfers. It is easily cleanable and fully autoclavable, and provides me a crystal clear product just minutes after moving a keg that is full of yeast. I have still been unlucky in finding a way for it to work well pre-tap. Seems the filter only works best when both sides of it are pressurized. A tap allows to much pressure release and so the beer first burbs (squirting your kegerator and tap), and then pours with to much head afterwords. I only leave it hooked up now because I haven't bought the stuff to make another "beer only" line. I'm thinking I will buy more quick connects and rig up an easy transfer system like I used to have.

More to come as it develops. I am still thinking through this dry hopping thing. 2oz of hops would be way to much, if left free floating in a keg, for my filter to handle during the transfer. Pellets are just so hard to use for that application. Whole or plugs are my next trials.
 
Oh yes, the on/off should be useful so I'll have two. It just might be helpful to have the additional pictures in case someone misses the caption that says the picture that was there was an on/off device. Not an adjustable one. I've gone through the thread before and after, and there are discussions about which one was the recommended one (the adjustables). It's merely the experience was that I was at the store, saw one that matched the picture that I remembered and got home and resaw the bits about the caption and went: "oops, oh well. I'll use it for now." I can always use it for venting kegs that get overcarbonated, or just use it for pressure checks if I'm not going to use it for fermenting.

I had a beer that I've been fermenting using a blowoff tube off the gas lock so I decided to try the spunding valve just to figure out how to work it. It's no big deal, it's just that with the on/off, I can't really limit the psi to say the 15psi per the earlier bits in the thread, when I was (ideally) going to let the fermentation finish out and carbonate without adding additional sugar. Admittedly, I didn't expect it to go quite as long as it has, but eh, less opening the keg means less chance of something unwanted getting in. It was after a keg to keg transfer, and I don't recall the gravity at the time of transfer, it was however, above 1.000.
 
Did my first transfer with the new set-up. Used the adjustable racking cane to counter pressure transfer right down to the yeast cake. Then swirled the keg and cleanly transferred the 825mL of yeast slurry into a flask. It took 5 psi to get the slurry moving since it's so thick. The next beer fermented with this system will be a Munich Dunkel so I'll do it under pressure and see how it goes.

 
That's cool. I'm still a little confused about how you are putting this together and getting a pressurizable seal. Can you show some pics and discuss? I did read your previous description and am still ?'d .

I am doing the same thing you are with corny kegs. I make my starters in a 3 gal corny and crash. My version of an adjustable racking cane is a 36" dip tube welded to a tri-clamp cap. With about 5 PSI and me pushing an o-ring down with a compression nut to make a seal, I decant in place down to the yeast cake into one vessel, leave about a cup of beer, shake the 3 gal corny vigorously, then pitch into primary, all closed. I also harvest from my 15 gal corny this way too. Can imagine that washing yeast would be very easy this way too due to the dish bottom of the corny.

I'd love to see more of the innards if you'd care to share and maybe a parts list. I like your solution.
 
I'm doing essentially the same as you. The racking cane is sealed with an o-ring and the nut on a compression fitting which is bored through. I'm working with Derrin at brewers hardware to make something much simpler with a tri clover clamp to replace the keg coupler, similar to his sanke fermenter set-up.
 
A month ago I did NBs Furious recipe. 1-2 weeks ago I dry hopped it by putting the pellets into a second sankey and counter pressure transferred to the second sankey.

Today I tried to filter and transfer to cornies to serve. What a gong show! :eek:

As you can imagine, the spear plugged with hop particulate after about 7 nanoseconds. I was unable to get it unplugged by back flushing the lines with CO2. So I depressurized the sankey, removed the spear, and auto siphon transferred the beer through my funnel with a screen in it. It took forever and I lost probably 7 gallons of beer. :mad:

I knew putting the hops in the sankey directly was a bad idea. I bought 3 hop bags specifically to dry hop this batch, but I couldnt get them to fit down the neck of the keg because there was so much hops in them. Plus I was worried if I ever did get them in, the hops would swell and I'd never get them out.

If I ever try and dry hop again with this technique, I think I might pressure transfer to 3 cornies with a hop bag in each corny. With the bigger mouth they should be easier to get in and out and then won't plug the dip tube.

Any other thoughts? Sounds like Worts hop tea was a bust.
 
I'm doing essentially the same as you. The racking cane is sealed with an o-ring and the nut on a compression fitting which is bored through. I'm working with Derrin at brewers hardware to make something much simpler with a tri clover clamp to replace the keg coupler, similar to his sanke fermenter set-up.

Please post what you come up with. Interested.
 
I don't know what happened with my hop tea. Maybe I used too little to be noticeable. 2oz in a 15 gallon batch? Does it sound like too little? I did exactly as Gerard said, only I didn't put the hop solids in, as he said they add it directly after making the tea and wasn't specific if it was tea only... I only assumed it would be tea (only being tea mentioned)???

As for cmuench, that sucks man!!! I had no problems getting those round tea balls into my Sanke opening, but my problem was 1oz of hops in each one swelled up larger than the ball could handle. So, I guess I did try dry hopping once before and just forgot because I gave up due to difficulties. I would never try pellets directly in the Sanke... ever! Hop sack(s) would never be tried by me either, do to the potential problems you mentioned cmuench about retrieving them later.

Looks like I am going to revisit my filter idea and pump, since if done with pellets/whole/plugs it would need to be in the beer for a period of time. I'm thinking hooked up post transfer to the serving keg. How much solids would one be looking at in the serving keg if done like I am thinking?
 
As for cmuench, that sucks man!!! I had no problems getting those round tea balls into my Sanke opening, but my problem was 1oz of hops in each one swelled up larger than the ball could handle. So, I guess I did try dry hopping once before and just forgot because I gave up due to difficulties. I would never try pellets directly in the Sanke... ever! Hop sack(s) would never be tried by me either, do to the potential problems you mentioned cmuench about retrieving them later.

Duh. I knew this was a bad idea. Oh well, brew and learn. The beer we were able to save is fantastic! :D


Looks like I am going to revisit my filter idea and pump, since if done with pellets/whole/plugs it would need to be in the beer for a period of time. I'm thinking hooked up post transfer to the serving keg. How much solids would one be looking at in the serving keg if done like I am thinking?

Remind me what this is about.
 
The filter and pump idea was about rigging a filter housing up in such a way it could hold the hops like a Randall. Then I would hook it up to the pump and back to the keg. I could then put the pump on a timer and filter the beer through the hops for a time so I could keep the system closed and still get dry hopping done before or after the beer was transferred to the secondary/serving keg. I figure after, since the filter would probably also filter and/or stir up the yeast if it were in primary. If done in the secondary/serving keg I feel it would be a cleaner type of setup. I know dry hopped beers usually have more of a haze to them from the hop debris. So, possibly after dry hopping is achieved you could rig the filter with a cartridge to actually filter during the pumping. Not sure how long it would take to exchange all the "then dry hopped" beer through the filter to make it as clean and sediment/debris free as possible.

I just think it would work to maintain the closed part of the process and maintain a true dry hop with out using teas or other methods like hop bags that have to be removed. Sankes would be really hard to get swollen hop bags out of.
 
Please post what you come up with. Interested.

Derrin took a 2" Tri clover x 1/2" MPT fitting and welded in a thermowell. I put a T-port 3-way valve on it with a compression tube fitting on the top and a 1" tri clover on the side to attach my old spunding valve assembly to. Works great so far, got a Munich Dunkel fermenting now.
I chilled the Dunkel from boiling to 44F (cfc) and let it sit for 6 hours to let the cold break settle and compact. Then tried racking the cold break out from under the wort with the racking tube inserted all the way to the bottom. About 1 cup of cold break came out and then it ran clear. I'm sure there's much more left so I don't think that procedure was very successful. Maybe if I waited and racked again, more would come out but I wanted to get the yeast in there.


Thats some purdy stuff dstar.

1) So, your gauge and valve don't get gunky with this setup or do you wait until after high krauesen?

2) Care to share the McMaster part #s (guessing here, where ever) for stuff (important stuff like o-rings, compression fittings, not pipe fittings, etc.) so I can make one?

3) So, with the T-port valve, you are leaving it open the whole time? I'm not really getting why you didn't just do a pipe tee. Or maybe you pull out the dip tube until you are just past the valve, then shut the valve before then removing the dip tube? I'm not sure why this confuses me.

4) Channeling in the fermenter- Yeah.. even with my bottom dump, I can't harvest all the cake until the beer is racked. I waste too much beer into my harvesting vessel. I mean, I guess I could crash and do it 6 or 7 times over the course of a couple days, but just waiting till racking, swishing around, and then harvesting is much easier. When I did it once like I just described, the bits of trub that were in my 1/2 barb fittings settled back into it and clogged it anyways and prevented me harvesting, so I won't do it like that again. This is where having an actual conical might help (I call mine a dome-ical).
 
Thanks

This is the second time I've used the spunding set-up. It stays on the whole ferment, should I expect it to get gunky? It was fine after the first round.

I'll make a post with the part numbers

The racking tube is only inserted when it's time to rack. Otherwise, I'd need a closed valve on the end of the racking tube the whole time to keep beer/CO2 from gushing out. The 3-way valve will be positioned to only let CO2 out of the keg into the spunding valve during the ferment and I put a piece of sanitized foil over the compression fitting so nothing settles inside on top of the valve's ball. When it's time to transfer, I put a valve on the racking tube, compression nut and o-ring on the other end, insert it into the closed 3-way valve, tightened the compression fitting and open the (3-way) valve. The racking tube then gets purged with head space CO2, tubing attached to the receiving keg and then racking tube inserted into the beer to counter pressure transfer.

Yeah, the only way to get the cold break out would be to transfer the wort off of it into another keg. I'm planning on doing that next time to keep the break out of the yeast for harvesting purposes.
 
Thanks

This is the second time I've used the spunding set-up. It stays on the whole the ferment, should I expect it to get gunky? It was fine after the first round.

I'll make a post with the part numbers

The racking tube is only inserted when it's time to rack. Otherwise, I'd need a closed valve on the end of the racking tube the whole time to keep beer/CO2 from gushing out. The 3-way valve will be positioned to only let CO2 out of the keg into the spunding valve during the ferment and I put a piece of sanitized foil over the compression fitting so nothing settles inside on top of the valve's ball. When it's time to transfer, I put a valve on the racking tube, compression nut and o-ring on the other end, insert it into the closed 3-way valve, tightened the compression fitting and open the (3-way) valve. The racking tube then gets purged with head space CO2, tubing attached to the receiving keg and then racking tube inserted into the beer to counter pressure transfer.

Yeah, the only way to get the cold break out would be to transfer the wort off of it into another keg. I'm planning on doing that next time to keep the break out of the yeast for harvesting purposes.

Since I use a blow-off/cropping vessel, I push the limits of final volume in a 15.5 gal vessel. Last time I brewed, I put about 14.5 gals into the keg until the foam was about to come out. Then I put .5 gal in my starter vessel to wake up yeast, and then about 1/2 hr later (after the foam had subsided) I pushed the slurry into the primary w/ CO2 (at which point the vessel becomes the harvester.... ahhh circle of life....:p)

So, I'm doing about 14.75 gals in a 15.5 gal vessel. If I did it like you, I'm sure I'd have to tone it down. You're probably doing more like 12-13 gals max? My blow-off tube sees a lot of gunk. I get about a quart of beer after primary in the vessel (and some top crop yeast, but not enough yet to mention).

For racking, my routine is to counter-pressure fill 3 cornies at the same time which I described on page one thousand forty six of this thread.:D Harvest afterwards.

Thanks for the explanation. So, I'm guessing then after you insert the racking tube and opened the T-valve, you can loosen the compression fitting just enough so you can push the cane down to the bottom and not loose any pressure? Think I got it now.

You should shoot a video!
 
Thanks for the explanation. So, I'm guessing then after you insert the racking tube and opened the T-valve, you can loosen the compression fitting just enough so you can push the cane down to the bottom and not loose any pressure? Think I got it now.

You should shoot a video!

Yes, that's how it works. I have to make sure to have the oring wet with sanitizer so the tube can slide through it.
I ferment ~11.5 gallons since I also boil in a keg and do 90 minute boils (2.1 gallons boil off, .5 gallons left after transfer). Boiling 14.1 gallons in a keggle is as far as I want to push it!
 
2) Care to share the McMaster part #s (guessing here, where ever) for stuff (important stuff like o-rings, compression fittings, not pipe fittings, etc.) so I can make one?

The 3-way valve is from directmaterial.com via ebay. Their part number is VBS3T-050. Make sure to get the T-port, not the L-port.

This is Derrin's link for the 2" TC x 1/2" MPT + thermowell

The compression tube fitting on the 3-way valve is McMaster #8239K25

The o-ring I use in the compression fitting is McMaster #5233T52

Coming off the other port of the 3-way valve is:
-1/1.5" TC x 1/2" MPT
-1" silicone gasket
-1"/1.5" clamp
-1"/1.5" TC x 1/4" FPT (this is getting swapped out for a 1/4" MPT from st.pats to thread directly into the cross)
^These 4 parts were from brewers hardware

Then there's:
-1/4" NPT cross (McMaster #4464K312)
-1/4" NPT x 2.5" face, 0-60 psi gauge from directmaterial via ebay (PB254L-060) They also have an all SS one that I was unaware of before ordering (PS254L-060).
-1/4" NPT Male x Female 90º Elbow (McMaster #4464K36)
-1/4" NPT valve from directmaterial via ebay (VBSM2-025)
-1/4" NPT x 3/8" ID tube barbed adapter (McMaster #5670K85)
-1/4" NPT x 1/8" NPT Hex Nipple (McMaster #48805K86)
-Back Pressure Relief Valve (McMaster #99045K46)
 
Since I use a blow-off/cropping vessel, I push the limits of final volume in a 15.5 gal vessel. Last time I brewed, I put about 14.5 gals into the keg until the foam was about to come out. Then I put .5 gal in my starter vessel to wake up yeast, and then about 1/2 hr later (after the foam had subsided) I pushed the slurry into the primary w/ CO2 (at which point the vessel becomes the harvester.... ahhh circle of life....:p)

So, I'm doing about 14.75 gals in a 15.5 gal vessel. If I did it like you, I'm sure I'd have to tone it down. You're probably doing more like 12-13 gals max? My blow-off tube sees a lot of gunk. I get about a quart of beer after primary in the vessel (and some top crop yeast, but not enough yet to mention).

For racking, my routine is to counter-pressure fill 3 cornies at the same time which I described on page one thousand forty six of this thread.:D Harvest afterwards.

Thanks for the explanation. So, I'm guessing then after you insert the racking tube and opened the T-valve, you can loosen the compression fitting just enough so you can push the cane down to the bottom and not loose any pressure? Think I got it now.

You should shoot a video!

I've been doing 15 gal in a sankey with a blow off for 24-48 hours. I agree, I get a ton of krausen out of the tube even using fermcap S.

I would love to see a video as well if possible.
 
I keep hoping I get krausen in spades once I set up my cropper. I can only imagine how much I will get in viable and clean yeast this way. I figure I can collect and throw away the first part with the braun and then collect creamy stuff after that point. 15+ gallons should get me the volume needed to really push the stuff out at lower pressures I plan on using from now on out for the initial primary stage.
 
I was hoping to get more than I am so far. In about a quart of blow-off, I got maybe a fluid ounce (crashed) of pretty white top crop yeast. I'm going to play around with gas dip tube lengths so I can get right down to just above the beer level.
 
Does anyone see a problem fermenting in a 15 gallon sanke keg that has a few dents in the sides? To me, stainless is stainless and it shouldn't effect the fermentation but just make it harder to clean. But Thats why i am asking, i don't know if there is something that I am missing.
 
This keg I picked up for $20 bucks has some rather large dents. Maybe a 4" dia dent pushed in 1"

Friday i am taking a drive to purchase 3, almost new kegs for $170. Is that a good deal?
 
Depends what you mean by almost new. I'd have to look at them to see how new they were, but I payed $30 for a keg with very minor dents and scratches and works just as well as a pristine polished keg.
 
I chose the finest bottom skirt and dome for my fermentor. It has a huge dent in the side. Since then, I don't care so much anymore. They all work for me, and I keep it swapped up unless using the cake again. The more you use them the yuckier they get ;).
 
I chose the finest bottom skirt and dome for my fermentor. It has a huge dent in the side. Since then, I don't care so much anymore. They all work for me, and I keep it swapped up unless using the cake again. The more you use them the yuckier they get ;).

I'm not following you, was your comment directed to someone else?
 
It was in response to you. You ask if a dented keg was a problem so I answered. I use all my kegs as fermentors, and they all work great.
 
Back
Top