Closed-system pressurized fermentation technique!

Homebrew Talk - Beer, Wine, Mead, & Cider Brewing Discussion Forum

Help Support Homebrew Talk - Beer, Wine, Mead, & Cider Brewing Discussion Forum:

This site may earn a commission from merchant affiliate links, including eBay, Amazon, and others.

What do you guys think about pressure fermentations? Time for a poll.

  • I've done it and I liked it just fine!

  • I've done it, nothing wrong with it, but prefer normal fermentation techniques.

  • I've done it, hate it, and never will do it again!

  • I've never done it, but it is on my list!

  • I've never done anything. I only brew beer in my mind.


Results are only viewable after voting.
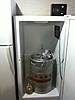
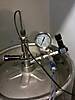
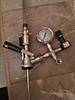
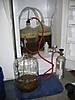
Sorry I should have clarified. I primaried in a bucket, then secondaried in a better bottle, then transfered to a corny keg w/ spunding valve. All fermentation had stopped and the gravity remained the same for several days. I am naturally carbing in my keg, as a result i assume there would be relatively little CO2 in solution, so the CO2 used to seal the keg would have began to equalize therefore slightly reducing the internal PSI.

Since my post the pressure has risen slightly over time, I under stand it will take a while to naturally carb. According to my calculations 22.9 PSI is the desired and right now it is at 21 PSI. I have the spunding valve completely closed to build up the initial pressure. Once it hits ~25 PSI I plan on backing it down to 22.9 PSI for the remaining duration of the conditioning.

Cool, so you added priming sugar to the keg and set it with some CO2 pressure. Sounds like a groovy plan! I would definitely recommend going over pressure and then setting to the lower. It will work very well for you as long as your temperature is kept constant. Also, I recommend your setting a little higher than final wanted volumes. After you are done carbonating with the sugar it is easy to set it lower and vent off the excess volumes. I'm talk a psi or two higher than "finishing" pressure. The head space will pull out the suspended extra CO2 over a day or two tops and get you a perfect product. Works faster at a higher temperature too.
 
Well, checked the fermentor pressure gauge this morning 3/13/11 at 11:30 and it was on 6 psi. Checked it just a minute ago 3:45 and it is at 14 psi. Building very quickly and smelled good when I vented it just a tad bit. I am happy so far with the way things are going. I will keep you guys updated on when and what I do.:mug:
 
Wow, 7:45pm at night now and already topping 27 psi. I'm almost ready to start venting excess pressure and get the SV set just perfect for 68-70*F and around 2.5 volumes of carbonation at the end.
 
Well, this morning everything had settled down and I couldn't hear anything. The valve wasn't set properly and so it slipped down to 24 psi again over the night. I cranked it down a bit after taking it off and cleaning it out. Then I cleaned it out and re-tapped. Last night it was "The Big Show" right before bed. Not a lot of liquid coming out but tons of bubbles. This morning at 8:30 was remarkably different.

4:45 today, slight over-pressure of 34 psi. I guess I cranked too hard on the SV??? Oh well, I slowly opened it back up two different times to dial it in better. Now, I am back on 30 psi and at 67*F on top of the keg. Last night must have been high krausen and the most active part of the fermentation. The gas out of the keg smells spectacular when it vents. I cannot wait to hop tea this ***** for my dry hop additions and smell it afterwords. I guess we will all wait and see how it turns out.
 
Hey guys! Beer is holding perfect. Just wanted to do a poll for all of you keeping up with the technique. Please go vote and be honest for others to gauge if this might be worth it or not for them. Thanks guys for a lot of fun since November of '07. I can't believe it has been that long and I'm still doing this. ;)
 
Hey folks.

Just thought I'd share an email exchange with Chris White from White Labs.

{Hello Chris-

I have yet been unable to find any science on my question, just anecdotes from other brewers (homebrewers). I do 1/2 bbl batches and also do pressurized fermentations with a spunding valve. My vessels are rated much higher than bigger brewery equipment and so I do batches where I achieve full carbonation (so like 30+ PSI at 68*) naturally with no problem.

I am trying to find out the recommended rate at which to depressurize my primary (and ganged yeast harvester) gently, using my spunding valve- with the purpose of not loosing viability more than like 10% by breaking cell walls or causing mutations, but otherwise as fast as possible for convenience sake. So, like bleed off 2 PSI every 5 mins or something....}

to which his reply was:

{I think that bleed off rate is okay. Once yeast get over 15psi, you will get some damage, and very much near 30psi. So it is best if you can keep if from going over 15psi. But if it gets higher that bleed off rate would be good. Thanks,

Chris}

Interesting. I primary ferment at ~15PSI, so it seems like I should rack when I'm near the end of fermentation and then let it finalize up to 30 if I'm looking to harvest some yeast.

I guess that I probably wouldn't recommend harvesting bottle conditioned yeast either.

I was thinking about yeast harvesting, but maybe I won't change my current procedure. Right now, I just use some exta wort and create a second batch of yeast while I'm making my starter.
 
Proof is in the pudding! I am sure I get dead cells with my technique, however I haven't had a batch taste bad from the yeast. The fact that yeast is in a bottle conditioned beer that can get above 30 psi due to shipping/etc and not taste that way either makes me not worry at all. To each his own, but I like the fact the beer is on top of that much yeast for faster clean-up. I would hate it if I needed to move to another keg prior to final transfer. Remember, I served out of my primary for the first ferment on the yeast I am using 3 beers later... and no problems so far.
 
Well, today after work I decided to un-tap and shake the fermentor to rouse the yeast. I did this because the gauge was just sitting at 30 psi and I was curious. After shaking, I let it sit for 10 minutes before upping the pressure on the SV and re-tapping. Once tapped, the gauge only shot up to 32 psi. I let it be to see if the gas would get reabsorbed or if it would start making again. Checked and it was up to 34 psi 20 minutes later, so I adjusted the SV back to 30 psi release. It has been there ever since and I can still hear a slight hiss now. This is why I want to try the stir-bar experiment so bad.
 
I have a general question about this technique: what happens if you brew with a yeast that throws off a lot of sulfur (some lager strains), or other unpleasant odors (some belgian strains)? Won't a lot of those gasses/smells remain in solution along w/ the CO2?
 
I have a general question about this technique: what happens if you brew with a yeast that throws off a lot of sulfur (some lager strains), or other unpleasant odors (some belgian strains)?

Correct, not all yeast work well under pressurized fermentation. Pressurized fermentation is a tool in your brewing toolbox, not a one-size-fits-all. :)
 
I have a general question about this technique: what happens if you brew with a yeast that throws off a lot of sulfur (some lager strains), or other unpleasant odors (some belgian strains)? Won't a lot of those gasses/smells remain in solution along w/ the CO2?

LamarGuy nailed it. I do most of my brews pressurized now, but I just finished up 2 Belgians, that were fermented in BetterBottless, for that very reason. I wanted the esters. I'd imagine a Hefe would be the same too.
 
Yep, I concur with these last two responses. Clean lagers though have been successfully brewed with this technique. I don't believe that the sulphur doesn't get carried off in the venting gases. Unless it is heavier than CO2 it is going to get pushed out the same as O2. As a matter of fact, lagers are where this technique originated for the ability to use a higher fermentation temperature and still suppress ester and fusel production.

That being said, I fully believe this is not for every beer. Think about the fact that some beers pretty much have to be fermented in open fermentors for that "authentic taste." Some beers have to be boiled with hot rocks for "that taste." (You see where I am going with this. You aren't going to go out and make a open fermentor for one beer you produce, and you are not going to build a rock heater for just one either... unless you really like those beers;))

The easy thing is, you can try this technique with a small amount of beer and test if you like it or not. Enough CO2 is produced to ferment a small amount of beer in a 5 gallon keg to test if that beer works or not. The tools involved can come in handy for other things/ways if you later decide it is not for you. If it just isn't your cup-o-tea, then go ahead and ferment as normal. Then, use the tools to carbonate your beer after flavor by yeast isn't an issue, such as the final gravity points. Use the spunding valve when you are counter pressure transferring your beer from keg to keg.

The biggest value to me is you aren't wasting your money build a spunding valve, because it will get used. You aren't wasting money on kegs, because you need them to serve your beer out of anyway (another reason not to cut dip-tubes IMHO, lol). It is just another tool in your brewers toolbox like lamarguy said.:mug:
 
Roused the yeast this morning before I headed out of town thinking the beer is probably done. It hasn't shown any activity for the last couple of day, but it is hard to tell with this technique without taking readings. Came home 12 hours later and I am showing signs of further activity. This has happened on the last couple of brews, so no biggie. I am taking gravity samples tomorrow after work for the complete picture. I am having no problems with the beers turning out wonderful, just taking longer than they used to with lower pressures (like 15 psi fermentation and then carbonating at the tail end).

Reading the yeast book has made me want to build and try top cropping. I am for sure building the yeast collector, and when I go back to lower pressure initial primary fermentation I will have the yeast mess I used to have (only this time being collected for peak pitching conditions on the next beer). I have enjoyed these experiments, but it is time to achieve the perfect practice with this technique based on what I have found out. I can't wait for my next beer and hopefully prove that I have ales perfected. Then I get to move into lager experimentation.:ban:
 
OK, so my first attempt with a spunding valve didn't go exactly how i planed :( . Everything was going great until i opened the valve. The pressure valve was i little less precise than i though and i forgot to check on it frequently. I set it at the desired PSI and did not hear any more hissing coming out so I assumed it was good to go. When i checked it the next day it had dropped from 24 to 12. I closed the valve to prevent any more spunding until the PSI returned to 24 but it never did. After several days at leveled out at 16 PSI. I believe that the priming fermentation is over.

So I have two questions:
1) Is there anyway to check if the fermentation is over in the keg since it is partially carbed?
2) Assuming that the fermentation is over can I hook up the CO2 at 24 PSI at room temp and finish carbing that way (I don't yet have room in my keezer)?

Yep, I have been there before. I always recommend setting it just higher throughout the process to account for the valves not being perfect and temperature swings. I would un-tap the keg and rouse the yeast. I bet you can get a little more attenuation and more carbonation in the process. Of course, I don't know what your gravity is or how long you have been fermenting so take the advice for what it is worth.

As for your questions:
1) Yes, the same way you would if you were fermenting the normal way... you just have to wait to degas the sample, or use a refractometer.
2) Yes, this beer is no different from any other and you can carbonate that way if you choose... but why? If/when I mess up on my P-ferment, I take my medicine and play it as it lies (golf analogy). Treat the beer as you would if it were done at that point and cold crash and/or transfer. Then carb like you would a forced carbed beer. It will take less time and less CO2 pressure to do so.

That being said... try the un-tap and rouse if you have a few days after that to cold crash and get ready for transfer. See if your pressure doesn't start coming up. Or, take a gravity reading and see if you are at terminal gravity where the rouse has nothing to work on. just my $.02.:rockin:

Thanks for the advise, i will try to rouse the yeast and see if helps. If it doesn't then i will just force carb. In the all I plan on trying again as soon as i have an empty keg :mug:
 
Really shake it up and get the yeast suspended and I bet you'll see the pressure come up. I would wait 10-20 minutes to re-tap your spunding valve, and be sure and set it higher than wanted pressure. Nothing like tapping the keg and losing all your pressure in an instance. If you see you pressured up, wait... it may come back down if that was just head pressure increasing from the shaking and not further fermentation.
 
so the pressure is remaining constant. It has been in the keg for two weeks, should i leave it for another week until I put it in the keezer, or can I put it in now? (I cleared some room in my keezer)
 
Did it up-pressure after rousing, or was that to no avail? I am wondering about your carbonation.

Two weeks should be plenty of time to be cleaned up and ready for crashing, but you never really know until you sample it. Time is your friend, so it is your call. If it were me, I would let it sit another week. It is completely up to you, but I would definitely taste it first.

It tasted good and there was carbonation. When I tasted it though it was warm and my hoses are only 6ft. so when it hit the glass it foamed big. I decided to put it in the keezer earlier so it is chilling down now.

I assume since when it was warm the PSI was higher then the final cold PSI needed for equilibrium I am going to let it cool over night purge the head space then attach the CO2.
 
Glad it was carbonated, but... once it it chilled to the temperature you are transferring it at post crashing you need to check the carbonation via pressure at the temperature it is at. Use BeerSmith or similar program to determine what pressure you need to be at "at" that temperature. Pressure will drop with temperature drop. You might still need to carbonate to get you to volumes wanted. This is why I would rather be high than low. Then, I will release excess at a higher temperature so it off-gasses quicker. Foam was all I ever got when sampling and then I had to let it settle down before tasting/testing gravity.
 
Glad it was carbonated, but... once it it chilled to the temperature you are transferring it at post crashing you need to check the carbonation via pressure at the temperature it is at. Use BeerSmith or similar program to determine what pressure you need to be at "at" that temperature. Pressure will drop with temperature drop. You might still need to carbonate to get you to volumes wanted. This is why I would rather be high than low. Then, I will release excess at a higher temperature so it off-gasses quicker. Foam was all I ever got when sampling and then I had to let it settle down before tasting/testing gravity.

Thanks for all the help.
 
Finally got a sanke fermenter pieced together and put a Black IPA in there last night. This batch won't get pressure fermented since it gets dryhopped but it'll be a good practice run with racking and everything. I included a thermowell in the design that can be removed and replaced with an adjustable height racking cane without any pressure release.


I am curious of your design. You say you can replace the thermowell with a racking cane without pressure loss. Are you using the spear assembly that seals the keg? If so, how are you getting around the ball?

I like the way you attached your blow-off tube. Oh, and just because you are going to dry hop doesn't mean you can't have carbonated beer before you do. You can use your blow-off until you are a couple of points shy of finishing, and then let it carbonate with the remaining points. You would want to over pressure a little to account for the head pressure loss when you open the keg to dry hop. Then you should be able to seal everything back up and let your beer vent off the excess CO2 in its carbonation.

You may even have enough over-pressure to vent all the O2 that was added during the dry hopping by pulling the tap connector relief valve. I haven't done this, but I do over-pressure mine a bit to make sure I have at least enough carbonation. It is very easy to vent off the excess at the higher temperatures before you go to the crash cooling stage. I set my wanted carbonation "hot" and it is always perfect after the crash and transferring stages.
 
I am curious of your design. You say you can replace the thermowell with a racking cane without pressure loss. Are you using the spear assembly that seals the keg? If so, how are you getting around the ball?

I removed the ball and spring and reinstalled the rubber grommet thing to support the bottom of the coupler probe. Then cut the stem off just below the indents that hold the spring (just incase I want to reinstall the ball and spring for some reason). The original beer outlet of the keg coupler probe has the micromatic shut-off valve that coincidentally has a through bore just larger than 3/8" stainless tubing when open. The compression fitting at the top has an o-ring that seals the thermowell/racking tubing. I tested it at 30 psi, shut the blow-off valve and cranked the regulator up, removed the thermowell just past the valve and shut the valve. Then inserted the racking tube and opened the valve back up. No pressure loss.

This shows the beer outlet shut-off valve better:
 
Glad it was carbonated, but... once it it chilled to the temperature you are transferring it at post crashing you need to check the carbonation via pressure at the temperature it is at. Use BeerSmith or similar program to determine what pressure you need to be at "at" that temperature. Pressure will drop with temperature drop. You might still need to carbonate to get you to volumes wanted. This is why I would rather be high than low. Then, I will release excess at a higher temperature so it off-gasses quicker. Foam was all I ever got when sampling and then I had to let it settle down before tasting/testing gravity.

The charts that are available online are handy to keep lying around or bookmarked.

http://hbd.org/ford/brewinfo/kegcarb.html

http://www.kegerators.com/carbonation-table.php

http://sdcollins.home.mindspring.com/ForceCarbonation.html

etc
 
I'm trying dry hopping with my latest pressure ferment.

Once I got to FG I sanitized a second keg, dropped in my dry hops, transferred the beer with CO2 on top of the hops, purged the O2 during the transfer and took the sankey coupler off. We'll see how it turns out.
 
Once there's no risk of krausen, couldn't you sanitize the second keg, then hook the spunding valve to the diptube and let it purge, then let it pressurize for a day or two before the transfer. I would think that would save you a lot of CO2.
 
I'm trying dry hopping with my latest pressure ferment.

Once I got to FG I sanitized a second keg, dropped in my dry hops, transferred the beer with CO2 on top of the hops, purged the O2 during the transfer and took the sankey coupler off. We'll see how it turns out.

That's what I plan on doing except the dry hop keg gets purged with CO2 and left with 2 psi (or something close to the fermenter pressure) before the transfer. Then counter pressure transfer from the fermenter. I've done that with carboys but the risk of glass blowing up in my face made me switch to kegs. That and the pressure ferment option.

In the first pic, the carboy with hops and valves is under 2 psi of CO2. The fermenter carboy gets just enough pressure to move the beer and pressure is released from the dryhop carboy as the beer is transferred. Second pic just shows counter pressure filling a sixtel.

 
I'm trying dry hopping with my latest pressure ferment.

Once I got to FG I sanitized a second keg, dropped in my dry hops, transferred the beer with CO2 on top of the hops, purged the O2 during the transfer and took the sankey coupler off. We'll see how it turns out.
Are you planning on another transfer, or do you want to serve off the hops in that keg?
Once there's no risk of krausen, couldn't you sanitize the second keg, then hook the spunding valve to the diptube and let it purge, then let it pressurize for a day or two before the transfer. I would think that would save you a lot of CO2.
Yep, and I have been wanting to try that myself. Actually, I wanted to try it as soon as I got my yeast top cropper thingy made and just start purging from the get-go. If it was a dry hopped beer, I could just dry hop (or hop tea) that keg from the beginning. It would save quite a bit of CO2.
That's what I plan on doing except the dry hop keg gets purged with CO2 and left with 2 psi (or something close to the fermenter pressure) before the transfer. Then counter pressure transfer from the fermenter. I've done that with carboys but the risk of glass blowing up in my face made me switch to kegs. That and the pressure ferment option.

In the first pic, the carboy with hops and valves is under 2 psi of CO2. The fermenter carboy gets just enough pressure to move the beer and pressure is released from the dryhop carboy as the beer is transferred. Second pic just shows counter pressure filling a sixtel.

2 psi... my beer is at 12 psi (or around that depending) after crash cooling and before my counter-pressure transfer and filtering. Ya gotta love having filtered "and" fully carbonated beer going into your serving keg.
 
Ahhh, ok. I was wondering if serving on hops would be what someone would want to do? I think I am in the same boat as far as crash/filter/transfer.
 
Ok guys, the time has come to roll the old keg out to the garage kegerator and chill it down. Yay! I was supposed to do this yesterday, but got busy mowing and cleaning up dog poo in severe wind so I said F'it after my shower. After listening to Gerard Lemmens on Basic Brewing Radio, I decided to try something I have never done on my homebrewed beers... EVER! Dry hop... yep, never done it at home. After listening to the podcast, I was willing to try it his way on my system and technique. This was the reason I had never attempted it before. The fact that I would have to transfer to yet another keg after hopping was not a good enough excuse for me in the past. Adding tea... I can do!

So, today I am leaving my hops out at room temperature like Gerard mentions, but I am not adding the hop solids tomorrow when I transfer. I am going for 4 oz of hops for the tea (2oz Columbus and 2oz of Summit) and winging it for the amount of water I will add. I am using my larger french press so the hops can expand fully before being pressed for their precious oils. I really hope this works well and gives my APA that hop nose I am looking for. Guess we will see, as with everything in this monster of a thread.:mug:
 
Whole or pellet? I had good luck making a hop tea out of pellet hops, but I imagine whole hops would work better.
 
I'm going with pellets like in Mr. Lemmens' podcast. Did your tea pack the aroma punch it should have for your beer? How much did you use in how much beer, and how did you go about making your tea?
 
Back
Top