Spike - Steam Condenser Lid

Homebrew Talk - Beer, Wine, Mead, & Cider Brewing Discussion Forum

Help Support Homebrew Talk - Beer, Wine, Mead, & Cider Brewing Discussion Forum:

This site may earn a commission from merchant affiliate links, including eBay, Amazon, and others.
Agreed. I missed that on the diagram. Probably would want to extend it down a little too since the McMaster Carr nozzles have a 90 degree fan. Don't want it spraying into the tube coming across the lid. Probably just need a short pipe nipple, coupler or reducer, and the nozzle if that part is NPT thread. Probably can get all of that for $20-25 shipped at McMaster Carr.
 
Agreed. I missed that on the diagram. Probably would want to extend it down a little too since the McMaster Carr nozzles have a 90 degree fan. Don't want it spraying into the tube coming across the lid. Probably just need a short pipe nipple, coupler or reducer, and the nozzle if that part is NPT thread. Probably can get all of that for $20-25 shipped at McMaster Carr.
Nice! Seems like a workable solution. I'd love to hear what @SpikeBrewing thinks about this. Maybe they could offer a package that omits the pump and substitutes in a higher pressure nozzle? We would be extremely grateful!
 
We fully understand that HBT is full of DIY homebrewers. We designed a system that out of the box is 100% guaranteed to work correctly and have the testing to verify that. We tested lower flow nozzles and we were not getting the vacuum readings that we wanted and had steam escaping out from the lid. The lid can certainly be DIY'd to connect directly to your water supply and another nozzle can be purchased however obviously there's no way for us to spec this out as everyone's water supply pressure is different. Personally I would always be a little nervous about DMS levels and I'm assuming most brewers aren't going to spend the $1,000's of dollars to have a lab test their beer for DMS levels. However if it tastes good enough for you that's all that matters!
 
We fully understand that HBT is full of DIY homebrewers. We designed a system that out of the box is 100% guaranteed to work correctly and have the testing to verify that. We tested lower flow nozzles and we were not getting the vacuum readings that we wanted and had steam escaping out from the lid. The lid can certainly be DIY'd to connect directly to your water supply and another nozzle can be purchased however obviously there's no way for us to spec this out as everyone's water supply pressure is different. Personally I would always be a little nervous about DMS levels and I'm assuming most brewers aren't going to spend the $1,000's of dollars to have a lab test their beer for DMS levels. However if it tastes good enough for you that's all that matters!
Thanks for the detailed and thoughtful response. Of course, this totally makes sense. You have to make a product that you know will work for the majority of your customers regardless of factors outside of your control, such as source water pressure, and you certainly can't conduct laboratory testing on myriad configuration possibilities. That said, your assurance that the system can be DIY'd to allow for a home water source is very encouraging. Might you be willing to sell a package at a reduced price that omits the pump, for those of us who want to tinker?

Thanks again!

Unfortunately since the BOM has 11 different components which comes out to 39,916,800 different combinations if my math is correct. I think our shipping department would quit if we opened up the kit for piecemealing like that.
 
I'm not sure anyone is asking you to part out all 11 pieces. I think we're just asking for two options: 1) with pump and mister or 2) without pump and mister. I fully understand if it's not worth the energy to separate those out as a business decision. I will be purchasing one regardless.

Edit: I think the number of possible combinations for people to purchase if you parted out all 11 pieces, and no one bought any duplicates of the 11 items, would be 2^11 = 2,048 (this includes the combination of buying nothing as well). I suspect your number may include all permutations, where buying a pump and a mister is a unique combination compared to buying a mister and a pump (order matters), and also include buying 11 of one piece, 10 of one piece, etc.
 
Last edited:
Edit: I think the number of possible combinations for people to purchase if you parted out all 11 pieces, and no one bought any duplicates of the 11 items, would be 2^11 = 2,048 (this includes the combination of buying nothing as well). I suspect your number may include all permutations, where buying a pump and a mister is a unique combination compared to buying a mister and a pump (order matters), and also include buying 11 of one piece, 10 of one piece, etc.

It's been 40+ years since I had Stats, but wouldn't it be something like 11*10*9*8*7*6*5*4*3*2*1? Which would be 39,916,800.
 
Yeah that's 11 factorial. But I don't believe that's the answer in this case. Think about it this way - if there were 4 items: A, B, C, D. The number of combinations people could purchase, getting no more than one of each item would be: (NONE), A, B, C, D, AB, AC, AD, BC, BD, CD, ABC, ABD, ACD, BCD, ABCD = 16 ways. That is 2^4 = 16. If the formula was 4 factorial the answer would be 4*3*2*1 = 24 ways.

Edit: Here's a link: Combination - Wikipedia
 
Can I get it with the rubber grip on only the right handle? :D

That pump appears to be the one from their cooling kit. Its $40 when purchased individually and I'd hope they are marking it up a good bit from their cost when purchased that so it probably doesn't make much difference.
 
I can fully appreciate why a single tried and tested solution is desirable from a vendor perspective. Having sold the slayer for about 2 years, there is always that variable of source water pressure and temperature to deal with. However, flow rate is only one variable. The water temp is a big factor but it looks like erring on the high side of flow rate negates it. I think many people want to try to optimize for both condensing performance and water usage but they would have to be willing to work on it and perhaps buy a few sprayers to make it work.
 
When we approached the problem we looked at it two ways (like Bobby mentioned). Do we try to optimize the water usage down to the pint or make sure that absolutely no DMS will be present WITH a factor of saftey since users use products differently than the engineers that designed them ;)

We decided that if we used 5 extra gallons it would have little to no affect on anything. The extra water will be hot and can be used to clean. If you don't need that water to clean you can use it for plants, water the grass, etc. While on paper 10 gallons of usage is less than 15 gallons and therefore better does it really actually make a difference? We decided that it did not.
 
Has anyone who purchased during the presale received their lid yet? If so, please help us out with some unboxing and testing info!
 
The primary details I would like confirmed are if the OEM nozzle is removable as depicted in the product guide and if so, what connection to the TC cap does it use, e.g. 1/8” NPT, 1/4” NPT, etc. This way if I purchase one and find I’m not satisfied with the pump configuration, I can easily modify to suite my own setup preferences without replacing the entire TC cap/nozzle assembly.

As an aside, it’s too bad the 4” cap doesn’t use some form of pivot attachment to easily rotate open/closed during the boil. Not sure I want to be messing with a clamp, gasket and cap over escaping steam.
 
As an aside, it’s too bad the 4” cap doesn’t use some form of pivot attachment to easily rotate open/closed during the boil. Not sure I want to be messing with a clamp, gasket and cap over escaping steam.

We have had this suggestion a couple times however this would significantly increase the price of the unit. Rest assured when the 4" cap is off the steam still goes up the pipe. A 'Pro Tip' is to leave the clamp off and just place the cap/gasket on the ferrule. It will still make a seal and will make it easier to take off if you have multiple hop additions.
 
Interested in this as I brew in a basement with no vent hood. also new to this idea outside of distilling applications... So, two concerns...

1) What about pellet hops? I have a 15 gal SB kettle and I typically have a lot of head space as my batches are 5 gal. Would one put a large muslin bag around the port for pellet hops then?

2) Boil off rate. I like high boil off rates typically because it allows me to keep an on my OG and dial that in by how hard I boil. I assume I was just have to adjust my mashes and change my brewing technique a little

A lot of people just go commando with the hops in the kettle. For the most part, this is what I do. I tend to use a hop spider with heavier hop loads though. I'm still not sure what my solution for that will be. I've seen some pictures of people just standing their hop spiders up on the bottom of the kettle and just letting it sit there. I might try this and just position the spider to be under the port on the lid. (When I have an extra $300 to spend, I actually have been thinking about buying the basket from Spike's Solo system to use as a giant hop spider so that I don't take a hit on hop utilization...).

The boil off rate shouldn't be a huge deal. You'll just have to adjust your recipes for it. Typically I boil off a gallon and a half and I account for that in my recipes. With this, you'll just have to account for the smaller boil off. I think I'll actually like the lower boil off rates because I can keep more volume in the kettle!
 
Lid showed up! Will assemble later this week. Don't have a brew coming up for a couple of weeks yet, unfortunately. As is typical @SpikeBrewing fashion, everything came packaged very nicely!

Cond Lid 2.JPG

Cond Lid 1.JPG
 
I got mine this week and had time to brew yesterday with it. There is a learning curve at getting the output percentage right on the element so that you don’t get a boil over. I waited for hot break to put it on but still had it coming out of the 4 inch port. (16 gal of wort in 20 gallon pot) I ended up with the element at 45% and that seemed to hold the temp right at boiling. (Normally I run it somewhere between 75-80% once it is boiling. I had about 1 gallon loss over an hour which was considerably less than with the lid off, and some of that was boil over too.

Water use was probably more than what was stated but hard to say as again this was my first time and might have boiled for more than an hour. I have an outbuilding that I brew in now and the amount of steam in the room was no existent which is a huge improvement from normal. We are about to start building a new home for the brewery and other things and this solves not having to do a vent hood for sure.

Things I learned: You need to be wearing some heat proof gloves for sure. Adding hops wasn’t too bad but messing with the boil over and the hot water it made things easier. I have
 
Inquiring minds want to know...what does the nozzle fitting look like?
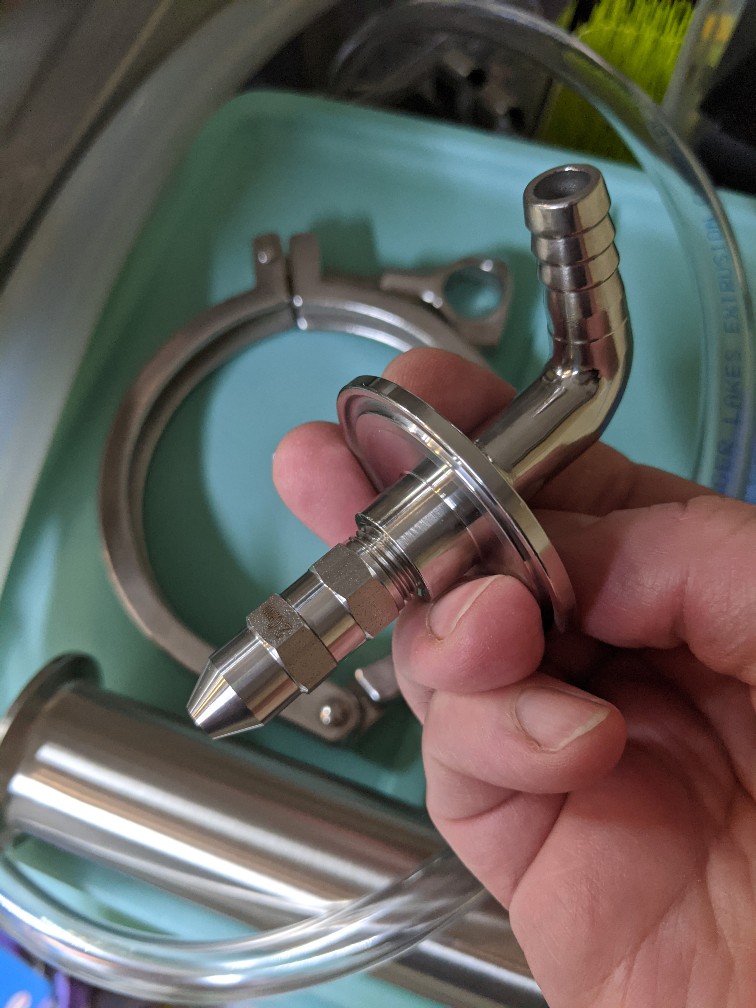
I just got mine in the mail, and haven't had a chance to test it yet, but I wanted to share some pictures here that might be helpful.

Here is the nozzle. It appears to be stainless steel and has a 1/4" MPT thread which screws into the water inlet tri-clamp fitting.

PXL_20200911_212901161.MP_copy_756x1008.jpg

PXL_20200911_212848161.MP_copy_756x1008.jpg

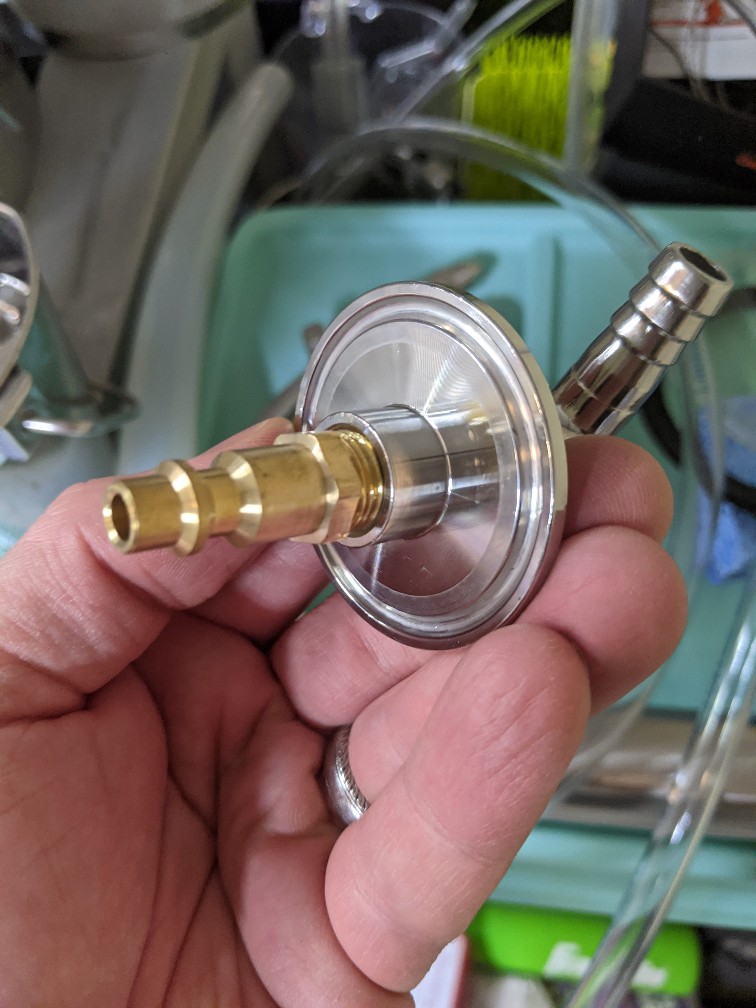
To confirm the size and compatibility with other 1/4" NPT fittings, I screwed in a compressed air quick connector.
PXL_20200911_213823071.MP_copy_756x1008.jpg


This being the case, it should be easy to swap in one of the spray nozzles that have been widely used in other steam condenser systems. That said, before I go that route, I'm going to try hooking this nozzle up to my house water and seeing how it goes. Maybe try an inline water pressure regulator to keep it close to what the pump puts out.
 
I was excited about this until I saw the 15-25 GPH figure too. As far as I can tell, the steam slayer doesn't require a pump and uses less water - am I wrong?
I have the steam slayer, 27 gal pots, 9 gph nozzle, 70-80 psi city water pressure, and boil for 90 min. I produce 13 to 15 gal of waste water and it is hot.
 
I just got mine in the mail, and haven't had a chance to test it yet, but I wanted to share some pictures here that might be helpful.

Here is the nozzle. It appears to be stainless steel and has a 1/4" MPT thread which screws into the water inlet tri-clamp fitting.

View attachment 698050
View attachment 698051
To confirm the size and compatibility with other 1/4" NPT fittings, I screwed in a compressed air quick connector.
View attachment 698052

This being the case, it should be easy to swap in one of the spray nozzles that have been widely used in other steam condenser systems. That said, before I go that route, I'm going to try hooking this nozzle up to my house water and seeing how it goes. Maybe try an inline water pressure regulator to keep it close to what the pump puts out.
Very interested in how it worked with your house water supply. Any updates?
 
Very interested in how it worked with your house water supply. Any updates?
My house water pressure is like 45-50 PSI, while the Spike pump puts out 6 PSI, so running the condenser sprayer right off the tap gave a dramatically stronger stream. I bought an inline water pressure regulator (typically used for RVs), and am able to crank it all the way down to 0 PSI if I want to. I haven't had a chance to try it with an actual brew yet, but I can confirm that with the pressure set to 6(ish) PSI, the spray coming out of the nozzle looks much more like the one with the pump now, so I see no reason why it wouldn't work.

There are a million of these RV water pressure regulators available on Amazon, all around $30 and looking almost identical. I wouldn't be surprised if they're all coming out of the same factory, with a different name and maybe some bells and whistles slapped onto them. That said, the one I got is https://www.amazon.com/gp/product/B088KQRQWT, and it seemed to be the only one with a large thumbscrew at the top for adjusting the PSI, which is nice because you don't have to get out a screwdriver. It also came with a carrying case, although I intend on mounting mine to the wall anyway.

Good luck!
 
My quick review... 20 Gal version used on SSBrewTech BME kettle, InfuSsion MT, and their standard kettle for HLT.
1) Pay no attention to the "Fits Most Brands" with pics of Blichmann and SSBrewTech. PAY ATTENTION to the diameter chart. The chart is spot on. I hoped for some play in the dimensions, but no. The lid fits VERY snug in my HLT kettle and MT. It does NOT fit the BME boil kettle.
2) The lid adds another function... the Spike Brewing CIP ball can be set into the condenser lid to clean your kettles. Most kettle lids have no TC ports, so this was a bonus. I also set the lid onto the MT and used the CIP to preheat the MT without having to volume fill it. Much quicker and much more efficient.
3) The clear port is useless. Minutes into heating the wort (not even at boil yet) that clear cover fogs over and you can't see anything inside of the kettle. The previous mention of a TC cover with handle would be much more useful.
4) Be sure to adjust your recipes for a MUCH lower boil off. I ended up with a higher post-boil volume than predicted and thus a lower OG. Future brews, I will calculate for the lower boil off rate, and/or plan to boil for a given time before adding bittering hops.
5) BEWARE!! I learned the hard way that opening the large port or moving the lid aside is a serious scalding hazard. There's a LOT of steam under the lid and I used several curse words each time I accessed the pot.

Despite the fact that it doesn't really fit my boil kettle, it was still functional. Small amount of steam escaped from the gap where the lid didn't seat. I'm more disappointed that I couldn't use it to CIP the boil kettle (not much steam escaped but the CIP spray went right out the gap lol). It did CIP the MT very nicely though.
 
I just tested the fit of the 10 gallon lid on an SS Brewtech 10 gallon eKettle and an older Blichmann 10 gallon Boilermaker kettle (G1). The lid does not fit either one. It's just a tad too large, probably 2-3mm. As these are stainless steel, there isn't any play to force the lid to fit. I will have to return it to Spike.

@SpikeBrewing Is there any possibility of updating this product to make the lid just a tad smaller so it really will fit popular kettles like SS Brewtech and Blichmann? It's so close, I think it would still fit Spike kettles if you just shrunk it down a tad.
 
3) The clear port is useless. Minutes into heating the wort (not even at boil yet) that clear cover fogs over and you can't see anything inside of the kettle. The previous mention of a TC cover with handle would be much more useful.

Pro Tip: Use a flash light or your phone up against the clear cap and you'll be able to see in pretty well even with condensation.

I just tested the fit of the 10 gallon lid on an SS Brewtech 10 gallon eKettle and an older Blichmann 10 gallon Boilermaker kettle (G1). The lid does not fit either one. It's just a tad too large, probably 2-3mm. As these are stainless steel, there isn't any play to force the lid to fit. I will have to return it to Spike.

@SpikeBrewing Is there any possibility of updating this product to make the lid just a tad smaller so it really will fit popular kettles like SS Brewtech and Blichmann? It's so close, I think it would still fit Spike kettles if you just shrunk it down a tad.

It may be a problem with the older style Blichmann and SS kettles as we have purchased Blichmann and SS kettles to test the fit during development and they all fit correctly. Unfortunately tooling costs for something like this is extremely high so we don't have plans to change, sorry!
 
I just tested the fit of the 10 gallon lid on an SS Brewtech 10 gallon eKettle and an older Blichmann 10 gallon Boilermaker kettle (G1). The lid does not fit either one. It's just a tad too large, probably 2-3mm. As these are stainless steel, there isn't any play to force the lid to fit. I will have to return it to Spike.

@SpikeBrewing Is there any possibility of updating this product to make the lid just a tad smaller so it really will fit popular kettles like SS Brewtech and Blichmann? It's so close, I think it would still fit Spike kettles if you just shrunk it down a tad.
I just received my lid a few days ago and saw it was a little too big as well. I ran a test this morning and it seals well on a G1 10 gallon Blichmann, although it doesn't rest on the flanges perfectly.
 
It may be a problem with the older style Blichmann and SS kettles as we have purchased Blichmann and SS kettles to test the fit during development and they all fit correctly. Unfortunately tooling costs for something like this is extremely high so we don't have plans to change, sorry!

Thanks. FYI - the SS Brewtech eKettle that I tested on is brand new. I just got it last week. I got two (one for HLT) and the fit is the same on both (not surprising, but just to eliminate the possibility that I got a weird one).
 
I’ve got to say I laughed a little bit when I read the equivalent of “hey spike, please redesign your product so that it will fit my kettle from a competitor”
 
Well, they advertise "fits most kettles" with Blichmann and SS Brewtech logos, and I assume they want to sell to the whole market, not just those with Spike kettles.

I didn't mean "I'm special and I want to redesign it for me." I meant: I want to buy your product, which costs 2x the price of the competing solution (Steam Slayer), but it doesn't seem to meet one of your design objectives (compatibility with competitor's kettles).

Also, I know this is new product which has gone through some design iterations (like the pipe slope), so I was really just asking whether there could still be future iterations.
 
I have a test run and a full brew (60m boil) with Spike’s lid and I love it. It was an affordable way for me to go fully electric and in the basement.

One odd thing - during the brew the discharge water wasn’t very hot. Anyone else notice this? I had a good rolling boil, lid fit snugly, and I had no residual steam.

Regarding fit - I second on checking measurements. My new build was actually designed around a MegaPot 15g which the lid did not fit (but was very very close). It was so close in fact I believe it was inaccurate measuring on my part. Luckily the pot was still new in box and Spike had a nice deal on a custom 15g kettle.
 
I have a test run and a full brew (60m boil) with Spike’s lid and I love it. It was an affordable way for me to go fully electric and in the basement.

One odd thing - during the brew the discharge water wasn’t very hot. Anyone else notice this? I had a good rolling boil, lid fit snugly, and I had no residual steam.

Regarding fit - I second on checking measurements. My new build was actually designed around a MegaPot 15g which the lid did not fit (but was very very close). It was so close in fact I believe it was inaccurate measuring on my part. Luckily the pot was still new in box and Spike had a nice deal on a custom 15g kettle.

I have good water pressure and run my condenser barely open. It takes care of all the steam and the effluent is not very hot either. I've been using it for a year and it's always been like this, but it doesn't seem to matter.
 
Mine's not very hot either. I'm running a 9 gph spray nozzle and I could probably install the 6 gph nozzle. But I don't mind not putting very hot water directly into my drain pipes. I figure I'm only using $0.23 of water for the entire boil so it's not a big issue.
 
@SpikeBrewing Loving my 15G Solo+ I've recently obtained from you all, but I seem to be having issues with the CIP ball on my kettle and steam condenser lid. I don't know if the lid just doesn't fit correctly, or if it's not heavy enough, but my CIP ball sprays my hot pbw, or cold rinsing water out of the kettle between the lid and kettle rim pretty much constantly an all the way around the kettle. Is this expected? I've bought 4 strong spring clamps to try and clamp the lid down, but still, water coming out all over. I've even tried restricting the flow to the CIP ball, but still leakage. Is there a simpler solution I just haven't thought of yet? As far as amount of water goes, I ran it for 5 minutes to get a good rinse of the kettle after a PBW bath, and after 5 minutes, there was enough water around my kettle to completely soak a normal sized bath towel to the point it's dripping if you were to hang it from a hook.
 
@SpikeBrewing Loving my 15G Solo+ I've recently obtained from you all, but I seem to be having issues with the CIP ball on my kettle and steam condenser lid. I don't know if the lid just doesn't fit correctly, or if it's not heavy enough, but my CIP ball sprays my hot pbw, or cold rinsing water out of the kettle between the lid and kettle rim pretty much constantly an all the way around the kettle. Is this expected? I've bought 4 strong spring clamps to try and clamp the lid down, but still, water coming out all over. I've even tried restricting the flow to the CIP ball, but still leakage. Is there a simpler solution I just haven't thought of yet? As far as amount of water goes, I ran it for 5 minutes to get a good rinse of the kettle after a PBW bath, and after 5 minutes, there was enough water around my kettle to completely soak a normal sized bath towel to the point it's dripping if you were to hang it from a hook.

The lid and kettle don't make a water tight seal however liquid shouldn't be squirting out. Do you have the CIP ball in the top port or the side port? It should be on the lower side port. If all else fails you could get some gasket material to help make a water tight seal.

https://www.mcmaster.com/catalog/127/4140
 
The lid and kettle don't make a water tight seal however liquid shouldn't be squirting out. Do you have the CIP ball in the top port or the side port? It should be on the lower side port. If all else fails you could get some gasket material to help make a water tight seal.

https://www.mcmaster.com/catalog/127/4140

I have it in the lower port, but have tried both ports with the same result. Would you happen to have the CAD dimensions available for the lip of the steam condenser lid that I could potential give to a company that could make me a gasket? It's quite a bit of liquid that's escaping and it's basically stopped me from using it because I have to babysit it and clean up all the water around my kettle brewstand.

Edit: just realized you linked to a potential solution, my apologies, ignore my request for dimensions. Thank you for the link.
 
I'm wondering if anyone has tried the condenser lid on the 80 qt Concord pots? I chose these for my electric brewery, but I'm really liking the idea of the steam condenser lid vs a hood. 80 qt Concord pots @SpikeBrewing do you guys know if your 20 gallon lid would fit?
 
So the bright flashlight trick works decently to see into the kettle, but has anyone come up with any DIY anti-fog that doesn't involve chemicals or soap? I'll admit, I forgot to add my fermcap-s and was seconds away from a boil over, but wouldn't you know it, the bubbly boil over that touched the clear see through triclamp port added a film that acted as an anti fog for the rest of the boil. It was nuts, thing was clear as day. Anyone smarter than me that can figure out how to replicate this without actually almost boiling over?

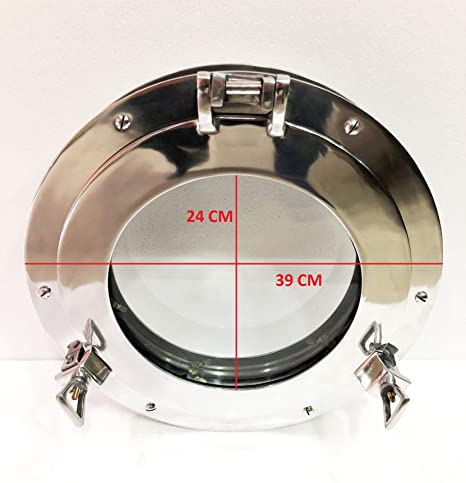
Also, anyone aware of a 4" Triclamp that has a hinged lid that clamps into place (similar to like a port hole on a ship)? Obviously not this exactly, but similar design:
1621980087445.png

Out ring would clamp onto the steam condenser, and the door can be easily opened/closed. That tri-clamp gets so dang hot and it's finicky to get back on and something like this would be awesome. This is definitely a WANT and not a need, the steam condenser works great as is, but this little upgrade would be huge QOL improvement in my opinion.

@Bobby_M are you aware of anything or do you sell anything similar?
 
Back
Top