
Mike Dalecki
New Member
- Joined
- May 27, 2016
- Messages
- 2
- Reaction score
- 0
It’s time; your brewing has advanced to kegging beer, and you need a way to chill and dispense those kegs. You have some options, including making a kegerator out of a small refrigerator or a larger kegerator from an upright refrigerator, or...a keezer. A keezer (kegerator/freezer) is usually a chest-type freezer on which a wooden collar is attached, and through which faucets, CO2 lines, and electrical/thermostat controls may be run. Before you jump keg-first into keezer building, here are some of the issues you need to address.
 Top loading chest freezer converted into a keezer - photo courtesy of groovepuppy
Sometimes you luck into a freezer you can use–I did. If you have one already, some of your choices are predetermined. Dimensions and capacity are set. If you are buying a freezer, you’ll have many options. Think on how many kegs you will want to keep chilled, and whether you will keep your CO2 tank inside or outside the keezer. Different kegs have different dimensions; when you go shopping it may be helpful to take along paper plates cut to the diameter of your intended kegs. Spread them out on the bottom of the floor model and see how you might arrange the kegs. Include a cutout for the CO2 tank as well if you plan to keep it in the keezer.
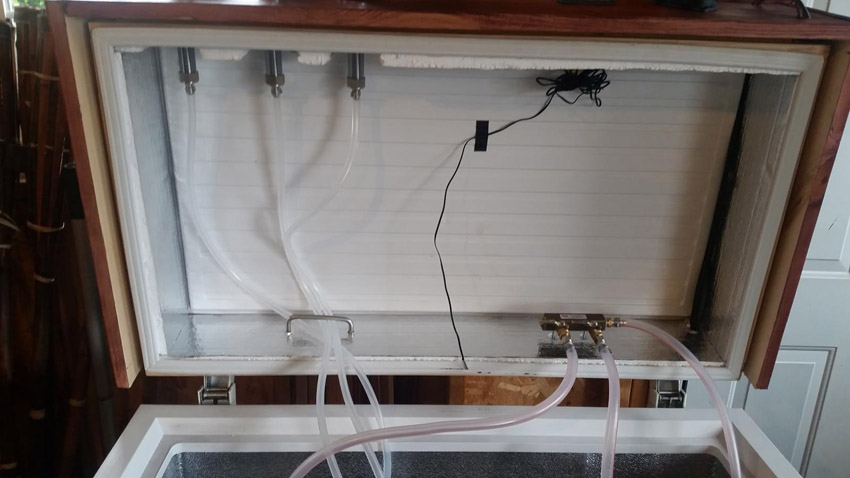
Freezers aren’t made for keeping beer at precise serving temperatures. To overcome this problem, use a temperature controller such as an Inkbird, Johnson Controls, STC-1000 build or similar. These controllers use a temperature sensor inside the keezer and control the freezer unit directly through an on/off approach. Get one that allows for compressor downtime–you don’t want to be cycling the compressor on and off rapidly. A 3-minute delay should be sufficient. Submerge the sensor inside a tank of water or tape it to a keg and place insulation over the sensor to protect it from rapidly changing air temperatures; what matters is the temperature of the liquid in the keezer, not the air.
Consider, too, how you’ll distribute CO2 (and possibly nitrogen) to your kegs. Do you want to run all kegs off the same pressure, or have multiple regulators running different pressures? I want mine to both feed kegs at serving pressure and allow for force carbing–so I have a dual regulator system. If I’m not force carbing I can run two separate serving pressures. One regulator is enough to feed multiple kegs, if you have a manifold or use a WYE to split the lines to different kegs.
While you could use a tower on a keezer, or make a “coffin keezer,” most use a collar, which is a wooden frame set on the mouth of the lower unit. The faucets are installed in holes drilled through the collar, plus you can run electrical lines, CO2 lines if you want your tank outside the keezer, or perhaps a digital display, all through the collar. Size your collar based on the height of your kegs and possibly the CO2 tank if you want that inside. Dimensions of collars have ranged from 2x4s to 2x12s, depending on internal dimensions and space requirements. Allow for space for the lines, and also think about whether you'll be using pin lock or ball lock kegs--ball lock kegs are smaller in diameter but taller, and if you plan to use both over time, size for the tallest one you might use. Stacking smaller kegs? Consider height restrictions on that as well.
Another consideration is whether you want to use the existing freezer lid on top of the collar, something else entirely, and whether you want to hinge the lid, the bottom of the collar, or both. Hinging the bottom of the collar allows you to lift it up and reduce the height you must clear in order to load filled kegs in the keezer. However, that bottom-hinged collar comes at a cost: the keezer cannot be snugged up to a wall and still be opened. One way around that is to put the keezer on casters, so that it can be rolled away from the wall to lift the collar. It’s also possible to hinge both the collar and the lid.
Of course, you may find no difficulty lifting that keg over a permanently-installed collar, but figure out ahead of time what height is comfortable, using a filled keg. In most keezer installations the builder attaches the collar permanently to the freezer using Liquid Nails, Silicone caulk, or similar. Be sure–take measurements–that if you do this the keezer can still be moved to its intended location. One nice thing about hinging the collar to the freezer, and the lid to the collar, is that both can be removed for moving the keezer. You can also, if the need arises, return the keezer to its original freezer configuration.
 Insulation around collar - photo courtesy of Redtab78
Using raw wood in an area with moisture or splashing beer is, as they say, contradicted. You need to seal the collar with stain, varnish, polyurethane, or similar. Add foam board insulation to the inside of the collar as additional insulation–at least an inch of expanded or extruded polystyrene, and 2 inches may be better yet.
Figure out ahead of time how much insulation you’re going to need, and when you buy your faucets and shanks, make sure the shanks protrude far enough into the keezer to get them past the insulation.
Some brewers build a beautiful wooden skin around the entire keezer body. If you do this–and they really are beautiful–make sure that your freezer unit has enough airflow to shed heat. Many freezers shed heat through the outside skin; if you cover that with wood, it will insulate that skin and force the freezer to work harder. If you can get enough space (at least an inch, and up to 3 ½ inches is good), you’ll get natural convection; some builders use a small computer fan to create air movement inside the skin to alleviate the heat problem.
Collars need to be sealed to the freezer base, plus the lid needs to be sealed to the collar. Failure to do this almost certainly will result in excess condensation inside the keezer, and puddles of water. You’ll always have some condensation just from opening the top; it’s unavoidable, but that can be addressed by using a small computer fan inside the keezer to keep air circulating or absorptive material designed to remove moisture.
Weatherstrip can be foam, silicone stripping, even insulating tape used underneath a pickup truck cap are possibilities.
 Dip trays attached to the collar
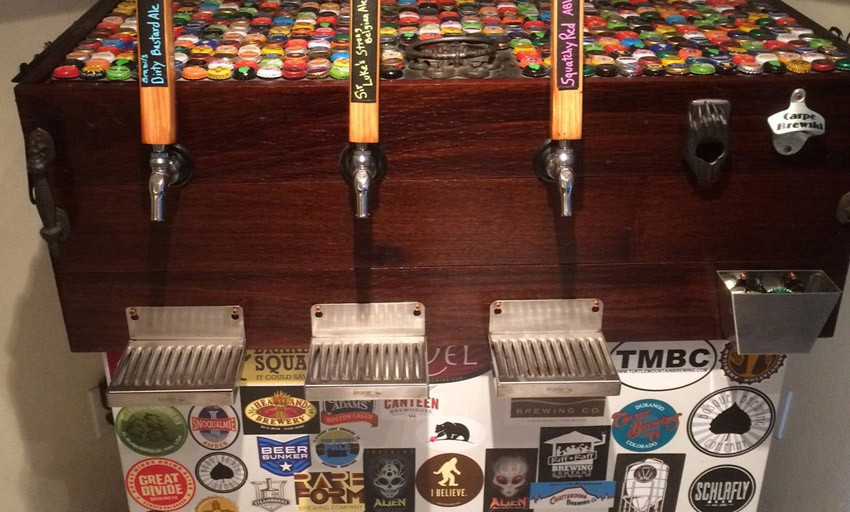
Once you have your freezer, soon to be keezer, home, more choices need to be made. For instance, a drip tray. You'll want something to catch drips from faucets. You can use commercially-available trays, or build your own. Consider whether you want a drain or expect to clean it out manually. Also think about future expansion. On mine, I have three faucets but I expect to expand to five faucets, so I sized my drip tray to that expectation.
There are several options for attaching the drip tray. One method is to screw it right to the freezer side or collar. This however comes with a strong warning to avoid attempting, as you run the risk of puncturing the refrigeration lines. The safer option is using strong magnets to stick it to the side. Check with significant weight to ensure the drip tray doesn't slip and fall down; a few bricks or similar weights will help with this task. You can also use bar magnets underneath the tray and stuck to the keezer to help support the drip tray.
 Wood skin on a keezer - photo courtesy of Garmoni
Consider your look ahead of time, including how you’ll indicate types of beers. As noted, some people build a wooden enclosure or skin around the keezer; others leave the exterior as-is. Still others paint the body of the keezer, sometimes using chalkboard paint on which they may write a beer menu. Be careful how you prepare the surface before any painting, or you may suffer from abrasions removing the paint. Anything from chalkboard tap handles to a chalkboard menu to a digital menu is possible.
Enjoy!
Careful planning at the outset can provide a keezer build experience that is satisfying and makes you the envy of your beer-drinking friends. Do your due diligence and search for and read keezer-building threads on HomeBrewTalk, and then....go for it.
Brew on!
The Freezer
 Top loading chest freezer converted into a keezer - photo courtesy of groovepuppy
Sometimes you luck into a freezer you can use–I did. If you have one already, some of your choices are predetermined. Dimensions and capacity are set. If you are buying a freezer, you’ll have many options. Think on how many kegs you will want to keep chilled, and whether you will keep your CO2 tank inside or outside the keezer. Different kegs have different dimensions; when you go shopping it may be helpful to take along paper plates cut to the diameter of your intended kegs. Spread them out on the bottom of the floor model and see how you might arrange the kegs. Include a cutout for the CO2 tank as well if you plan to keep it in the keezer.
Temperature Control
Freezers aren’t made for keeping beer at precise serving temperatures. To overcome this problem, use a temperature controller such as an Inkbird, Johnson Controls, STC-1000 build or similar. These controllers use a temperature sensor inside the keezer and control the freezer unit directly through an on/off approach. Get one that allows for compressor downtime–you don’t want to be cycling the compressor on and off rapidly. A 3-minute delay should be sufficient. Submerge the sensor inside a tank of water or tape it to a keg and place insulation over the sensor to protect it from rapidly changing air temperatures; what matters is the temperature of the liquid in the keezer, not the air.
Gas System
Consider, too, how you’ll distribute CO2 (and possibly nitrogen) to your kegs. Do you want to run all kegs off the same pressure, or have multiple regulators running different pressures? I want mine to both feed kegs at serving pressure and allow for force carbing–so I have a dual regulator system. If I’m not force carbing I can run two separate serving pressures. One regulator is enough to feed multiple kegs, if you have a manifold or use a WYE to split the lines to different kegs.
The Collar
While you could use a tower on a keezer, or make a “coffin keezer,” most use a collar, which is a wooden frame set on the mouth of the lower unit. The faucets are installed in holes drilled through the collar, plus you can run electrical lines, CO2 lines if you want your tank outside the keezer, or perhaps a digital display, all through the collar. Size your collar based on the height of your kegs and possibly the CO2 tank if you want that inside. Dimensions of collars have ranged from 2x4s to 2x12s, depending on internal dimensions and space requirements. Allow for space for the lines, and also think about whether you'll be using pin lock or ball lock kegs--ball lock kegs are smaller in diameter but taller, and if you plan to use both over time, size for the tallest one you might use. Stacking smaller kegs? Consider height restrictions on that as well.
Another consideration is whether you want to use the existing freezer lid on top of the collar, something else entirely, and whether you want to hinge the lid, the bottom of the collar, or both. Hinging the bottom of the collar allows you to lift it up and reduce the height you must clear in order to load filled kegs in the keezer. However, that bottom-hinged collar comes at a cost: the keezer cannot be snugged up to a wall and still be opened. One way around that is to put the keezer on casters, so that it can be rolled away from the wall to lift the collar. It’s also possible to hinge both the collar and the lid.
Of course, you may find no difficulty lifting that keg over a permanently-installed collar, but figure out ahead of time what height is comfortable, using a filled keg. In most keezer installations the builder attaches the collar permanently to the freezer using Liquid Nails, Silicone caulk, or similar. Be sure–take measurements–that if you do this the keezer can still be moved to its intended location. One nice thing about hinging the collar to the freezer, and the lid to the collar, is that both can be removed for moving the keezer. You can also, if the need arises, return the keezer to its original freezer configuration.
Insulation and wood finishing
 Insulation around collar - photo courtesy of Redtab78
Using raw wood in an area with moisture or splashing beer is, as they say, contradicted. You need to seal the collar with stain, varnish, polyurethane, or similar. Add foam board insulation to the inside of the collar as additional insulation–at least an inch of expanded or extruded polystyrene, and 2 inches may be better yet.
Figure out ahead of time how much insulation you’re going to need, and when you buy your faucets and shanks, make sure the shanks protrude far enough into the keezer to get them past the insulation.
Some brewers build a beautiful wooden skin around the entire keezer body. If you do this–and they really are beautiful–make sure that your freezer unit has enough airflow to shed heat. Many freezers shed heat through the outside skin; if you cover that with wood, it will insulate that skin and force the freezer to work harder. If you can get enough space (at least an inch, and up to 3 ½ inches is good), you’ll get natural convection; some builders use a small computer fan to create air movement inside the skin to alleviate the heat problem.
Condensation
Collars need to be sealed to the freezer base, plus the lid needs to be sealed to the collar. Failure to do this almost certainly will result in excess condensation inside the keezer, and puddles of water. You’ll always have some condensation just from opening the top; it’s unavoidable, but that can be addressed by using a small computer fan inside the keezer to keep air circulating or absorptive material designed to remove moisture.
Weatherstrip can be foam, silicone stripping, even insulating tape used underneath a pickup truck cap are possibilities.
Drip Tray
 Dip trays attached to the collar
Once you have your freezer, soon to be keezer, home, more choices need to be made. For instance, a drip tray. You'll want something to catch drips from faucets. You can use commercially-available trays, or build your own. Consider whether you want a drain or expect to clean it out manually. Also think about future expansion. On mine, I have three faucets but I expect to expand to five faucets, so I sized my drip tray to that expectation.
There are several options for attaching the drip tray. One method is to screw it right to the freezer side or collar. This however comes with a strong warning to avoid attempting, as you run the risk of puncturing the refrigeration lines. The safer option is using strong magnets to stick it to the side. Check with significant weight to ensure the drip tray doesn't slip and fall down; a few bricks or similar weights will help with this task. You can also use bar magnets underneath the tray and stuck to the keezer to help support the drip tray.
The Look
 Wood skin on a keezer - photo courtesy of Garmoni
Consider your look ahead of time, including how you’ll indicate types of beers. As noted, some people build a wooden enclosure or skin around the keezer; others leave the exterior as-is. Still others paint the body of the keezer, sometimes using chalkboard paint on which they may write a beer menu. Be careful how you prepare the surface before any painting, or you may suffer from abrasions removing the paint. Anything from chalkboard tap handles to a chalkboard menu to a digital menu is possible.
Enjoy!
Careful planning at the outset can provide a keezer build experience that is satisfying and makes you the envy of your beer-drinking friends. Do your due diligence and search for and read keezer-building threads on HomeBrewTalk, and then....go for it.
Brew on!


![Craft A Brew - Safale S-04 Dry Yeast - Fermentis - English Ale Dry Yeast - For English and American Ales and Hard Apple Ciders - Ingredients for Home Brewing - Beer Making Supplies - [1 Pack]](https://m.media-amazon.com/images/I/41fVGNh6JfL._SL500_.jpg)


