• Please visit and share your knowledge at our sister communities:
  • If you have not, please join our official Homebrewing Facebook Group!

    Homebrewing Facebook Group

My Ugly Junk- Corona Mill Station...

Homebrew Talk

Help Support Homebrew Talk:

This site may earn a commission from merchant affiliate links, including eBay, Amazon, and others.
I hooked up a wiper motor and motorized this big bad boy the build is detailed here. https://www.homebrewtalk.com/f51/windshield-wiper-motor-powered-grain-mill-164285/
its a monster to say the least


006.jpg
 
HaHa thanks its the story of my life. like the old drag racing adage......Run what ya brung. might have to add that one to my sig
 
BADASS son BADASS!! I am going to try to make one of these. with my carpo tunnel or however you spell it milling my grain has become a pain in the arse and wrist. so this will be a lot of fun thanx for being awesome.
 
Well, i don't know if mine is ugle enough, and it is a barley crusher, but it is kinda ugly. I took apart a dead cordless drill, used a pc power supply, few screws and hose clamps and came up with this
100_1860.JPG

and just for good measure, i use a bilge pump to recirculate cold water through my wort chiller,
100_1837.JPG

100_18381.JPG
 
Well, i don't know if mine is ugle enough, and it is a barley crusher, but it is kinda ugly. I took apart a dead cordless drill, used a pc power supply, few screws and hose clamps and came up with this

I've been wondering how you switch the pc power supply on for use out of the computer. Any links?
 
I have super old style pc power supplies that don'et require shorting to turn on, its the AT style. the newer ones(ATX) require usually 2 pins on the connector to be shorted together to turn them on. you will have to look up which type you have. the other thing i did learn is that i have to put a load on the 5v side of the power supply to keep some internal overload switch from shutting it off. but it definatley can be done, and its usally not hard finding a power supply or two for free.
http://en.wikipedia.org/wiki/Power_supply_unit_(computer)

start here and expand out
 
Tight clumping, no, cool square bucket, yes!!! Good job and nice to see someone who like to work on their arm muscle by going the "analog" route. :D

Thanks Revvy! I don't mind a little manual labor, makes the beer taste better :D Though I'll only stick with 'analog' milling as long as I'm doing 5 gallon batches!
 
Well, after reading this thread, and looking at my milling station:

I must say I was inspired, and got to work! I don't know if it qualifies as 'ugly' nevertheless it was a fun project with EXCELLENT rewards! :mug: Thanks revvy, biermuncher and everyone else who contributed to this thread.

My dustfree, Corona in a bucket!
mill6.jpg

I used the Homer bucket, and just jigsawed off the bottom. I didn't want the weight of the mill bearing down on the handle, so I cut 2" off the thick section of shims, and they slid right into the notches on the rim of the Homer bucket, and give good separation. Not sure how much grain it will hold, but it's ENOUGH.

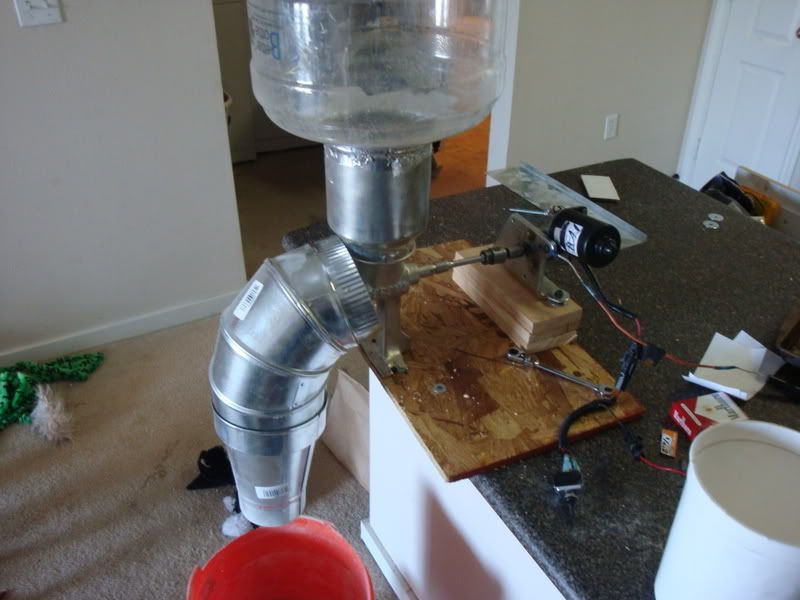
Well, at least I thought it was, but the stock hopper wasn't enough, so I upgraded it!!!
megahopper.jpg

I used some 6" pipe to make a windshield for my burner, and with the leftovers I made the Megahopper! I just pour and crank now! :rockin: And yes that is Duct tape, on actual duct - who knew, right?! Working with sheet metal REALLY sucks, and the cut edges REALLY want to tear up your skin. The top ring of tape is keep my hands from shredding whenever I pour grain.
 
Just bought a new real Corona mill from the LHBS. Guy behind the counter said I would be lucky to get 60% out of it. Glad I found this thread with all the mods and positive feedback. Can't wait to start tinkering with it!
 
This is still my favorite thread on here, even after 3 months of ice fishing instead of brewing. I need to dust off all my brewing gear and get another batch in the works so I can show off my ugly junk, too!
 
It's not a Corona Mill, but it's pretty ugly yet very functional. Sits right on top of a 5 gallon bucket. The Phil Mill was given to me by a friend and the hopper I made for a different mill but it happens to fit just right on the plastic bottle. I've filled the hopper and didn't need to steady it. :)

Phil Mill setup.jpg

Phil Mill setup1.jpg
 
It's not a Corona Mill, but it's pretty ugly yet very functional. Sits right on top of a 5 gallon bucket. The Phil Mill was given to me by a friend and the hopper I made for a different mill but it happens to fit just right on the plastic bottle. I've filled the hopper and didn't need to steady it. :)

View attachment 15025

View attachment 15026

nice boss, you staying warm up there the last few days? I think spring came a few days early :)
 
Decide to play with mine tonight. Did not uglify it yet!

1st run looks real close to LHBS's roller mill. I just set it to what I thought it should be. Real close, I think. Got some Vienna to try next!

CORONA1.jpg


MILLRUN.jpg
 
Just got one of these and will be doing the bucket-in-a-bucket trick out. A couple of quick questions:

(1) how many washers on the plate brackets, 2 or 3, to gap the plates? Can't tell from the pics...

(2) what's the bottom line with the cotter pin v. bolt issue? After reading this entire thread, near as I can tell, there is a "Wilser" camp that seems to avocate leaving the cotter pin as is and just tightening down the gap (pretty narrow) until a good crush is obtained, the theory being that the grains flowing thru will create uniform resistence that will align the plate enuf to get the job done. On the other hand, there seems to be a "Revvy" camp that avocates replacing the cotter pin with a bolt (or doing some sort of a JB weld) to totally eliminate the all wobble in the plates to get a uniform crush that way. Is there any consensus as to which is the better way? Has someone done it both ways and able to give a definitive opinion? Or is this one of those deals where I just need to flip a coin?
 
Answer to #1, in my case, is that my mill* required NO washers or spacers. The adjustment bolt provided produces a satisfactory crush.

For #2, I went with the "Revvy"-ision replacing the cotter pin, which was a lousy fit anyway, with a stainless bolt, nut & washers. This seems to stabilize the outer plate of the mill so that it operates well.

I would add that from reading about various people's experience with these mills, there is sufficient variation among units, due to the sloppy casting, that it's a total crapshoot as to what your mill may require.

*My mill is a "Victoria" branded unit, purchased from Discount Tommy on E-bay.
 
not sure of its the same version, but my SWMBO got for me from Discount Tommy. based on what i read from other peoples mills, oout of the box, mine seems pretty solid. I have not used it yet, but turning it, the plates do not seem to wobble much at all and the plate brackets sit completely flush and the plate gap is darn pretty narrow (like maybe credit card width). so, did i luck out....should I do none of these mods until testing some grains on it first?
 
If yours is as good as you say out of the box, I would sure give it a try before attempting any mods. Look around in this thread, there's somebody who put up links to pix of what a good crush should look like. If you have a camera, post pix of your results, I'm sure people would be interested.
 
Just got one of these and will be doing the bucket-in-a-bucket trick out. A couple of quick questions:

(1) how many washers on the plate brackets, 2 or 3, to gap the plates? Can't tell from the pics...

(2) what's the bottom line with the cotter pin v. bolt issue? After reading this entire thread, near as I can tell, there is a "Wilser" camp that seems to avocate leaving the cotter pin as is and just tightening down the gap (pretty narrow) until a good crush is obtained, the theory being that the grains flowing thru will create uniform resistence that will align the plate enuf to get the job done. On the other hand, there seems to be a "Revvy" camp that avocates replacing the cotter pin with a bolt (or doing some sort of a JB weld) to totally eliminate the all wobble in the plates to get a uniform crush that way. Is there any consensus as to which is the better way? Has someone done it both ways and able to give a definitive opinion? Or is this one of those deals where I just need to flip a coin?

1. I bought a grizzly brand mill (available on amazon) and it came with some 3/8" thick nylon bushings.

2. If your outer grinding plate and auger shaft do not spin true to the inner grinding plate, you will probably need to stick with the cotter pin. If they spin true, the bolt may be a good way to go. My mill was severly out of true and if I used a bolt about 1/4 of my grain was uncracked.

Bottom line is that these things are so crappily built, you'll just have to see what your mill needs.
 
Answer to #1, in my case, is that my mill* required NO washers or spacers. The adjustment bolt provided produces a satisfactory crush.

For #2, I went with the "Revvy"-ision replacing the cotter pin, which was a lousy fit anyway, with a stainless bolt, nut & washers. This seems to stabilize the outer plate of the mill so that it operates well.

I would add that from reading about various people's experience with these mills, there is sufficient variation among units, due to the sloppy casting, that it's a total crapshoot as to what your mill may require.

*My mill is a "Victoria" branded unit, purchased from Discount Tommy on E-bay.

I have a Victoria "Tommy" one as well, and mine did require spacing washers(#1) and used the cottor pin(#2), after realizing that putting a bolt in was keeping the device from "floating" while grinding (different than static analysis) There is alot of centering that takes place when grinding.
After than I got a good grind.

These things are poorly cast, and there are no less than 6 different mfgs in China for them, so variability is large. Just get one, put in spacers if it won't adjust to turn without plates hitting, and you'll be good to go.

Rich
 
Mine is a "Victoria" brand from my LHBS. No spacing washers. I did remove the cotter pin and rotate the collar piece 90 degrees which resulted in the plate wobbling considerably less. The collar has indentations the cotter pin rests in and the set or indentations at 90 degrees from the ones the pin was originally installed in were shallower. I really should take a picture.
 
Back
Top