BrunDog 50A eRig - no HLT for me!

Homebrew Talk - Beer, Wine, Mead, & Cider Brewing Discussion Forum

Help Support Homebrew Talk - Beer, Wine, Mead, & Cider Brewing Discussion Forum:

This site may earn a commission from merchant affiliate links, including eBay, Amazon, and others.
Funny, but true. Right now I am content but definitely have visions of 2.0.

I wish I could brew more to really learn and figure out exactly what changes I would like to make iteratively or for round 2... problem is my friends are all bud/miller/coors light junkies and I can't drink it fast enough. I have 5 beers on tap right now and in a week will be the better part of >15 gallons. Need to hand out growlers!


BrunDog -- sounds like your area needs a microbrewery! ...and we know just the guy to start it! [emoji6]
 
I joined to learn about making better beer too. After reading yours and many other quality threads here, I am now ready to take the engineering test! :mug:
Jam packed quality info here, quality info!

John
 
The video really helped bring it all together. I'm very interested to see what your solution is for the BK filter to replace the bazooka tube.
 
Thanks. I have a plan for my next beer: the half coupling I mentioned, then a mini hop-stopper kind of gig, which will be vertically inserted and held down by its weight. The mesh I have had larger pores than the bazooka to let small material through. But if/when it clogs up, I can just pull it out. Will post up pics when done.
 
A little side project: motorizing my mill.

I have a Cereal Killer mill from AiH. I think it is basically the same as the Barley Crusher. Not a high end mill by any stretch but gets the job done well enough for homebrewing purposes. I had been jealous of some of the amazing motorized mills that have been built and shown off on this forum, but also realized I didn't need something that elaborate. I mean, some are legitimate works of art! I don't have the space or need for a dedicated standing mill, so wanted to keep mine portable, grinding on a bucket as I have been doing but powering via electric drill.

I found this motor on Amazon: https://www.amazon.com/gp/product/B00LTM3AT6/?tag=skimlinks_replacement-20

It is a basic 12VDC, worm drive, right angle motor/gearbox. It has a 10mm shaft with flats and an M6 threaded end. I took my Dremel and cut off the threaded end.
View attachment ImageUploadedByHome Brew1456103241.152654.jpg

The mill comes mounted on a plywood plank with dowel pins to rest inside a bucket. It is biased to one side so that the shaft hangs over the side, allowing for a hand crank or a drill to be connected. I rotated the mill so the shaft extended over the long side of the plank.
View attachment ImageUploadedByHome Brew1456103358.631219.jpg
View attachment ImageUploadedByHome Brew1456103375.849990.jpg

Then I fab'd up a quick L bracket out of some spare steel sheet. I don't have a shop, just banged this out in the garage with some 2x4's and a hand drill.
View attachment ImageUploadedByHome Brew1456103456.027340.jpg

Using a 10mm straight coupling from McMaster Carr, I mounted it together.
View attachment ImageUploadedByHome Brew1456103641.304666.jpg

Powering up with an old laptop brick power supply I had. Now this motor generates >100 in-lbs of torque which should be enough, but only cranks at 50rpm. While that won't do LHBS duty, that's plenty fast enough for my needs. Here is a quick video:

https://youtu.be/9BX0ZhX8eJY

Looking forward to putting it to use next brew day!

Edit: I did, and it took just under 6 minutes to mill 8lbs of grain. Works for me!
 
Last edited by a moderator:
Not gonna lie... It makes life much easier! I do have a slight problem where water somehow leaks past the lids. Clamping them down helps but I think repositioning the heads lower will help. Baby steps like everything else....

Have you resolved this? I use the same CIP nozzle for cleaning kegs and my conicals. A couple months ago I tried a CIP cycle for the kettles using my March pumps but could not get past the leaking past the lids. I tried taking some silicone tubing cutting it in half and using as a "gasket"... it helped but not enough.
 
Not yet. I have been thinking about it and I am not exactly sure what is going on. The lid extends down, so it would seem that any water coming in at an angle should be blocked from getting out.

What I *think* is happening is the lid is getting wet and water is holding to the interface between the lid and edge of the kettle via adhesion. Any internal pressure rise (heating water, etc.) causes that water to push out. Alternatively, or in combination, the PBW causes that water to have less surface tension, allowing some of it to slip passed. I dunno - but it is a major issue because I can't stand there plugging up leaks for two hours while the cycles run!

The gasket idea is good. Just need to figure out the right stuff.
 
Please do. I've been looking to motorize my bucket top monster mill for a while, haven't seen a good motor for it yet.
 
I'm in the same boat. I dont have space for a stand dedicated for my mill. Additionally all the motors I have seen are at least $60, but you still have to get a gear reduction box for them.
 
This one was $70 and the coupling was $10 + a few dollars to ship it. The bracket was free to me, but you could make up an L bracket with just about anything. No additional cost to the mill as the only thing needed is to rotate the mill on the wood. You also need a decent power supply, but it was free again to me as I had an old computer brick power supply on hand. There is an inexpensive 12V power supply linked to the motor's webpage.

Now, in truth my supply provides 15V. The motor rating according to the description on the site says 13.5V, so it is probably geared (pun intended) for automotive applications. I figured another 1.5V is within tolerance and I am not running it for more than a few minutes. I didn't see/hear any strain on the motor with this supply. I do not know what a 12V supply would do. That 3V difference may be valuable as that's 25% more power.

I should be doing a brew in a few days - will report!
 
BrunDog do you mind sharing your arduino sketch for your fly sparge flow control? I'm looking into doing something similar on my setup.
 
Curious to see the results of how long it takes to mill a full hopper of grain. I could use a smaller motor like this as I'm toying with the idea of mounting it to a kettle lid to mill right into the mash tun. I'm going to be testing heating the strike in the HLT and filling the MLT with dry grain and then transferring strike water from HLT to MLT underletting the grain.
 
Not yet. I have been thinking about it and I am not exactly sure what is going on. The lid extends down, so it would seem that any water coming in at an angle should be blocked from getting out.

What I *think* is happening is the lid is getting wet and water is holding to the interface between the lid and edge of the kettle via adhesion. Any internal pressure rise (heating water, etc.) causes that water to push out. Alternatively, or in combination, the PBW causes that water to have less surface tension, allowing some of it to slip passed. I dunno - but it is a major issue because I can't stand there plugging up leaks for two hours while the cycles run!

The gasket idea is good. Just need to figure out the right stuff.

I tried the "gasket" made of silicone tubing and it didn't do much. Paired with a "weight" (a brick) on the lid it worked better but not enough that I could leave it. If I get around to trying other options I'll post.
 
I'm going to be testing heating the strike in the HLT and filling the MLT with dry grain and then transferring strike water from HLT to MLT underletting the grain.

I started doing this. Fill the MT with dry grain then slowly pump strike water into the bottom of the MT. No need to use a mash paddle anymore. I haven't seen any effect on my efficiency so Im pretty sure I'm not getting any dough balls.
 
I started doing this. Fill the MT with dry grain then slowly pump strike water into the bottom of the MT. No need to use a mash paddle anymore. I haven't seen any effect on my efficiency so Im pretty sure I'm not getting any dough balls.

Good to know! Do you not stir your mash at all? Do you run a continuous recirulation?

(Sorry BrunDog for the OT!)
 
No, I love the discussion! I thought about being able to put the grain into the MLT and walk away but of course my 2 vessel design would not support that unless I controlled the incoming water temp carefully (possible) and re-routed the water through the bottom drain or another port (not practical as it would require another 3 way electric valve).

For the sake of discussion, I did consider a remote mill/chute design, which would be a better approach for my rig, but it's probably a level of automation that is not needed... At least not yet!
 
Good to know! Do you not stir your mash at all? Do you run a continuous recirulation?

(Sorry BrunDog for the OT!)

Correct, no stirring the mash at all. Haven't touched my mash paddle for the last 7 or 8 brews. I have a herms setup so I am continously recirulating the entire mash.
 
Correct, no stirring the mash at all. Haven't touched my mash paddle for the last 7 or 8 brews. I have a herms setup so I am continously recirulating the entire mash.


Wow this is a sweet idea... Thanks for sharing!
 
What temp is the strike water when you pump it in? Same as a single infusion?

Yup same as a single infusion. 11f higher than the first rest temp. There is some temperature stratification initially, but it all settles out after 10 min of recirulation.
 
I guess that would be a consideration. With recirculation before doughing-in (done that way on my rig, anyway), or pumping over heated strike water (most HLT systems), everything reaches a nearly equal temp (kettle, tubing, recirc hardware, etc.). Via underletting, the local grain is exposed to much hotter water, then as the water spreads to the edges, heat is pulled out into the kettle. This would create temp differences for some period of time, depending on how quickly the water is introduced (~5 minutes?).

In theory/worse case scenario, the local grain gets overheated and the edge grain starts converting at a lower temp than desired. I don't know if this would amount to a hill of beans, just something to consider.

I typically try to dough in as quickly as possible to get uniform temps fast. I get the grain in quick, give a couple of stirs, then get the re-circulation going ASAP. I am not big into stirring the mash for 5 mins like some guys do on their YouTube vids. Probably too anal, but hey that's me!

BTW I will send you my sketch. Just need to pull it out of the programming laptop, which I don't fire up unless I am editing it.
 
Even with underletting, I'll still be mixing. I use a mortar mixer in my drill and can thoroughly mix in a few seconds. On a 60 minute mash, I mix at 60, 45, 30 & 15 minutes. With the continuous recirc, I still run clear since it has 15 minutes to settle out before I start fly sparging.
 
I guess that would be a consideration. With recirculation before doughing-in (done that way on my rig, anyway), or pumping over heated strike water (most HLT systems), everything reaches a nearly equal temp (kettle, tubing, recirc hardware, etc.). Via underletting, the local grain is exposed to much hotter water, then as the water spreads to the edges, heat is pulled out into the kettle. This would create temp differences for some period of time, depending on how quickly the water is introduced (~5 minutes?).

In theory/worse case scenario, the local grain gets overheated and the edge grain starts converting at a lower temp than desired. I don't know if this would amount to a hill of beans, just something to consider.

I typically try to dough in as quickly as possible to get uniform temps fast. I get the grain in quick, give a couple of stirs, then get the re-circulation going ASAP. I am not big into stirring the mash for 5 mins like some guys do on their YouTube vids. Probably too anal, but hey that's me!

BTW I will send you my sketch. Just need to pull it out of the programming laptop, which I don't fire up unless I am editing it.


Any idea if this is a bad idea for single infusion without recirculating?

Right now I'm just using a rectangular cooler, and ideally I like to throw the grain in a bag for easier cleanup (which is counter productive for mixing the grain and water on mash in...).
 
I didn't see a mixer Jon. Is that something that is in the works or you just didn't photo it?
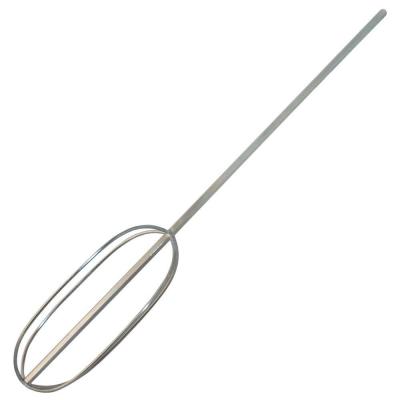
I've been using this for a while. It's just a mortar mixer I put in my cordless drill.

ba5be37d-2d79-47a5-a346-1714f347fb1a_400.jpg
 
brewApprentice, I don't understand your question. If you do single infusion in a cooler, you heat your strike water to a temperature that your software calculates, which takes into consideration ambient temperature, the materials of the mash tun, and the amount and temperature of your grains. You can then fine tune with a bit of cool or hot water, then seal it up for an hour or so. The cooler is insulated and helps prevent temp differences and any need to recirculate. You likely know all that already, but I would assume you are asking about the impact of putting the grains in a bag. I would say... just do it. You could drop the bag with grains in at one time, stir inside the bag, then seal it up.
 

Latest posts

Back
Top