Element Suggestions for 120V eBIAB setup

Homebrew Talk - Beer, Wine, Mead, & Cider Brewing Discussion Forum

Help Support Homebrew Talk - Beer, Wine, Mead, & Cider Brewing Discussion Forum:

This site may earn a commission from merchant affiliate links, including eBay, Amazon, and others.
Are you going to use 2 qty of the 120V heating elements in your kettle?
Even with an insulated kettle you will need >2K watts to boil more than 5 gallons.
 
I have used similar 120v high density elements for years now, however, I did scorch one large batch badly, a dumper, due to pausing the boil and letting the trub settle, low density elements might have avoided this IDK.

FWIW, I still use the high density elements, but now I am more careful to keep the trub from settling excessively while approaching boil.

My experience using HD elements, of course YMMV....cheers!

ps. the same HD elements are available at Home depot / Lowes for like 10 bucks.

edit...this one posted above by helibrewer looks promising
http://www.amazon.com/dp/B000LNICCO/?tag=skimlinks_replacement-20

I prefer the 2000w elements, but if your batch size is only 5 gal. you likely don't need 4000w total.
 
Last edited by a moderator:
That element looks awesome but my pot has a 14.5" diameter so I don't think a 15" element would fit :/

Sent from my Nexus 7 using Home Brew mobile app
 
15" it's a whole element length. The part which suppose to be inside a boiler is around 13". See picture below.

DSC00385.jpg
 
hmm, looks like I would be able to fit 1 of those in my pot but I'd need 2 of them to get a boil in a reasonable amount of time :/ I don't think it'd be able to fit 2 in..
 
I went with 2 of these LWD 1500W elements. I mainly do 5G batches with a 7.5G pre-boil volume. This should be more than enough to get the job done I think.
 
Last edited by a moderator:
That looks like the regular HWD elements you can get at HD, Lowes to me. It will work fine, I would suggest stirring a few times as you approach boil...YMMV.
 
If amazon says so, I guess they are.

Sorry to confuse, but that looks like the typical 120V element that is commonly referred to as HWD.

Edit
Sorry, yes google reveals that is LWD, the HWD is 02142/02143
Cheers!
 
If amazon says so, I guess they are.

Sorry to confuse, but that looks like the typical 120V element that is commonly referred to as HWD.

Edit
Sorry, yes google reveals that is LWD, the HWD is 02142/02143
Cheers!

Phew. I didn't want to have to return them and get different ones. Thanks.
 
Everyone is saying they are only 4in long and not LWD even though thats what the label says... I was planning on ordering it today but not sure now
 
Everyone is saying they are only 4in long and not LWD even though thats what the label says... I was planning on ordering it today but not sure now

The ones I linked are close to 7 in long and are indeed LWD based on the Camco information and pretty much every website I go to. I can measure it when I get home if you like.
 
sorry its http://www.amazon.com/dp/B000KKVZUO/?tag=skimlinks_replacement-20

that it is coming differently than it shows and says. thats the one i really wanted that claimds to be a 1500w 120v ULW

Ah ok. I actually originally ordered that one for my RIMS tube, but returned it when it came. It really is only like 4 inches long. It's heavy as hell though, so I do believe them when they say it's ULW. It don't think it'd be good in a brew kettle or anything really because there would be such a small amount of the element actually sticking into the kettle because of fittings.
 
Last edited by a moderator:
I want to do BIAB and was thinking it was perfect now starting my look over for two and really want 1500w 120v ULD
 
I want to do BIAB and was thinking it was perfect now starting my look over for two and really want 1500w 120v ULD

You could do 2 of these and run them at 120V. Since they're already LWD, they'd be ULWD at 120V.
 
Last edited by a moderator:
nice but the pots only i think 13in diameter :( boo

Yeah those look longer. LWD just might have to do. I'm getting mine welded in this weekend but might not be able to brew for a couple more weeks. I will let you know how it goes as far as any noticeable scorching...but I don't expect any.
 
Ah ok. I actually originally ordered that one for my RIMS tube, but returned it when it came. It really is only like 4 inches long. It's heavy as hell though, so I do believe them when they say it's ULW. It don't think it'd be good in a brew kettle or anything really because there would be such a small amount of the element actually sticking into the kettle because of fittings.

I made a heat stick with two of these. They work great for this application.
 
I made a heat stick with two of these. They work great for this application.

I can see them working great as a heat stick, but not as being added with welded fittings to the side of a kettle. I wish they were the size as described because that wattage and ULWD is perfect for people with 120V for either application. Ohwell.
 
Finally got my elements in and holding water. May not look the best but works. Going to hook up the wires and boil test tomorrow
ImageUploadedByHome Brew1395268769.257395.jpgImageUploadedByHome Brew1395268782.023115.jpgImageUploadedByHome Brew1395268795.653065.jpg


Sent from my iPhone using Home Brew
 
Fail hooked the wires up filled up to check again and drops at this point in about rdy to just trash this


Sent from my iPhone using Home Brew
 
Used the tape and the silicone us the food grade everyone say to use. It is still leaking though the silicone. I ripped it all out and put new silicone in all I can think to do at this point


Sent from my iPhone using Home Brew
 
Used the tape and the silicone

I would think it takes quite a few wraps of teflon tape to seal or choke off the threads on the element, you shouldn't need the silicon sealant if done correctly.

https://www.youtube.com/watch?v=5QjkXWE1QI8#t=378

Bobby says liberal use of the teflon tape, more than once, 4.00 minutes in...the nut should have resistance threading on the element with the tape.
 
Ya the problem is one of the two holes they made too big but that one isn't leaking. The one that is leaking is the right size but as I put the element in the pit strips the most of the tape


Sent from my iPhone using Home Brew
 
Used the tape and the silicone us the food grade everyone say to use. It is still leaking though the silicone. I ripped it all out and put new silicone in all I can think to do at this point


Sent from my iPhone using Home Brew

Did you let the silicone cure? I'm sure there's a time period that needs to be waited before it's water tight right? Also, wrap that thing up more with tape! It won't hurt anything.
 
Yes I let it sit a min. of 24hrs after applying so I wont know if redoing the silicone will fix it till tomorrow night. that way it have almost 48hrs
 
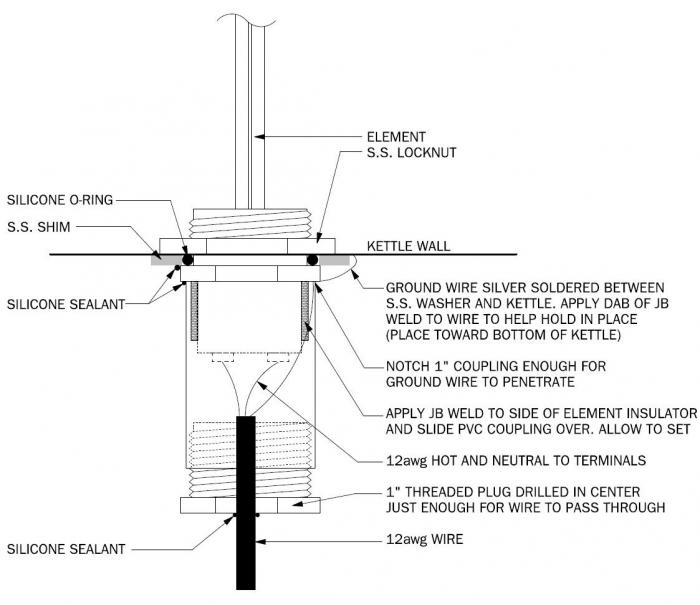
ok got a question. I added the o-ring on inside and on out side my pot but have seen several pic like below.. what way is correct??

ele.jpg
 
I haven't used a threadless element bulkhead before, but I was under the impression that the SS locknut that's used on the interior of the vessel has a knocked interior that allows the silicone o-ring to sit inside of it right? If that's the case, then the o-ring should be on the inside of that locknut and pressing up against the inside wall of the kettle.
 
Welp still leaking so at this point guess I'll try to find a wielder around me that will wield the pot..


Sent from my iPhone using Home Brew
 
I'm going to explain this one more time in case you've done something different.

Wrap the element threads with about 4-5 wraps of teflon tape going clockwise when the element tubes are facing you. If you put the teflon tape on backwards, it will get stripped off while you put the nut on and that's a fail.

Now, with just the teflon tape on the elements and nothing else, push it through the enclosure cap and then through the hole in the pot. Now push your oring over the threads and against the pot and then thread the 1" locknut on with the groove facing the oring. Once you get it touching the oring, turn the locknut so that you have a point on the hex facing directly up. Now hold the locknut still and turn the hex on the heating element until it's nice and tight.

That is very important. If you turn the locknut for tightening, you'll screw up the oring and it will bulge out of place.

The process I described has worked for 250 customers so far.

Do NOT put any gaskets on the outside of the pot. Do not put any silicone sealant on there.
 
I did all but i do have a gasket on the out side I'll remove that and try once more


Sent from my iPhone using Home Brew
 

Latest posts

Back
Top