• Please visit and share your knowledge at our sister communities:
  • If you have not, please join our official Homebrewing Facebook Group!

    Homebrewing Facebook Group

TIPS and TRICKS for beginning home brewers

Homebrew Talk

Help Support Homebrew Talk:

This site may earn a commission from merchant affiliate links, including eBay, Amazon, and others.
Agreed, I cold crash and gelatin fine a week to 10 days after brewing. Then generally keg it a couple days later. I'm usually in the keg inside 14 days.

I've only been doing all grain since June but I've learned a lot.

I think my biggest take away is that you don't need to be scared of wrecking a batch, it's surprisingly hard to do.

exactly

people like us have been brewing for centuries, but we have the benefit of superior equipment, a greater selection of ingredients and pretty much the entirety of human knowledge on the subject at our disposal

:mug:
 
Tip #1 - Find a local home brewer or home brew club and ask if you may join them as an observer to get a first hand feel for the process.

Tip #2 - Refer back to Tip #1
 
A tip I suggest is to use a 4 gallon bucket to ferment and to start out and make 2 gallon batches. Then you can get two 1 gallon glass jugs for secondary fermentation and add flavors to one of the jugs if you want.

The reason is that, a one gallon batch is a lot of work and you only get about 10 twelve ounce bottles. A five gallon batch will give you about 50 twelve ounce bottles but if the beer does not come out good you will have wasted a whole lot of supplies and time. Who wants to drink 50 bottles of a beer that did not come out well at all?


Benefits of making 2 gallon batches in 4 gallon buckets are.


  • With the head space no worry of over active fermentation blowing the airlock up to the ceiling creating permanent stains.
  • You can add and remove fruit, ginger, or other larger items easily. Try getting the fruit out of a 1/2 inch diameter hole.
  • Buckets are easy to clean
  • 2 gallons are lighter than 5 gallons

You can get 4 gallon food safe plastic buckets from local restaurants/bakeries for free! I even got 1 gallon glass wine jugs from a restaurant for free!
 
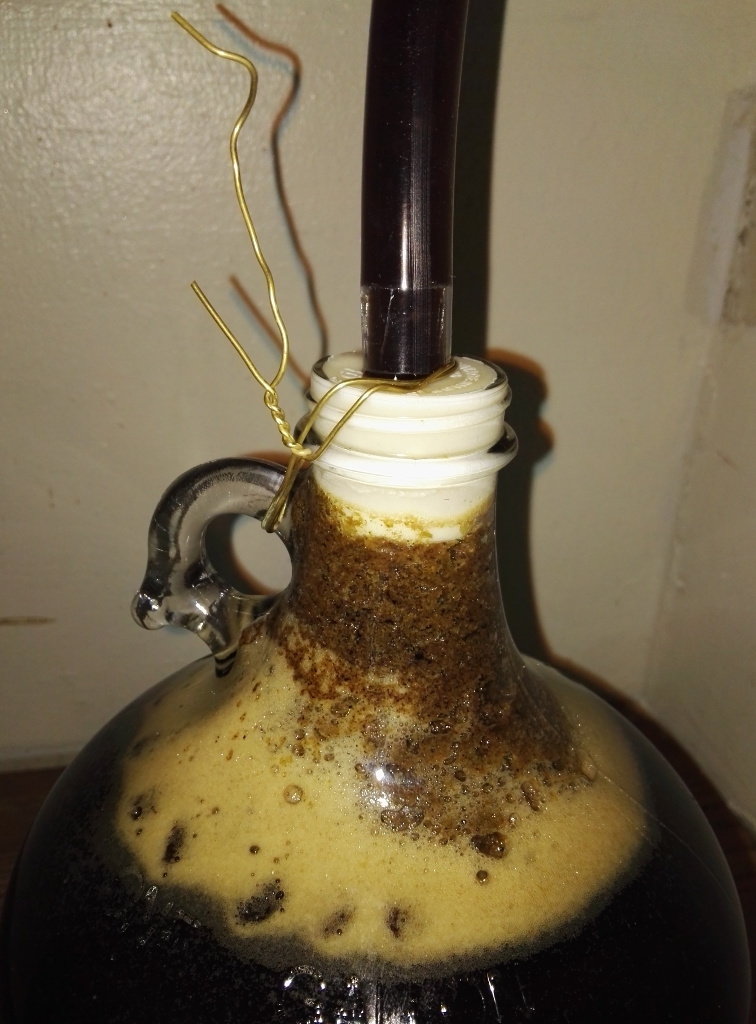
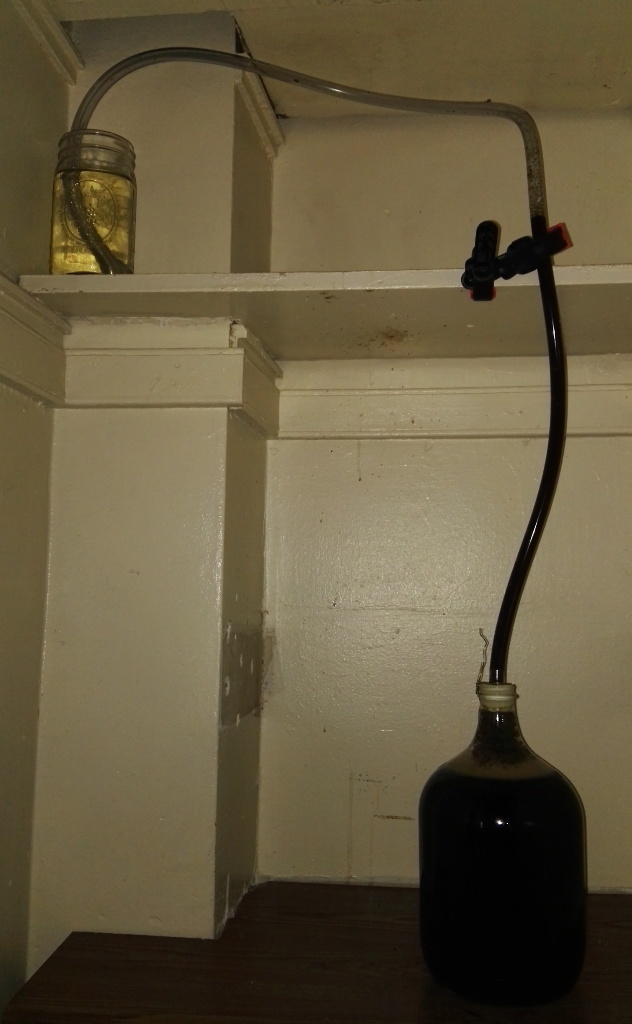
Use a long blowoff tube so that you do not lose beer during an over active fermentation. Use the tube to create a high arch so that the brew goes up a bit but will come back down into once fermentation slows down. You went through so much work to create your beer, losing 1/4 of it through a blowoff tube totally rots. I attached pictures of my setup. I also tied down the stopper bung thing with wire so it would not get blown out due to the over active fermentation.

blowoff.jpg


bung.jpg
 
Use a long blowoff tube so that you do not lose beer during an over active fermentation. Use the tube to create a high arch so that the brew goes up a bit but will come back down into once fermentation slows down. You went through so much work to create your beer, losing 1/4 of it through a blowoff tube totally rots. I attached pictures of my setup. I also tied down the stopper bung thing with wire so it would not get blown out due to the over active fermentation.

I haven't tried your set-up, but have read that the star san bottle being higher than the fermenter will let it siphon back into the fermenter, depending on circumstances.
 
I haven't tried your set-up, but have read that the star san bottle being higher than the fermenter will let it siphon back into the fermenter, depending on circumstances.

Yes, hydraulic gradient, definitely not a good idea.

As long as there is pressure from the fermentation, it is all good, but if there is beer in the tube and the fermentation slwos down and the pressure drops, the beer goes back into the fermenter, sucking the solution (star san) in.
 
Maybe his thinking was to elevate the blowoff so that whatever beer goes up will eventually run back down into the fermenter. Not sure I'd want blowoff to go back in. That falling column of blowoff beer will pull liquid from the blowoff jar back down with it, as Miraculix noted. Once that happens, you have a siphon going the other way and all the liquid from the jar will go into the fermenter.
 
Maybe his thinking was to elevate the blowoff so that whatever beer goes up will eventually run back down into the fermenter. Not sure I'd want blowoff to go back in. That falling column of blowoff beer will pull liquid from the blowoff jar back down with it, as Miraculix noted. Once that happens, you have a siphon going the other way and all the liquid from the jar will go into the fermenter.

I saw that picture. I'd rather waste some beer to a blow off than have the contents of that jar in it.

Seems like a very bad idea.
 
I thought my first brew was way too bitter, but I bottled it anyway and after a 3-4 weeks it was way better, so don't be too quick to dump a beer.
If you brew in a cold climate, (40F or below at night) you don't need a chiller just brew in the evening and set the pot outside with a lid on. In the morning it will be ready to dump into the fermenter.
Don't worry about kettle trub, it will all settle out.
I used to siphon from the kettle to the fermenter, now I just dump it all in, the wort get aerated and the beer comes out fine.
Don't worry about hot side aeration.
You don't need an oxygen tank or an aeration stone.
You don't need to make a yeast starter, just make a 2.5 gallon batch of beer, and then re-use that yeast for a bigger batch. The exception to the above is when I'm going to "wake up" yeast that has been stored for a while.
Learn how to save your yeast, you don't have to "wash" it. Just pour the slurry into a sanitized jar and keep in the refrigerator.
Check with the bakery section in your local grocery store, frosting comes in food safe buckets and can often be gotten really cheap.
Keep Star san in a bucket, you can use the same Star San over and over many times, the same with PBW.
You don't need an expensive rig to make wort. You don't need a pump, tri-clamp fittings, a sight glass on the kettle or many other things that are sold as essential.
Its OK to make small batches, although to me, 1 gallon seems like a lot of work for all the time involved. Making 2.5 to 3 gallon batches is sensible for a moderate drinker and allows you to brew often and have a lot of variety.
Brew clone recipes of top rated beers to get some experience before designing your own recipes.
Buy hops in bulk and keep in the freezer.
Look on craigslist for used brewing equipment, there's always something on there, but you need to know current prices, some people seem to try to charge full price for used gear.
Keep good notes and don't worry if you make mistakes, it will still be beer. :mug:
 
Maybe his thinking was to elevate the blowoff so that whatever beer goes up will eventually run back down into the fermenter. Not sure I'd want blowoff to go back in. That falling column of blowoff beer will pull liquid from the blowoff jar back down with it, as Miraculix noted. Once that happens, you have a siphon going the other way and all the liquid from the jar will go into the fermenter.

Pretty much guaranteed to happen - blowoff, followed by 100% suckback of that mason jar's contents.
 
This is really good advice. I like to brew 2-3 gallons until I get a recipe I really like, then I'll go up to the 5 gallon size. The free food-safe buckets from the grocery store are great.

I thought my first brew was way too bitter, but I bottled it anyway and after a 3-4 weeks it was way better, so don't be too quick to dump a beer.
If you brew in a cold climate, (40F or below at night) you don't need a chiller just brew in the evening and set the pot outside with a lid on. In the morning it will be ready to dump into the fermenter.
Don't worry about kettle trub, it will all settle out.
I used to siphon from the kettle to the fermenter, now I just dump it all in, the wort get aerated and the beer comes out fine.
Don't worry about hot side aeration.
You don't need an oxygen tank or an aeration stone.
You don't need to make a yeast starter, just make a 2.5 gallon batch of beer, and then re-use that yeast for a bigger batch. The exception to the above is when I'm going to "wake up" yeast that has been stored for a while.
Learn how to save your yeast, you don't have to "wash" it. Just pour the slurry into a sanitized jar and keep in the refrigerator.
Check with the bakery section in your local grocery store, frosting comes in food safe buckets and can often be gotten really cheap.
Keep Star san in a bucket, you can use the same Star San over and over many times, the same with PBW.
You don't need an expensive rig to make wort. You don't need a pump, tri-clamp fittings, a sight glass on the kettle or many other things that are sold as essential.
Its OK to make small batches, although to me, 1 gallon seems like a lot of work for all the time involved. Making 2.5 to 3 gallon batches is sensible for a moderate drinker and allows you to brew often and have a lot of variety.
Brew clone recipes of top rated beers to get some experience before designing your own recipes.
Buy hops in bulk and keep in the freezer.
Look on craigslist for used brewing equipment, there's always something on there, but you need to know current prices, some people seem to try to charge full price for used gear.
Keep good notes and don't worry if you make mistakes, it will still be beer. :mug:
 
By the way, I was aware that putting the jar with the blowoff tube up higher than the fermenter was a bad idea. I monitored the fermentation frequently. I also lowered the jar as the fermentation slowed so that nothing was sucked back into my brew. :)
 
A PH Meter and a Refractomenter was 2 of my last purchases, I wish I would have done it sooner! Milwaukee 102 PH Meter and a Brew Tapper Refractomenter both worked Great !!!!
 
Last edited:
The one thing it took me the longest time to learn was DON'T PITCH YOUR YEAST IN HOT WORT. Make sure your temperature is in the range of the yeast before you pitch. Stressed yeast make horrible flavors in beer. Pitch plenty of healthy yeast at the right temperature. For the longest time I thought it was the water...but it wasn't. I haven't ruined a batch this way in over 4 months (knock wood).
 
here's a tip for asking for feedback on your recipe here on HBT:

it will make beer

This!

And don't overthink your recipe. Ask 20 people and you'll get 20 different answers on what your recipe should be. Sure, if someone points out an obvious blunder, like if you were about to add 30% crystal to your mash, that is helpful. But at some point you have to go full speed ahead with your recipe. Don't let people nitpick the crap out of it. Just brew it.
 
Part of the problem (if you can call it that) with threads like this is that the utility may depend on whether a "new" brewer is truly new, or whether they're a few brews in. Even the language can be daunting to a new brewer. Sparge, pitch, wort, mash, tun, grist, lauter, liquor--I remember trying to acquire the language and it was...interesting.

BRAND NEW BREWERS:

I watched someone brew before I did my first one and it made a huge difference in that what I read online and in books became much clearer.

I taught a buddy to brew; he watched me do a brew day, then I supervised him doing his own, then he did his third one. He was doing all-grain so it was somewhat more involved, and he kept texting me with questions, but he did it.

The advice to join a Homebrew club or find a mentor to help at the outset is perhaps the best advice I can come up with. Try to find people who are better at it than you are, and learn from them. It will greatly accelerate the process.

NEWBIES BUT WITH SOME EXPERIENCE:

Keep trying to do things better than before. Continuous quality improvement. Keep good notes, and every time, make an improvement to your process. I'm a believer that outstanding beer is a consequence of the cumulative effect of best practices. Everything from proper management of yeast prior to pitching (rehydration if dry, starter if liquid), to getting the water chemistry right, to controlling mash temps, to controlling fermentation temperature, to oxygenating wort, to reducing or eliminating oxygen exposure post-fermentation, to....well, everything.

Some of this costs money, I know--but much of it can be done with low outlays of cash, and in other cases there are substitutes. Find a free refrigerator, get an Inkbird controller for $35, a heat mat for about $16, and you have fermentation temperature control! I bought a 4.4 cu ft. dormstyle fridge for $60, and my bigmouth bubblers will fit in there. It's small, so it'll fit in almost any apartment or house.

You can spend a lot, or a little, but whatever your resources and inclination, keep trying to improve. Every time.
 
I suggest learning to brew one beer style consistently that actually taste good before experimenting with other ingredient like fruit and spices.

usually my first order at any commercial brewery I've never been to before is their pale ale. if they can't get that right, I'm not interested in anything else they're brewing.

will give homebrewers much more slack, mostly because I'm not giving them $7 to drink what they've made.

but also, I think there's a point at the beginning of learning to brew where you want to make an extreme beer and that's OK. usually you go to taste it and you kick yourself for wasting the investment in time and money to realize maybe you should learn to crawl and walk before you try to run.

for me, that was the point when I made the decision between quitting and improving.

plus I think there's a bit of Mad Scientist in all of us, but, for most, the insanity is short-lived
 
Keep it simple for first few batches and stick with clone kits of beer you can purchase locally to compare
 
I have a couple that have not been mentioned yet:

1. I mash in a large cooler so I use 2 pots of water to mash and refill them for the sparge, etc. Not the issue here, but when I am done with these pots and the while the wort is boiling I wash my cooler tun. My point is CLEAN AS YOU GO! If you're no longer using something, a pot, tubing, etc. WASH IT, dry it (if necessary) and PUT IT AWAY. At the end of your brew day all you have left to clean is the brew pot, hydrometer & test tube/refractometer, spoon, and any other miscellaneous items.

2. When you set up your Wort Chiller, use your buckets (I use 3) to collect the water. Chilling usually takes me 10-15 minutes. The first bucket will be the hot water and colder for the others. Use some of the hot water to make a new batch of soapy water (if needed). As for the cold water...set a lid on them (don't seal) and save it for the net time you use the washing machine. I use the cold water in the garden during the summer. Speaking of the garden...I set out older buckets in the garden to collect rain water. Every little bit helps.

3. Buckets...Go to the bakery at Walmart and ask for larger buckets. They are the same lids that come with primaries (without the grommet and hole) and only cost $1. They are 3 gallons and food grade, but they smell of frosting. I use about 1 tsp of OxyClean and fill them with hot water for an overnight soak. Sometimes I have to do it twice, but rarely a third time to remove the smell. Also, when I lay them on their side it's like the odors fall out. If you stand them up to dry the odors remain...odd, but it works.

BONUS 1: After all the odors are gone I also use them for grain.

BONUS 2: I have about 6 extras that I use to measure out my grain for the next scheduled brews. I tape a 3x5 (or a piece of paper) on the lid with the recipe name and ingredients. On brew day (or the day prior) I grind it up and use another bucket to collect the ground grain.

BONUS 3: Sometimes (rarely, 3 out of 20 over the last 5 years), the bottom cracks and can no longer hold liquids. When this happens I remove the handle and cut the bottom out so I can use them in the garden. Say WHAT? LOL! After tilling I will put in some plants then push the bucket into the ground (about 3 inches) to keep creatures off. I used to use plastic coffee cans (bottoms removed), but these buckets are larger/better. Watering is easy, just point the hose into the bucket and the rest of the garden stays dry. No wasted water.

I probably have a ton of others, but I'll leave a couple not mentioned for the next person...
 
99% of the things you do, won’t matter as much as you think. Don’t stress the small stuff until you can truly control the small stuff. I’ve found a ferm chamber made the biggest difference in my beers. Have fun and try to take notes so you can learn/progress on your brews.
 
Try to find a good local home brew store, they will have dealt with many beginners before and have helped any progress in their brewing career. The place I go to is great because he set me up with my first kit and was great at answering all my questions. I always give him one of my beers to sample after they are ready and ask for any feedback. What they lack in brewing hardware inventory they make up for with all the required ingredients to make pretty much any beer and their advice is fantastic.
 
Another tip is you can dissessemble a spigot to clean it out thoroughly since wort gets trapped inside of them. Don't let a dirty spigot be the source of your beer infection.

Spigots can also be installed in plastic buckets so that you will not have to deal with the auto-syphon. Using a bucket with a spigot will allow you to rack or to bottle a lot easier. All you need to do is connect your hose to the end of your spigot.

You can install spigots in all your plastic buckets and use them to as fermenters.
 

Attachments

  • spigot_dissessembled.jpg
    spigot_dissessembled.jpg
    764.5 KB
Last edited:

Latest posts

Back
Top