You are using an out of date browser. It may not display this or other websites correctly.
You should upgrade or use an alternative browser.
You should upgrade or use an alternative browser.
Show us your sculpture or brew rig
- Thread starter Onescalerguy
- Start date

Help Support Homebrew Talk:
This site may earn a commission from merchant affiliate
links, including eBay, Amazon, and others.
jfkriege
Well-Known Member
I think that I currently have the smallest rig. My 2.5 gallon rig has a 20"x14" footprint (I could cut the legs a bit smaller as well) with brutus 20 all electric goodness. Yours looks like a nice rig, though. Well done.
https://www.homebrewtalk.com/f11/modular-electric-brewery-177852/
https://www.homebrewtalk.com/f11/modular-electric-brewery-177852/
I think i win for smallest rig. It's all electric and uses the RIMS as an instant water heater for fly sparging. Build thread here.

You win for being the smallest brewer.

Sizz
Well-Known Member
I think that I currently have the smallest rig. My 2.5 gallon rig has a 20"x14" footprint (I could cut the legs a bit smaller as well) with brutus 20 all electric goodness. Yours looks like a nice rig, though. Well done.
I just saw your rig in the electrical forums. Nice, you win!

ClaudiusB
Well-Known Member
The smallest brewerI think i win for smallest rig.
I think that I currently have the smallest rig.
jfkriege I don't think so
I am currently designing, testing the smallest and cheapest three vessel system.
No pumps all gravity when completed.
Hot water supply video below
Cheers,
ClaudiusB
BrewBeemer
Well-Known Member
That looks like a Claudie Mouse brewery.


$7.79 ($7.79 / Count)
Craft A Brew - LalBrew Voss™ - Kveik Ale Yeast - For Craft Lagers - Ingredients for Home Brewing - Beer Making Supplies - (1 Pack)
Craft a Brew


$10.99 ($31.16 / Ounce)
Hornindal Kveik Yeast for Homebrewing - Mead, Cider, Wine, Beer - 10g Packet - Saccharomyces Cerevisiae - Sold by Shadowhive.com
Shadowhive


$33.99 ($17.00 / Count)
$41.99 ($21.00 / Count)
2 Pack 1 Gallon Large Fermentation Jars with 3 Airlocks and 2 SCREW Lids(100% Airtight Heavy Duty Lid w Silicone) - Wide Mouth Glass Jars w Scale Mark - Pickle Jars for Sauerkraut, Sourdough Starter
Qianfenie Direct

![Craft A Brew - Safale BE-256 Yeast - Fermentis - Belgian Ale Dry Yeast - For Belgian & Strong Ales - Ingredients for Home Brewing - Beer Making Supplies - [3 Pack]](https://m.media-amazon.com/images/I/51bcKEwQmWL._SL500_.jpg)


$176.97
1pc Commercial Keg Manifold 2" Tri Clamp,Ball Lock Tapping Head,Pressure Gauge/Adjustable PRV for Kegging,Fermentation Control
hanhanbaihuoxiaoshoudian


$28.98
Five Star - 6022b_ - Star San - 32 Ounce - High Foaming Sanitizer
Great Fermentations of Indiana

$53.24
1pc Hose Barb/MFL 1.5" Tri Clamp to Ball Lock Post Liquid Gas Homebrew Kegging Fermentation Parts Brewer Hardware SUS304(Liquid MFL)
yunchengshiyanhuqucuichendianzishangwuyouxiangongsi


$58.16
HUIZHUGS Brewing Equipment Keg Ball Lock Faucet 30cm Reinforced Silicone Hose Secondary Fermentation Homebrew Kegging Brewing Equipment
xiangshuizhenzhanglingfengshop


$53.24
1pc Hose Barb/MFL 1.5" Tri Clamp to Ball Lock Post Liquid Gas Homebrew Kegging Fermentation Parts Brewer Hardware SUS304(Liquid Hose Barb)
Guangshui Weilu You Trading Co., Ltd


$22.00 ($623.23 / Ounce)
AMZLMPKNTW Ball Lock Sample Faucet 30cm Reinforced Silicone Hose Secondary Fermentation Homebrew Kegging joyful
无为中南商贸有限公司


Bigscience
Well-Known Member
The smallest brewer
jfkriege I don't think so
I am currently designing, testing the smallest and cheapest three vessel system.
No pumps all gravity when completed.
Hot water supply
Cheers,
ClaudiusB
I've thought about trying to use a french press as a MLT and a modded out coffee mug warmer plate as a kettle to make a 1 pint desktop system. That way you could brew at work. I'm not sure how the man would feel about it though.
Under one gallon wouldn't be worth the time
IMHO
That was a bit of a joke. Apparently, you did not read the last several posts before mine.
ThickHead
Well-Known Member
- Joined
- Oct 4, 2008
- Messages
- 967
- Reaction score
- 48
FYI...You might want to check the connections of your temperature probes prior to your next batch. It looks as if your assistant may have made some undesirable adjustments.
Fritztheelephant
Well-Known Member
What is the mecanno looking stuff I have seen in here? It looks like it is pre-rigged with holes for simple fabrication. Is this stuff cost effective/reliable? Are there any other examples of this stuff being used for brew rigs?
Moxie - The product I used on mine is called "Metal Lumber" by Republic Storage. My rig is very stable as-is but I will be adding some additional bracing for overkill. I am slightly concerned that with a full keggle and plenty of heat, some warping could occur. I will report back after the first full test. I think from a time perspective, this option is quite good compared to welding up a frame. It really comes down to wether you have the time, skill, equipment etc. to weld a frame.
Sizz
Well-Known Member
FYI...You might want to check the connections of your temperature probes prior to your next batch. It looks as if your assistant may have made some undesirable adjustments.
Agreed. This newly hired assistant is not working out as planned. When I said "go check the boil kettle thermocouple and make sure it's secure", he simply said "BOON!", and proceeded tug the 'balloon' downward. He's been with me for a year but I had to let him go. Good help is hard to find these days.....
- Joined
- Mar 4, 2009
- Messages
- 9,408
- Reaction score
- 1,926
He's been with me for a year but I had to let him go. Good help is hard to find these days.....
This made me laugh!
I like this guy's last name !
The other Lehr.

Nice rig. Whats really interesting is my family is from Smithtown, NY, a few miles east of you.
BrewBeemer
Well-Known Member
DNA testing required?
lehr
Well-Known Member
Nice rig. Whats really interesting is my family is from Smithtown, NY, a few miles east of you.
That's Flushing Michigan.
Pat
aModestMouse
Active Member
- Joined
- Aug 4, 2009
- Messages
- 41
- Reaction score
- 0

brewed on this for the first time yesterday.
MussBrew
Active Member
Here's my single tier stand. made out of adjustable shelving 24"x24"x60" which sits on top of a dolly. A no weld design for less than $70.00! Propane tanks are stored on sub shelving on the right.


fusa
Senior Member
Almost done with my wooden stand.

Just need to add a shelf for the propane tank. Went way over budget with the bolts, but will make it easier to move.
Just need to add a shelf for the propane tank. Went way over budget with the bolts, but will make it easier to move.
BulldogBrewer
Well-Known Member
Nice jfulton, I really like that. I'm just itching looking at some of these cool wood sculptures until I have time to start working on my own.
Almost done with my wooden stand.
Just need to add a shelf for the propane tank. Went way over budget with the bolts, but will make it easier to move.
I concur with that, I just bought the hardware for my wooden rig build - and it came out to about $60 - almost the same if not more than what I think the lumber is going to cost me...
You need 25 posts to show pics. :rockin:
klyph
Well-Known Member
You also can't hotlink pictures from facebook.
92greenyj
Well-Known Member
Thought I'd show you guys my home made system. 10 gallon capacity. Custom built from the ground up by myself and a buddy. I did all the welding on it. I typically build a lot of Jeep parts so I probably went a little overkill as that is what I am used to doing on the Jeep front. I built this system about 5 years ago now so I don't remember every brand part we used, but here is a rough parts list:
3 15.5 gallon kegs (got for free from my old job)
2 Outdoor turkey fryer burners
2 brewers pumps (i think melling)
copper tube
various valves
pipe wrap insulation
hoses and tubes
2 BBQ ignitors
2 propane gas valves
propane regulator (12psi)
2 work spot lights (i often brew at night)
1 extension cord
120V toggle switches
misc electrical stuff, box, conduit, connectors, etc
4 4" locking heavy duty casters
a 2 ton hydraulic bottle jack
level
sight glass
old steel lamp post we got for free
about 50' of 1"x1" steel tube
expanded mesh
sheet metal
We used the lamp post (4"x4" steel) to make the legs. We wanted the system to sit high enough to store all of our fermenters underneath it as my garage space is at a premium. Welded some plate and the casters to it. Layed out the kegs and a propane tank to get our length and proceeded to build the frame from there. from left to right we have:
the propane tank area, seperated from the boil kettle by a heat shield.
the boil kettle. One turkey fryer underneath it.
the mash tun. fully insulated and contained and seperated from both the boil kettle and hot water tank by heat shields. Top is cut to fit the lid from our old mash cooler. holds temp perfectly. Has a false bottom and hole in the bottom connected to one of the pumps for recirculating and transfering wort to the boil kettle. Also, its on hinges and tilts out for easy cleaning.
the HLT, again seperated by a heat shield from the mash tun with a turkey burner underneath and fed to the second pump.


so what do you guys think? let me know if you want more details or more detailed pics of something specific
3 15.5 gallon kegs (got for free from my old job)
2 Outdoor turkey fryer burners
2 brewers pumps (i think melling)
copper tube
various valves
pipe wrap insulation
hoses and tubes
2 BBQ ignitors
2 propane gas valves
propane regulator (12psi)
2 work spot lights (i often brew at night)
1 extension cord
120V toggle switches
misc electrical stuff, box, conduit, connectors, etc
4 4" locking heavy duty casters
a 2 ton hydraulic bottle jack
level
sight glass
old steel lamp post we got for free
about 50' of 1"x1" steel tube
expanded mesh
sheet metal
We used the lamp post (4"x4" steel) to make the legs. We wanted the system to sit high enough to store all of our fermenters underneath it as my garage space is at a premium. Welded some plate and the casters to it. Layed out the kegs and a propane tank to get our length and proceeded to build the frame from there. from left to right we have:
the propane tank area, seperated from the boil kettle by a heat shield.
the boil kettle. One turkey fryer underneath it.
the mash tun. fully insulated and contained and seperated from both the boil kettle and hot water tank by heat shields. Top is cut to fit the lid from our old mash cooler. holds temp perfectly. Has a false bottom and hole in the bottom connected to one of the pumps for recirculating and transfering wort to the boil kettle. Also, its on hinges and tilts out for easy cleaning.
the HLT, again seperated by a heat shield from the mash tun with a turkey burner underneath and fed to the second pump.
so what do you guys think? let me know if you want more details or more detailed pics of something specific
Boerderij_Kabouter
Well-Known Member
Probably the best tippy dump design I have seen. I love it. Full insulation with good aesthetics and a practical way to clean it out.
Very well done.
Very well done.
92greenyj
Well-Known Member
Probably the best tippy dump design I have seen. I love it. Full insulation with good aesthetics and a practical way to clean it out.
Very well done.
thanks. Since i took those I have added a water filter set up mounted to the side next to my HLT. I've been making some small improvements to it lately as I finally got back into brewing.
kal
Well-Known Member
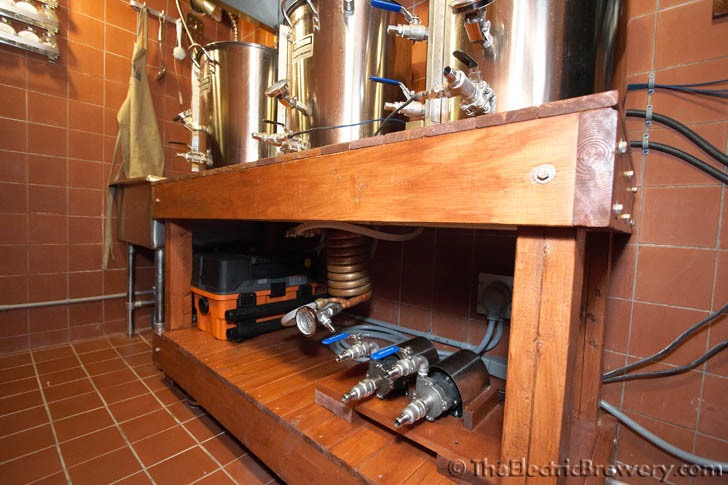
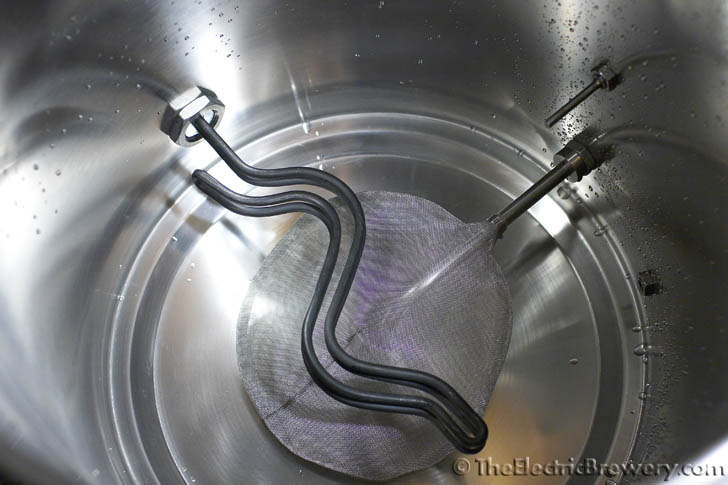
Here's a bunch of pictures from mine:

Hot Liquor Tank:

Mash/Lauter Tun:
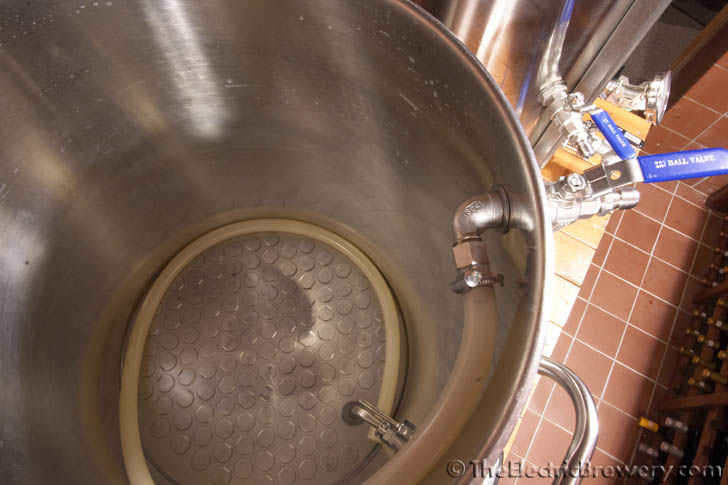
Boil Kettle:
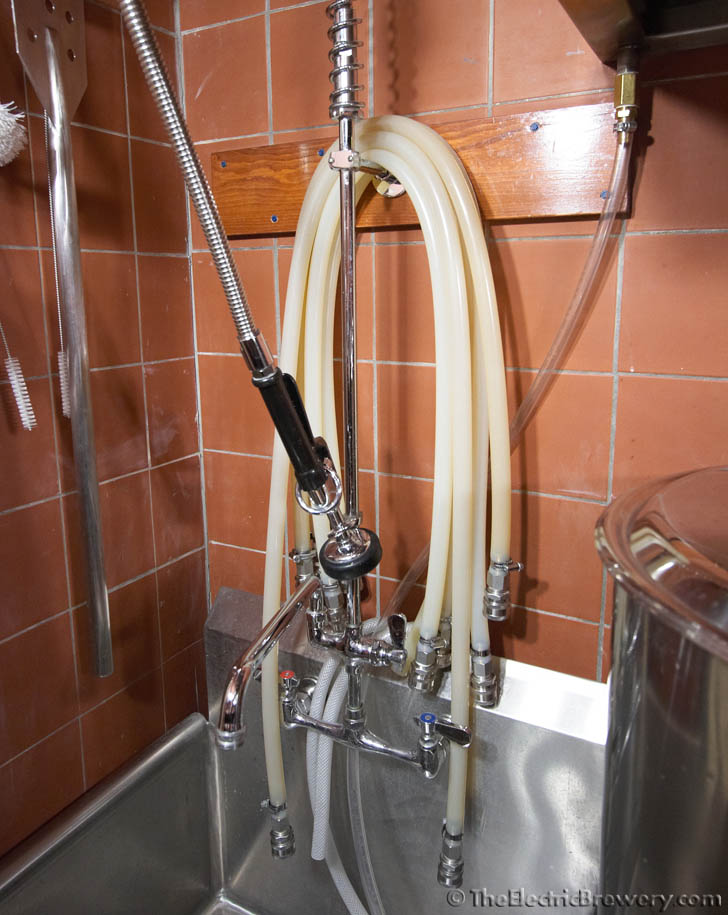
Hoses and sink:
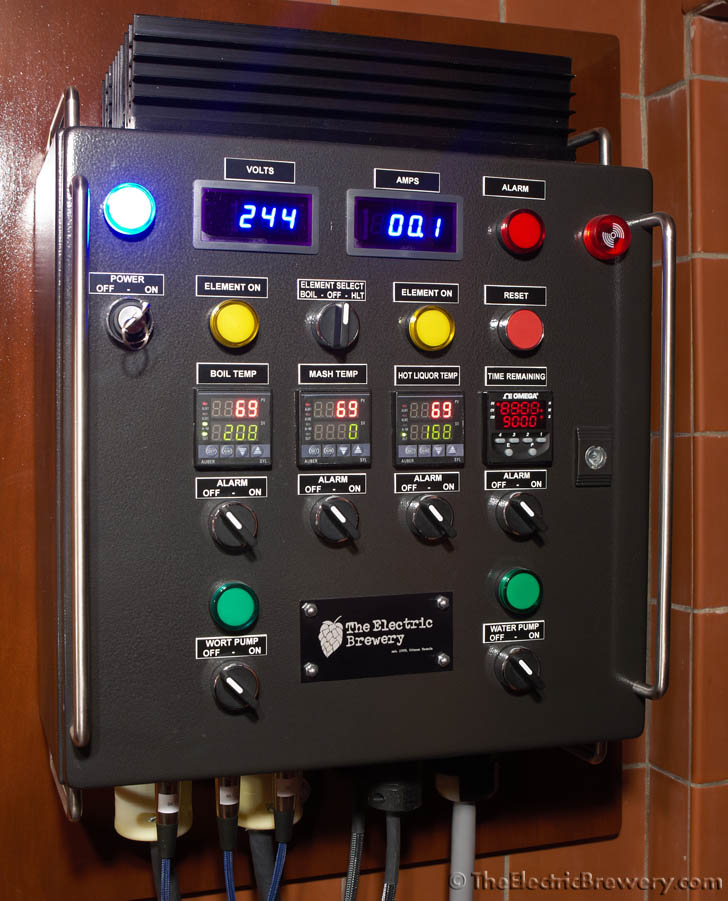
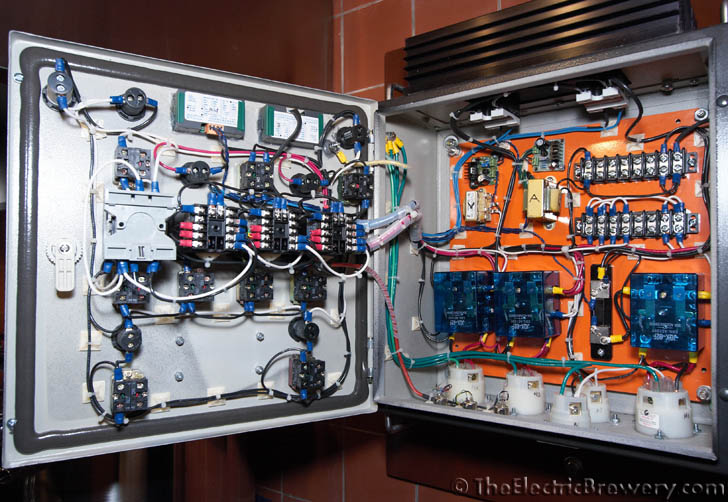
Control panel:
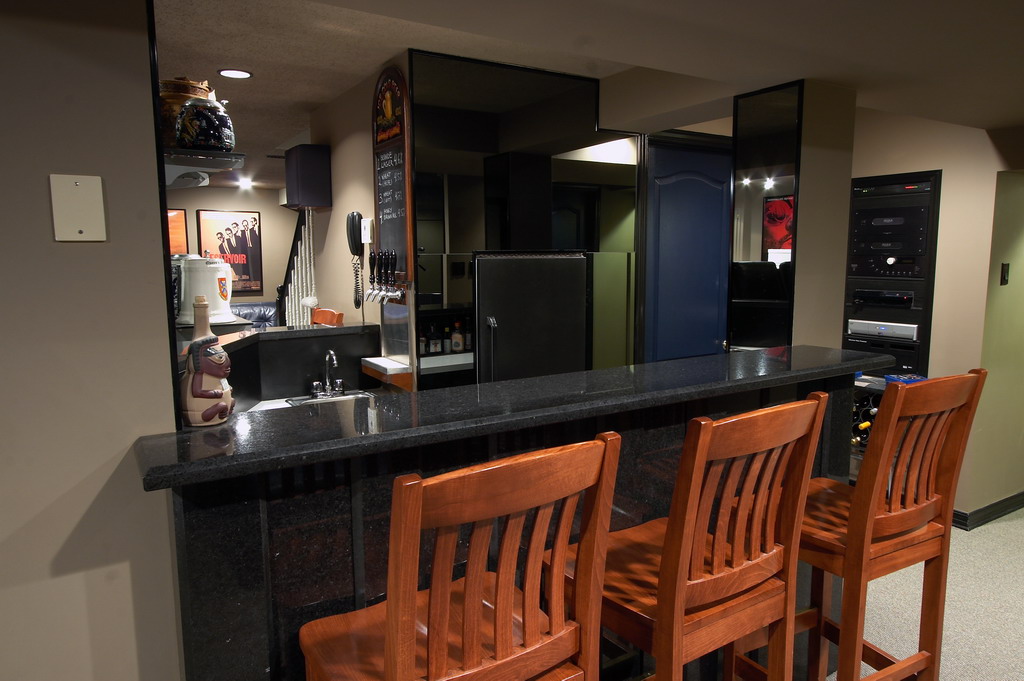
Bar/Taps:
The liquid gold at the end of the rainbow:

Kal
Hot Liquor Tank:
Mash/Lauter Tun:
Boil Kettle:
Hoses and sink:
Control panel:
Bar/Taps:
The liquid gold at the end of the rainbow:
Kal
Similar threads
- Replies
- 11
- Views
- 1K
- Replies
- 132
- Views
- 10K
- Replies
- 45
- Views
- 5K
