• Please visit and share your knowledge at our sister communities:
  • If you have not, please join our official Homebrewing Facebook Group!

    Homebrewing Facebook Group

Robobrew/Brewzilla Discussion

Homebrew Talk

Help Support Homebrew Talk:

This site may earn a commission from merchant affiliate links, including eBay, Amazon, and others.
The split phase (2 hot, 1 ground) complicates things in my head. I'm pretty sure I can use a normal 110-220v ac/dc powersupply to get 5v and hook up hot1 and hot2 to hot and neutral on the ac/dc powersupply. I'm a bit confused on the SSR setup, would I just hook up 1 hot to the SSR and treat the other one as neutral? Then each half phase the SSR is alternating between switching hot and neutral?

Maybe a contactor is more appropriate? What about using 2 SSR, 1 for each half phase, that would also help distribute heat.
If the DC power supply is rated for something like 85 - 250VAC input, just connect the two hots to the power supply. If one of the inputs is labeled "Neutral" connect a hot to it. Do not mix up ground and neutral as doing so will cause your GFCI to trip.

With an SSR, you only want one hot going thru an SSR, as using two SSRs will double the power "wasted" in the SSRs (25 - 35W in each one.) An SSR is not a perfect, or galvanically isolating switch (doesn't remove voltage). Think of an SSR as a current modulator with high current and very low current conduction states. Here's an equivalent circuit model for an SSR that will help you understand what an SSR looks like electrically:

SSR Model.PNG


Here's a simple design that shows how an SSR and contactor can be used:
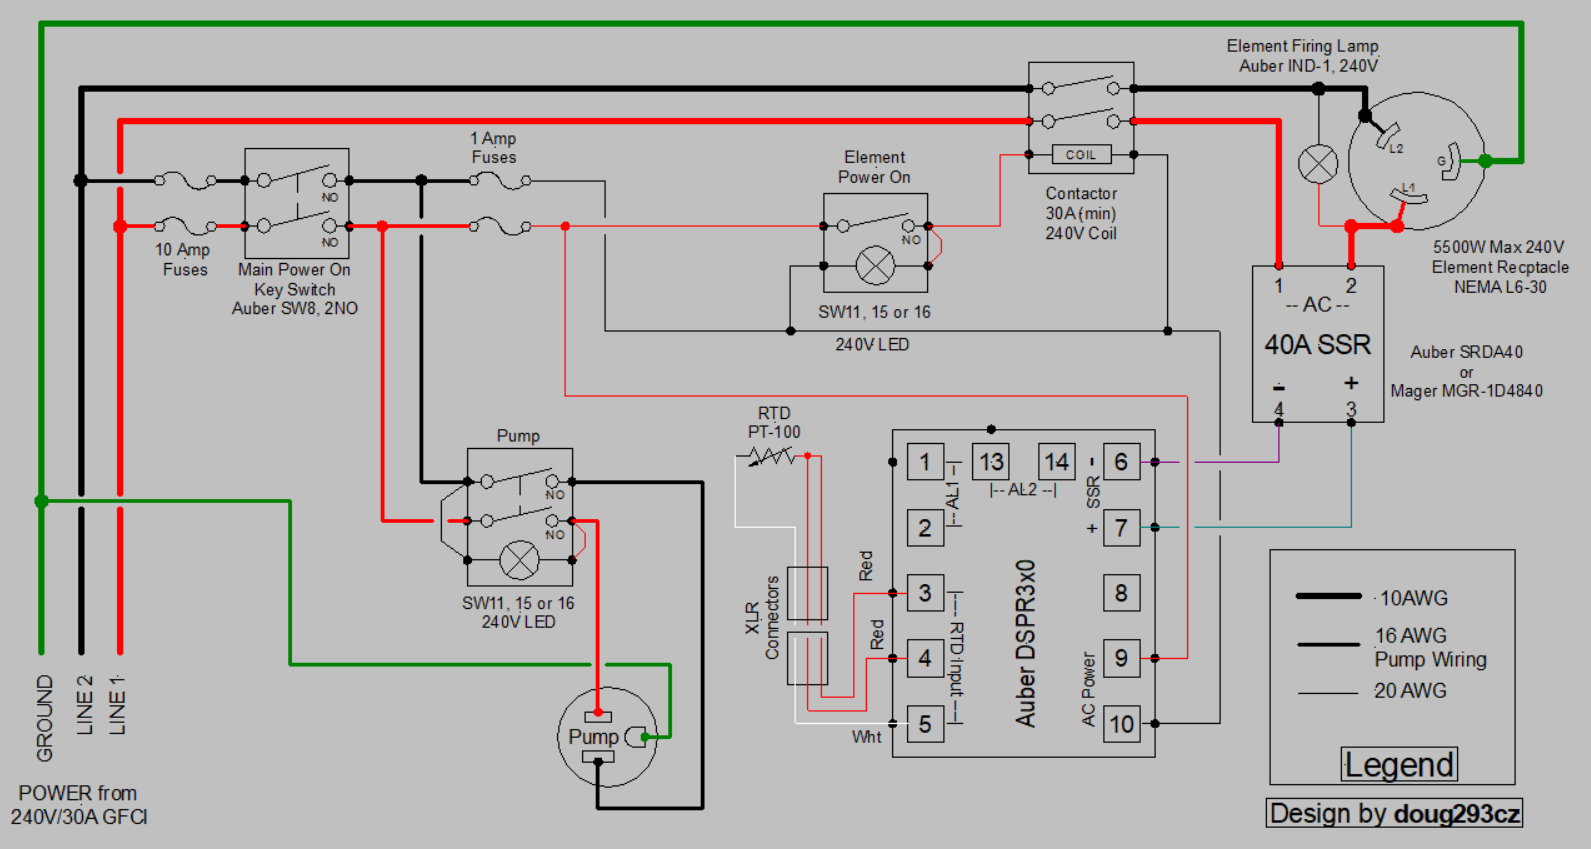
DSPR300 1-Pump 1-Element 240V only.PNG


The contactor provides galvanic isolation of the element from the input power. This can be advantageous, as the most common failure mode for SSRs is latched in the "ON" state. Without the galvanic isolator, you would have to unplug a live 240V circuit from the wall while it is pulling ~23A, which will give you some startling arcing when you do it.

You would substitute your microcontroller for the DSPR.

Brew on :mug:
 
I used my 3.1.1 to brew today, still refining my process. I did notice that at a simmer it only read 206, and at a boil 208. I'm only about 130' above sea level, not enough to make a difference. Which makes me think my unit needs calibration. But when draining after cleaning, the water coming out tested almost exactly at the reading. Suggestions?
Hi John.
I did calibrate my unit by a couple degrees. It has been a few years, so I forget exactly. But on my Brewzilla, I normally set the temp to 219 and let it rip. One of the early complaints of these 110v units was that the boil wasn’t strong, but I just set it a bit high and generally get a strong boil.

I just searched for how far above sea level. Answers were from 482 to 741. One site said 629 ft, so I‘lL go with that as a middle ground. There are a lot of hills around here Which probably accounts for the variance.
 
Good to see people still posting on this thread. I haven’t been brewing near as much recently, or checking in here. Just restocked on some supplies, and may brew today. My last one was a pale ale which turned out well. This one will be the Dortmunder Lager recipe that’s become my standard brew. My taste has really shifted from favoring IPA’s to lagers the past couple of years. This Robobrew/Brewzilla unit is still going strong. Love it.
 
I recently got a 35L digimash, I also have an anvil pump. If I hook up the pump to the digimash is it essentially a robobrew? Can I use the robobrew equipment profile in brewfather?
 
I recently got a 35L digimash, I also have an anvil pump. If I hook up the pump to the digimash is it essentially a robobrew? Can I use the robobrew equipment profile in brewfather?

I'd say pretty close, remember your numbers may vary slightly based on where you are in the world, elevation, temperature, etc.
 
I used my 3.1.1 to brew today, still refining my process. I did notice that at a simmer it only read 206, and at a boil 208. I'm only about 130' above sea level, not enough to make a difference. Which makes me think my unit needs calibration. But when draining after cleaning, the water coming out tested almost exactly at the reading. Suggestions?i
 
I've got a obout 40 brews into my 35L 110 volt Brewzilla, I've tried calibrating it with ice water and at boil, it seems that if I adjusted one end the other was off, i mainly care about the boil, it tops out at 219,my temp for mashing in needs to be about 9 degrees over what my desired temp is, I use a thermometer in my mash to control my temp, I do mostly step mashed rather than a single infusion mash, I have no.issues, still beats propane IMHO,that being said, I run the jacket, and a steam trap with 3" viewing window, once I get past the hot break, the cover and trap go on and I get a vigorous boil with only the 1000 w heater,my boil off rate for a 5 gallon 1 hour boil is 1 gallon, even with the steam trap,, very close to what it was"free willy," I always use rice hulls, 8 ounces if using wheat,I leave the silicone grain cap on and pay attention to.my mash,stiringvevery 15 minutes, cycling the pump off and on as needed.,I tried the plastic sight glass and found them brittle, I've since gone to a glass sight glass and am happy,, doing this(cycling the pump) will eliminate any scorching from a dry boiler.. I use a pulley to pull the malt tube, or hold it higher for larger grain Bill's, my sparge water is adjusted to 5.6 and heated to 170 in a 5 gallon cooler fitted with a 500 w heating element controlled by an inkbird controler, a small pump is used to pump.my sparge water... I use a modified hop spider that is held across the malt pipe rests so I can make late hop additions through the top of the steam trap..I dont measure efficiency, my numbers are good, I ferment well, the beer is good , it's all I care about.
 
I use a thermometer in my mash to control my temp
That's the most important key to using the Brewzilla, in my experience. I completely disregard the temperature as reported by the Brewzilla (not at all reliable), and rely entirely on the temperature probe inserted in my mash during the entire mash. I use an Inkbird meat probe thermometer (the long probe is attached to a long metallic lead and inserted into the centre hole of the top filter screen), which makes all the difference, and adjust the target temperature accordingly. I also make sure to set the pump at about 50%, since it allows the wort near the heating element to heat properly before recirculating, rather than passing directly down the drain without much chance of reheating.
 
That's the most important key to using the Brewzilla, in my experience. I completely disregard the temperature as reported by the Brewzilla (not at all reliable), and rely entirely on the temperature probe inserted in my mash during the entire mash. I use an Inkbird meat probe thermometer (the long probe is attached to a long metallic lead and inserted into the centre hole of the top filter screen), which makes all the difference, and adjust the target temperature accordingly. I also make sure to set the pump at about 50%, since it allows the wort near the heating element to heat properly before recirculating, rather than passing directly down the drain without much chance of reheating.
Do you recall which Inkbird model?
 
No, I haven't tried that. You would likely have to use more grain to get the gravity up to where you wish. Should be less astringent.
thanks ...yes , but I think it will have more flavor and color control ... especially in red beers .... without washing....irish red ale ....red ipa
 
Checking back in. I am 1.5 years and about a dozen brews into a 65L, 3.1.1, 220v. My biggest frustration was auto-shut downs at boiling due to scorch grain-**** on the bottom. My second was the piss poor efficiency (65%). Fixing either was a catch-22. By grinding grain further to get better effic., I created more 'dust' to stick to the bottom and scorch. So I went back to mashing in my cooler - no more scorched mess on the bottom and efficiency is in the high 80's. The 65l is a hot liquor tank, then I fly sparge into pots. When I'm out of HLT water, wort is ready to pour in from pots. I hit boil in 10-15 minutes. Honestly, I am happy even though the malt pipe does not function enough. There's 1.7 gallons of dead tun space which limits the amount of sparge/rinse water which can be used. I've no idea how to improve the grain dust/scorching issue. Anyway - a cross German-CAP pilsner will be ready in a few months and the fruit-cream ale in a few weeks. The Belgian Strong on tap just may last until then...Cheers

Can you send us any photos of the scorching? This is quite difficult to do as the watt density is quite low already. We the Gen 4 is even lower but the older 3.1.1 was still quite low watt density too.

Also with triggering the boil dry sensor this also sounds strange as all 3.1.1 models used the higher 175C boil dry cut out that you can see here:
https://www.kegland.com.au/products/brewzilla-35l-replacement-175c-thermal-cut-out-switchIt should be quite difficult to get this hot if you have liquid in the boiler and that is not something we have seen before. Were you re-circulating when this happened?
 
I’ve been experimenting with BIAB in my Brewzilla and after crushing my false bottom I added a screw to act as support. Works great! I was able to use a rubber mallet to flatten the crushed false bottom.
If you want to load the false bottom with weight I would suggest getting this one instead:
https://www.kegland.com.au/products/35l-heavy-duty-false-bottom-for-digiboil-and-brewzilla
This one is designed to actually be loaded.

The one you have in the shot is just designed to be a pump protection screen.
 
65L bought summer of 2019. Modifications include pulling the overflow pipe and plugging the mash pipe with a stainless steel plug.

1. I wet condition the grain before milling. Even before I was wet conditioning I didn't have any issues with recirculating though, the conditioning helps with the muck and dust. Right now I'm milling at .34.


2. I mash thin 2 qts/pound of grain. So for a standard 1.050 beer I'm mashing in with 11 gallons.

3. I mix the grain in for the mash adding rice hulls as I go...three handfuls total. I mix everything well let it rest for 10 minutes then start recirculating with this: Eagle Brewing BE510 Siphon Spray Wort Aerator https://www.amazon.com/dp/B00ODSS5J8/ref=cm_sw_r_cp_apip_pUnZs1AJRsAE2

I use the Hochkurz mash steps. First step at 144° for 30-45 minutes. Stop recirculating, mix really well let it rest 10 minutes and then recirculate and bump temperature up to 158 for 30-45 minutes.

Once done I pull the pipe, sparge with my Digiboil 1/2 gallon at a time...sometimes i put the top screen on sometimes I don't.

Never had a stuck sparge using this method. What it sounds like to me is your mash is too compact or channelling is happening interupting the flow of wort from top to bottom.
I'm new to the forum...I bought my Brezzila 35 gen 4...I'm reading this topic...I liked your technique...a question: do you turn off the power of the machine when you do the 10 min stops?

Thanks
 
OK....and the hop trub? ... how to do ? ...use that fine mesh bottom screen?

Yes. When the boil is done, I let it rest for five minutes. Then I use the whirlpool arm for 15-20 minutes to create a nice cone in the middle of trub/hops. Cool through a CFC and into the fermenter.
 
Yes. When the boil is done, I let it rest for five minutes. Then I use the whirlpool arm for 15-20 minutes to create a nice cone in the middle of trub/hops. Cool through a CFC and into the fermenter.
No need for the whirlpool or even to wait. There is a screen at the bottom that will filter out most of the trub. In addition, you can use the same brew bag, place it in the fermenter, and drain the wort from the Brewzilla through the brew bag into the fermenter. That's the process I use, and the wort comining into the fermenter is very clear.
 
No need for the whirlpool or even to wait. There is a screen at the bottom that will filter out most of the trub. In addition, you can use the same brew bag, place it in the fermenter, and drain the wort from the Brewzilla through the brew bag into the fermenter. That's the process I use, and the wort comining into the fermenter is very clear.

I’m aware and thank you for the advice but I’m good with my process and results.
 
Back
Top