• Please visit and share your knowledge at our sister communities:
  • If you have not, please join our official Homebrewing Facebook Group!

    Homebrewing Facebook Group

Native ESP8266 BrewPi Firmware - WiFi BrewPi, no Arduino needed!

Homebrew Talk

Help Support Homebrew Talk:

This site may earn a commission from merchant affiliate links, including eBay, Amazon, and others.
(helpful words which I had to cut all of because posting from phone)

Pocketmon's pinout was based on the original pinout that I was using if I recall correctly. That said, I would imagine that you could remap the pins he's using for the rotary encoder to unused pins in the current pinout if you were so inclined.

To the extent that you're looking to retain all the features, you could even replace the heat/cool pins with OneWire GPIO expanders and keep the buzzer/door pins (though I wouldn't see an issue with dropping the buzzer pin regardless).

No matter what - adding a rotary encoder will require a different PCB. My preference would be to make sure that the heat/cool pins weren't remapped to outputs (so if someone flashed the wrong firmware to their device they wouldn't burn up their fridge/heater/house) but beyond thinking about keeping the firmware safe to use with the alternate pinout I don't see an issue with remapping pins given a different use case.
 
Worked!

Still getting this warning ... maybe put it on your TODO list?

Sep 18 2016 10:49:23 Warning: minimum BrewPi version compatible with this script is 0.4.0 but version number received is 0.2.4

Also, do you think you might be able to give us the ability to name the network device something other than "ESP2384371"?

On the version warning - I'll take a look at updating the BrewPi script to not complain (it works after all), but I'm not inclined to change the firmware version as the warning is accurate. It's unlikely, but if there were to be updates to the official fork which made the firmware compatible with the official script, there could be features added which don't work.

Of course, we're only using 1/3 of the available flash space on the ESP8266, so theoretically whatever features could likely be back ported. Go figure.

In terms of changing the mDNS name, absolutely. I just need to research the best way to validate & store the "new" name in SPIFFS (which is probably a 5 minute thing). Adding the code to request the name when you configure the wifi looks like it would be pretty simple. In short - I just need to stop being lazy.
 
I'm not sure what the original developers had in mind for the buzzer and the door switch. I think the door switch is mildly useful as an annotation so you can see where the door was opened and determine if there's an issue recovering the temp. Of course it's often very apparent from the fridge temp too if the door opened. I did have one case where I left the door open accidentally and was able to see that from home. I lacked the automation to close it remotely however. :)

If all the buzzer is doing is beeping on startup, it's only very marginally useful. If it could be a high/low temp alarm it would be more useful.

It is possible to do the rotary encoder with only one of the remaining GPIO and not change anything else:

http://hackaday.com/2015/06/15/king-of-clever-reads-4-pin-rotary-encoder-with-one-analog-pin/
and
https://analog10.com/posts/rotary_encoder_analog_input.html

It's not going to be cut and paste from @Pocketmon 's code, but it does have the appeal of keeping the firmware version safe, and does not force people to decide which thing they don't want. The implementation could be complete.

I say that knowing I don't have the time do do it either. So, it will require someone who can do it and who has the time to volunteer.
 
On the version warning - I'll take a look at updating the BrewPi script to not complain (it works after all), but I'm not inclined to change the firmware version as the warning is accurate. It's unlikely, but if there were to be updates to the official fork which made the firmware compatible with the official script, there could be features added which don't work.
So let me see if I understand. We're technically/sorta using the current script (Master), but the Arduino code (Legacy)?

In terms of changing the mDNS name, absolutely. I just need to research the best way to validate & store the "new" name in SPIFFS (which is probably a 5 minute thing). Adding the code to request the name when you configure the wifi looks like it would be pretty simple. In short - I just need to stop being lazy.
That ain't being lazy ... I'm sure you have a day job. :) It's all I can do sometimes to fix a little documentation here and there. I have the ability to code, I've just not had the time to sit down and figure out how to work with this project/language.
 
So let me see if I understand. We're technically/sorta using the current script (Master), but the Arduino code (Legacy)?


That ain't being lazy ... I'm sure you have a day job. :) It's all I can do sometimes to fix a little documentation here and there. I have the ability to code, I've just not had the time to sit down and figure out how to work with this project/language.


Doesn't Pocketmons guide change the ESP name to brewpi, is there something in his code that can be lifted when getting the ESP from AP to connected to wifi?
 
Pocketmon's pinout was based on the original pinout that I was using if I recall correctly. That said, I would imagine that you could remap the pins he's using for the rotary encoder to unused pins in the current pinout if you were so inclined.


To the extent that you're looking to retain all the features, you could even replace the heat/cool pins with OneWire GPIO expanders and keep the buzzer/door pins (though I wouldn't see an issue with dropping the buzzer pin regardless).


No matter what - adding a rotary encoder will require a different PCB. My preference would be to make sure that the heat/cool pins weren't remapped to outputs (so if someone flashed the wrong firmware to their device they wouldn't burn up their fridge/heater/house) but beyond thinking about keeping the firmware safe to use with the alternate pinout I don't see an issue with remapping pins given a different use case.


I've made the changes but I'll need to test it before I put in a pull request. In principle the current pcb will work you could just drop the rotary encoders into the headers of the ESP no? Not as tidy but equally as functional
 
Doesn't Pocketmons guide change the ESP name to brewpi, is there something in his code that can be lifted when getting the ESP from AP to connected to wifi?

It's actually really simple - the line of code that needs to be changed is this one. What I'm talking about doing is using the "custom parameters" options in WifiManager to collect a custom mDNS name, save it, then load/use it going forward. The only thing holding me up is the actual validating/saving/loading bit -- which should be one of the easiest parts.

I've made the changes but I'll need to test it before I put in a pull request. In principle the current pcb will work you could just drop the rotary encoders into the headers of the ESP no? Not as tidy but equally as functional

Yep. I like tidy though. :) If it works, I'll design a different version of the PCB with headers for it.
 
So let me see if I understand. We're technically/sorta using the current script (Master), but the Arduino code (Legacy)?

Correct.


That ain't being lazy ... I'm sure you have a day job. :) It's all I can do sometimes to fix a little documentation here and there. I have the ability to code, I've just not had the time to sit down and figure out how to work with this project/language.

Setting up the environment is the worst part, in my opinion (or at least it was for me). There's a way to compile using command line tools -- but I don't know how to leverage it.
 
It is possible to do the rotary encoder with only one of the remaining GPIO and not change anything else:

http://hackaday.com/2015/06/15/king-of-clever-reads-4-pin-rotary-encoder-with-one-analog-pin/
and
https://analog10.com/posts/rotary_encoder_analog_input.html

That solution would use the A0 pin as well, which is awesome since currently that pin is unmapped. The current implementation uses interrupts - I doubt we could get interrupts on the A0 pin but that's not to say it couldn't be integrated into BrewPi with some code tweaks.
 
Setting up the environment is the worst part, in my opinion (or at least it was for me). There's a way to compile using command line tools -- but I don't know how to leverage it.
I think I have the environment set up now on my laptop. The part I fail at is local development with integration into GitHub. It's just not clicking for me.
 
Having issues with some of the includes.

For the OneWire I used this.

What do I use for the I2C?

I don't recall installing any libraries manually. I believe I just installed the Arduino development environment, installed the ESP8266 within the boards manager and then set up Visual Micro. I can't remember if the "deep search includes" option in Visual Micro needed to be on or off.
 
I don't recall installing any libraries manually. I believe I just installed the Arduino development environment, installed the ESP8266 within the boards manager and then set up Visual Micro. I can't remember if the "deep search includes" option in Visual Micro needed to be on or off.
Okay, that makes sense. They are in the project so I should be fine there. Then I hit this:

Compiling debug version of 'brewpi-esp8266' for 'WeMos D1 R2 & mini'

brewpi-esp8266.ino: 2:25: fatal error: WiFiManager.h: No such file or directory
#include <WiFiManager.h>
compilation terminated
Error compiling project sources


This one is not in the project files. I think it's this one?

https://github.com/tzapu/WiFiManager

Yep - that's the one. I think you can install it with the library manager.

Let me know if you run into more issues - I'll update the "develop" document
 
I'm not sure what the original developers had in mind for the buzzer and the door switch. I think the door switch is mildly useful as an annotation so you can see where the door was opened and determine if there's an issue recovering the temp. Of course it's often very apparent from the fridge temp too if the door opened. I did have one case where I left the door open accidentally and was able to see that from home. I lacked the automation to close it remotely however. :)

If all the buzzer is doing is beeping on startup, it's only very marginally useful. If it could be a high/low temp alarm it would be more useful.

It is possible to do the rotary encoder with only one of the remaining GPIO and not change anything else:

http://hackaday.com/2015/06/15/king-of-clever-reads-4-pin-rotary-encoder-with-one-analog-pin/
and
https://analog10.com/posts/rotary_encoder_analog_input.html

It's not going to be cut and paste from @Pocketmon 's code, but it does have the appeal of keeping the firmware version safe, and does not force people to decide which thing they don't want. The implementation could be complete.

I say that knowing I don't have the time do do it either. So, it will require someone who can do it and who has the time to volunteer.

1. My implementation of Rotary encoder is simple, but it does cause some issues which is caused by the pull-ups of the rotary encoder module, a KY 040. The configuration that works on one of my setup doesn't work on the other but prevent the system to boo up. You might need to figure out which would work.
Update: I was wrong about the rotary encoder. Please don't use that configuration.

2. I skimmed the analog PIN method and thought it might not work in this application. "The ADC is gated by the watchdog timer every millisecond." I don't think we have this resource on ESP8266.

3. I am thinking about using a IO expander, but in fact not having the rotary encoder is not really a big deal since it is easier to control by the web pages. I don't feel urgent to implement this.

4. Buzzer is a 'nice-to-have'. I had it in my Arduino build and want email notification instead. My Arduino build was very unstable and sometimes reset several times a day. When it reset, I heard the buzzer if I happened to be nearby. Nothing I could do for it, however. Therefore, I don't care about it anymore.:ban::tank::mad:

To Thorrak,
Be careful with D0(GPIO16), which is set to HIGH during reset. It might stay HIGH for 2~3 seconds during booting up before setup() is executed.
 
I'm running into issues with OneWire still. It's possible my work laptop is having issues so I'll try this again @ home and see what I get. That might take a day or two unless I can get a hole punched in my firewall.
 
I'm running into issues with OneWire still. It's possible my work laptop is having issues so I'll try this again @ home and see what I get. That might take a day or two unless I can get a hole punched in my firewall.

Weird... The one I'm using is just named "Wire" and supposedly is by Arduino but specifically cites the esp8266 in the description. Not sure how to interpret this. I also have OneWire installed, but I think that's the one you linked to.
 
1. My implementation of Rotary encoder is simple, but it does cause some issues which is caused by the pull-ups of the rotary encoder module, a KY 040. The configuration that works on one of my setup doesn't work on the other but prevent the system to boo up. You might need to figure out which would work.

2. I skimmed the analog PIN method and thought it might not work in this application. "The ADC is gated by the watchdog timer every millisecond." I don't think we have this resource on ESP8266.

3. I am thinking about using a IO expander, but in fact not having the rotary encoder is not really a big deal since it is easier to control by the web pages. I don't feel urgent to implement this.

4. Buzzer is a 'nice-to-have'. I had it in my Arduino build and want email notification instead. My Arduino build was very unstable and sometimes reset several times a day. When it reset, I heard the buzzer if I happened to be nearby. Nothing I could do for it, however. Therefore, I don't care about it anymore.:ban::tank::mad:

To Thorrak,
Be careful with D0(GPIO16), which is set to HIGH during reset. It might stay HIGH for 2~3 seconds during booting up before setup() is executed.

Yeah - I'm not sure how to handle the lack of interrupts. Theoretically the polling is happening fast enough that I would imagine you could detect the pulse, but I'm not sure. Even more - given that the BrewPi firmware expects an interrupt-based system I'm not entirely sure how a non-interrupt based implementation would work. All things to consider, I suppose.

On D0 - I was specifically trying to avoid using pins that would trigger output at startup, and thought D0 was safe. I'll have to keep an eye on it.
 
So just starting trialling this. Loaded all reqd data to new sd card on Pi.
Running an old model b Pi with a wifi dongle and connected via wifi
Loaded esp8266 files via git.
Got to the stage of seeing the wemos on another pc wifi. Connected to th wemos.
I then got to the home page of the esp wifi manager and pressed the configure wifi button and connected to the home wifi.
Then lost the page and ability to change or see anything. Might be because I didn't set up the wemos MAC address on the home wifi. I use a wifi with assigned mac and IP address. Doh!
Re flashed wemos with Pi successfully but still can't see the wemos or its home screen on the pc. Seems like it remembered the attempt at connection.
Does the flashing clear all memory on the wemos and reload to the start? Like a factory reset?
If it does then I might have to look into the home router.
I can find the MAC address of the wemos by plugging it into another pc and using the esp flasher tool from expressif
 
Re flashed wemos with Pi successfully but still can't see the wemos or its home screen on the pc. Seems like it remembered the attempt at connection.

Does the flashing clear all memory on the wemos and reload to the start? Like a factory reset?


No - Flashing does not clear all memory on the device. To reset your wifi, just flash the wifi-reset.bin firmware, boot up the device, wait a few seconds, then reflash the brewpi firmware.
 
If you move heating and cooling to onwire you'd definely get there. As luck would have it BrewPI store sell onewire SSR moduals One modual two relays and three extra one outputs using RJ12. And your giving just a little bit back to the original coder.

froot
 
Might it be possible to cobble up a relay board using this?

https://www.adafruit.com/product/1551

Yep. That's the officially supported chip. It would also be possible to surface mount that on the board and have it directly drive the two pins going to the relay (but damn those pins are tiny)

Of course, it would be about as easy to add a 4-pin header to the edge of the board to directly mount the Adafruit module if you were so inclined. Options!
 
Just in case anyone is looking for a buzzer, here's one that will damn near fit between the pins (okay that's an exaggeration) and does 70 dBA.

http://www.mouser.com/new/cui-inc/cui-buzzers/

At 4mm that's the smallest I've seen I think.

Got an email that my boards are shipped. Not sure how long they will take but I'm in the home stretch! Be too much to ask that the tracking number worked, huh? :)
 
No - Flashing does not clear all memory on the device. To reset your wifi, just flash the wifi-reset.bin firmware, boot up the device, wait a few seconds, then reflash the brewpi firmware.

re-flashing with wifi-reset then flashing the firmware again worked. thanks I can now see the screen. moving onto installing other components. thanks thorrak:ban:
 
Also, do you think you might be able to give us the ability to name the network device something other than "ESP2384371"?
So in brewpi-esp8266.ino we have:

Code:
#ifdef ESP8266_WiFi
	// Next, if we're going to set up WiFi, let's do it
	WiFiManager wifiManager;
	wifiManager.setConfigPortalTimeout(5*60); // Time out after 5 minutes so that we can keep managing temps 
	wifiManager.setDebugOutput(false); // In case we have a serial connection to BrewPi
	// TODO - Add code here to 
	[COLOR="DarkRed"]wifiManager.autoConnect();[/COLOR] // Launch captive portal with auto generated name ESP + ChipID

	String mdns_id = "ESP" + String(ESP.getChipId());

	if (!MDNS.begin(mdns_id.c_str())) {
		// TODO - Do something about it or log it or something
	}

#endif

I think the TODO there is to make the access point a given name rather than the default? According to the WiFiManager docs that would need to be:

Code:
wifiManager.autoConnect("AP-NAME");

I gather you'd have to pass in the name externally when this fires up the first time?

I'd actually do the work rather than posting notes if I could get the damned thing to compile locally. :)

Correct. There is a means by which you can take in a parameter when you are setting up the WiFi, so my plan was to set it like that. Basically, the code that needs to be written is:

1. Modify the WiFiManager code to add the custom field for the new (optional) AP name
2. Validate the mDNS name (must have at least one period, be alphanumeric, and be within some character limit - I'll need to research the standard for domain names at some point)
3. If #2 is successful, save it to a file using SPIFFS
4. On startup, load the file from SPIFFS (and then use the name saved therein in the line of code you cited)

It would also be good to add new management commands to update the mDNS name (but it's not a requirement).

This is all on my to-do list, but is at least a week or more out.
 
I am jinxed ... can't get this to compile to save my life. Since nobody else has posted having an issue I'm sure I'm the idiot but not sure why. I no longer get missing dependencies but I get the impression perhaps I've chosen the wrong supporting libs - this is the version of OneWire I grabbed. I'd take any hints.

Here's my current error:

Code:
Compiling debug version of 'brewpi-esp8266' for 'WeMos D1 R2 & mini'
 
Main.cpp.o: In function handleReset()
Main.cpp:42: multiple definition of handleReset()
brewpi-esp8266.cpp.o: C:\Users\Lee\AppData\Local\Temp\VMicroBuilds\brewpi-esp8266\esp8266_d1_mini\brewpi-esp8266.cpp:76: first defined here
 
OneWire.cpp.o: In function OneWire::depower()
OneWire.cpp:144: multiple definition of OneWire  reset()
OneWire.cpp.o: E:\Users\Lee\Documents\Arduino\libraries\arduino_665201\OneWire.cpp:143: first defined here
 
OneWire.cpp.o: In function OneWire::search(unsigned char*)
OneWire.cpp:178: multiple definition of OneWire  write_bit(unsigned char)
OneWire.cpp.o: E:\Users\Lee\Documents\Arduino\libraries\arduino_665201\OneWire.cpp:177: first defined here
 
OneWire.cpp.o: In function OneWire::read_bit()
OneWire.cpp:207: multiple definition of OneWire  read_bit()
OneWire.cpp.o: E:\Users\Lee\Documents\Arduino\libraries\arduino_665201\OneWire.cpp:205: first defined here
 
OneWire.cpp.o: In function OneWire::write(unsigned char, unsigned char)
OneWire.cpp:231: multiple definition of OneWire  write(unsigned char, unsigned char)
OneWire.cpp.o: E:\Users\Lee\Documents\Arduino\libraries\arduino_665201\OneWire.cpp:229: first defined here
 
OneWire.cpp.o: In function OneWire::write_bytes(unsigned char const*, unsigned short, bool)
OneWire.cpp:245: multiple definition of OneWire  write_bytes(unsigned char const*, unsigned short, bool)
OneWire.cpp.o: E:\Users\Lee\Documents\Arduino\libraries\arduino_665201\OneWire.cpp:243: first defined here
 
OneWire.cpp.o: In function OneWire::read()
OneWire.cpp:259: multiple definition of OneWire  read()
OneWire.cpp.o: E:\Users\Lee\Documents\Arduino\libraries\arduino_665201\OneWire.cpp:257: first defined here
 
OneWire.cpp.o: In function OneWire::read_bytes(unsigned char*, unsigned short)
OneWire.cpp:269: multiple definition of OneWire  read_bytes(unsigned char*, unsigned short)
OneWire.cpp.o: E:\Users\Lee\Documents\Arduino\libraries\arduino_665201\OneWire.cpp:267: first defined here
 
OneWire.cpp.o: In function OneWire::select(unsigned char const*)
OneWire.cpp:278: multiple definition of OneWire  select(unsigned char const*)
OneWire.cpp.o: E:\Users\Lee\Documents\Arduino\libraries\arduino_665201\OneWire.cpp:276: first defined here
 
OneWire.cpp.o: In function OneWire::skip()
OneWire.cpp:290: multiple definition of OneWire  skip()
OneWire.cpp.o: E:\Users\Lee\Documents\Arduino\libraries\arduino_665201\OneWire.cpp:288: first defined here
 
OneWire.cpp.o: In function OneWire::depower()
OneWire.cpp:296: multiple definition of OneWire  depower()
OneWire.cpp.o: E:\Users\Lee\Documents\Arduino\libraries\arduino_665201\OneWire.cpp:294: first defined here
 
OneWire.cpp.o: In function OneWire::reset_search()
OneWire.cpp:310: multiple definition of OneWire  reset_search()
OneWire.cpp.o: E:\Users\Lee\Documents\Arduino\libraries\arduino_665201\OneWire.cpp:308: first defined here
 
OneWire.cpp.o: In function OneWire::target_search(unsigned char)
OneWire.cpp:325: multiple definition of OneWire  target_search(unsigned char)
OneWire.cpp.o: E:\Users\Lee\Documents\Arduino\libraries\arduino_665201\OneWire.cpp:323: first defined here
 
OneWire.cpp.o: In function OneWire::crc8(unsigned char const*, unsigned char)
OneWire.cpp:502: multiple definition of OneWire  crc8(unsigned char const*, unsigned char)
OneWire.cpp.o: E:\Users\Lee\Documents\Arduino\libraries\arduino_665201\OneWire.cpp:506: first defined here
 
OneWire.cpp.o: In function OneWire::crc16(unsigned char const*, unsigned short, unsigned short)
OneWire.cpp:540: multiple definition of OneWire  crc16(unsigned char const*, unsigned short, unsigned short)
OneWire.cpp.o: E:\Users\Lee\Documents\Arduino\libraries\arduino_665201\OneWire.cpp:544: first defined here
 
OneWire.cpp.o: In function OneWire::check_crc16(unsigned char const*, unsigned short, unsigned char const*, unsigned short)
OneWire.cpp:534: multiple definition of OneWire  check_crc16(unsigned char const*, unsigned short, unsigned char const*, unsigned short)
OneWire.cpp.o: E:\Users\Lee\Documents\Arduino\libraries\arduino_665201\OneWire.cpp:538: first defined here
 
collect2.exe*: error: ld returned 1 exit status

Error compiling for board WeMos D1 R2 & mini
 
First!

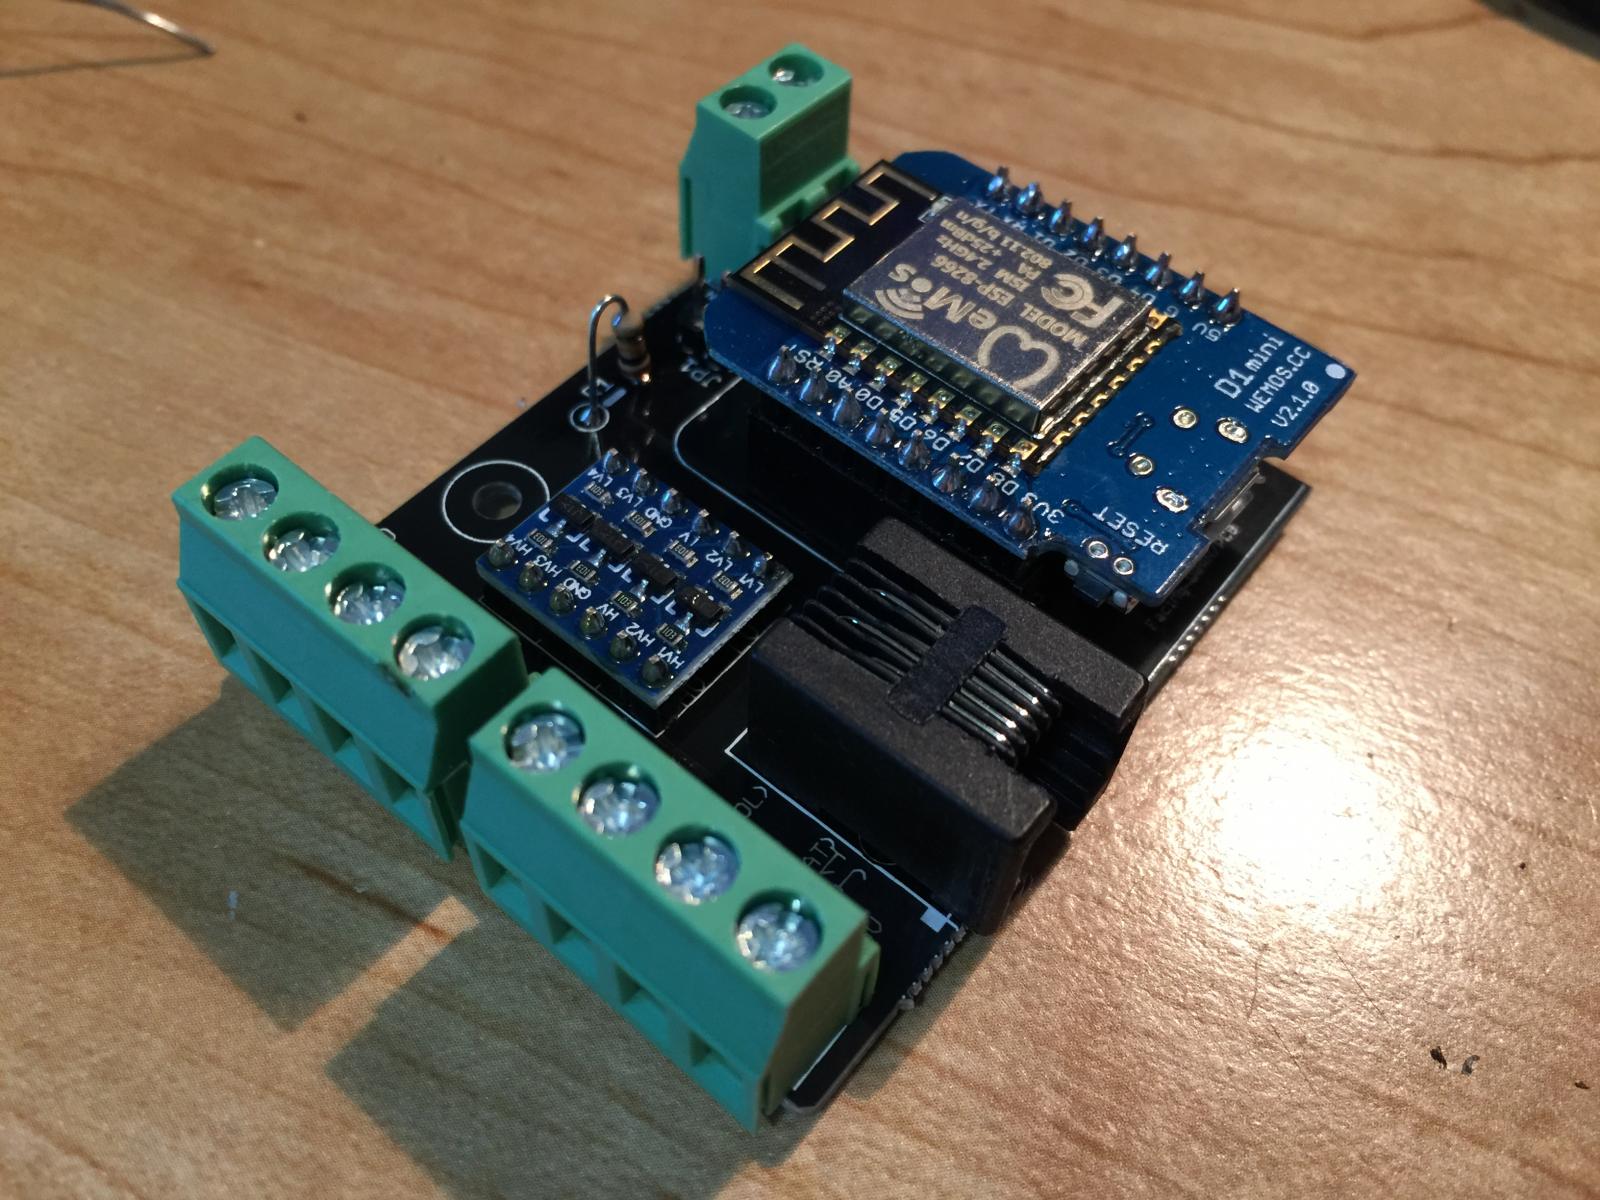
IMG_5442.jpg
 
Nice! Everything working as expected?
The pads are on the small side for the resistor, but other than that it soldered up well. I've not plugged it in yet as I am fighting with a printer issue so I can mail something I promised.

Hopefully tonight though.
 
I've thrown together one of these jobbies on the cheap using Thorrak's BoM from reddit for pretty much everything:

  • The esp is on a small breadboard zip-tied behind the fridge
  • The beer and fridge probes are connected using a spare bit of cat5e with a few sacrificed dupont cables soldered onto the ends
  • The ambient (handy "is the fridge on?") sensor had its wires tinned and shoved into the breadboard. It's duct taped to the side of the fridge!
  • The relay board is in a small plastic food container with 4 holes drilled in its lid (mains in, heater, fridge, control) tucked into the compressor area

I have no display because the Chinesium I2C board is DoA, not responding on any i2c address from the ESP, an arduino, or a pi.

It also seems the Chinesium relay board is also dead. It worked fine while I was putting things together, but I've just had to disturb my brew to fix it... by smacking the relay with a screwdriver! Yeah. Noticeably weaker relay click on the fridge side along with some disturbing rattling noises when energised.

Good thing my heater band can just about compensate for a fridge not turning off!

So yeah, a stark warning about the need for vigilance when dealing with dirt cheap Chinese parts!


Referring to a conversation earlier in this thread, I've just been playing and this relay board really can't use 3.3v - it can take a second or two to contact! However there's no difference between putting 5v in the VCC and putting 5v in the JC-VCC.

Also, a handy hint for testing. In the UI, toggle the heat/cool devices between inverted/non-inverted to test operation without having to wait for the 10+10 minute timeouts
 
Referring to a conversation earlier in this thread, I've just been playing and this relay board really can't use 3.3v - it can take a second or two to contact! However there's no difference between putting 5v in the VCC and putting 5v in the JC-VCC.
So you pull the jumper and power the relays with 5v0?

That brings up a question for @Thorrak ... I see the board is marked 5v. We're good here?

I hooked up my LCD to the new board last night and it powered right up. I have not yet hooked up a relay or sensors as SWMBO was strongly encouraging me to leave my project alone for a day. :)

It works fine for me. I supply 5V power to the relay boards and connect the input pin direct to NodeMcu. All my relay boards, 3 to be exact, work fine.
I think the transistors of the boards mater. However, I guess most of the manufacturers will use one that saturates at 2.2~2.5V for TTL logic, which makes 3V signal workable. In fact, I've seen some eBay sellers listed their relay boards 3V compatible.

YMMV. though.
 
I had a thought about the board design. Bear in mind I have no idea how to do a board design so I'm not being critical!

One of your design criteria was going smaller therefore you used SMD. The logic level converter fits under the ESP8266 quite cleanly as it is. It could have been soldered in and the ESP8266 mounted above it. Just a thought to avoid messing with those tiny parts.

I am out of phone cable and I need phone cable to splice into the temp probes in order to crimp on an RJ11 plug so I'm going to lose another day before I can test.
 

Latest posts

Back
Top