• Please visit and share your knowledge at our sister communities:
  • If you have not, please join our official Homebrewing Facebook Group!

    Homebrewing Facebook Group

My wire shelve brewstand setup

Homebrew Talk

Help Support Homebrew Talk:

This site may earn a commission from merchant affiliate links, including eBay, Amazon, and others.

fiveohmike

Well-Known Member
Joined
Jan 15, 2014
Messages
146
Reaction score
17
Location
Hayward
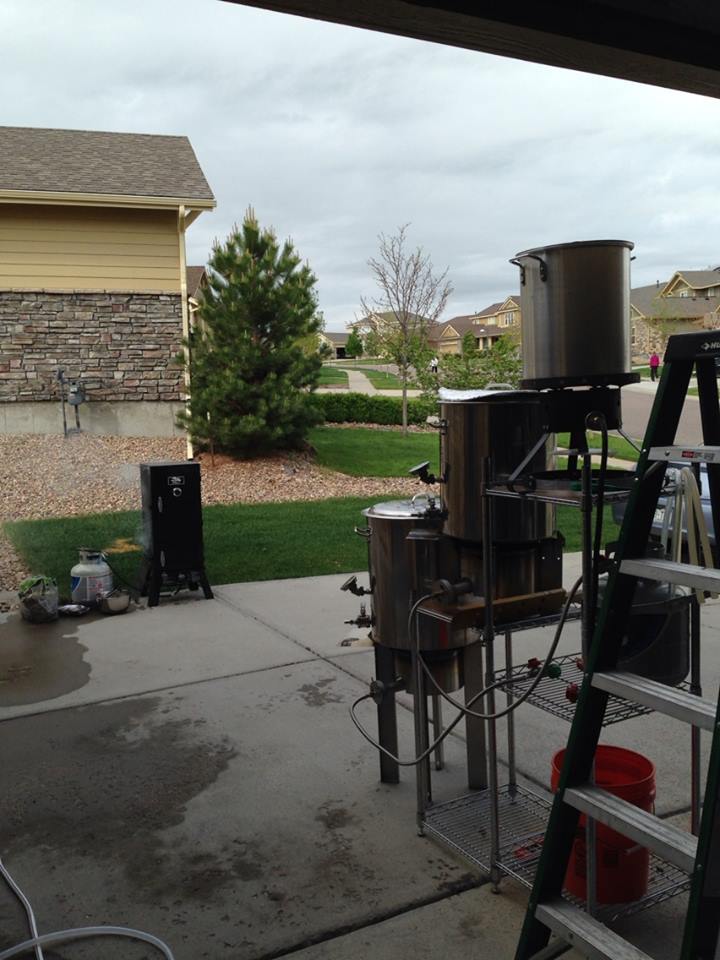
Well after making the switch to all grain, I brewed one time on a two tier where I had to move hot liquid around a lot so I decided to figure out a 3 tier stand.

I used some shelving units rated at 600lbs (300lb per shelf) that were 54"T, 14"D and 36" wide for the main part. The smaller part is 30"T 14"D and 36". its only function is to hold the mash tun.

The top pot is an 8.5Gallon for the HLT. Its still waiting for the Blingmann burner to arrive.

The two other pots are 15Gallon heavy duties from Morebeer. I have the wood down there as a heat shield and to support the burner on the bottom as it has thin legs that dont work with this...the Blingmann shouldnt be an issue:

10527878_10204440868246961_472305761659818697_n.jpg


Gonna test run with cold water to see it hold full weight.
 
Got the Blingmann burner and a few other items in today. I have her set up and have been dry running cold water through the system to see how it does.

So far, not bad for 100 bucks worth of materials.


10577122_10204447954664117_4134571548010777279_n.jpg
 
As long as the stand holds to the weight you look pretty good. The nice things about the burners is the heat goes up, not down so I think you'll be just fine with the plywood.

Only thing I need to say in doubt of your set up. Looks like maybe it is in an enclosed room? The burners need ventilation so you don't Carbon Monoxide poison yourself. If it's in your garage, just leave the door open. Cheers and congrats!
 
Edit, looks to be in your garage.. cement floors. Just ventilate, everything else looks great. Gravity systems are awesome in my opinion. No messing with a pump.. if the electricity goes out you can still brew! :mug:
 
As long as the stand holds to the weight you look pretty good. The nice things about the burners is the heat goes up, not down so I think you'll be just fine with the plywood.

Only thing I need to say in doubt of your set up. Looks like maybe it is in an enclosed room? The burners need ventilation so you don't Carbon Monoxide poison yourself. If it's in your garage, just leave the door open. Cheers and congrats!

Oh ya, this is the garage. I have feet that slide on the concrete and will move it to the open door side when I do an actual brew. Was hot outside so I was just building with the door closed.

Thanks for looking out though :)
 
Great!

Have you figured out the first brew you're going to new on your new rig?


Well I have put down one all grain batch already, but not on this system. I was using a backbreaking lift and switch method and it was a Pliny clone.

For my first brew on this stand I am thinking about doing a simcoe SMaSH with Marris Otter mashed at 152
 
Well I have put down one all grain batch already, but not on this system. I was using a backbreaking lift and switch method and it was a Pliny clone.

For my first brew on this stand I am thinking about doing a simcoe SMaSH with Marris Otter mashed at 152

I admire that. I always got caught up on trying to use a bunch different type grains and hops.. To be honest? I only got lost. Never knew which grain or which hop contributed exactly.

There could be a preface on brewing which is SMaSH first.

Good decision you've made and best of luck to you Mike!
 
Looks good. I love my gravity system. Its easy and works well. The recipe sounds good too. Good luck!
 
I admire that. I always got caught up on trying to use a bunch different type grains and hops.. To be honest? I only got lost. Never knew which grain or which hop contributed exactly.

There could be a preface on brewing which is SMaSH first.

Good decision you've made and best of luck to you Mike!


Trust me its hard. I am working out a recipe in Brewsmith... and I keep clicking "Add grain" and keep eyeballing some Crystal 60L lol

But I am toying with the idea of some Nottingham yeast instead of WLP001. I have not done Nottingham in anything yet, as I mainly use WLP001 or US-05
 
Man, I really like that setup. Very creative!


Sent from my iPhone using Home Brew
 
Trust me its hard. I am working out a recipe in Brewsmith... and I keep clicking "Add grain" and keep eyeballing some Crystal 60L lol

But I am toying with the idea of some Nottingham yeast instead of WLP001. I have not done Nottingham in anything yet, as I mainly use WLP001 or US-05

Do you and me a favor. Or better, yourself one. Stick to your original recipe. Crystal 60, or anything else, leave out. Brew it straight forward. A nice experiment might be to split you're batch and ferment with two different yeasts.

I'd be curious if you noted much difference between Notty and the WLP001/US-05. (those last two I'm pretty sure are the same, one a dry strain of the wet) So a difference in Notty versus the other two might be interesting.
 
Do you and me a favor. Stick to your original recipe. Crystal 60, or anything else, leave out. Brew it straight forward. A nice experiment might be to split you're batch and ferment with two different yeasts.

I'd be curious if you noted much difference between Notty and the WLP001/US-05. (those last two I'm pretty sure are the same, one a dry strain of the wet) So a difference in Notty versus the other two might be interesting.


Actually since I decided to stray away from WLP001 I cam up with this recipe:

14 lbs Pale Malt, Maris Otter (3.0 SRM) Grain 1 100.0 %
2.00 oz Cascade [5.50 %] - Mash 60.0 min Hop 2 6.2 IBUs Whole Leaf
2.00 oz Cascade [5.50 %] - Boil 60.0 min Hop 3 33.8 IBUs
1.00 oz Cascade [5.50 %] - Boil 5.0 min Hop 4 3.4 IBUs
1.00 oz Cascade [5.50 %] - Boil 1.0 min Hop 5 0.7 IBUs
2.00 oz Cascade [5.50 %] - Boil 0.0 min Hop 6 0.0 IBUs
4.00 oz Cascade [5.50 %] - Dry Hop 4.0 Days Hop 8 0.0 IBUs

Dry English Ale (White Labs #WLP007)

Mash at 152, batch sparge.

What do you think? I will also post this in the recipe section.
 
Actually since I decided to stray away from WLP001 I cam up with this recipe:

14 lbs Pale Malt, Maris Otter (3.0 SRM) Grain 1 100.0 %
2.00 oz Cascade [5.50 %] - Mash 60.0 min Hop 2 6.2 IBUs Whole Leaf
2.00 oz Cascade [5.50 %] - Boil 60.0 min Hop 3 33.8 IBUs
1.00 oz Cascade [5.50 %] - Boil 5.0 min Hop 4 3.4 IBUs
1.00 oz Cascade [5.50 %] - Boil 1.0 min Hop 5 0.7 IBUs
2.00 oz Cascade [5.50 %] - Boil 0.0 min Hop 6 0.0 IBUs
4.00 oz Cascade [5.50 %] - Dry Hop 4.0 Days Hop 8 0.0 IBUs

Dry English Ale (White Labs #WLP007)

Mash at 152, batch sparge.

What do you think? I will also post this in the recipe section.[/QUOTE

Lot of hops! Do it and report back. I can't wait to hear the results!
 
I don't know if you can see it well, but on my wire shelves, I cut down some porcelain tiles to put the burners on. Works awesome.

3-tier w20G BK.jpg
 
First brew....engage:

10557287_10204460719103220_7471261081546147851_n.jpg


Its working like a champ so far. Was a little off on my mash temp (i forgot to warm my tun). So had to pop in a pop of boiling water and I am on target.
 
Like this wire rack brew stand idea. Was going to build myself a wooden brew stand. But with just buying a house last month and putting a kegerator together. And looking to do a new ferm chamber. I just don't have the time. This seems like an easy solution and one less project out of the way. Thank for the idea.
 

Latest posts

Back
Top