• Please visit and share your knowledge at our sister communities:
  • If you have not, please join our official Homebrewing Facebook Group!

    Homebrewing Facebook Group

My Ugly Junk- Corona Mill Station...

Homebrew Talk

Help Support Homebrew Talk:

This site may earn a commission from merchant affiliate links, including eBay, Amazon, and others.
The advice for using these mills is just too funny.

"Tighten up the adjusting screw until you're scared, then give it an extra twist" This is of 'course only after you've added spacing washers so that the grinding plates are farther apart. :drunk:

I think I understand though. IF you have a mill that won't loosen enough you MAY have to add washers. If ON THE OTHER HAND you have a mill that is properly fit you should tighten it up more than you'd think would be necessary.

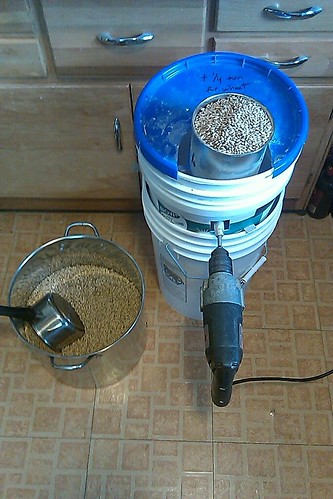
So anyway, I mounted the mill inside a bucket. My next question is why are people cutting the bottoms out of these buckets and nesting them inside another bucket?

My first grind of about 28lbs I ground too fine - more flour than was wanted. I lost a tidge to stuck sparge. Next time I'll back it off a bit.
 
Last edited by a moderator:
BeerMe21 said:
FYI: I just found this one for $20 shipped! Video Link: http://www.amazon.com/gp/product/B000U5NZ4I/ref=ox_ya_os_product

Thought you guys might be interested. I have been searching for one of these but so far the cheapest I had found was $26-30 shipped, so needless to say I just ordered one and am looking forward to crushing my own grain :ban:

I bought this same one and it does not have the hood over the grinder. Mine may just have not had one but might want to ask. Works great after I bought a bolt to put in where the handle goes so I could use my makita drill on it.
 
Last edited by a moderator:
Mine didn't have a goos either (the one from amazon above. I used a cutout food storage container which did the trick. If you bucket it eventually it won't matter anyway. :)
 
I thought u guys may enjoy this. It's my wife running my ugly station. A little beauty and the beast action / brew porn. Chopps

ForumRunner_20110924_225153.jpg
 
subscribed....just go a victoria w/"large" hopper. and i now have 3 brews worth of whole malt to grind and realized how little I know about it
 
It is actually. My wife picked up a Samsung like that with no camera and absurd battery life. Coincidently I've even found that Net10 is a much stronger service area everywhere I've been than the other Big 4 cellular providers so I keep one of those in my car for emergencies and it also doesn't have a camera with sickening battery life around 3-4 weeks.


@Brewskii
The single biggest problem I faced was getting the grinder stabilized. These creations with the buckets look like they solve this problem nicely by bolting it down to a 2x4 inside the bucket whereas the last time I used mine I had to use the clamp type setup at the base to bolt it to a table. I should point out I don't suggest this route if there is any way you can get around it. I think I'm definitely going to go the bucket route as well but unless I step up beyond 10g recipes I don't think I'm going to go the drill route.
 
I like the bucket in a bucket... One to hold the hardware and another for the grist. I think I may get this together this weekend. Need to brew soon...pipeline is running low.
 
Yesterday I opened the box to my brand spankin new corona knock-off and I must say, what a hunk of crap! I spend all day fixing Mercedes-Benz's, and come home to this? I've seen boat anchors built with more care! Anyway, after reading up on this thread I pulled the trigger and ordered one, 19.99 shipped!! (ebay). I got pretty much what I expected. In all seriousness, its not that bad for a cast iron tool. I had many of the same issues others have had with the plates not being calibrated/sloppy. I decided I wanted to use the center adjuster to change my grind, so I left the wingnuts on the sides alone. I took a little different route to solve the problem with the cotter pin. I decided to do away with the cotter pin/collar set up entirely and weld the outer plate directly to the auger(after squaring it up against the other plate of course, to ensure a smooth and uniform grind). My model also has three screws holding the other plate to the body, so i took them out and used a grinder to flatten the surfaces that meet up in order to square the fixed plate up, as well as removing the handle and replacing with a bolt to motorize with my drill and socket. I couldn't wait to get home and try it out! first handful, nice and uniform, but a bit coarse with uncrushed grains. Quarter turn on the center adjuster and voila! A beautiful, uniform grind! Husks still intact and each grain broken into a few bits, with a little flour on the bottom of the bowl. SO much nicer crush than my LHBS! I can't wait to get it mounted and run a few batches through to see how she performs. I was getting about 68% from the LHBS crushes, hope to improve on that. I'm so glad i found this thread! Thanks to all of you for sharing all of your tips and tricks! I can now buy in bulk, and I have cut my brewday bill literally in half (keeps SWMBO off my back!) between being able to use the corona, buy hops in bulk and next I'll be trying my hand at yeast washing! Again, thank you all! I love this site!
 
Yesterday I opened the box to my brand spankin new corona knock-off and I must say, what a hunk of crap! I spend all day fixing Mercedes-Benz's, and come home to this? I've seen boat anchors built with more care! Anyway, after reading up on this thread I pulled the trigger and ordered one, 19.99 shipped!! (ebay). I got pretty much what I expected. In all seriousness, its not that bad for a cast iron tool. I had many of the same issues others have had with the plates not being calibrated/sloppy. I decided I wanted to use the center adjuster to change my grind, so I left the wingnuts on the sides alone. I took a little different route to solve the problem with the cotter pin. I decided to do away with the cotter pin/collar set up entirely and weld the outer plate directly to the auger(after squaring it up against the other plate of course, to ensure a smooth and uniform grind). My model also has three screws holding the other plate to the body, so i took them out and used a grinder to flatten the surfaces that meet up in order to square the fixed plate up, as well as removing the handle and replacing with a bolt to motorize with my drill and socket. I couldn't wait to get home and try it out! first handful, nice and uniform, but a bit coarse with uncrushed grains. Quarter turn on the center adjuster and voila! A beautiful, uniform grind! Husks still intact and each grain broken into a few bits, with a little flour on the bottom of the bowl. SO much nicer crush than my LHBS! I can't wait to get it mounted and run a few batches through to see how she performs. I was getting about 68% from the LHBS crushes, hope to improve on that. I'm so glad i found this thread! Thanks to all of you for sharing all of your tips and tricks! I can now buy in bulk, and I have cut my brewday bill literally in half (keeps SWMBO off my back!) between being able to use the corona, buy hops in bulk and next I'll be trying my hand at yeast washing! Again, thank you all! I love this site!

Pictures? :rockin:
 
Put my Victoria in a bucket and mounted 4" spacers to the outside rim to allow space enough in the lower bucket for entire grain bill.
Still had to manually feed the stock "large"'hopper several times but it worked like a charm.
I made a feeble attempt to condition malt using a spray bottle as I went due to time constraints, and consequently ended up with a lot more torn husk that I really wanted....'still; I had no stuck sparge and 78% eff. vs 68-70 with pre milled!
Thanks for the awesome thread and ideas :rockin:
 
I mounted my Victoria inside a bucket as per this thread. Using the hand-crank was a bit of a pain as the bucket is not very stable and I had to use one hand to hold the bucket still.

So I tried using a drill. I used my 3/8" VSD (DeWalt) which has a 6 Amp motor. It seemed to handle the job just fine. I didn't even have to pull the trigger all the way. But afterwards the motor housing seemed pretty hot.

Is it necessary to use a 1/2" drill for this? Does anybody else use a smaller drill for powering the mill?
 
I use a cordless makita. 3/8 drive and 18 volt I believe and it takes me 2 batteries to get through it.
 
I used my mill for the first time this weekend, got 76.4% according to a calculator I found on the web. I'm very pleased with the grind, no problems with runoff.

I was getting mid to high 60's from the LHBS grind, which isn't too awfully bad but they started charging .20/lb to grind and they won't do a 50# bag, which led me to do it myself.

I so far got better efficiency by almost 10% and my grain is now cheaper too! I enjoy grinding my own grain too, might sound dumb but I feel that much closer to the beer! :D

Thanks again for this forum, and this thread in particular!
 
I use a cordless makita. 3/8 drive and 18 volt I believe and it takes me 2 batteries to get through it.

I have a cordless Hitachi with the lithium ion batteries, which has the power & capacity to drive the Corona mill. But I have never believed that this is the type of duty these battery-powered drills were designed for. Consequently, I use an antique Craftsman 1/2 AC drill that came down to me from an uncle, which will mill whatever size grain bill I have without breaking a sweat....although it will get quite warm after milling 15 pounds of malt. I think this drill is illustrated back in the photos of my Ugly Junk on p. 26 or so......
 
I just recieved mine from discount tommy, so far so good. The only thing I noticed is that there is no guard or barrier above the grinding wheels on mine. Is this going to be an issue? Grain flying all over the place?

I must say, this thing is heavy duty.
 
Well, if you mount it inside a 5 gallon bucket, taking care to place it low enough to put the cover on, there is no need for the "fender". I set mine so that the top of the cast iron piece is flush with the bucket top. Then I only needed to cut a hole in the lid to allow me to connect the hopper.
 
Well, if you mount it inside a 5 gallon bucket, taking care to place it low enough to put the cover on, there is no need for the "fender". I set mine so that the top of the cast iron piece is flush with the bucket top. Then I only needed to cut a hole in the lid to allow me to connect the hopper.

Excellent......I suppose a guy could always fashion one as well.


Also, what is the verdict? Are folks JB welding the outer wheel in place or just using it as is...kind of wobbly?
 
Excellent......I suppose a guy could always fashion one as well.


Also, what is the verdict? Are folks JB welding the outer wheel in place or just using it as is...kind of wobbly?


I place a plastic bag around the plates and loosely hold it closed with one hand, while crushing.

I turned the pin 90 degrees and was able to keep the outer plate from being wobbly.
 
Here is my install, which uses the bucket lid to eliminate flying grain & dust, muss & fuss:

https://www.homebrewtalk.com/f51/my-ugly-junk-corona-mill-station-90849/index21.html#post1408147

Had the old paint bucket to start with, and decided on a two-bucket arrangement (which helps get the mill up to a level where I sit holding the drill. I just cut a hole with a 2" hole saw in the bottom of the paint bucket, and I've been able to accommodate 20# of malt.

I didn't do much modification- just pulled out the cotter pin, which was pretty mangled and twisted to start with. I replaced it with a SS bolt, nut & washers of the correct size, and it took the wobble out of the plate, although the plates still aren't perfectly parallel. Doesn't seem to matter, though, since I get a great crush and hit the correct OG with boring regularity.
 
Are folks JB welding the outer wheel in place or just using it as is...kind of wobbly?

It all depends on your particular mill, crush some grain first and see how it is. My plate is wobbly but I did end up replacing the cotter pin with a bolt & nut.
 
I picked up one from amazon but the outer plate floats freely by design instead of being mounted on a plate so changing the bolt won't stabilize mine unfortunately (it also renders adding spacers useless as well unfortunately) but it still manages a consistent crush without shredding the husk once you get the bolt loose enough.

Still tho, if you have access to one of the models with the outer plate stabilized with a bracket that you can move in and out with spacers (a friend of mine has one of these and it is fantastic) for a minimal crush width get it instead. Mine is quicker and less troublesome to adjust tho but even does well with red wheat and oats too.
 
My Victoria mill, made in Columbia, converted to some Ugly Junk:

5622-ugly-junk-1.jpg


5623-ugly-junk-2.jpg


Its the version with the wobbly outer plate. I turned the cotter pin, now it is less wobbly. I've had it about 3 months and have crushed lots of grain with it. I got the best results by crushing my malts separately and malt conditioning. I took the advice on this thread and crush finer, but am careful not to get it too fine. This thread really helped to tweak it out, thanks alot guys.

DING, DING, DING, DING! I believe we may have our new winner folks!!! Nice Job!!!! :mug:
 
Back
Top