• Please visit and share your knowledge at our sister communities:
  • If you have not, please join our official Homebrewing Facebook Group!

    Homebrewing Facebook Group

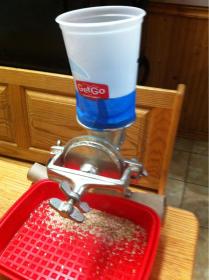
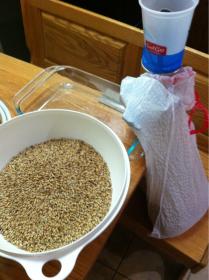
My Ugly Junk- Corona Mill Station...

Homebrew Talk

Help Support Homebrew Talk:

This site may earn a commission from merchant affiliate links, including eBay, Amazon, and others.
Excellent thread. It will certainly save me $100+ from buying one of them "fancy" grain mills. This will definitely be my next piece I pick up in an effort to have a fully functional single tier brewing setup. Well that and finally being able to take full advantage of the group grain buys.

I saw many people posting about picking one of these up for around $25 or so, however; in my search for the el cheapo grain mill I found the one I plan to order tonight when I get home from work. I found one online for only $19.95 with free shipping!

http://grantfords.com/product_info.php?&i=B000U5NZ4I
 
awesome! just dont get frusterated if your numbers turn out low, just tighten up the grind till you get them! :)
i'm still dialing mine in, but last one was 70% so i think i'll just work around that for now
 
+1 to not getting frustrated or discouraged with low numbers.

My first go with my mill was about 60%. I've cranked it down now and my last two batches were both 84% (according to my measurements and BeerSmith software).

I read here somewhere to crank it down until your scared you'll get a stuck mash, then crank it another 1/4 turn down. Seems to have worked for me. I did get one stuck mash (out of 4 so far), but even that's not the end of the wold.
 
I just got my new mill. Is there a summary on which mods need to be done? This thread is huge!

Honestly i would just tighten it down and grind some until you see what you like, brew with it, check efficiency. I bought my Victoria and just tightened it as much as it would reasonably go and until the crush looked right.

I get 76-78%+ on a typical 10G batch.

You can do the mods, but try it tightened before you get creative.
 
All I did was replace the cotter pin in front with the correct size SS bolt, and then started tightening per the above post. Tighten until you get scared, then give it another twist. ;)

Seriously, these things are so crudely made that there's bound to be so much variation that it would be impossible to give any sort of specific adjustments. My front plate still has some wobble in it, but I get a great crush and hit all my numbers when brewing.
 
Excellent thread. It will certainly save me $100+ from buying one of them "fancy" grain mills. This will definitely be my next piece I pick up in an effort to have a fully functional single tier brewing setup. Well that and finally being able to take full advantage of the group grain buys.

I saw many people posting about picking one of these up for around $25 or so, however; in my search for the el cheapo grain mill I found the one I plan to order tonight when I get home from work. I found one online for only $19.95 with free shipping!

http://grantfords.com/product_info.php?&i=B000U5NZ4I


That everyone- including me- got from 'crazy sam' or whoever...
For a couple $ less:mug:
 
Nice one. I just scored a free Corona last week and had a decent 78% efficiency for my second all grain brew! Mine didn't come with a hopper so here is how I rigged it.

I have everything but the drill to do it your way though. Going to get on it!

image-2679724170.jpg


image-2906104397.jpg
 
I replaced the cotter pin with machine screw, JB welded the grind plate, and added 3 washers to the tensioner frame. I must not have done a good job aligning the grind plate because it is not parallel to the opposing grind plate. :mad:
 
I replaced the cotter pin with machine screw, JB welded the grind plate, and added 3 washers to the tensioner frame. I must not have done a good job aligning the grind plate because it is not parallel to the opposing grind plate. :mad:

I did the screw, no JB or washers. My plates aren't parallel, either, but it just doesn't seem to make any difference. I get a great crush.
 
I replaced the cotter pin with machine screw, JB welded the grind plate, and added 3 washers to the tensioner frame. I must not have done a good job aligning the grind plate because it is not parallel to the opposing grind plate. :mad:

Were you getting a bad crush before you did all that stuff? .... FWIW, all I did was remove the cotter pin, rotate the retaining collar 90 degrees, and reinsert the same cotter pin. No JB, No washers. No bolt. No only crushing on even numbered days while standing on one foot and singing the Ave Maria. IMHO, letting the plate float a little lets the pressure of the grain even out the plates all they need to be.
 
Were you getting a bad crush before you did all that stuff? .... FWIW, all I did was remove the cotter pin, rotate the retaining collar 90 degrees, and reinsert the same cotter pin. No JB, No washers. No bolt. No only crushing on even numbered days while standing on one foot and singing the Ave Maria. IMHO, letting the plate float a little lets the pressure of the grain even out the plates all they need to be.

Never crushed with it so I don't know. I may try singing the Ave Maria though. :rockin:
 
Man you guys weren't kidding about turning it down until you're scared and then turn it more. On the first batch I ran I tried to crush it to look similar to the crush from a roller mill and ended up with terrible (<60%) efficiency. On my second batch I cranked it down. Compared to the adjunct grains crushed at the LHBS, my crush was floury and tore up to the point I was worried, but I kept the board's advice in the back of my mind and kept going. I ended up getting 70% efficiency and no stuck sparge so I'll take it up another notch on the next batch. I think the adjustment instructions should be, turn it down until you get a stuck sparge, then back off a quarter turn :)
 
I have done one crush with mine. Took a stab in the dark and got 78% efficiency. My hulls were mostly intact... It wasn't all flour either.
 
Never crushed with it so I don't know. I may try singing the Ave Maria though. :rockin:


So if you had never crushed with it what exactly were you trying to fix by doing all that other crap.

No offense intended, I am just trying to make the point for you and anyone else reading this that you do not have to automatically do all these tweaks unless there is a specific problem you are trying to fix and then only do what is necessary to fix the problem you are having. I know I read one instance where someone did the JB weld only to have the auger shaft snap due to the extra stress.

Anything you do to these mills should only be done to fix a problem with your specific instance of the mill. The manufacturing tolerances of these mills are so loose that they simply cannot all be treated alike. What may be necessary for one mill may not be necessary for another or at the extreme may make a problem worse. There is a reason the design has the plate floating and not simply cast as part of the auger.

I apologize if this came across as a rant/dig/slam.

no +1

if it ain't broke don't fix it.

my Victoria mill just needed to be tightened and that was it. 76-78% I didn't do any of the mods.
 
camiller said:
So if you had never crushed with it what exactly were you trying to fix by doing all that other crap.

No offense intended, I am just trying to make the point for you and anyone else reading this that you do not have to automatically do all these tweaks unless there is a specific problem you are trying to fix and then only do what is necessary to fix the problem you are having. I know I read one instance where someone did the JB weld only to have the auger shaft snap due to the extra stress.

Anything you do to these mills should only be done to fix a problem with your specific instance of the mill. The manufacturing tolerances of these mills are so loose that they simply cannot all be treated alike. What may be necessary for one mill may not be necessary for another or at the extreme may make a problem worse. There is a reason the design has the plate floating and not simply cast as part of the auger.

I apologize if this came across as a rant/dig/slam.

I have thick skin so no worries. I am not a "if it ain't broke don't fix" kind of guy.
 
letting the plate float a little lets the pressure of the grain even out the plates all they need to be.

Sorry for the reduncy, but this is worth repeating. You really only need to "true up" the grinding plate if it is bound up crooked and unable to "true itself" during grinding. It is really a remarkable design that is able to overcome such piss-poor manufacturing and QC.
 
Yep mine looks a bit off when not grinding but it still does a great job. Last brew I mentioned 78% eff. Yesterdays brew = 77.5% eff. Corona kicking butt.
 
Yep mine looks a bit off when not grinding but it still does a great job. Last brew I mentioned 78% eff. Yesterdays brew = 77.5% eff. Corona kicking butt.

And the results are all that matters. Yes, the Corona-type mill is made quite a bit more crudely than machinery we're used to. But, yes, it also works, and works just fine.
 
mine was a victoria- red box edition. the only tweeks i had to make were the washers to get more adjustability, and a homeade cardboard shim on the tailshaft. gettin 80-83 every grind. id try another crank beezy see if you can get more efficiency. I have also found that slower is waaaay better at least on my rig. the true test coming up in 3 weeks 34lb for 1 brew session. 3 beers.
 
tchuklobrau said:
mine was a victoria- red box edition. the only tweeks i had to make were the washers to get more adjustability, and a homeade cardboard shim on the tailshaft. gettin 80-83 every grind. id try another crank beezy see if you can get more efficiency. I have also found that slower is waaaay better at least on my rig. the true test coming up in 3 weeks 34lb for 1 brew session. 3 beers.

I could crank it down a bit more I think but I am not sure I need that much more eff since most recipes I see go with 75%.
 
20110726101450.jpg
Its a 5 gallon water bottle on a wooden base with a phil mill underneath powered by an electric drill. The hopper holds 21 pounds of grain and I can go through it in about 5 minutes.
 
Introducing the Three Bucket System! :fro:

Yes - that's right. I'm blatantly ripping off Revvy and Wilsenbrewer (among many others), adding a slight tweak, and calling it a brand new version. Look out patent office - here I come!

When measuring out my grains, I dump into a Homer bucket. I then dump that into the water cooler bottle. I then set down the bucket as a rest / holder for my drill (because yes... I AM that lazy). The height works out perfectly. (Yes, I errrr... was planning for that work out). Once milling is done I switch out the "catch" bucket for the "holder" bucket. This keeps things neat and tidy while I brew. When done I slap the "catch" bucket on the bottom of the rig and it's good to go. Now if I could only get the water bottle tucked INTO the buckets with the lid on top that would be fantastic in my small basement.

One thing I love about the wood spacers idea someone had is that I can bring the handle for the bottom bucket up and it rests right on top of the spacer. That way I can use the handle for the top bucket to carry the primary system around since the catch bucket is "locked in". My blocks are just over 2" high.

WP_000450.jpg
 
holy crap, I just hand cranked 14 lbs with my new mill... now I truely have sweat in my next beer! Great looking grind though!
 
ryclo said:
holy crap, I just hand cranked 14 lbs with my new mill... now I truely have sweat in my next beer! Great looking grind though!

You must have a desk job lol. I am a work smart not hard kinda guy but I am not buying a slow drill just for milling grain.
 
Back
Top