• Please visit and share your knowledge at our sister communities:
  • If you have not, please join our official Homebrewing Facebook Group!

    Homebrewing Facebook Group

My Ugly Junk- Corona Mill Station...

Homebrew Talk

Help Support Homebrew Talk:

This site may earn a commission from merchant affiliate links, including eBay, Amazon, and others.
I used 3 washers each side. and replaced cotter pin with nut and bolt. best efficiency was 80% haven't jb welded yet plate has slight wobble... but only slight... 76 to 80 ( hit every number high to low) works well now and mostly my varience comes from sparge. trying "wet crush" not what james called it... ( moistening grains with spray bottle on this next batch to maintain more hulls from basic brewing radio) may be able to back off crush a bit.
 
I spent a day this past week putting together a millhouse for my corona style i got on the cheap from Grizzly.com. Fixed up how the grind plate sat with that 8/32 bolt and some tin foil shoved under one side. Put a i'm guessing 18 lb hopper on it and enclosed it totally in a bucket so no more grain dustings. Turned the problem of the bolts from the mill platform sticking out to a 'feature' to hold that bucket above another collection bucket.

Used to get between 50 and 60% extraction efficiency. This last brew i had to adjust the hop schedule up a big amount as i got 80%! This thread was incredibly helpful in turning my mill into something useful and i'm psyched about it!
 
Used to get between 50 and 60% extraction efficiency. This last brew i had to adjust the hop schedule up a big amount as i got 80%! This thread was incredibly helpful in turning my mill into something useful and i'm psyched about it!

Rock on CHIPMAN!:rockin: I still use my ugly junk as "living room sculpture" so I'm still looking for an artful way to expand the hopper!~
 
I just made a pale ale on friday using my corona mill and I only achieved 52%. I think it was because I had too much space about 8/32s space between the plates. Can someone give me a reference to how much space should be inbetween the two plates. Should a credit card be able to fit?

Thanks!
 
got one of these a month ago. there is a long thread on getting the max use out of this. after three brewing sessions and reading that long and valuable thread, i am pretty happy. you gotta dial it down pretty tight. because it seems like every one of these mills is somewhat off kilter in some fashion due to lack of quality control in manufacture, there is no general rule. i dialed mine all the way tight and then started backing off quarter turns until the crush was to my liking (no uncrushed husks, decent amount but not too much flour). its now about a credit card width, maybe less. i have been very pleased with the results. you may find that if your unit is off kilter is some form or fashion, then the suggested fixes on that thread will likely get you fixed up. you can and should be doing much better than 52% imho - i would say tighten that sucker up more. Wilserbrew and Revvy are the go-to experts on this unit, so you might check in with those guys for better guidance.
 
.....I had too much space about 8/32s space between the plates. Can someone give me a reference to how much space should be inbetween the two plates. Should a credit card be able to fit?

Thanks!

8/32"...that's 1/4" and way too much. Try a credit card thickness and adjust from there.
 
I just finished my build. It was really a spur of the moment thing because I wanted to see how much faster it would be with a drill. I used an old piece of scrap wood and cut a hole out with a jig saw. I just laid that on top of the bucket. Then I replaced the screw that held the crank on with a screw with a bolt head. I cut up a coffee can to catch most of the grain. If I hadn't had to run to the hardware store to pick up that screw it would have taken me less time to slap everything together and then grind my grain with the drill than it would have to grind it by hand. I'm so glad I did this. I will no longer dread having to grind my grain bill.

2r20xmq.jpg
 
hey! why not add a hinge on the tin box with a lid on it to cover the crushed grain output. I'm picturing something like a zippo lighter. but a larger scale. That will surely help reduce the mess and waste.
 
...or just put the mill down IN a bucket, and eliminate all the mess. Here is my earlier post showing my "ugly junk" adaptation:

https://www.homebrewtalk.com/f51/my-ugly-junk-corona-mill-station-90849/index21.html#post1408147

Since then, I retired my original "Ale Pail" fermenter, and the bucket with the mill fits down perfectly into that 6.5 gal. bucket, resting on the rim. I just mill the grain, let it all drain out into the bottom bucket, put on the lid until mash time.
 
I upgraded my Ugly Junk to "Uglier." About time to bump this thread anyway, what with all the NASA-built high-end roller mills in Louis XV cabinetry appearing in this forum.

My upgrade: A 5 gal. #7 plastic bottle with bottom cut off and duct-taped to the hopper of my Corona Mill.

The good news: no more putting in more malt every pound or so; this sucker will hold a 20 lb. grain bill.

The bad news: I can mill until my drill starts to overheat.

Total cost: bottle donated by neighbor, so maybe 25 cents worth of duct tape.

The goods:

Mill Improved.jpg
 
This thread encouraged me to save my money on a BC and go Corona.

My contribution
100_1160.jpg

100_1161.jpg

100_1162.jpg


Tried it out today, made a couple adjustments (had to tighten down, then a bit more, g/f reminded me of what you guys said, "tighten till scared...") and I got these results, I'm thrilled!!
100_1163.jpg

100_1163.jpg
 
Great setup! Crush looks good too....I can't really make out any uncrushed grain in there.
 
Looks good, not sure I'm scared yet...hah...can't really tell unless I run my stick fingers through the grain....no whole pieces right..
 
Been one of those days where you can honestly call yourself a Lucky Bastard and thought I'd share the joy. Here's the story, (long post, sorry):

I'm an amateur vintner of Country Wines and found that I have a large hole in my pipeline with nothing to draft off of, (lost 6gal of Pear to "flowers of wine"). Rice wine would still be a few months out at its youngest, and we've always had trouble not drinking up my children before their time.

Recently had a friend gift me what he thought was a wine corker laying around from garbage picking, but it turned out to be a Super Agata Bench Capper. Nice Gift!

"Crap" I thought, "This smells like another hobby I won't be able to shut up about."

So I made up my mind to start my first batch of homebrew and went to a local wine store that has a small beer/wine ingredients section. I wrote down a recipe for a Newcastle clone before I went, without knowing the difference yet between an extract and AG brew. Started gathering the ingredients and just about soiled my nethers when I picked up a bag of malt extract. "15$ and I need two of these?!?!?" Didn't sit well AT ALL, so I picked up a Cooper's Stout kit which seemed like a good place to start at 17$.

Caught the bug pretty hard at this point and started researching properly into homebrewing. Found out that an AG brew would cut my costs pretty significantly. Also realized that extract brewing felt like "cheating" to me as a winemaker. (Fruit prep alone can take up more time than 1 AG brew day.) No offense to extract brewers, but it just feels like mixing different packets of koolaid together. No connection to the ingredients. (Please don't flame me for this, I won't care.)

So I started looking into equipment and wanted a roller mill like all the big kids seem to be using. The cost of those are relatively cheap, but I already have that $ allocated to the wine press I'm building. (HDPE 3/4" sheet is the cost of a roll mill and my forearms are tired and my hands stained.) Then I found Revvy's fun thread here and resigned myself to probably ending up with a Discount Tommy Victoria. Been watching the Ebay auctions and see y'all bidding them up slightly over 20$ every time. 30$ and in my hands was something I was about to pull the trigger on and could live with, having the collected advice here to lean on. (Thank you ALL very much!)

But today, TODAY, I went to see that friend who gave me the super agata. He was selling me an old table saw at a deal and I happened to ask him if he found a grain mill along with that capper. He told me "No," but that he did have what he thought was a mill laying around that he never seriously used. He told me I could have it, but he could borrow it back whenever he needed.

DEAL!

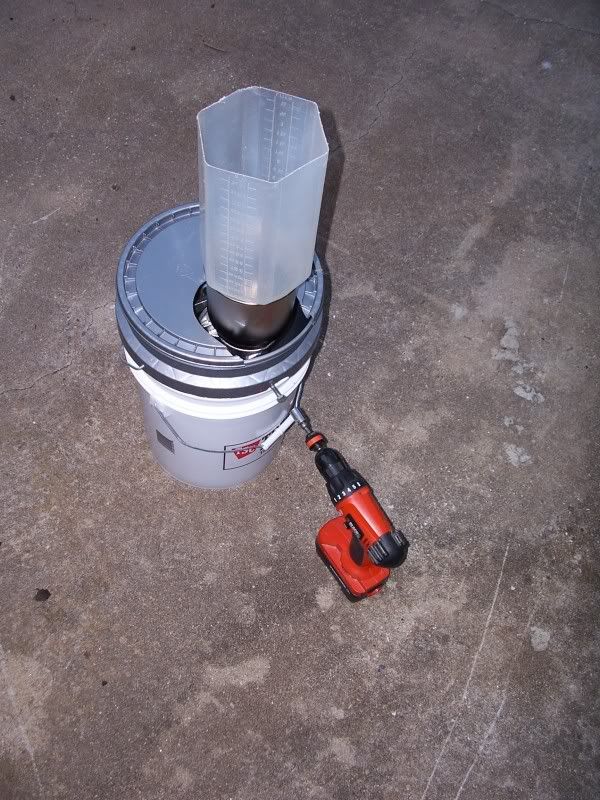
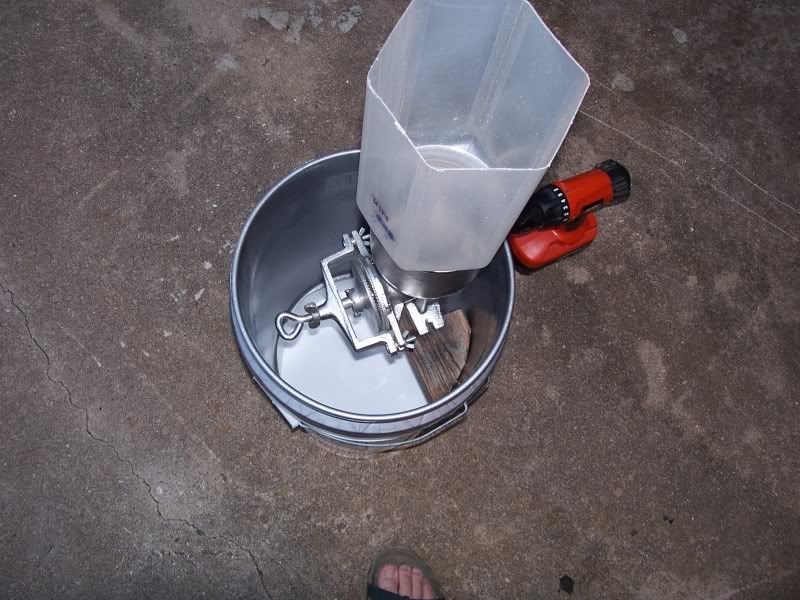
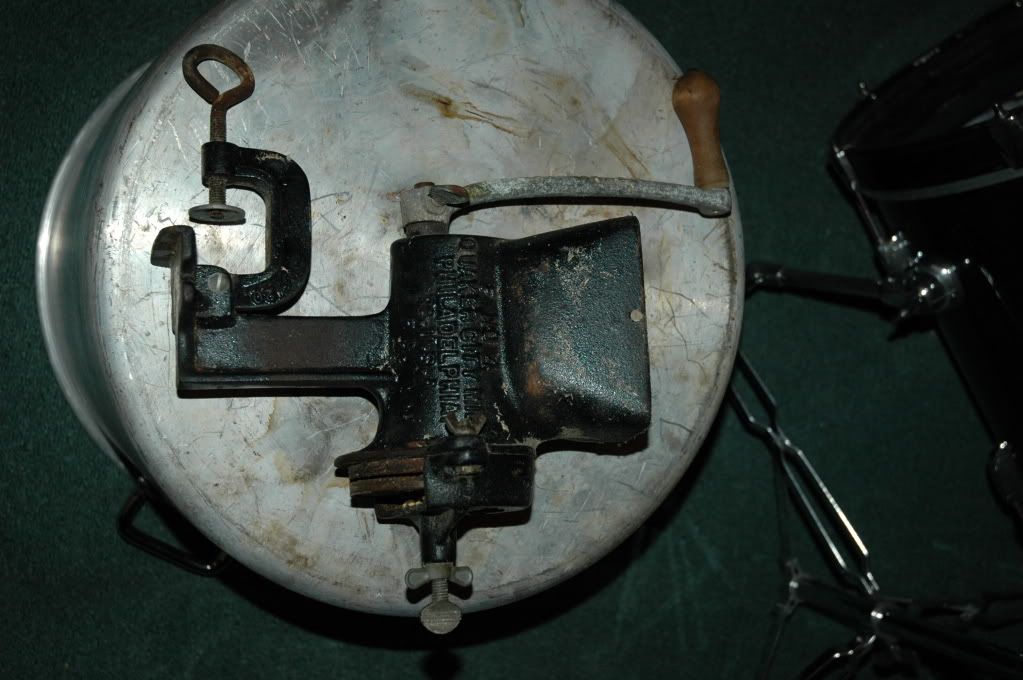
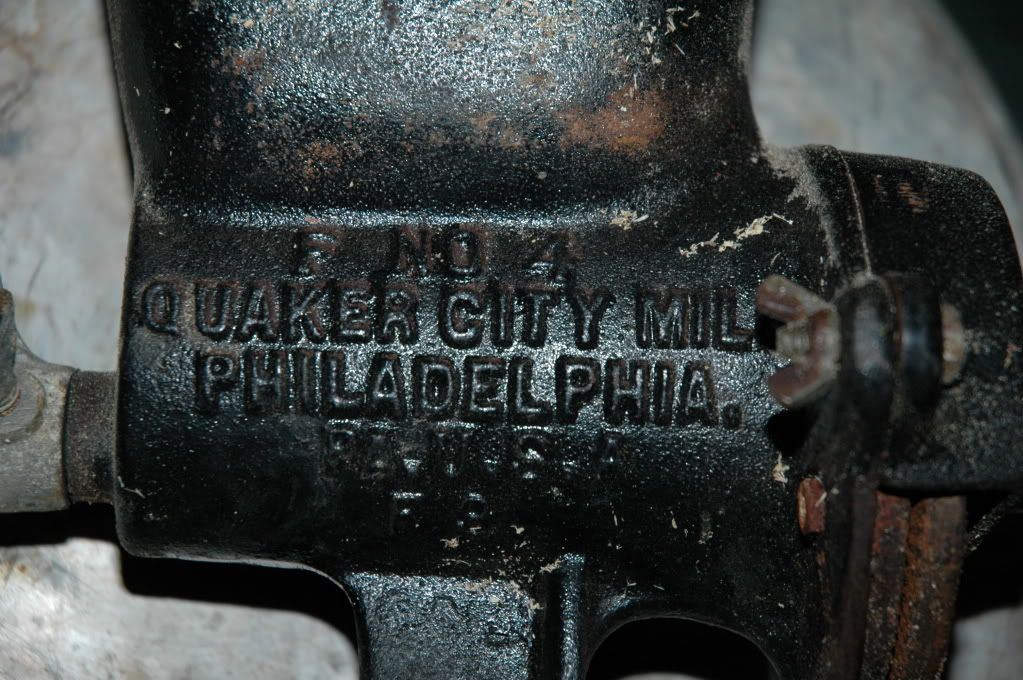
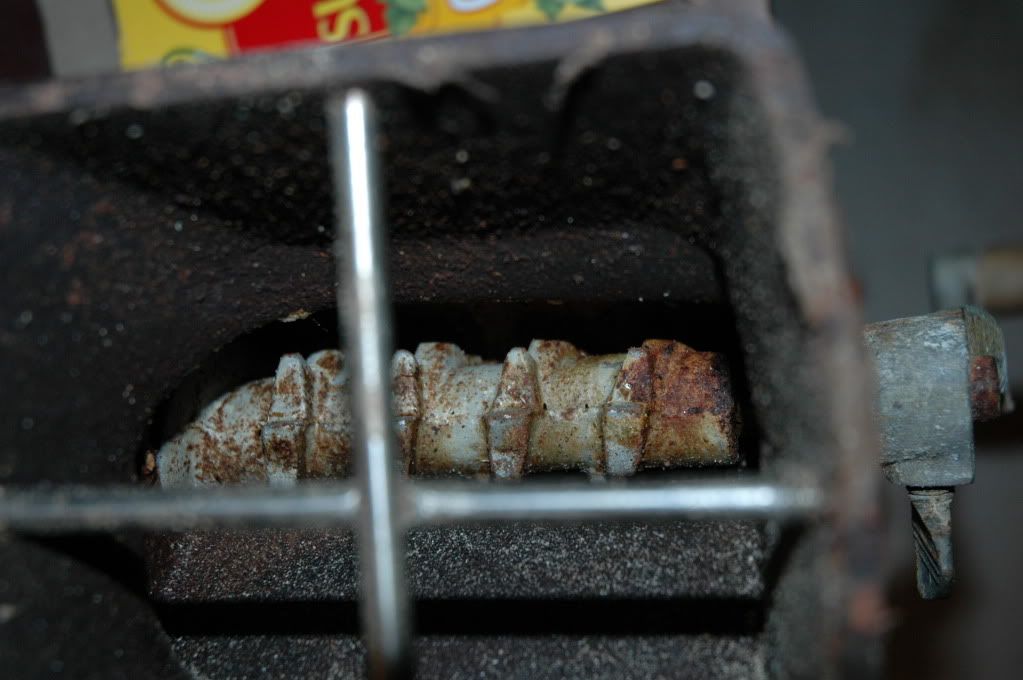
Then he went to fish it out, came back and handed me this bad boy, (Sorry for the large pics).

I feel so lucky, I could cry.


DSC_0014.jpg


DSC_0015.jpg
 
Apologies if that seemed like boasting. Just very happy about my "Deal Day."

I do have one question for you all.

What is the best method for cleaning this beast up and removing the rust while keeping things "Food Grade"?

The 2 bucket solution seems about the best stand I could make for storage efficiency, even though this mill seems to want something elaborate made out of fine hardwoods and Corinthian Leather. (That will be what adorns the wine press!)

I'll document the cleaning and the build in this thread, along with copious amounts of Mill Pr0n.

Thanks everyone...
 
That is a gorgeous old piece......looks like it's got more iron in it than a lot of new cars. If I were going to use anything to clean it, I'd probably soak it in a solution of "Green Cleaner" overnight, then rinse. I'd then be tempted to use some PBW (an Oxi-Clean on steriods) for a soak, but as long as any surface crud that comes off easily has been removed, I'd be too worried abou taking off any protective coating. The thing looks like it's been painted, rather than galvanized, and something like PBW or Oxi-Clean is gonna want to lift that paint off.

For mounting solutions, the "Ugly Junk" thread is replete with ideas.....some, like mine, uglier than others. "Wilserbrewer" in particular is a fount of good thoughts.
 
What is the best method for cleaning this beast up and removing the rust while keeping things "Food Grade"?


Thanks everyone...

Cleaning it? Are you crazy, it has taken perhaps the better part of a century to develop that fine patina. You could take it apart and wire wheel the grinding plates to remove the rust. Maybe running a bag of feed corn through it would "polish" up the plates. IMHO, don't soak it in water, but if you do, dry it quickly in a warm oven.
 
I do understand about the whole patina over time argument and I welcome the caution. Antiques should be left alone as to their fit and finish.

That is the problem right there though. I won't be leaving this thing alone to gather time for theoretical value as an antique. I'll be using it as Mr. Straub intended, grinding up shoit.

My plan is hopefully to keep the outward appearance just as it is, but to clean up the grain pathway alone so I don't mix iron oxide into my future crushed grain. I'll take pics of how rusted the inside is.

I would really love to treat it like an iron skillet if I could. Brush off any caked rust and soak the grain path alone with 1:1 ratio of vinegar and water to get rid of the rest of the rust on the inside. Then just bake it in the oven with multiple coats of lard like you would season a skillet. That would supposedly be a nice food grade coating for the internals.

Problem is, will that black coating, that may or may not be paint, survive oven temps just high enough to oxidize/carbonize the coatings of lard?


That's what I'm thinking about right now. The future will probably change this of course, but the idea seems sound if the paint will survive baking.
 
I've been meaning to mention this to satisfy y'alls curiosity:

The outside burr plate of this beauty does indeed wobble or "float". The inside burr plate is bolted to the cast body and the outside burr plate is not fixed rigidly to the shaft. (Again, more pics coming.)

Thought that might help out some of you about to JB Weld your Tommy Vic's.

Does anyone require video of the amount of wobble?
 
Subscribed cause I want some ugly junk too!!

I ran a recipe 3 times, each time missing my TG. Changed mash water amount, etc, no change. After reading this thread I'm thinking HBS grind was off?
 
yeah, been there. I now grind finer than I thought was correct and I'm hitting 75% + up to 80% consistently. I use a paint strainer in my mash tun too even if I'm a bit fine helps with filtration.
 
Turns out I don't have an antique, which is good in a lot of ways. (One of them being I can buy new burr plates for most likely an obscene amount.)

http://www.qcgsys.com/prod.htm


My mill doesn't have the patent #'s and dates on the stem like the antiques.

For some reason, these Quakers really found a niche in labs and universities from what I've researched. That there might be a testament to the quality of the thing I hope.

It also means that I might be getting my daily dose of wolframite and molybdenum while those who own Tommy Vic's are getting a daily dose of Chinese lead and cadmium.

Sustenance farmer/militia/end of the worlder type shops have them for sale still:

http://www.readymaderesources.com/cart/index.php?act=viewProd&productId=845
http://www.urbanhomemaker.com/productcart/pc/viewPrd.asp?idcategory=135&idproduct=1810
http://www.lightwarriorproducts.com/barrelflier.shtml

(That last link is where one can buy their colloidal silver and turn the largest organ humans have a nice, dead-ish shade of grey/blue...)

Fun, no?

here's a link to the 1911 catalog version, for those interested in any of this.

http://www.gristmillers.com/quaker-city/page-04.htm
 
It also means that I might be getting my daily dose of wolframite and molybdenum while those who own Tommy Vic's are getting a daily dose of Chinese lead and cadmium.

l[/url]

eh!? speaking Latin!...run some corn grind away... and enjoy! I'm sure my mexican cronona has some bad voodoo radioactive cheap-ass alloy. but I've dialed it in.... made some damn good efficient beer. Grind away grasshopper ,grind away!
 
I'm guessing your older mill is higher quality casting with much tighter tolerances than our chinese/mexican versions.
 
Wolframite might as well be Latin to me as well. Doing the research to find out about Quaker City Mills kept returning research paper pdf's where they referred to "Ground sample to x fineness in Quaker City Mill". Wolframite was one of the minerals being ground up in one of them.

Hell, that 1st link above has this as material grinding list:

Grinding Mill
Model F-4

Typical Applications

* Soft or hard grains for cereal & bread
* Corn
* Coffee
* Pharmaceuticals
* Chemicals
* Ores
* Coal
* Nut leats
* Peanuts
* Soil tests
* Iron turnings
* Lab sample preparation


Coal and Ore? Iron Turnings? Holy Zeus! Seeing as how this was garbage picked out of a dumpster for one of the big 3 chemical companies...,

Kinda makes me skittish about what is coating the inside of this thing. (If the owner was grinding pharmaceuticals, then I better make a quick batch of AG before I clean this bad boy!!!)

DSC_0018.jpg


As far as the play in burr mill plates, here's a vid showing how much there is on this particular mill. Granted, this may just have been used all to hell and is loose because of that. I also haven't run any grain through it yet, but will do so by this weekend, (corn at first, sorry for you and me.)

[ame]http://www.vimeo.com/15571708[/ame]

Probably be a few weeks of prep before I grind my first AG batch. I want to get the toxic crud off, then electrolyze what rust I can back to iron, then coat 'er like a skillet.

I will stop teasing and get crushing as quick as I can, promise.
 
For $200 + up, think I'll stick with my "Victoria" Corona knockoff from Discount Tommy for $17. Once I got it dialed in, it just keeps cranking out the grist that hits all my numbers when I mash. Did a 20# grain bill today for a Founder's Breakfast Stout clone.
 
Back
Top