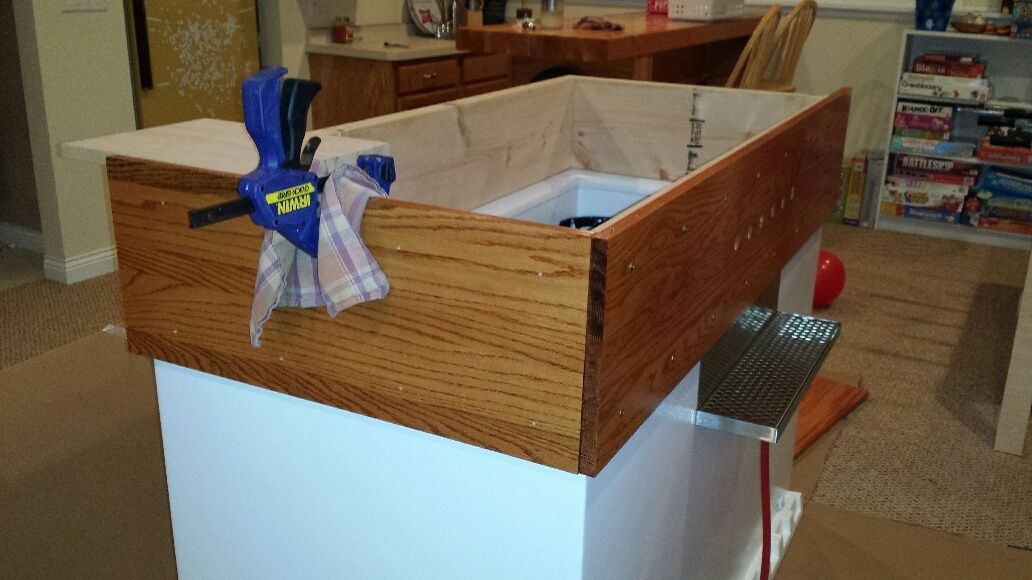
My Keezer is done!

Homebrew Talk - Beer, Wine, Mead, & Cider Brewing Discussion Forum

Help Support Homebrew Talk - Beer, Wine, Mead, & Cider Brewing Discussion Forum:

This site may earn a commission from merchant affiliate links, including eBay, Amazon, and others.
That's the idea. I've been planning for about 6 months, we'll see what Santa brings and I'll buy the rest myself, build should start in the next couple weeks. I'll post a picture and link my thread when it's done but it will look pretty similar to yours.
Merry Christmas
 
Trying to figure something out. When you attach the freezer lid to the wooden frame at the top which has the faucets in it, how does the frame attach to the freezer? Is it just the silicon? Seems like when you open it that the front of the frame will want to lift up? Do you have a picture of the back?

Is the frame also attached to the freezer in the back?

The entire collar is glued to the freezer with silicone. This blocks out air gaps to help control moisture and temperature, not necessarily to hold everything in place. That said, the collar still doesn't budge. The weight of the collar alone ensures that nothing moves when I open and close the lid.

The back of the collar is just 2x6 pine with the lid hinges installed and a thermostat. So the entire collar is sitting on the freezer with just silicone and weight. Did that answer your question?

Cheers
 
GrainToGlass...thanks for documenting your wonderful work. You have stimulated a lot of new builds, in addition to mine! Question for you, did you mount the collar on double-sided foam rubber as a seal? I see some silicone but it looks like it joins the foam to the freezer? I'll be sealing my collar on soon but not sure what approach works best. Thanks.

I am about 99% complete with my GrainToGlass clone keezer. Thanks to all for lot's of inspiration, answered questions and great ideas. Thought I would share some photos and what I would do different if there is a next time:

1) I wanted to plumb the two three-regulator Kegco secondaries together with a long nipple. The fittings must be assembled with loctite as they will not budge. So, I'll have to tee off the primary outlet. Don't assume these ganged regulators will come apart!
2) I screwed the 2X6 collar together on a flat surface (table saw) but due to imperfect cuts it pulled to leave a gap of 3/16" in one corner when placed on the freezer. Foam seal took up the gap but if I did it over I would assemble on the freezer and slowly torque the screws insuring it stayed flat.
3) The 1" foam polystyrene board is very soft. So as I lean into the freezer the aluminum foil tape crushes under pressure. I would cut another 1" wide X 3/4" wood strip to protect the top of the foam board, especially on sides and from where I'll be leaning over to load and unload.


Cheers!

Keezer1.jpg


Keezer2.jpg


Keezer3.jpg
 
Last edited:
Looking good rudy! I'm debating painting my white freezer black so I can do a red stain, but yours has me second guessing as the brown/white is very sharp. Decisions decisions...
 
Looking good rudy! I'm debating painting my white freezer black so I can do a red stain, but yours has me second guessing as the brown/white is very sharp. Decisions decisions...

Thanks jiMithing83. The "facade" on the keezer is 1 X 6 cedar with an espresso Polyshades Minwax stain/poly combo. Rough sawn side is exposed. I had the same concerns but did not want to paint the keezer in case I needed to convert it back.

Cheers
 
I am about 99% complete with my GrainToGlass clone keezer. Thanks to all for lot's of inspiration, answered questions and great ideas. Thought I would share some photos and what I would do different if there is a next time:

1) I wanted to plumb the two three-regulator Kegco secondaries together with a long nipple. The fittings must be assembled with loctite as they will not budge. So, I'll have to tee off the primary outlet. Don't assume these ganged regulators will come apart!
2) I screwed the 2X6 collar together on a flat surface (table saw) but due to imperfect cuts it pulled to leave a gap of 3/16" in one corner when placed on the freezer. Foam seal took up the gap but if I did it over I would assemble on the freezer and slowly torque the screws insuring it stayed flat.
3) The 1" foam polystyrene board is very soft. So as I lean into the freezer the aluminum foil tape crushes under pressure. I would cut another 1" wide X 3/4" wood strip to protect the top of the foam board, especially on sides and from where I'll be leaning over to load and unload.


Cheers!

Well done Rudy! I'm not too keen on white keezers, but that is a beauty!! The collar, drip tray, insulation, everything looks sharp and well executed. What size freezer is yours? Looks like a great size for 6 taps.
:mug:

Cheers!
 
Well done Rudy! I'm not too keen on white keezers, but that is a beauty!! The collar, drip tray, insulation, everything looks sharp and well executed. What size freezer is yours? Looks like a great size for 6 taps.
:mug:

Cheers!

Thanks GrainToGlass. The freezer is a 14 ft^3 Whirlpool (Lowes) which was a Christmas present from my wife. Her motivation was to reclaim space in our spare refrigerator that was occupied by Corny's. Easily handles six tapped with spare room for lagering. I like your black freezer and toyed with painting mine but I wanted to be able to re-purpose it as a freezer if that need hopefully never arises! Thanks again for your excellent documentation of your build.
 
Awesome build! I got a question for you. I also have the thermostar, Are you going to place in a jar of water or tape to a keg? Or dangle? Would like to get an idea as I am collecting pieces I need to build my own keezer. Thanks.
 
Awesome build! I got a question for you. I also have the thermostar, Are you going to place in a jar of water or tape to a keg? Or dangle? Would like to get an idea as I am collecting pieces I need to build my own keezer. Thanks.

Savagejair, Most builds I've seen on HBT insert the thermostat sensor into a small jar of water to slow the response of the system. Taping to a keg is another option and maybe a better one. I plan to use a jar of water...but I do like you keg idea! As you can imagine, if the sensor was hanging in air it would cool very quickly and probably cause the compressor to cycle on &off more frequently than needed.

Cheers
 
The entire collar is glued to the freezer with silicone. This blocks out air gaps to help control moisture and temperature, not necessarily to hold everything in place. That said, the collar still doesn't budge. The weight of the collar alone ensures that nothing moves when I open and close the lid.

The back of the collar is just 2x6 pine with the lid hinges installed and a thermostat. So the entire collar is sitting on the freezer with just silicone and weight. Did that answer your question?

Cheers

So I guess yes it does answer my question, but I only have trim pieces. I thought the 1 by's would be enough to hold the weight of the top. I guess maybe I should by 2 by's and then add the trim to that so I have a sturdier collar. Good thing I did not cut anything yet.

Todd
 
i copied GrainToGlass, 2x rough construction lumber with trim boards on the outside. mine are 2x10 rough with 1x12 trim. that thing ain't going nowhere...

20151224_170822_resized_zpspwnhh0qk.jpg
 
Shut up and take my money! I want one! That looks awesome! One of my next big jumps will be to kegging. Looking to do lagers and all-grain first.

<sigh> <looks on your finished creation with dreamy eyes...>
 
Awesome build! I got a question for you. I also have the thermostar, Are you going to place in a jar of water or tape to a keg? Or dangle? Would like to get an idea as I am collecting pieces I need to build my own keezer. Thanks.

Thanks! The Thermostar probe goes into a 22oz glass bottle filled with water. I then sealed the mouth of the bottle with tape and placed it on the hump of the freezer beside the kegs. I should've posted a picture of it, but I'm sure you get the idea. Hope that helps!
 
i copied GrainToGlass, 2x rough construction lumber with trim boards on the outside. mine are 2x10 rough with 1x12 trim. that thing ain't going nowhere...

20151224_170822_resized_zpspwnhh0qk.jpg

Awesome build so far! Are you able to fit a 5 gallon keg on the hump now? I thought about doing the same, but wasn't sure I wanted a collar that tall. Looking good, keep us updated.
 
Thanks! The Thermostar probe goes into a 22oz glass bottle filled with water. I then sealed the mouth of the bottle with tape and placed it on the hump of the freezer beside the kegs. I should've posted a picture of it, but I'm sure you get the idea. Hope that helps!


Thanks :mug:
 
Awesome build so far! Are you able to fit a 5 gallon keg on the hump now? I thought about doing the same, but wasn't sure I wanted a collar that tall. Looking good, keep us updated.

i'm documenting the build as part of my overall brewery build. keezer action starts on post 83:

https://www.homebrewtalk.com/showthread.php?t=542625

i can get two more kegs up on the hump with the 10" rough collar. i might have been able to get by with an 8" but would have needed an additional 1" or so spacer. it was easier to just go with the 10".

and yes, your build was probably my biggest influence. aside from the dimensional differences, biggest differences were square joints with outside corner trim (instead of mitered), screwed trim piece (instead of glued) and xps foam insulation on the collar instead of reflectix. yours looks nicer on the inside. :)
 
i copied GrainToGlass, 2x rough construction lumber with trim boards on the outside. mine are 2x10 rough with 1x12 trim. that thing ain't going nowhere...

20151224_170822_resized_zpspwnhh0qk.jpg

Looking good isnotrequired! Seems like GrainToGlass has stimulated a keezer revolution. As you pointed out, the collar does get surprisingly heavy with all the 2X and 1X wood and stays put without extra bonding. I did shoot a 1" bead of silicone in each corner to bond 2X to freezer collar in just for peace of mind.
 
I also modeled my keezer after GrainToGlass's beautiful build. Thanks for all your help along the way!

Wow! That's a beautiful keezer, way to go! I'm loving the grain on that wood, looks wild. Glad to provide some worthy assistance!

:mug:
 
I also modeled my keezer after GrainToGlass's beautiful build. Thanks for all your help along the way!

abledsoe: Nice work. I see you and many others have a PC cooling fan for air circulation to reduce temperature stratification. I also plan the same with the fan on with the compressor. This approach seems logical, but what really makes the most sense? On with compressor, on all the time, on when compressor is off? Any experience with different approaches or am I splitting hairs.
 
has anyone put these outside? we live in south florida (near west palm beach). we dont have anywhere to stick something like this inside our house, but could put under a covered part of our patio out of the weather, but would still be in the heat of summer. anyone ever try this? any issues?
 
I also modeled my keezer after GrainToGlass's beautiful build. Thanks for all your help along the way!

abledsoe: Nice work. I see you and many others have a PC cooling fan for air circulation to reduce temperature stratification. I also plan the same with the fan on with the compressor. This approach seems logical, but what really makes the most sense? On with compressor, on all the time, on when compressor is off? Any experience with different approaches or am I splitting hairs.


On all the time is best. The amp draw is so low, you'll never notice.
 
has anyone put these outside? we live in south florida (near west palm beach). we dont have anywhere to stick something like this inside our house, but could put under a covered part of our patio out of the weather, but would still be in the heat of summer. anyone ever try this? any issues?


Humidity would be your main concern... especially in Florida. It will drive you crazy trying to keep it dry. A regular kegerator may be your best bet.

:mug:
 
I am about 99% complete with my GrainToGlass clone keezer. Thanks to all for lot's of inspiration, answered questions and great ideas. Thought I would share some photos and what I would do different if there is a next time:

1) I wanted to plumb the two three-regulator Kegco secondaries together with a long nipple. The fittings must be assembled with loctite as they will not budge. So, I'll have to tee off the primary outlet. Don't assume these ganged regulators will come apart!
2) I screwed the 2X6 collar together on a flat surface (table saw) but due to imperfect cuts it pulled to leave a gap of 3/16" in one corner when placed on the freezer. Foam seal took up the gap but if I did it over I would assemble on the freezer and slowly torque the screws insuring it stayed flat.
3) The 1" foam polystyrene board is very soft. So as I lean into the freezer the aluminum foil tape crushes under pressure. I would cut another 1" wide X 3/4" wood strip to protect the top of the foam board, especially on sides and from where I'll be leaning over to load and unload.


Cheers!

rudy,

I'd like to know more about how you wired up that STC-1000 controller installed directly in the collar so that there's no exposed wiring / terminals inside the keezer.
 
why not just put a dehumidifier inside? ive read kegerators outdoors ultimately bite the dust due to the issue with constantly trying to adjust themselves
 
has anyone put these outside? we live in south florida (near west palm beach). we dont have anywhere to stick something like this inside our house, but could put under a covered part of our patio out of the weather, but would still be in the heat of summer. anyone ever try this? any issues?

I don't have a keezer outside , but I do have all of my fermenting chambers out, stored in a tin shed (in Miami, FL). A couple mini-fridges, and chest freezers. When opening and closing them regularly, they definitely accumulate moisture and puddle. But, when left shut puddling is not a huge concern. It still happens but over a longer period of time. As for operation, I haven't had any issue with my coolers being outside. They handle lagering, ale, and serving temps fine, and have been running outside for about a year now.
If you decide to have your keezer outside, make sure that it is very well sealed, and you shouldn't have a major issue with moisture.
 
Finally posting my keezer build based on this thread. I went with the double hinged option, to make it easier to load kegs. My freezer is a bit smaller than the one in the original post (5.1 cu vs 8.8), but I did a fit test and it is able to hold 3 kegs (one on the compressor hump). I don't have a third keg yet though, so I currently only have two of the taps connected and use the basket for bottles.

View attachment ImageUploadedByHome Brew1453998169.129978.jpg
View attachment ImageUploadedByHome Brew1453998211.099262.jpg
View attachment ImageUploadedByHome Brew1453998244.901291.jpg
View attachment ImageUploadedByHome Brew1453998276.487953.jpg

I used the stock hinges to connect my collar to the freezer. It's a bit heavy with the weight of the collar and the shanks, but there is a wall behind it to support it when open. I tested it to see if the hinges would hold by themselves, and they do, but they are definitely not meant to support that much weight. The upper hinges are just door hinges that I bought at Lowes. They roughly matched the screw pattern on the lid so I didn't have to drill any extra holes.

I used weather stripping to seal between the bottom of the collar and the lip of the freezer. The weight of the collar (inner is white pine, outer is red oak) is more than enough to compress the gasket. The seal between the lid and the top of the inner collar is just the stock gasket that the came on the lid.

Stained with mahogany as recommended in this thread. It was my first time staying something, but I think it came out pretty well.

So far so good. I've been enjoying beers out of it since about Oct! Not to mention the SWMBO said it looked nice enough to keep in the dining room!
A win win in my book!
 
I also modeled my keezer after GrainToGlass's beautiful build. Thanks for all your help along the way!

abledsoe: Nice work. I see you and many others have a PC cooling fan for air circulation to reduce temperature stratification. I also plan the same with the fan on with the compressor. This approach seems logical, but what really makes the most sense? On with compressor, on all the time, on when compressor is off? Any experience with different approaches or am I splitting hairs.

I have mine set to run all the time. When I wired my STC box I have the outlet split so one side (the freezer) kicks on and off when the controller tells it to, and the other half of the outlet is always hot and it powers my fans. It seems to help with the temp quite a bit, I still get a little bit of moisture on the walls of the keezer (I also have an EvaDry). I may not leave both fans in the keezer, still experimenting with placement. I'm in the process of moving across the country so I had to shutdown the keezer for the move.
 
Have you got your specs for the bottom collar and casters. I am just about finished with my basic GraintoGlass keezer clone. What size casters did you go with?

I don't have the info in front of me, I'm in the process of moving across the country. Terrifyingly, my keezer is about to be moved and stored by a moving company for what looks like at least month. I'm not excited about it.

I actually built the base several months before I finished the rest of the build and I just measured the bottom of the freezer and slapped together a base out of 2x4s. Later, near the end of the build I cut some nice red oak for the trim on the base and then realized my base was just a little out of square. I should've gone back and rebuilt it, but at that point I was out of patience, time and money. So I made it work. It was an incredibly tight fit to get the keezer on/into the base once the trim was on. Its actually wedged in there so tight I dont know if will come out without possibly damaging the base.

The casters were given to me by someone, but I think they are this one:
http://www.homedepot.com/p/Everbilt-4-in-Threaded-Stem-with-Brake-Non-Marking-Rubber-Caster-4031445EB/203672611
 
Great build, I'm getting my freezer this week and I'm going to "borrow" most of your ideas. Has anyone built or configured a hybrid collar design? I love how your freezer lid is recessed by I also like the idea below where the collar slides down over the freezer to secure it.

http://homebrewacademy.com/kegerator-collar/

I'm thinking 2x6 inner collar with 1x8 trim pieces. I would then mount the outer trim so there is a 1/2" extension on top and 1 1/2" extension at the bottom to secure the collar to the freezer.
 
I'm thinking 2x6 inner collar with 1x8 trim pieces. I would then mount the outer trim so there is a 1/2" extension on top and 1 1/2" extension at the bottom to secure the collar to the freezer.

Be careful of curved boards. When I built a collar for my last keezer, the wood had curved, so when I tried to 45 the corners, they just wouldn't fit. Wound up having to cut the corners and used spruce as trim to make the corners smooth.
 
rudy,

I'd like to know more about how you wired up that STC-1000 controller installed directly in the collar so that there's no exposed wiring / terminals inside the keezer.

agrazela: My apologies for missing your question. I just happened to revisit this thread and saw your question.

What I did was cut slots (5/8 X 5/8 or so) into the 2 X 6 to create a path for the wires to and from the STC and electrical box on the backside. They were then covered by the insulation. Hope that helps and once again, sorry about the poor response time.
 
Back
Top