HOWTO - Make a BrewPi Fermentation Controller For Cheap

Homebrew Talk - Beer, Wine, Mead, & Cider Brewing Discussion Forum

Help Support Homebrew Talk - Beer, Wine, Mead, & Cider Brewing Discussion Forum:

This site may earn a commission from merchant affiliate links, including eBay, Amazon, and others.
Status
Not open for further replies.
Yea if you dont have an active cooler i would take that off, i can see the variance in how fast the ambient air is cooling your beer possibly screwing up the algorithm. It thinks your "fridge" is cooling at say 1F/Hr part of the day and then at night it gets cold and its 5F/Hr, when in reality it should be constant.
 
Yea if you dont have an active cooler i would take that off, i can see the variance in how fast the ambient air is cooling your beer possibly screwing up the algorithm. It thinks your "fridge" is cooling at say 1F/Hr part of the day and then at night it gets cold and its 5F/Hr, when in reality it should be constant.

Thanks for feedback, turned off the cooling chamber device last night. Seems to be getting back on track. Will check when I get home from work today.
 
Hey guys, I'm getting back into brewing from many moons ago... Well, 2010. I'm curious, I read the first page with the instructions, etc. Does the temp probe actually dip INTO the wort? Which is why the thermowells are used? Or does this just monitor air? Just curious (I think Fuzze stated it that it measures the wort, rather than the air surrounding including insulated surround from your actual fermenter

This seems neat. I used to use the Johnson control with my minifridge when I brewed, this seems like a much bigger step up
 
Hello all!

I completed my build a few weeks ago but decided to change out the cheap 10A dual Relay with 2 SSR's of 25A. They arrived today and I'm trying to figure out how to connect them -_- You have one + and - comming from the arduino and then 2 signal wires? I don't know.. Looking at the original scheme I can't figure out how to get two times plus and minusses from the duino, one for each relay:

218025d1408159304-howto-make-brewpi-fermentation-controller-cheap-arduino.gif

Your two +3V SSR inputs come from Digital Pins 5 and 6 in that image, your negative should be ground if im not mistaken.

Then on the output end of your SSR one side is the black wire from your power cord shown in the image, and out of the other SSR output is the red wire in the image going to the socket with the jumper broken between the sockets.

Hopefully that makes sense. Pin 5 to SSR +3V, Ground to SSR-3V, Power cord HOT to SSR Input, SSR Output to socket. Same chain for Pin 6 from Arduino to other SSR to other Socket. Make sure you break the tab.
 
Well, doesn't seem to have corrected itself after turning off the cooling chamber device. I swear I never had issues like this before the re-install. The fermwrap should not be taking almost 8 hours!!! to heat up a few degrees.

brewpigraph1.JPG
 
Okay, instead of starting all over (still might), I ran this command;

sudo echo 'E\n' > /dev/ttyACM0

followed by;

sudo ~/brewpi-tools/updater.py --ask

....gave me this;

Checking whether the update script is up to date
remote: Counting objects: 20, done.
remote: Compressing objects: 100% (20/20), done.
remote: Total 20 (delta 10), reused 0 (delta 0), pack-reused 0
Unpacking objects: 100% (20/20), done.
From https://github.com/BrewPi/brewpi-tools
2093a96..74429d0 master -> origin/master
2093a96..74429d0 develop -> origin/develop
/home/pi/brewpi-tools is not up-to-date, updating...
Updating 2093a96..74429d0
Fast-forward
install.sh | 93 +++++++++++++++++++++++++++++---------------------------------
1 file changed, 43 insertions(+), 50 deletions(-)
This script was not up-to-date and has been automatically updated. Please re-run updater.py.
pi@raspberrypi:~ $ sudo ~/brewpi-tools/updater.py --ask


Ran the legacy install again, came back saying everything is up to date. What was odd, this wiped out my device configuration, so reloaded and going to monitor to see if it gets back to normal operation.


The FermWrap may actually became defective... shouldn't the damn thing be semi warm after 25 minutes? May have to switch to a different heat source.
 
That graph is baffling. Here's an example:

Right above the 20Jan label, you see the Fridge Setting being cranked down, the Fridge Temp following - and the Beer Temperature still going UP three degrees at the exact same time. BrewPi can't be happy about the non-responsiveness wrt the Cooling function.

And I don't understand the jitter on the Fridge Temp channel.
Does that probe really wander that much?
I wonder if that messes with BrewPi's brain.
I think I'd swap the Fridge and Beer probes to see if that thrashing follows the probe or not...

Cheers!

Good point, if his fridge sensor is really floating in air theres no way it should be cycling +-2F what looks like dozens and dozens of times a day.
 
Morning, getting my first brew fridge set up and after reading this thread (possibly not in its entirety, but a good couple of hundred pages) I decided to go down this route for controlling it.

I'm still waiting on a resistor to arrive so decided to get the software side all loaded in the mean time.

So, Raspbian went on fine and, following here

http://docs.brewpi.com/automated-brewpi-install/automated-brewpi-install.html

for the automated brewpi install that seemed to go smoothly. I can go to the BrewPi web interface so I assume it is working too.

At this point it starts to go wrong though, I then attached the Arduino to the Pi I and followed the link from the first post of this thread to the Arduino programming

http://docs.brewpi.com/after-install/program-arduino.html

I downloaded the 0.2.1 HEX file (the last Arduino compatible one I believe) from here

https://github.com/BrewPi/firmware/releases/tag/0.2.10

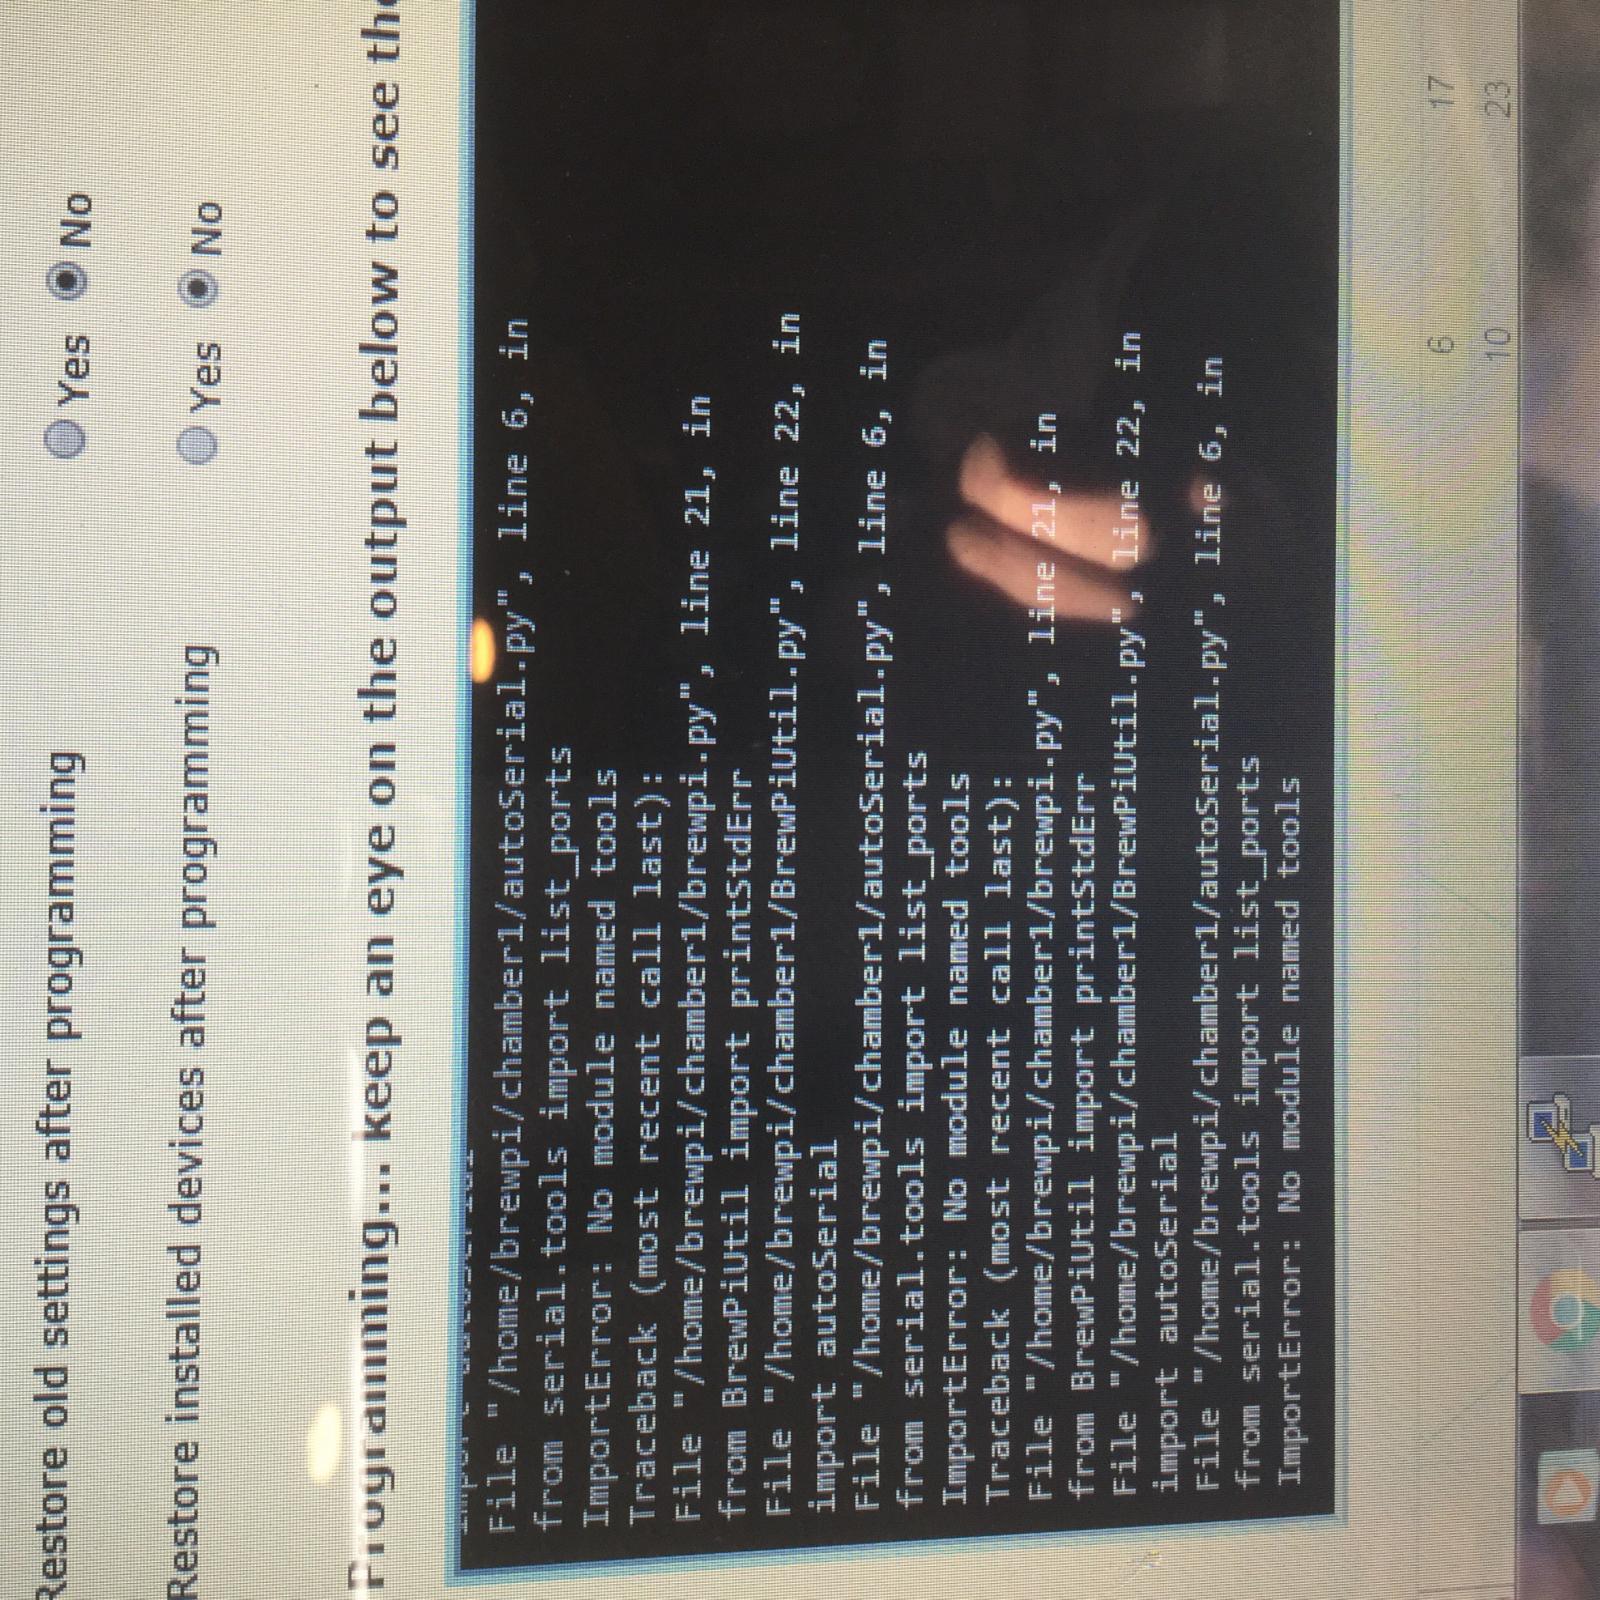
and went through the Maintenance Panel>Reprogram controller option, choosing my downloaded Hex file, UNO, No, No for the four options. When I hit Program though I get this output (two presses I believe)

wpa_supplicant: /sbin/wpa_supplicant daemon failed to start
run-parts: /etc/network/if-pre-up.d/wpasupplicant exited with return code 1
Jan 22 2016 07:32:11 Opening serial port
Jan 22 2016 07:32:11 Notification: Script started for beer 'My First BrewPi Run'
Jan 22 2016 07:32:21 Checking software version on controller...
Jan 22 2016 07:32:31 Warning: Cannot receive version number from controller. Your controller is either not programmed or running a very old version of BrewPi. Please upload a new version of BrewPi to your controller.
Traceback (most recent call last):
File "/home/brewpi/brewpi.py", line 629, in
bg_ser.stop()
AttributeError: 'NoneType' object has no attribute 'stop'
Jan 22 2016 07:37:03 Opening serial port
Jan 22 2016 07:37:03 Notification: Script started for beer 'My First BrewPi Run'
Jan 22 2016 07:37:13 Checking software version on controller...
Jan 22 2016 07:37:23 Warning: Cannot receive version number from controller. Your controller is either not programmed or running a very old version of BrewPi. Please upload a new version of BrewPi to your controller.

Anyone have any idea what is going on?

For the Arduino it's not an official one, it's one of these

http://www.amazon.co.uk/dp/B00PHY3HH2/?tag=skimlinks_replacement-20

I can see it attached to the Pi when I lsusb and if I attach to my laptop I can use it with the Arduino IDE, so I dont think the Uno should be the problem. I've tried both Uno and ATmega328 Based in Program options too with same results.

Thanks in advance...
 
Last edited by a moderator:
What do you mean "make sure you break the tab"?

So I understand the Side connected to the sockets, those remain the same as on the old relay. It is the input Side where im confused. So pin 5 and 6 are the + for each relay. I also have a negative and positive coming from the arduino. So the negative Wire I need to split op So it Goes to both SSRs and the positive Wire remains unused then?
 
I think I've fixed it (this post is going to look weird as the one I'm referring to is still in moderation).

Used xloader to upload the hex to my arduino via my laptop rather than my pi.

Could have saved myself a lot of typing
 
Ok, but like I said, the socket side was already wired since my brewpi was functional with those cheap 10A relays. So that's all done.

The final thing to do and that's different from before: Wiring the INPUT of the 2 SSR's

So what I understand:

SSR1 => Pin 5 (arduino) to positive (on SSR1) AND Ground (arduino) to negative (on SRR2)
SSR2 => Pin 6 (arduino) to positive (on SSR2) AND Ground (arduino) to negative (on SSR2)

So the ground from the arduino is split up and this leaves me with the + wire from the arduino that will no longer be in use, correct?
 
The Arduino, as that is what all of those things are connected to. If the website still pops up the RPI is likely fine. Its possible the Arduino crapped itself? If you putty into the RPI do you see the ttyACM0 device in /dev? Its possible it just lost communication for some reason.


I still believe that it is/may be the Arduino but from the web interface I was able to successfully (at least the script said it was successful) reprogram the Arduino with the appropriate .hex file. Still confused as to what happened.
 
Good point, if his fridge sensor is really floating in air theres no way it should be cycling +-2F what looks like dozens and dozens of times a day.

A zoomed-in graph may help. Is that thrashing in the fridge temp just noise in the sensor or does it correspond to numerous heating or cooling cycles?

Also where is your fridge sensor physically located since you're using a brew belt? It appears the fridge temp is being controlled by something other than the heating or cooling cycles (eg from 18 Jan to 20 it appears heating almost all the time, but fridge temp jumps cooler in the middle).

If I had to guess I'd say your room temp is on a time thermostat, cooling after midnight and for most of the day, then warmer in the evening. The fridge temp seems to follow that pattern regardless of brewpi heating/cooling

I did swap the temp sensors, to see if the erratic spikes follow the "fridge temp." I will check this behavior when I get home from work today.

Currently the wort and setup is in back bedroom, which yes the house thermostat is lower at night, on during the the morning for a bit, off during the day, and on again during evening hours. This does explain the rise and fall of the fridge temp sensor, but I cannot explain the crazy spikes. Like I said, I swapped the two sensors to see if the spikes are only on 1 sensor. Will post an update later.
 
Ok, but like I said, the socket side was already wired since my brewpi was functional with those cheap 10A relays. So that's all done.

The final thing to do and that's different from before: Wiring the INPUT of the 2 SSR's

So what I understand:

SSR1 => Pin 5 (arduino) to positive (on SSR1) AND Ground (arduino) to negative (on SRR2)
SSR2 => Pin 6 (arduino) to positive (on SSR2) AND Ground (arduino) to negative (on SSR2)

So the ground from the arduino is split up and this leaves me with the + wire from the arduino that will no longer be in use, correct?

Yes, and yes to the SSR part. If you mean the + wire being the 5V red wire from the Arduino then yes thats no longer needed. That 5V is needed to power that relay board, and 5/6 as inputs. For the SSR's the voltage from pin 5/6 is the input.

Make sure you break the brass tab, not the silver one. You have to do this or else both sockets are connected together. But i assume you did this already if you had a setup using the relay board.
 
I did swap the temp sensors, to see if the erratic spikes follow the "fridge temp." I will check this behavior when I get home from work today.

Currently the wort and setup is in back bedroom, which yes the house thermostat is lower at night, on during the the morning for a bit, off during the day, and on again during evening hours. This does explain the rise and fall of the fridge temp sensor, but I cannot explain the crazy spikes. Like I said, I swapped the two sensors to see if the spikes are only on 1 sensor. Will post an update later.

Give us a zoomed in pic of one days worth if you can when you get a chance.
 
...

Anyone have any idea what is going on?

For the Arduino it's not an official one, it's one of these

Thanks in advance...

My first guess is that you didn't install the Legacy version. I don't believe the automatic install works any longer for us arduino users, since the newest code no longer supports the arduino. You should run the updater and choose the legacy branch.

Code:
cd ~/brewpi-tools
sudo python updater.py --ask

choose the legacy branch.

If you didn't (or can't) read the whole thread you should at least start at Post #4363. There is some good information thereafter regarding the legacy version.
 
I love this project. I'm a total linux/arduino/hacking newb, but I can follow directions, so I'm giving this a shot. I have RaspberryPints set up with 3 flow meters and working perfectly for over a year, so this should be a good second project.

I'm going to read a lot of this enormous thread for education purposes, but I was hoping for some quick help so I can order my parts and then read up while I wait for them to arrive.

Since I'm already running RaspberryPints on a Pi, all I need is the Uno, a relay board, temp probes, a resistor, and whatever wires and outlets necessary to hook the things up, correct? Secondly, since both of my usb ports on the Pi are used by my wifi dongle and my keyboard/mouse, I'll need a hub. Is there a proven usb hub that I can buy?

Thanks in advance for the help everyone will be giving me as I work through the build.
 
Well, switching the sensors did not matter, seems to not follow 1 specific probe. I'm almost for certain the FermWrap is not working... here's a zoomed in photo.

See the thing at ~18:00 just doesnt make sense, its 6pm why in the hell is your ambient temperature shooting up 3-4F? Is this area connected to your Heating system or something that might be kicking in around that time or something?

Also the cyclical fridge temp readings make no sense at all. The resolution of the probes is .12F, its not that i dont expect variance over time, yours is just too "clean". Theres no way your actual cellar or this room is going +-1F that regularly for 12 hours its just not possible? I expect something more along the lines of what happened at 9:00 or so where there is a smooth steady curve.

Go out and feel your fermwrap, it looks like its on all the time...and because your fridge is never actually reaching its desired temp your heater is staying on forever. You might actually be better in this instance to attach your fridge probe to your fermenter at beer level but not under the fermwrap? Then you have a more stable temperature that your controller can control, right now your BrewPi has come to the conclusion that no matter how long it heats it has zero effect on your Fridge temperature, which is how it controls the beer temperature so its confused.
 
Yeah, I imagine BrewPi is pretty cranky about all this.

Along with perhaps more strategic probe placement, I think the PID controls should be reset to the "factory defaults" because at this point I can't believe there's much rational function remaining...

Cheers!
 
Yes, and yes to the SSR part. If you mean the + wire being the 5V red wire from the Arduino then yes thats no longer needed. That 5V is needed to power that relay board, and 5/6 as inputs. For the SSR's the voltage from pin 5/6 is the input.

Make sure you break the brass tab, not the silver one. You have to do this or else both sockets are connected together. But i assume you did this already if you had a setup using the relay board.

I hooked everything up and now I'm completely confused...

When the brewpi is "ideling" both sockets/SRR's are powered on, when heating, the cooling socket goes out and only the heating one is active... how is that possible??

I did not change a thing to all the rest, I only swapped out the old mechanical relay and placed the 2 SSR's... So why is it doing this...

When on ideling, both inputs measure around 4,.. volts, when heating, the cold side drops to 0volts and the SRR goes of :confused: :confused:
 
Found it!!

Apparently in the settings, the heating and cooling chamber were set to "inverted"... No idea how that happened (or maybe that was the correct setting for the mechanical relays?)

Switched out to "not inverted" and now it works! Happy!

EDIT: Cheered too soon :-( now the cooling is stuck when on idle -_- wtf is going on
 
Fwiw, I use reptile tape (fermwraps) for my setup. and I put the fridge temp probe under the fermwrap against the sidewall of the fermenter while the beer temp goes in the thermowell. this way i can put multiple fermenters in one chamber and have them going at different temps. I know it's not the way brewpi was designed to work, but the pid loves this method. I would recommend this for you if you are using just a fermwrap in an open room. this way brewpi isn't battling your hvac and you'll maintain smoother temp changes.
 
I hooked everything up with a fermenter filled with water, gave it another shot and now it seems to be working correctly :)

And more important: no more scrambling of the LCD screen ^^ Yey SSR's!
 
My uno was working fine using the brewpi-arduino-uno-revC-0_2_10.hex but I wanted to try to get my LCD working so I flashed it with brewpi-avr-i2c-0x27-menu-rotary.hex from here: https://github.com/herrfrost/firmware/tree/feature/SoftwareI2C/build

After I flashed it I got the error "Warning: Cannot receive version number from controller. Your controller is either not programmed or running a very old version of BrewPi. Please upload a new version of BrewPi to your controller."

I tried doing "sudo echo -ne 'E\n' > /dev/ttyACM0" but it didnt seem to do anything.

Now I am trying to do "sudo python updater.py --ask" and when it gets to the part of checking the controller it is saying:
Checking current firmware version...
Jan 23 2016 18:55:49 Opening serial port
Unable to connect to controller, perhaps it is disconnected or otherwise unavailable.

Did I fry my uno? Any way to get it back?
 
Don't know anything about that hex file you tried, but I doubt you fried anything.
Try plugging your Uno into a Windows box and use xloader to burn your original hex file.
Then clear the eeprom and see if BrewPi finds your Uno again...

Cheers!
 
Don't know anything about that hex file you tried, but I doubt you fried anything.
Try plugging your Uno into a Windows box and use xloader to burn your original hex file.
Then clear the eeprom and see if BrewPi finds your Uno again...

Cheers!

I'm trying xloader with the uno connected to my pc (win7 64bit). It seems to be stuck at "Uploading..." and the rx/tx lights on the uno are off.

EDIT: Sorry, I had to install the Arduino IDE to get the drivers installed. Xloader worked. Next step connect back to pi

EDIT2: I'm back in action! I guess I will give up on the LCD thing, I couldnt get it to work. Thanks day!
 
Morning all

I'm trying to do a multi install and it seemed to go well until I went to the web and the script won't start
I tried to reprogram arduino and end up with this

image.jpg
 
Hello,

I implemented everything, and everything works like I want it to work. Now I have two extra questions:

1) Is it possible to shut off the background light of the LCD? => With a switch? I tried coupling of the power (red wire, pin 15 i think? this resulted in a flickering screen), cutting the ground wire (black, pin 16) the letters were out, not the background lighting.

It is silly to have the background light on all the time since only 2% of the time you will be looking at the LCD, normally you check online so... It would be nice to be able to shut it off

2) Is there a way to set boundries with alarms? for example, I don't want the fridge/beer to go over a certain temp, but when it does I get an e-mail or something, telling me that something is going wrong? That would be a very nice addon!
 
LCD pin 15 is the backlight anode voltage input, pin 16 is the cathode.
With pin 16 grounded you should be able to control the backlight with a simple switch.

fwiw, my home-brewed BrewPi shield supports the same 4-bit parallel LCD and rotary encoder used on Elco's rev C shield. Both implementations use a PFET to switch the backlight anode voltage between 0 and ~ 4V, controlled by the shift register output bit 2 (QC).

brewpi_shield_rev_2p0.jpg

The BrewPi AVR code will blank the backlight after ~ 10 minutes from either power up, reset, or from the last time the rotary encoder was manipulated. The same code will "wake up" the backlight if the encoder is pressed or rotated.

As for alarms, check out this thread...

Cheers!
 
The BrewPi AVR code will blank the backlight after ~ 10 minutes from either power up, reset, or from the last time the rotary encoder was manipulated. The same code will "wake up" the backlight if the encoder is pressed or rotated.

Cheers!

Mine does not do that? It is always on... Any idea why that is?

I tried pin 15 and 16, when I power them of the light starts to flash or only the letters dissapear + when switching back on, the text on the screen is scrambled again (like when using mechanical relays)

EDIT: And yes, I have a rotary encoder installed
 
Anyone know of an elegant way to add an outlet inside of an enclosure? I'm building my enclosure and I want to be able to plug the 9v wall wart within the enclosure. I could easily splice in the cut off end of an extension cord to the incoming power, but I'm looking for something a bit more polished.
 
Mine does not do that? It is always on... Any idea why that is?

I don't know anything about your build, so, no.

I tried pin 15 and 16, when I power them of the light starts to flash or only the letters dissapear + when switching back on, the text on the screen is scrambled again (like when using mechanical relays)

EDIT: And yes, I have a rotary encoder installed

If you leave pin 16 grounded and simply control pin 15 between 0 and ~4.something volts, the backlight will be off or on. If your LCD doesn't work that way, provide the part number and maybe I'll look up the spec for it...

Cheers!
 
I posted this a few pages back and its worth it for people who don't want to mess with an LCD. It uses an old smart phone or ipod to display a lcd.php. Set the browser for full screen and to stay turned on. If you use dolphin browser like the blog says, you can even set the screen to night mode and run it dim. i used 3m tape and a usb slot on the Pi and bam, instant LCD. A change down in font size to 46 works well for phones (Galaxy s3 and moto X so far).

http://www.srvbrew.com/blog/use-an-old-phone-as-a-brewpi-display

example: http://greatscottbrewing.ddns.net/lcd.php
 
Last edited:
Status
Not open for further replies.
Back
Top