• Please visit and share your knowledge at our sister communities:
  • If you have not, please join our official Homebrewing Facebook Group!

    Homebrewing Facebook Group

Frigidaire Model FRC445GB Mini-Fridge Kegerator Conversion

Homebrew Talk

Help Support Homebrew Talk:

This site may earn a commission from merchant affiliate links, including eBay, Amazon, and others.
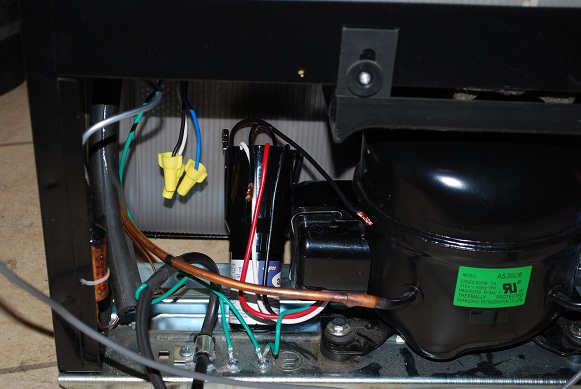
The 2 Black wires. 1 is the 120V from the thermostat suppling voltage to the compressor. The other is your 120V neutral.

DSC_0062_1.jpg


Put the cover back on the compressor and the unit is ready to run again.

DSC_0063_1.jpg


Quick, simple fix.

If unsure with electricity, consult an experienced neighbor.

So the common (white) from the actual power supply cord, and the compressor lead (black)?

Is that right? I cannot see where the wire from the Thermostat is coming from...

I have the same model, and I have a Love Temp controller hooked up to it, so I guess I'm a bit confused about the 120V from the Thermostat supplying the voltage. i wanna be ahead of the game incase mine decides to take a crap.

Sweet work around though! :mug:

Cheers!

Yes, the 120V hot and 120V neutral on the "3 in' 1" are both Black. Polarity on these two wires do not matter. The manufacturer should make one of the wires white, but they don't. It comes with a wiring diagram right on the device.

I guess when I say thermostat I'm referring the the device that controls the power to the compressor. Weather it's the thermostat that comes with the unit or an external thermostat.

I use a line volt Ranco thermostat. My 120V from the thermostat is in the black cord strapped to the bottom of the fridge in the second Pic.

If it's still unclear I can do better this evening.

What model of Love controller do you have?

I have a TS-2, I chose the TS-2 model because it is available inthe blue LED. Since it is only for a kegerator, I did not need a dual stage controller.

I have a decent write up on rhe install which can be found here.
 
I have a TS-2, I chose the TS-2 model because it is available inthe blue LED. Since it is only for a kegerator, I did not need a dual stage controller.

I have a decent write up on rhe install which can be found here.

After seeing your write-up on your TS-2 controller, schematic very helpful, I can see exactly where the 2 black wires attach.

Schnitzengiggle_TS_2_wiring_diagram.jpeg
 
After seeing your write-up on your TS-2 controller, schematic very helpful, I can see exactly where the 2 black wires attach.

Schnitzengiggle_TS_2_wiring_diagram.jpeg

Awesome! Great addition for the fix, I must give credit where credit is due though, ClaudusB is responsible for the awesome wiring schematic.
 
I did my conversion about page 28.... I have read most but I am going to move my CO2 tank to the outside. I remember it being covered in the past. If its worth it I will document it. It seems the model number has changed. Sorry I didn't read every post till now.
 
I did my conversion about page 28.... I have read most but I am going to move my CO2 tank to the outside. I remember it being covered in the past. If its worth it I will document it. It seems the model number has changed. Sorry I didn't read every post till now.

Very cool, do a detailed write up on moving your co2 tank to outside the fridge. I think it would be a great addition to this thread.

I know someone has done it before, however, if I remember correctly all they did was showed the location of where they drilled the hole post move, so the hose and whatnot was already there.

Not that moving the tank would be a huge challenge, a detailed write-up with lots of pictures is always helpful for those who learn/understand things better visually.
 
In regards to the temp of the unit: Has anyone successfully extended the wiring for the original thermostat? If so has anyone tried moving the probe higher up on the unit so it reads the colder temp at the top? I'm thinking this would trick the stat a bit and allow you to run the unit a few degrees warmer if you want.
 
Hello. I am new to the forum and looking forward to brewing my own beer! I'm planning on building a kegerator out of a chest freezer for myself but I also am building my brother a kegerator to hold a half barrel for Christmas. Anyway, I can get this fridge cheap locally and if at all possible would like to use it for his application. I know it's a couple inches short in depth. My question is whether the area in front of the compressor is plastic and styrophoam? If so I can cut it and modify it to fit. Let me know if I am crazy. Thanks for the help.
 
Hello. I am new to the forum and looking forward to brewing my own beer! I'm planning on building a kegerator out of a chest freezer for myself but I also am building my brother a kegerator to hold a half barrel for Christmas. Anyway, I can get this fridge cheap locally and if at all possible would like to use it for his application. I know it's a couple inches short in depth. My question is whether the area in front of the compressor is plastic and styrophoam? If so I can cut it and modify it to fit. Let me know if I am crazy. Thanks for the help.

If you are looking to fit a half barrel in this fridge you may want to extend it with a collar, rather than butcher the compressor hump.

IMO if you are looking t make a kegerator for a half barrel, I would use a small full-size fridge, or chest/upright freezer.

Two corny kegs in this model fit extremely tight, a half barrel would need about twice the depth this unit offers. I'm not sayin it can't be done, I'm just sayin I wouldn't do it. Just sayin...
 
Agreed, and that's what I'm doing for myself. I just need to come up with a smaller application for my brother. He lives in a college apartment. I'll keep exploring options. Thanks for the info.
 
Gentlemen (and Ladies),

I believe this is my first post - I read so many, I cannot remember if I have replied to any as of yet.

Several.....OK two really.......a "couple" of other members have asked the specific question about shank length for door mount applications with this fridge (specifically when backing with a little block of wood). But alas....there has been no reply to either query.

So as my (presumably) first post - I'll reiterate the previous queries - what length shank should one order when preparing for a "Through-The-Door" application using a backer of some type?

Disclaimer - I have not yet purchased the fridge myself - I am assembling the parts order by order so as to NOT arouse any suspicion from Fair Wife as to my ultimate goal (not world domination anymore...just good homebrew on tap).
 
I just wanted to thank everyone for all the info I received from this thread. I was able to successfully adapt this fridge to hold a 1/2 barrel without any modification to the exterior.
 
I just wanted to thank everyone for all the info I received from this thread. I was able to successfully adapt this fridge to hold a 1/2 barrel without any modification to the exterior.

Could you please post some pics? Being able to switch out a 1/2 barrel when two cornys aren't around would be awesome. I've been thinking of doing this conversion for a long time and that would definitely encourage me!

:mug:
 
I've made my way through 44 pages of this thread. Amazing info by all. Thanks.

Before I embark on my own fridge conversion, I saw Lowe's now only offers a Frigidaire model LFPH44M4LM. It's 4.4 cu. ft. and *looks* like it is the same interior for the most part. I'm just wondering if anyone has this newer model and does it present any issues above and beyond the conversion discussed here; i.e. removing the freezer shelf, moving the thermostat to allow 2 cornys, installing a tower, etc.

Cheers.
 
All.....

When moving the temperature control/thermostat/light housing out of the way, I have seen several photos of others who have simply removed the light and control dial and innerds from the plastic housing and left them dangling in the fridge.

Is this safe in this capacity? Would it be wise to place a plastic bag over and zip tie it on or something to keep the moisture out of the dial components?

I FEAR the electricity....I respect the electricity, I DONT UNDERSTAND the electricity.

What should I do? I'm having a HARD time making the 2 cornies fit while keeping the light/thermostat in the housing.
 
I've made my way through 44 pages of this thread. Amazing info by all. Thanks.

Before I embark on my own fridge conversion, I saw Lowe's now only offers a Frigidaire model LFPH44M4LM. It's 4.4 cu. ft. and *looks* like it is the same interior for the most part. I'm just wondering if anyone has this newer model and does it present any issues above and beyond the conversion discussed here; i.e. removing the freezer shelf, moving the thermostat to allow 2 cornys, installing a tower, etc.

Cheers.

If you do a quick search for that model number I think the consensus is the a little different interior door style but nothing that will change in the conversion process. Just finished mine up (new model) Had to do some slight alterations to allow a 1/6 bbl and corny to fit but alas, it can be done.

@windknot - Shank length I used was 5 1/8. Put a little square block of 1/2 in mdf to hold shanks in place. Could easily get by with a shank 1" shorter.
 
Just want to say "thanks" to every single person contributing to this thread... serious and great resource for building my first kegerator!

On that note, I picked up the "new" model of the this fridge at Lowes today and wanted to warn everyone: make sure you check the thing for damage before you buy it. I took one home and the door was falling off, along with a side being seriously dented.

Fortunately, Lowes took it back, but the one I was exchanging for I checked for damage... and it was dented too. The interior of the door was also pretty messed up. I was able to get them down to $130, the dent isn't that noticeable. Make sure you check before buying!

9kttaq.jpg


6izin5.jpg
 
hi folks,

Truly an epic thread here. I've read probably 95% of this thread and now I come to the tribe with some design questions. I am breaking in my LFPH44M4LB now to ensure it's functioning properly before i cut anything.

Unto the fun stuff!

1) For those with this kegerator, did you secure the tower to plywood under the plastic top OR through the ceiling inside the fridge?

- For those that went the plywood route, I see several options on how to do this but what about the tower stability? Were you happy with this decision?

- For those with the through hole design approach I am sure those coolant lines were a bit of a p.i.t.a.

- For either option, what did you do with the foam you had to remove? Fill back in with expanding foam? Create a collar that sits around the coolant lines up to the lid/plywood?

2) copper tubes vs forced air into the tower. Looking at this thread, it appears there are many coolant lines that run on the top.

- those that went the copper route: Were your copper lines tubes close to coolant lines? Do you have a line-freezing issue? Do you get foamy first pours? How did you secure the copper tubes? I saw one option using adhesive

- those that went forced air route: Is this overkill? How about condensation on the tower (inside or out)? How much more db does this add to your fridge?

- those that didn't do either: how are those first pours??

3) This fridge and it's longevity (i see brumbler's broke at some point)

4) If it isn't addressed in my questions, what would you have done differently with your build?

I have in the fermentor Dale's Pale Ale which is going to be the first to be poured from my conversion.

thanks for your thoughts/advice!

Jon
 
hi folks,

Truly an epic thread here. I've read probably 95% of this thread and now I come to the tribe with some design questions. I am breaking in my LFPH44M4LB now to ensure it's functioning properly before i cut anything.

Unto the fun stuff!

1) For those with this kegerator, did you secure the tower to plywood under the plastic top OR through the ceiling inside the fridge? I used ply wood. I glued a large piece to the plastic top after using pliers to rip off all those plastic ridges so it sat flush.

- For those that went the plywood route, I see several options on how to do this but what about the tower stability? Were you happy with this decision?Very happy. I could probably pick my fridge up by the tower.

- For those with the through hole design approach I am sure those coolant lines were a bit of a p.i.t.a.

- For either option, what did you do with the foam you had to remove? Fill back in with expanding foam? Create a collar that sits around the coolant lines up to the lid/plywood? I left the hole there assuming it would help cool the tower more.

2) copper tubes vs forced air into the tower. Looking at this thread, it appears there are many coolant lines that run on the top.

- those that went the copper route: Were your copper lines tubes close to coolant lines? less than an inch awayDo you have a line-freezing issue? No. I set my fridge's thermostat to the lowest setting. Do you get foamy first pours? No. I have ten foot lines though and about 1-2 fingers head.How did you secure the copper tubes?The holes I drilled were close enough to the diameter of the copper that they fit snug without needing other measures. I can slide them in and out with a little force. I saw one option using adhesive

- those that went forced air route: Is this overkill? How about condensation on the tower (inside or out)? How much more db does this add to your fridge?

- those that didn't do either: how are those first pours??

3) This fridge and it's longevity (i see brumbler's broke at some point)

4) If it isn't addressed in my questions, what would you have done differently with your build?I would have dug away a little more foam so that the top sat a little lower. Due to the ply wood, you need to dig away a little extra foam so that it sits like it did prior to the conversion. I glued it down and it's a little higher than originally.

I have in the fermentor Dale's Pale Ale which is going to be the first to be poured from my conversion.

thanks for your thoughts/advice!

Jon

Hope that helps
 
I layered three pieces of plywood (dug all the way down to coils) and it sits flush with the foam. I cut a 2.5" hole for air flow. Coils keep the tower very cold.
 
Looking for some input on this one.

Pictured below is the hole in the top of the fridge where the beer lines will run up to my tower. My plan is to not fill this in with foam, leaving it open, and then mount the top with foil-lined plywood over this box (I'm calling it a "cold box"), and running copper pipe around the beer lines from the top of the tower to about 2" into the fridge, thus keeping my tower nice and cold.

But... I'm kind of thinking that leaving these lines exposed in a small space will actually freeze this section of beer line. The hole is 1 1/4", the copper pipe will be slightly larger than the beer line.

Any thoughts on whether this will freeze or not? Looking for solutions or whether I should keep as is. Tower doesn't come til Friday, so have time to mull it over.

34e7nn5.jpg
 
Just my opinion but you would prob be happier converting a full size used fridge because 1 you can fit more kegs and 2 you can use the freezer for ya mugs. Also concerning the co2 I would put it on the outside. Just my opinion.
 
I was worried about the line freezing as well but had no issues. I figured if it did i could throw a sleeve over the line near the coils.
 
You all inspire me. I canceled my order for a "commercial" kegerator and now I've begun my own home built one. Not only will I save a lot, I'll also get what I want, double tap! I like the idea of a passive cooling method of the copper tubing. My question is: is it better to bundle the tubing with the copper or run the tubing through the copper? Also I imagine if you touch the copper tubing to the cooling plate it would conduct better or would it be better to wrap the "bundle" in insulation and extend it into the fridge? I've begun the process but it'll be a couple of days before I get the tower and parts. Let me know, thanks
 
nDub said:
You all inspire me. I canceled my order for a "commercial" kegerator and now I've begun my own home built one. Not only will I save a lot, I'll also get what I want, double tap! I like the idea of a passive cooling method of the copper tubing. My question is: is it better to bundle the tubing with the copper or run the tubing through the copper? Also I imagine if you touch the copper tubing to the cooling plate it would conduct better or would it be better to wrap the "bundle" in insulation and extend it into the fridge? I've begun the process but it'll be a couple of days before I get the tower and parts. Let me know, thanks

I ran the lines through the copper. I drilled two holes barely wide enough to fit the copper pipes. They slide in and out but it requires a little force. To me this is perfect because it's touching the cooling plate, like you said, and I don't have to secure it in any other way. That makes it easier to disassemble too.
 
I just finished my build of this fridge... a weekend project turned into a 2 week project thanks to UPS. Will post pics tomorrow when the tower gets here!
 
I just finished my build of this fridge... a weekend project turned into a 2 week project thanks to UPS. Will post pics tomorrow when the tower gets here!

You doing copper pipe or forced air into the tower?
 
Right now it's hooked up with both, I had a lot of spare time waiting for the tower to come, so I built the fan box with a tube running up the tower. I prefer this solution because now I know that the beer in the tower is cold all the way through the faucet. I hooked it all up tonight and I'm not convinced that doing just copper pipe would be sufficient to keep the beer at serving temp and prevent microbe growth, etc.

Like I said though, right now I have a combo setup. My plan is to wait until mid-next week and turn off the fan to see what the difference is for a few days with just the pipe, maybe I'll pove myself wrong. If there's no change I'll probably ditch the fan all together.
 

Latest posts

Back
Top