• Please visit and share your knowledge at our sister communities:
  • If you have not, please join our official Homebrewing Facebook Group!

    Homebrewing Facebook Group

How to find coolant lines in mini Fridge/Cooler?

Homebrew Talk

Help Support Homebrew Talk:

This site may earn a commission from merchant affiliate links, including eBay, Amazon, and others.

Ragman

Well-Known Member
Joined
May 22, 2020
Messages
323
Reaction score
138
Location
Hamlin
Hello all. Just acquired an Avanti AR4446B Mini Fridge.
No freezer to move out of the way and dimensions will accommodate at least 1 - 5 gallon corny keg (Which I ferment in normally) as well as room for a blowoff.

I want to make this into a ferm chamber. To do this I will need to remove some of the built in door shelves and poke a couple holes for temp probe and cable for heat supply.

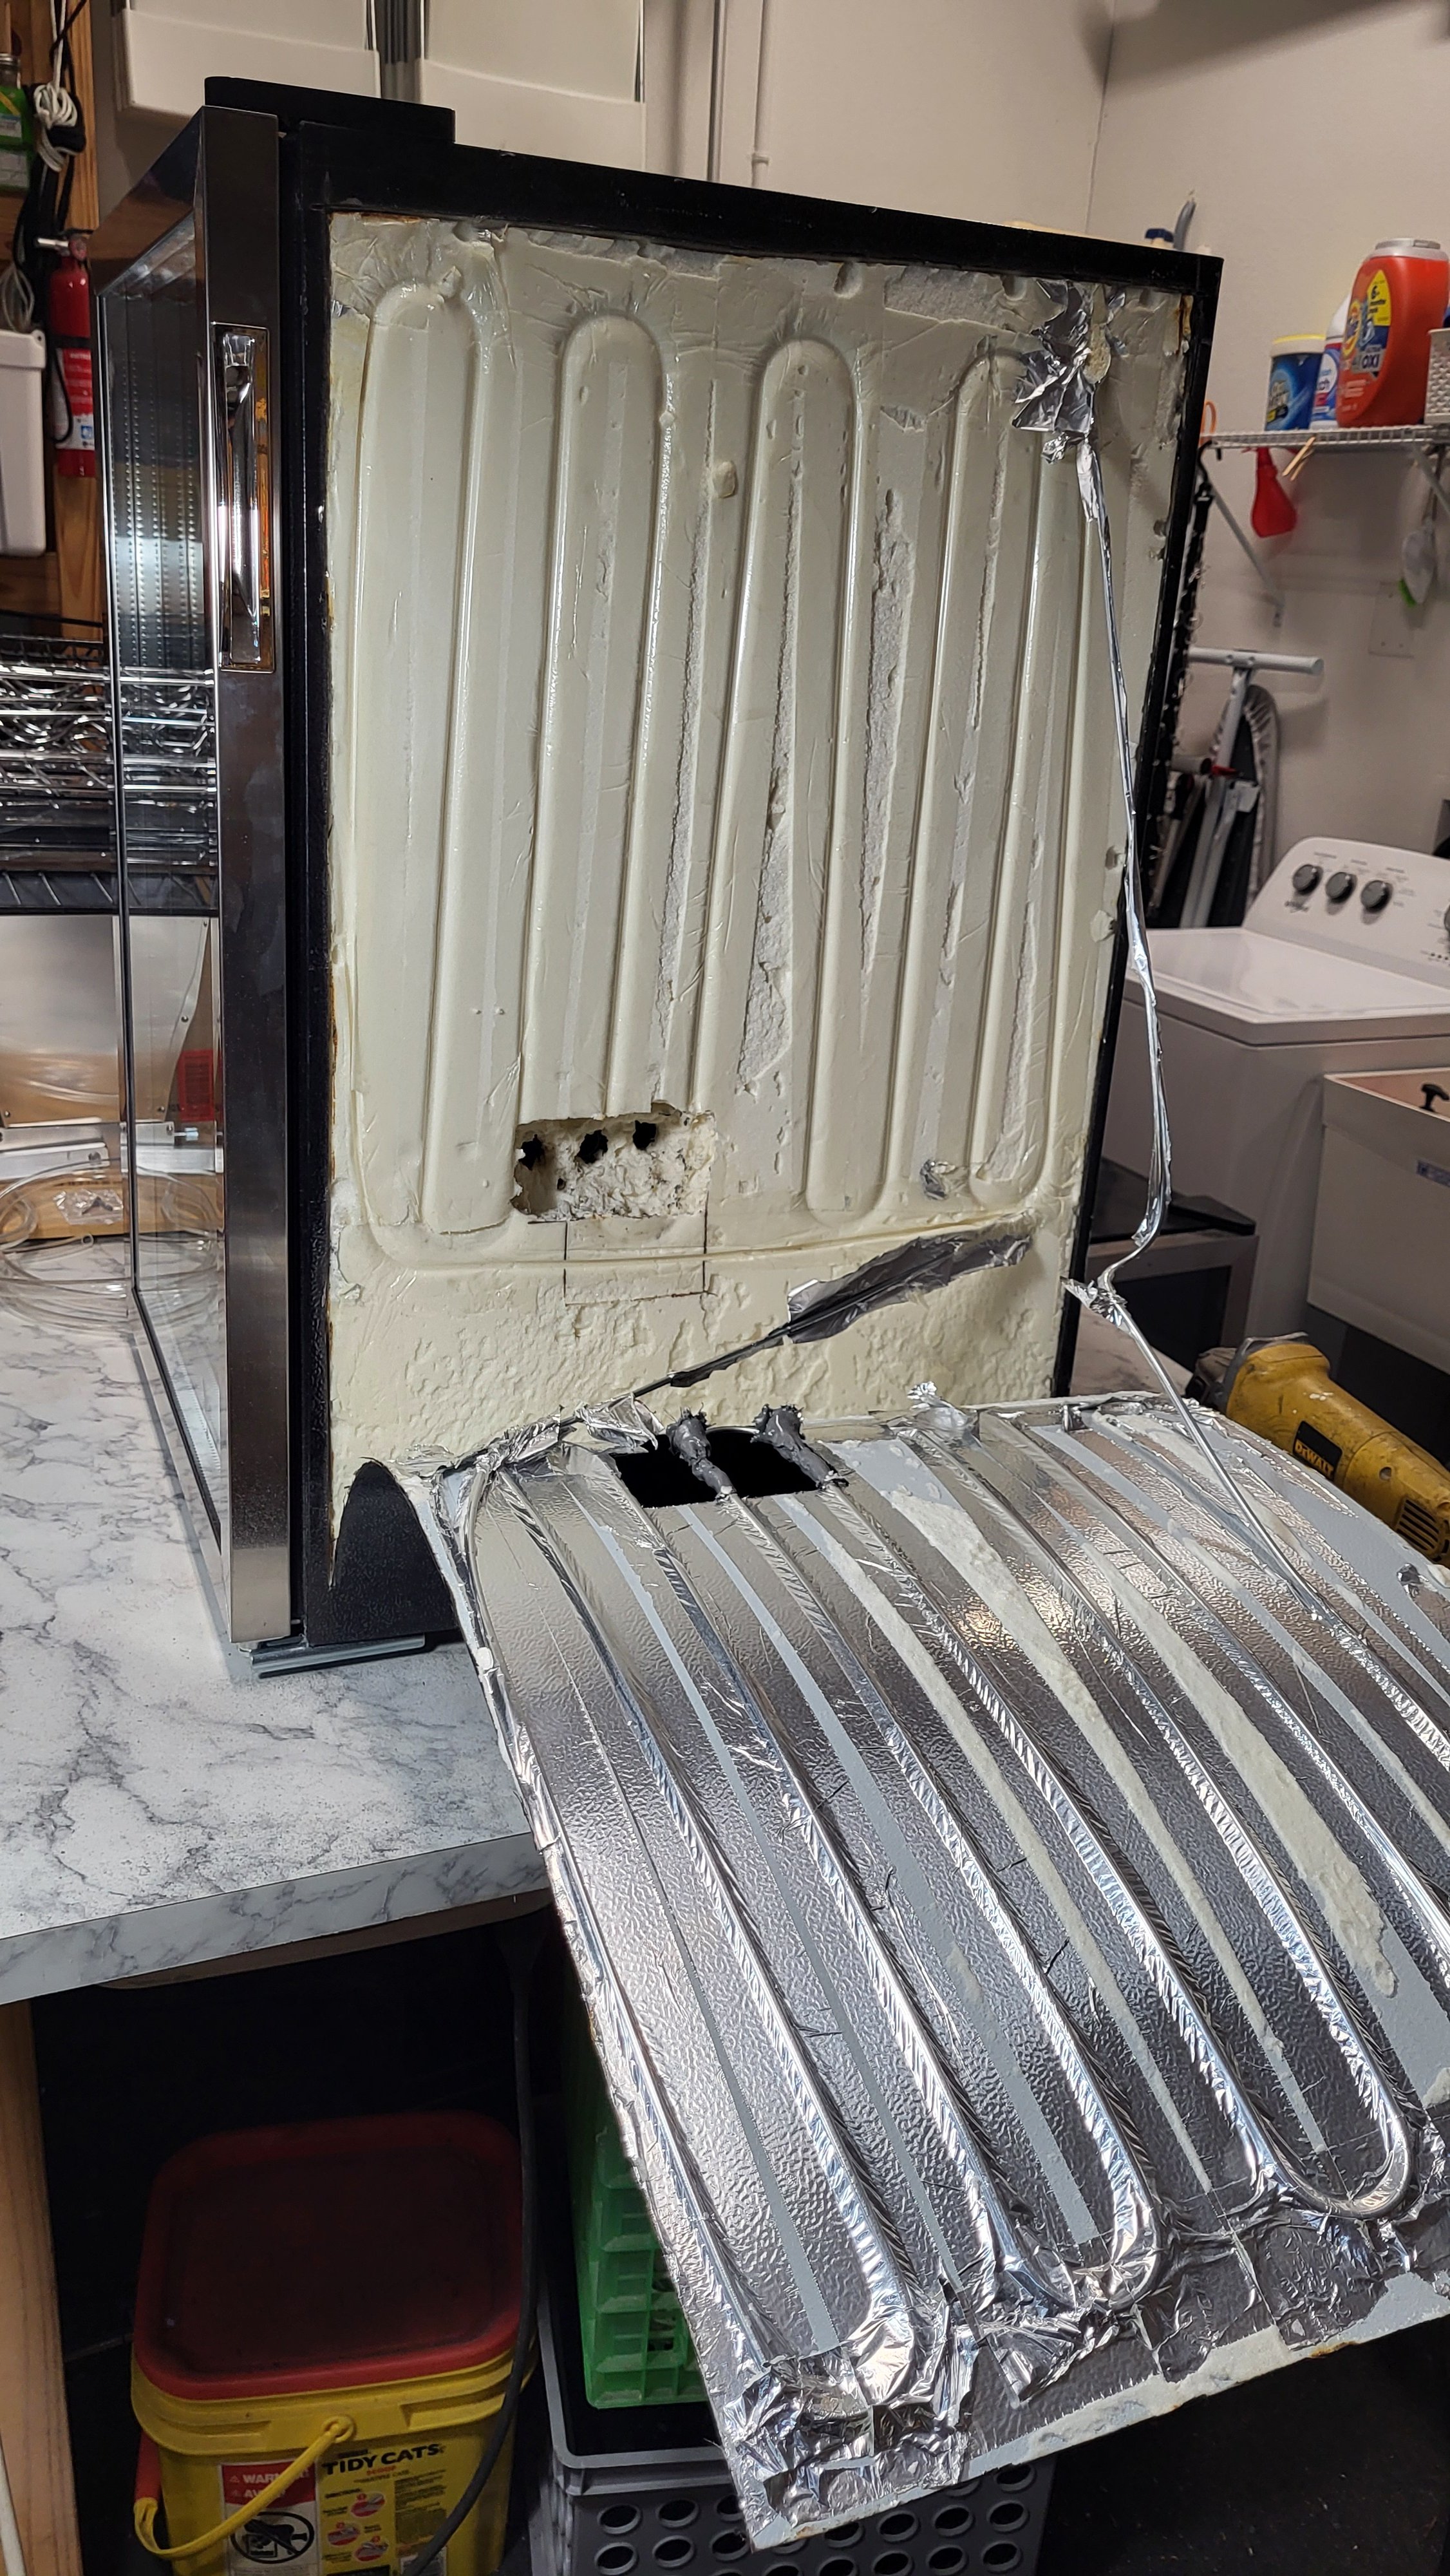
How do I find out where the coolant lines are so I do not make a mistake?

If there is no way to know I may just try to go above the condenser and drill through the hump part of the cooler.

Anyone know how to find out where the coolant lines are?
 
I've noticed in the last several years that manufacturers have been putting the condeser coils flat against the outer walls making it dangerous to do an exploratory shallow hole. From what I can find online, that model looks to use cyclopentine which is extremely flammable so DON"T explore with a drill!
This is the only pic I can find online of the back of the unit (if I even correctly identified it :p ):
th-3644989714.jpg

It looks to have a slip-on one piece outer shell... Are you able to elevate the unit, unscrew the bottom and lift the shell off?..failing that, I'd stick with going through the hump.
Just my thoughts.


EDIT: I just remembered an important tidbit you may or may not be aware of: BEWARE OF TILTING OR LAYING THE UNIT DOWN. The oil for the compressor is freely mixed with the refrigerant and gravity alone keeps it in the compressor. Look at where the lines for the condensor and evaporator and bear in mind that may send oil into the coils and cause a compressor failure if you lay in on its side. Any time you have to tilt the unit, only tilt to the backside and try to avoid going over 45° or thereabouts and after tilting, let it sit 24 hours for the oil to settle back where it belongs.
 
Last edited:
fwiw, Cyclopentane is the gas used to foam the insulation in place. It's not the refrigerant - which will be named on the manufacturer plate, and is most likely going to be R600a (isobutane).

Exploratory holes are best drilled from the inside...

Cheers!
 
fwiw, Cyclopentane is the gas used to foam the insulation in place. It's not the refrigerant - which will be named on the manufacturer plate, and is most likely going to be R600a (isobutane).

Exploratory holes are best drilled from the inside...

Cheers!
That's what I thought too, but it seems to be a recent addition to modern refrigerants.. I was surprised, you'd think we'd have heard of it well before it even entered the 'Approval for use' stage, but it seems "anything goes" is the new normal (and I'll shut up before I get political): https://applianceupdate.com/is-cyclopentane-used-as-a-refrigerant/
:mug:
 
https://en.wikipedia.org/wiki/Cyclopentane

"Cyclopentane is principally used as a blowing agent in the manufacture of polyurethane insulating foam, replacing ozone-depleting agents such as CFC-11 and HCFC-141b.[6][7] While cyclopentane is not typically used as a refrigerant, it is common for domestic appliances that are insulated with cyclopentane-based foam, such as refrigerators and freezers, to be marked with cyclopentane warning labels due to its flammability. "

I find zero references to Cyclopentane being used as a refrigerant in domestic appliances, probably because its boiling point is WAY too high. That wants to be well below zero but Cyclopentane boils at around 120°F...

Cheers!
 
Maybe this would work:
1. Turn the unit off and let the whole thing come to room temp.
2. Turn the unit on then shut the door for a few minutes.
3. Get a bowl filled with boiling water and put it on the bottom of the unit.
4. Open the door and look for the pattern of the evaporator lines to show in condensate.

Or just feel around with your hand in the first few minutes after power on.

Just an idea.
 
Do you have any pictures of the unit you can share? like inside and the lines in the compressor area.
 
Might see if there are any drain plugs in the floor that can be exploited for running lines inside. That's also potentially a viable location to make a hole...

Cheers!
 
https://en.wikipedia.org/wiki/Cyclopentane

"Cyclopentane is principally used as a blowing agent in the manufacture of polyurethane insulating foam, replacing ozone-depleting agents such as CFC-11 and HCFC-141b.[6][7] While cyclopentane is not typically used as a refrigerant, it is common for domestic appliances that are insulated with cyclopentane-based foam, such as refrigerators and freezers, to be marked with cyclopentane warning labels due to its flammability. "

I find zero references to Cyclopentane being used as a refrigerant in domestic appliances, probably because its boiling point is WAY too high. That wants to be well below zero but Cyclopentane boils at around 120°F...

Cheers!
Sorry.. I jumped the gun (again!)! ..It totally went over my head that would be a warning label for the insulation, but when I looked it up, it does appear poised to a new refrigerant pending approval...again; Sorry. oops....at least 'anything goes' hasn't entirely happened yet, but hey; It could be on the shelves in a couple weeks :p
I still don't recommend exploratory holes though...R600 (now common in mini fridges) is also extremely flammable and hey; you don't wanna rip a line in any unit.
 
Citation please.

With a boiling point of 120°F it's inconceivable to use as a refrigerant...

Cheers!
Sorry again.. I should have included these;
https://dyeastchem.com/the-role-of-cyclopentane-in-the-refrigeration-industry/
https://appliancesfirst.com/is-cyclopentane-a-refrigerant/
https://appliancesfirst.com/is-cyclopentane-used-as-a-refrigerant/
There's not a lot online and what I've found is all from last year.... (there's also a good chance my remaining axons just aren't properly comprehending) Thanks for making me look more deeply, let me know what take away from it.
 
You guys really need to get a room for this cyclopentane thing.

I would do as suggested and see if you can get the outer shell off. Before drilling through my kegerator recently I took the top off and peeled some of the protective coating back to make sure there weren't any surprises in the top of my unit. Once I realized it was clear it was no big deal to run a drill through it. I do suggest a hole saw for the plastic as regular bits can take off more than you want.
 
I've noticed in the last several years that manufacturers have been putting the condeser coils flat against the outer walls making it dangerous to do an exploratory shallow hole. From what I can find online, that model looks to use cyclopentine which is extremely flammable so DON"T explore with a drill!
This is the only pic I can find online of the back of the unit (if I even correctly identified it :p ):
View attachment 866889
It looks to have a slip-on one piece outer shell... Are you able to elevate the unit, unscrew the bottom and lift the shell off?..failing that, I'd stick with going through the hump.
Just my thoughts.


EDIT: I just remembered an important tidbit you may or may not be aware of: BEWARE OF TILTING OR LAYING THE UNIT DOWN. The oil for the compressor is freely mixed with the refrigerant and gravity alone keeps it in the compressor. Look at where the lines for the condensor and evaporator and bear in mind that may send oil into the coils and cause a compressor failure if you lay in on its side. Any time you have to tilt the unit, only tilt to the backside and try to avoid going over 45° or thereabouts and after tilting, let it sit 24 hours for the oil to settle back where it belongs.
Thanks BC. I knew about not tilting the unit during transport or otherwise but good reminder. That does look like the back of the unit, they do still sell these in places. I might see if the outer shell will slip off - that would be mighty convenient,
 
Might see if there are any drain plugs in the floor that can be exploited for running lines inside. That's also potentially a viable location to make a hole...

Cheers!
Thanks DayTrippr. I dont see any drain plugs but going thru the bottom might be the safest bet.
 
You guys really need to get a room for this cyclopentane thing.

I would do as suggested and see if you can get the outer shell off. Before drilling through my kegerator recently I took the top off and peeled some of the protective coating back to make sure there weren't any surprises in the top of my unit. Once I realized it was clear it was no big deal to run a drill through it. I do suggest a hole saw for the plastic as regular bits can take off more than you want.
Thanks Shoengine.
 
I drilled a hole for probe and heater wire in the shelf above the compressor. I looked up there via the back and saw where it was safe to drill. I made it big enough for the heat wrap plug to pass through, but filled the hole with a large grommet to keep air out.
 
In case my story helps someone down the line...

Bought a new Vissani beverage cooler from Home Depot, intending to drill some holes and feed my beer engine from a cubitainer in the fridge. Drilled small holes from the inside to explore, found nothing but foam insulation. Fire for effect! Everything worked out fine and my first batch was delicious, when served properly. At least until it warmed up to room temperature (75+ this time of year here) because the fridge quit cooling.

Ah, how young and innocent i was back then, last month.

I cut some more of the outer skin to see if my holes had actually nicked something important. Yep, two aluminum lines of the condenser that are fastened to the inside of the outer skin with shiny tape. Can I solder them? See below for the video of what happens to cyclopentane-blown foam insulation when exposed to open flame. Turns out molten solder isn't hot enough to ignite it, so that seemed safer, but it also isn't hot enough to fasten aluminum tubing. :/

I turned to the JB-Weld of aluminum, Alum Bond. It did a great job of making a big leak smaller. In fact, it did that 3 separate times. Each time I repeated the repair, it was a slower leak, but never completely gone.

I also learned a lot about recharging a fridge with R600a refrigerant. Don't try that with any older stuff-- R600a is environmentally friendly, as it's just a type of butane. But, uh... don't smoke around it.

So I've learned quite a bit about refrigerators for the cost of my fridge. A replacement arrives today.

As an autopsy, I ripped open the side to see just how this thing is assembled. See picture below. The lines appear to be installed by hand (not perfectly aligned, etc.) so I'll be using the vodka-and-cornstarch method on the new one.

Wish me luck!

KP
 

Attachments

  • 1000013345.mp4
    42.6 MB
  • 20250127_124402.jpg
    20250127_124402.jpg
    1.5 MB
A very good reason to not put your old fridge on the bonfire. I expect they would go off like a bomb given the butane based refrigerant, a highly flammable insulation, plastic lining and oil in the compressor.
Standby for this to be used in an action movie instead of the bowl of chemicals in the microwave trick.

Getting back on topic if you know anyone with a FLIR camera they are useful for spotting the coolant lines ( give an indication ) but I'd be very cautious even with this information.

There are no evaporator or cooling lines in the bottom of fridges.

A beer or gas line easily fits between the door seal and cabinet without a problem.
 
Update: the (second) new fridge arrived. I tried the alcohol-corn starch method twice, to no avail. Someone suggested a FLIR camera, which made me remember I have an IR thermometer. So I marked out a line where I'd like to drill, with marks every 1/2" and started taking measurements after letting the sides warm up.

Here's the graph of temperature vs. location as measured from the front, along the line (smoothed to make the peaks more obvious). I measured it twice, once on the line, and once an inch up. The peaks are roughly 10°F hotter than in between them. The two sets of data agree pretty well, so I concluded the condenser coils were at the peaks. Interestingly, they were positioned "exactly wrong" as compared to the previous unit that I ripped the side off (see previous). So if I had drilled in between where the first unit's coils were, I'd have hit them dead on! Nothing consistent with cheap manufacturing.

So I carefully drilled in between those peaks, and missed them all. Success! Everything's connected and cooling.

Now to brew a batch.

K
 

Attachments

  • Screenshot_20250129_125047_Sheets.jpg
    Screenshot_20250129_125047_Sheets.jpg
    76.6 KB

Latest posts

Back
Top