Finally (almost) complete BIAB Craftbeerpi system - testing

Homebrew Talk - Beer, Wine, Mead, & Cider Brewing Discussion Forum

Help Support Homebrew Talk - Beer, Wine, Mead, & Cider Brewing Discussion Forum:

This site may earn a commission from merchant affiliate links, including eBay, Amazon, and others.

rkhanso

Well-Known Member
Joined
Jan 24, 2017
Messages
774
Reaction score
174
Location
Plymouth, MN - terrible tap water for brewing
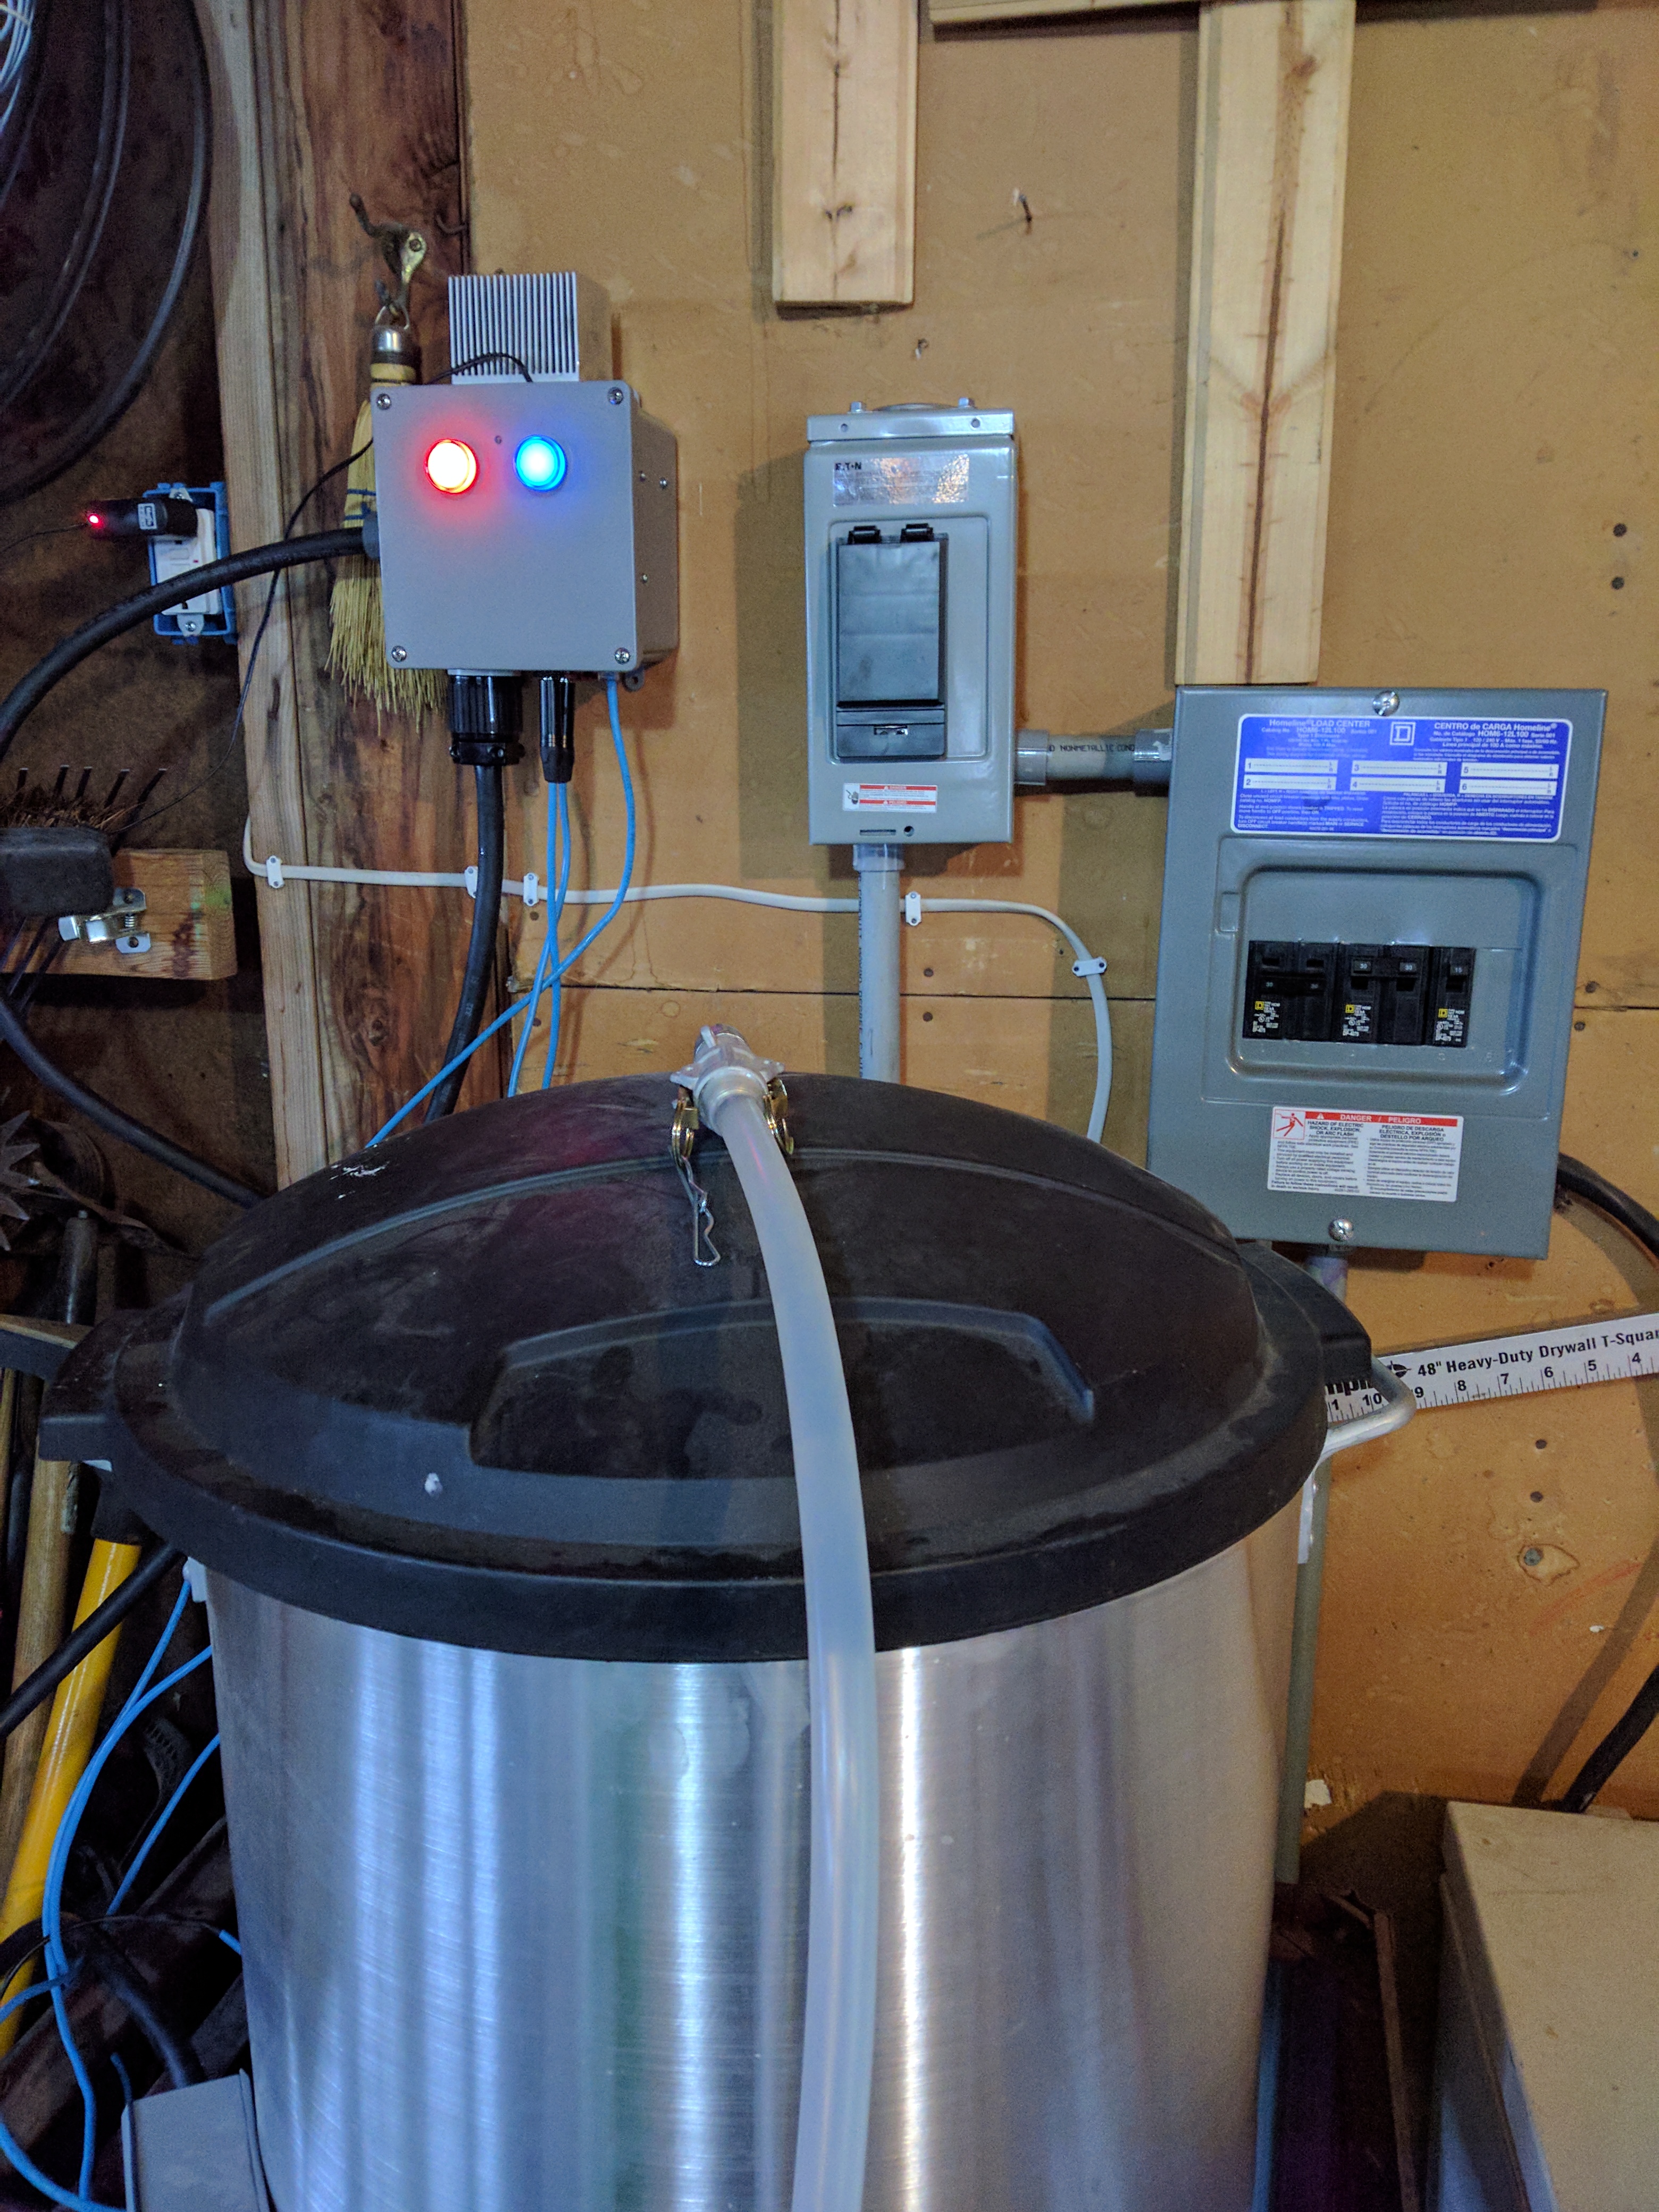
I just need to get a 12v DC jack and plug mounted in the 6"x6"x4" controller box to power the Raspberry Pi - but I'm doing a PID Tune right now.

I went pretty simple. Using my phone or a PC to control via the http interface.

I power the 240v and 12v separately. Have a 12v brown solar pump on the kettle for recirculation. I have a DIY Jaded Cyclone CFC which I haven't tested the efficiency yet, but our winter tap water temps in MN will sure help out chilling. I have a temp sensor on the CFC output to monitor exiting wort temps - and look forward to testing that soon.

I'm using a Terragady 4.2 board on the Raspberry Pi 3.

There are 3 Locking Stereo RCA jacks on the bottom of the controller box that the 1-Wire temp sensors plug into.

There is a RJ45 Jack that the pump plugs into at the bottom of the controller box.

The controller box plugs into 240v AC, powering just that part of the box and the heat element plugs into the bottom of the controller box with a locking plug.

I used an old computer CPU heatsink for the SSR.

The red light on the front lights when the heater is powered. The blue light is on when the pump has 12v DC to it.

There is a small hole between the lights where I mounted a buzzer inside the cover for an alarm.

I'm using Craftbeerpi v 3.0.

Pictures and initial temp ramp up from 70F to 152F during the PID auto-tune.
IMG_20171215_094250.jpg
IMG_20171215_094304.jpg
IMG_20171215_094914.jpg
pidtune.PNG
 
Last edited:
Well, auto-tune PID failed. I'm not sure why since I don't really know what the log is telling me. Can anyone help? I can start a new thread if needed.

2017-12-15 12:42:00,AutoTune will now begin
2017-12-15 12:45:00,switched state: relay step down
2017-12-15 12:45:00,input: 152.82
2017-12-15 12:46:20,found peak: 153.73
2017-12-15 12:46:20,peak count: 1
2017-12-15 12:46:50,found peak: 153.95
2017-12-15 12:46:50,peak count: 2
2017-12-15 12:47:56,found peak: 154.06
2017-12-15 12:47:56,peak count: 3
2017-12-15 12:48:11,found peak: 154.29
2017-12-15 12:48:11,peak count: 4
2017-12-15 12:51:22,found peak: 154.74
2017-12-15 12:51:22,peak count: 5
2017-12-15 12:51:22,amplitude: 0.0933333333333
2017-12-15 12:51:22,amplitude deviation: 2.0
2017-12-15 13:05:55,switched state: relay step up
2017-12-15 13:05:55,input: 151.48
2017-12-15 13:07:26,found peak: 151.7
2017-12-15 13:07:26,peak count: 6
2017-12-15 13:07:26,amplitude: 0.131666666667
2017-12-15 13:07:26,amplitude deviation: 2.0
2017-12-15 13:08:01,switched state: relay step down
2017-12-15 13:08:01,input: 152.71
2017-12-15 13:09:06,found peak: 153.61
2017-12-15 13:09:06,peak count: 7
2017-12-15 13:09:06,amplitude: 0.62
2017-12-15 13:09:06,amplitude deviation: 1.45161290323
2017-12-15 13:11:17,found peak: 153.61
2017-12-15 13:11:17,peak count: 8
2017-12-15 13:11:17,amplitude: 0.9
2017-12-15 13:11:17,amplitude deviation: 0.688888888889
2017-12-15 13:14:49,found peak: 154.06
2017-12-15 13:14:49,peak count: 9
2017-12-15 13:14:49,amplitude: 0.825
2017-12-15 13:14:49,amplitude deviation: 0.842424242424
2017-12-15 13:15:59,found peak: 154.06
2017-12-15 13:15:59,peak count: 10
2017-12-15 13:15:59,amplitude: 0.393333333333
2017-12-15 13:15:59,amplitude deviation: 2.0
2017-12-15 13:16:24,found peak: 153.84
2017-12-15 13:16:24,peak count: 11
2017-12-15 13:16:24,amplitude: 0.075
2017-12-15 13:16:24,amplitude deviation: 2.0
2017-12-15 13:25:51,switched state: relay step up
2017-12-15 13:25:51,input: 151.48
2017-12-15 13:27:06,found peak: 151.59
2017-12-15 13:27:06,peak count: 12
2017-12-15 13:27:06,amplitude: 0.111666666667
2017-12-15 13:27:06,amplitude deviation: 1.01492537313
2017-12-15 13:28:07,switched state: relay step down
2017-12-15 13:28:07,input: 152.71
2017-12-15 13:29:17,found peak: 153.73
2017-12-15 13:29:17,peak count: 13
2017-12-15 13:29:17,amplitude: 0.411666666667
2017-12-15 13:29:17,amplitude deviation: 2.0
2017-12-15 13:29:57,found peak: 153.84
2017-12-15 13:29:57,peak count: 14
2017-12-15 13:29:57,amplitude: 0.768333333333
2017-12-15 13:29:57,amplitude deviation: 0.60737527115
2017-12-15 13:33:38,found peak: 154.29
2017-12-15 13:33:38,peak count: 15
2017-12-15 13:33:38,amplitude: 0.75
2017-12-15 13:33:38,amplitude deviation: 0.5
2017-12-15 13:33:53,found peak: 154.51
2017-12-15 13:33:53,peak count: 16
2017-12-15 13:33:53,amplitude: 0.45
2017-12-15 13:33:53,amplitude deviation: 2.0
2017-12-15 13:34:18,found peak: 154.29
2017-12-15 13:34:18,peak count: 17
2017-12-15 13:34:18,amplitude: 0.13
2017-12-15 13:34:18,amplitude deviation: 2.0
2017-12-15 13:45:56,switched state: relay step up
2017-12-15 13:45:56,input: 151.48
2017-12-15 13:46:26,found peak: 151.59
2017-12-15 13:46:26,peak count: 18
2017-12-15 13:46:26,amplitude: 0.148333333333
2017-12-15 13:46:26,amplitude deviation: 1.25842696629
2017-12-15 13:46:51,found peak: 151.36
2017-12-15 13:46:51,peak count: 19
2017-12-15 13:46:51,amplitude: 0.523333333333
2017-12-15 13:46:51,amplitude deviation: 1.7898089172
2017-12-15 13:47:06,found peak: 151.59
2017-12-15 13:47:06,peak count: 20
2017-12-15 13:47:06,amplitude: 0.525
2017-12-15 13:47:06,amplitude deviation: 2.0
2017-12-15 13:47:06,AutoTune has failed
 
I'm giving a more real-world type test today. It's warmed up a bit outside at 31F.
It took about 45 minutes to heat up about 12-15 gallons of 50F water up to 155F.
I made a practice brew day in Craftbeerpi with some basic steps and am trying to give that a go
But, when I press the triangle/play button to start the brew steps, nothing happens. I don't need to also press the "Car" button to get the brew steps to work, do I? The demo video doesn't do that.

Capture.JPG


The CFC chiller is ready to test out - first test for that also.
 
I think I figured it out. The brew steps don't like the "Toggle Step" to be included. Once I removed the Toggle Step, the brew steps started working.
Or, maybe it's because I didn't have an "Actor" chosen. I guess that may have been the problem....
I'll have to try to figure all this out later - what options work and don't with different parts of the software.
 
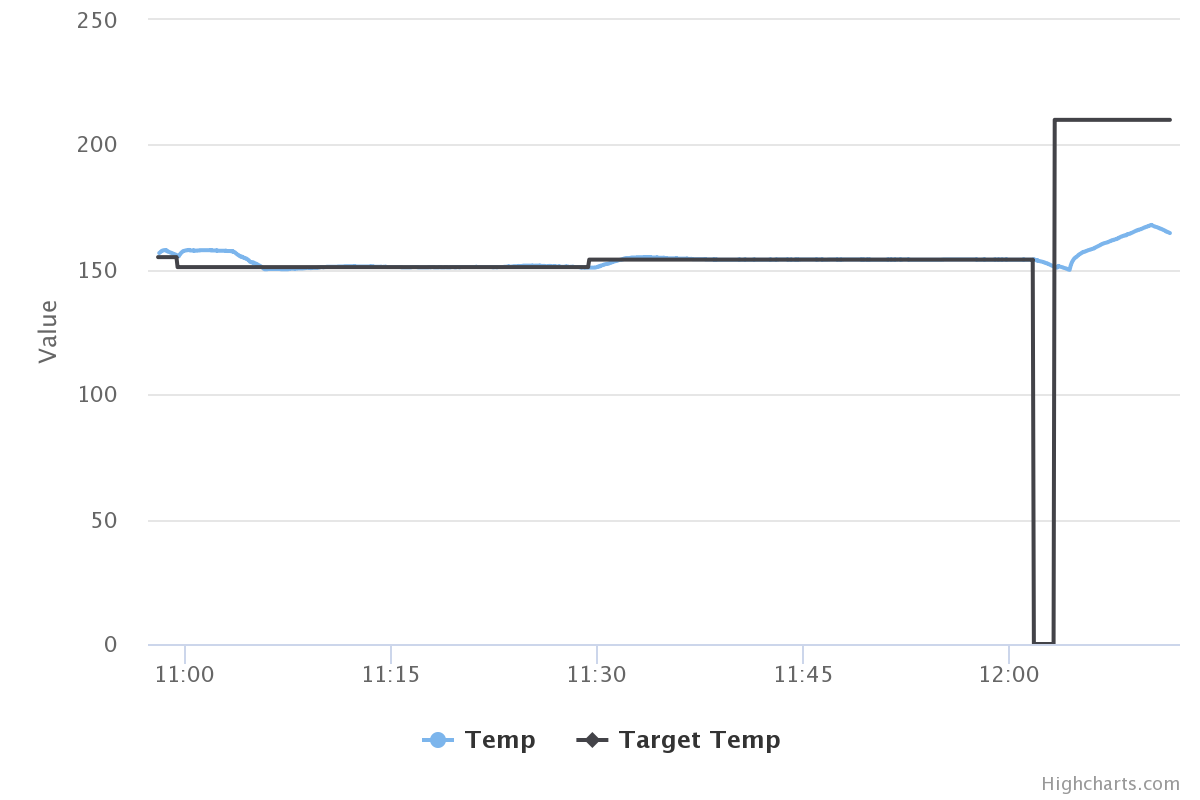
There's a bit of overshoot on the first over-temp, after the heater turns off. But after that first overshoot by 1-2 degrees F, the temp holds within .05 degree F on each side of the target temp. That's impressive.
I would like to get that first overshoot corrected. Ignore the temps after 12:00.
On to the boil phase. Time to test that boil steam condenser.
Can those little brown 12v DC pumps handle boiling water? I wonder if that needs to be removed before boiling.

chart (2).png
 
Last edited:
I think I may have to put a temp probe into the kettle itself instead of having just one on the output of the kettle....before the pump.
If the pump is off during boil, the wort gets stagnant there and cools off, giving a bad reading for the control logic.
 
Thanks for sharing this. I am wanting to build a controller from a Pi, I originally was going to use an Arduino but have changed my mind. Not sure if I'm going to write my own code or...? Any advice? Will have a monitor/mouse/keyboard on the brew stand.
 
Done with the test. It went about as I expected. Lots of water leaks on my crappy old garden hoses and garden hose fittings. I'll have to get some new hoses/fittings for the chiller before the first brew day.

Impressed with the CFC though. I cooled "wort" 205F down to 70F quickly. I didn't get to measure the GPM but I have a video of it below (link). The hot water output from the waste was at 90F. We are still really cold here - and the supply water is very cold, so that helps.

Some things to tidy up before brew day, but it's going to be fun.


A picture of the flow-rate going from 205F to 70F through the chiller
IMG_20180324_130021.jpg


A short video of the flow rate from 205F to 70F

https://www.dropbox.com/s/nr2o7dw097cnmez/VID_20180324_130043.mp4?dl=0
 
Last edited:
Thanks for sharing this. I am wanting to build a controller from a Pi, I originally was going to use an Arduino but have changed my mind. Not sure if I'm going to write my own code or...? Any advice? Will have a monitor/mouse/keyboard on the brew stand.
I can't write code. I have to use something like Craftbeerpi or BrewPI or something similar. For ease of install, you can't beat it.
Maybe you could use it for a bit and/or look under the hood and get clues for writing your own software. Or, just make changes to Craftbeerpi to make it work to your liking. It does have those plugins (which I also can't write).
I didn't want any attached or permanent electronics in my brew area - because it's in the garage, which is not heated in the cold winters and is a disorganized mess. I'll be using my mobile phone to run the brew day. Or, I could get a tablet if I wanted something a bit bigger.
Give it a try and see if it meets your needs. If not, you can always go a different route. You'd likely need the same or similar hardware anyway - relays, ssrs, 1-wire temp probes, enclosures, heat sinks, etc.
 
Yeah I have all the hardware, SSRs, electronic components and everything. I built and wrote the code for a complete Arduino one, but didn't have the 220v stuff at that time. Now I have all the 220v stuff, but I'm thinking the Pi would be a lot simpler. The Arduino is tough because your sort of limited on how to input information and see it as your brewing. I was using a 4x20 LCD and I had rotary encoders and push buttons for everything, and it was really a pain.

I also have one of those 12v pumps from ebay, I'm hoping it works fine. I'll be using an immersion chiller while running the pump instead of a CFC.
 
I think I may have to put a temp probe into the kettle itself instead of having just one on the output of the kettle....before the pump.
If the pump is off during boil, the wort gets stagnant there and cools off, giving a bad reading for the control logic.

Yup, that'll happen. Which is why most folks never shut off their mash recirculation pumps, they just modulate any heat source in that loop (eg: HLT bath temp, RIMs tube cycle, etc).

fwiw, I underlet my mash, give it five minutes to soak, then slowly start recirculating, building up to ~ 2 gallons/minute. I do not shut off the pump until I've completed the ramp to mash-out, then I briefly stop it to switch hoses to send the mash pump output to the boil kettle and bring the HLT contents (ie: sparge liquor) to the hex input. I then start the same pump to manage the fly sparge transfer.

So the temperature reading at the output of the HLT is only briefly affected through pretty much the whole brew day...

Cheers!
 
Yeah I have all the hardware, SSRs, electronic components and everything. I built and wrote the code for a complete Arduino one, but didn't have the 220v stuff at that time. Now I have all the 220v stuff, but I'm thinking the Pi would be a lot simpler. The Arduino is tough because your sort of limited on how to input information and see it as your brewing. I was using a 4x20 LCD and I had rotary encoders and push buttons for everything, and it was really a pain.

I also have one of those 12v pumps from ebay, I'm hoping it works fine. I'll be using an immersion chiller while running the pump instead of a CFC.

Have you looked at Brucontrol yet? Might want to consider it before charging down the pi route.

www.brucontrol.com
 
I did a more complete test run today. This is simulating BIAB brewing before my first brew - to get accurate losses so I can start with the correct amount of water.

My assumptions on losses was waaaay off.

I started with 10 gallons in the kettle. I simulated a 90 minute mash followed by a 60 minute boil. I have the boil condenser on my kettle and had the lid on the whole time. The boil condenser was "running" only during boiling, not during mash.

Here are some numbers:
I "mashed" at 152F
I boiled at 35% power. I tried going down to 26% and it still seemed to boil decent.
The waste water exiting the boil condenser was 175F.
After boiling, I ran the wort through the CFC. The wort was at 68F and the waste water exiting the chiller was also at 68F. I was running wort through the chiller at about 1 gallon per minute.

I got 7.6 gallons into the fermenter - way less than I thought I would.
There was 3 cups left in the bottom of the kettle (though no trub since it was only water)
There was about 1 cup of wort left in the chiller.

That means I had 2.25 gallons of loss during boil? --- when using a boil steam condenser?

Here's a chart of the mash - I changed it from 152F to 151F part way through since it would overshoot by 1F. I wanted it to stay closer to 152F, not 153F:
chart (3).png

Did I measure wrong? Did I measure the wrong things?
 
I measured the 10 gallons of water before adding it to the kettle at "Mash In", but didn't specifically measure it from the kettle right after boil. I waited until I was finished going through the chiller (at the end of brewing).

I guess I could throw 5 gallons in and boil for an hour and measure what's left in a separate test.

Gotta get this down before my first real brew in 2-3 weeks.

Thanks for the idea of a separate test.
 
Back
Top