Fermzilla All-Rounder Fun

Homebrew Talk - Beer, Wine, Mead, & Cider Brewing Discussion Forum

Help Support Homebrew Talk - Beer, Wine, Mead, & Cider Brewing Discussion Forum:

This site may earn a commission from merchant affiliate links, including eBay, Amazon, and others.

seatazzz

Well-Known Bloviator & Pontificator
HBT Supporter
Joined
Feb 4, 2016
Messages
4,004
Reaction score
8,522
Location
Seattle
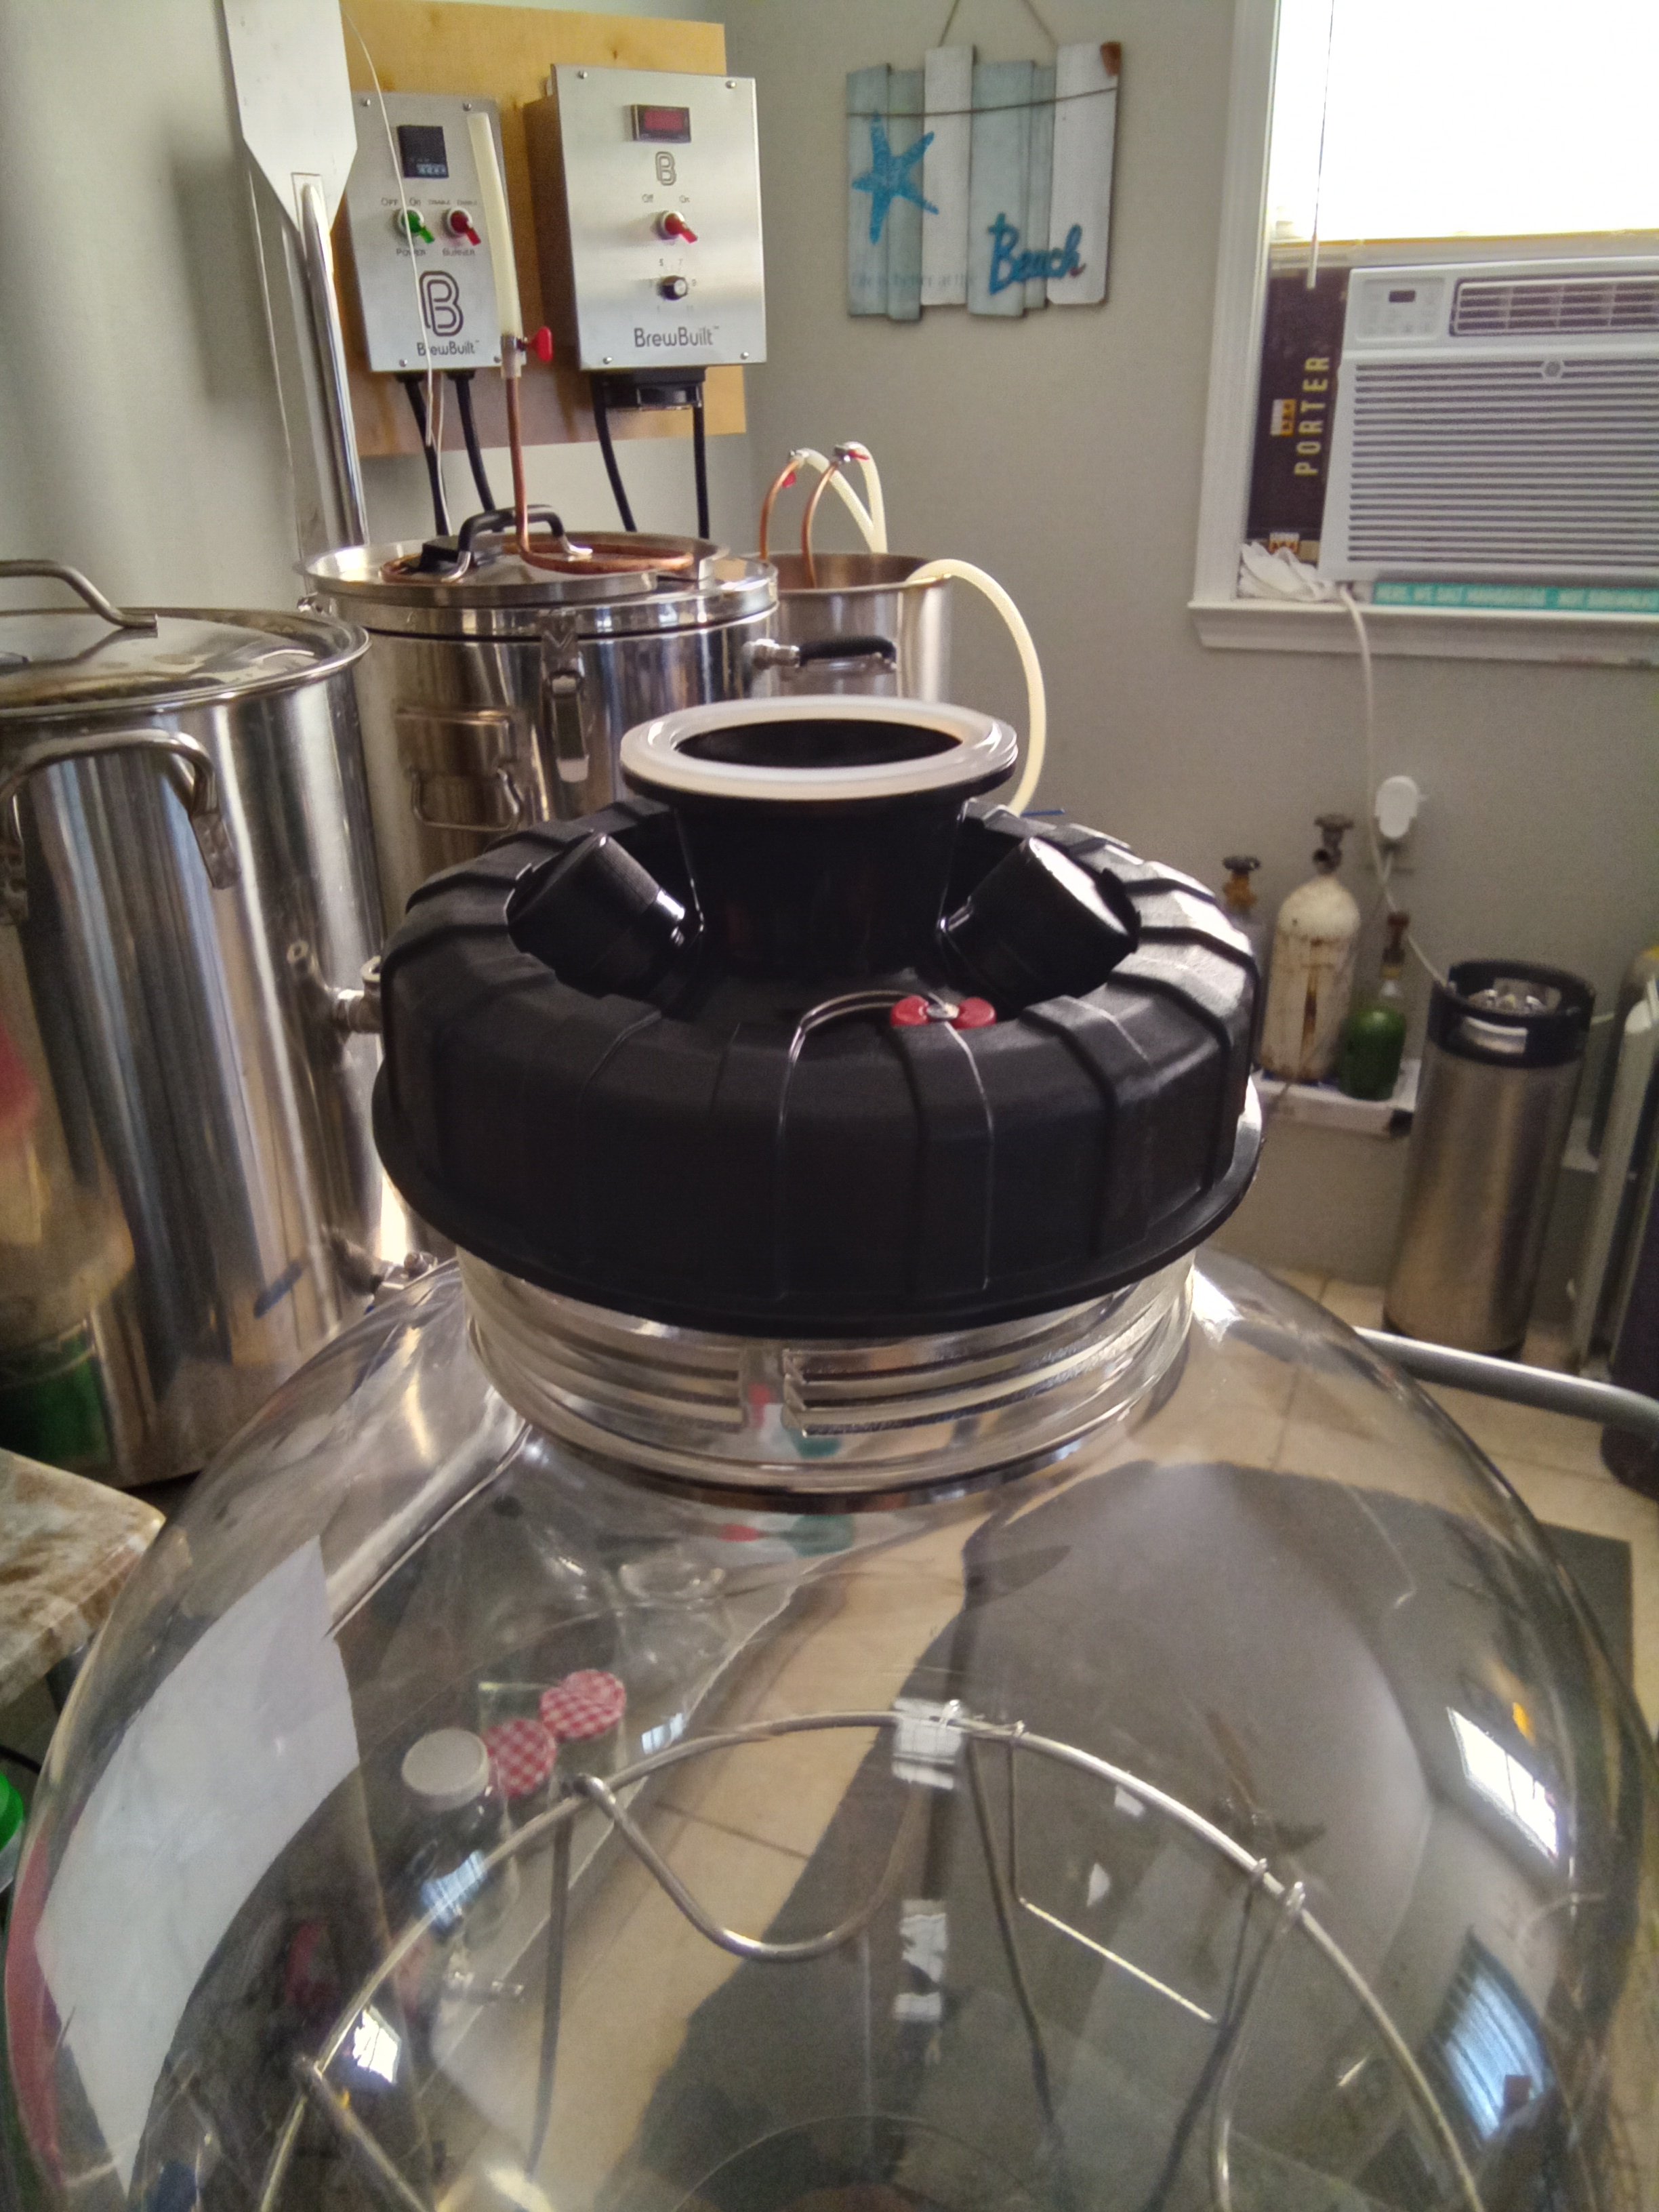
Just transferred the first batch out of my new Fermzilla All-Rounder. I've been doing pressure transfers in my Fermonsters for a bit, so thought I knew what I was doing. Nope. Forgot to open the spunding valve on the Fermzilla after the beer started flowing, and when it stopped I was confunded as to why. Figured that out, then realized that I hadn't loosened the straps holding it to the stand so I could tip it. Was awkward to get at with the lines in the way but got that done. This batch was an IPA with a hefty dry-hop, which I did with a bag attached to the side with magnets; with about 2g left to go, the filter got stuck under the bag and started pushing straight co2 into the keg. Took a few minutes but figured out a quick fix; released the pressure, then removed the post that had the floating dip tube attached. A few tugs and the filter/float got unstuck, added more co2 and transfer continued. Fairly full keg, happy. Then came the REALLY fun part; getting that lid off for cleaning. It does NOT like to come off. Not thinking, I used a screwdriver in one of the post openings; CRACK! Oops. More google. Ok, add co2 with the ring on loose until it starts to pop off. Stop reading right there...before the part that says release the pressure before trying to get the lid off. 5psi is plenty of pressure to send that lid flying, if my face had been any closer I would have had some splaining to do at the BBQ tomorrow with a lovely black eye, or other bruise on my countenance. New lid will be here next week.

Other than that, I'm happy with it. Beer came out partially carbonated; a few pulls of the PRV at 30psi will see it right. And the beer itself is quite tasty, lots of aroma and flavor from the Mosaic hops I used. I've been plagued with acetaldehyde in the last few beers I fermented in the fermonsters; it did go away (one of them needed krausening to get rid of it) but having one come out with absolutely NONE is well worth the price I paid for this thing. Easy to clean, doesn't take up any more space than my fermonsters, just a nice fermenter.

Anyone else have any comments/advice/horror stories with Fermzillas?
 
Well my fermzilla G3.2 arrived and right out of the box I am less than impressed. 1st it came with a 3 piece fermentation lock but no cap came with it to fix it to the lid. More unsettling all of the ports are of a size that none of the normal quick connect or other fittings will fit it. The lid has two ports but only one cap came with the unit. Expecting to ferment under pressure and adding a hop dropper, I ordered the pressure lid assembly. It is a two piece cap, the bottom portion has two ports and a prv. The two ports came with caps that look like soda bottle caps that will loosen but not completely come off. The top half also has one of the same caps. It is supplied with a 2 inch tc clamp to attach the top and bottom together.

Now the real unsettling issue. This pressure cap assembly did not come with any type attachment ring as the standard lid. The lid hold down ring that came with the fermenter will not fit over the ports on the pressure lid. From the lame photos in the item description I thought maybe it attached via a tc clamp but no it does not.

And finally no, zero, not, zilch directions was provided. Needless to say I am far from happy at this point. I am quite creative and I'm sure I could simply improvise and find a way to make it work. But it is not right to sell a bill of goods that is incomplete, unfamiliar and absolutely no instructions about the product.

Has anyone else had similar experiences with a Fermzilla G3.2?
16861452182633199561393345792021.jpg
 
Last edited:
Wow, that is very weird. The lid for my all-rounder doesn't look like the one you got; it does have the caps, but they come off easily and the ring fits just fine over the whole thing. Did you get this one from morebeer? I would email them pronto and voice your displeasure.
 
I talked to morebeer and they are sending a grommet for the air lock. They advised me the instructions etc are available online. And informed me they offer a pressure kit with quick connects and a floating dip tube. While they addressed my issues it did not change the fact that the ports are different than all other standard sanke type fittings and are not interchangeable. They should have made it clear that in order to actually ferment in this vessel more attachments are necessary at an additional cost. Mine came with soda bottle like caps on the pressure fermentation adapter, (that I added to my order to ferment under pressure). These caps literally are the same as bottle caps that have a seal ring that must be broken in order to remove the caps. Once you remove the bottle caps you can then install the cap and ring onto the fermenter.

I will order the necessary adapters as I have plans for this fermenter. But it really would have been nice to know ahead of time. I would have ordered the adapters. But I ordered extra sanke quick connects and other pieces that I thought would work with it, but no, I should have known normal American adapters would not fit a foreign vessel. Lesson learned.
 
Just transferred the first batch out of my new Fermzilla All-Rounder. I've been doing pressure transfers in my Fermonsters for a bit, so thought I knew what I was doing. Nope. Forgot to open the spunding valve on the Fermzilla after the beer started flowing, and when it stopped I was confunded as to why. Figured that out, then realized that I hadn't loosened the straps holding it to the stand so I could tip it. Was awkward to get at with the lines in the way but got that done. This batch was an IPA with a hefty dry-hop, which I did with a bag attached to the side with magnets; with about 2g left to go, the filter got stuck under the bag and started pushing straight co2 into the keg. Took a few minutes but figured out a quick fix; released the pressure, then removed the post that had the floating dip tube attached. A few tugs and the filter/float got unstuck, added more co2 and transfer continued. Fairly full keg, happy. Then came the REALLY fun part; getting that lid off for cleaning. It does NOT like to come off. Not thinking, I used a screwdriver in one of the post openings; CRACK! Oops. More google. Ok, add co2 with the ring on loose until it starts to pop off. Stop reading right there...before the part that says release the pressure before trying to get the lid off. 5psi is plenty of pressure to send that lid flying, if my face had been any closer I would have had some splaining to do at the BBQ tomorrow with a lovely black eye, or other bruise on my countenance. New lid will be here next week.

Other than that, I'm happy with it. Beer came out partially carbonated; a few pulls of the PRV at 30psi will see it right. And the beer itself is quite tasty, lots of aroma and flavor from the Mosaic hops I used. I've been plagued with acetaldehyde in the last few beers I fermented in the fermonsters; it did go away (one of them needed krausening to get rid of it) but having one come out with absolutely NONE is well worth the price I paid for this thing. Easy to clean, doesn't take up any more space than my fermonsters, just a nice fermenter.

Anyone else have any comments/advice/horror stories with Fermzillas?

Getting the lid off my all rounder, I unscrew the ring almost all the way, then use a flathead screwdriver under the lip of one of the ball lock lids and use the ring as leverage to pry the lid up. Don't waste CO2 popping it off. I'll try and post a picture if that description isn't clear enough for you. Also some keg lube on the lid ORing makes things easier as well.
 
Those Kegland folks do love their plastics, and their bottle-cap threaded widgets. Sounds like there's some rough edges, and a learning curve.

I've embraced stainless, but I'm impressed by Kegland's innovation of modestly priced brewing tech that could help us to enjoy brewing more, and to make better beer. Even better beer, I mean ;-)
And if kegland could use regular sanke type fittings on all the ports it would make their customers happier.
 
And if kegland could use regular sanke type fittings on all the ports it would make their customers happier.
Honestly I think most of the people to really use sanke type fittings are nano breweries and larger. In my experience in the US as a homebrewer I deal in 5 gallon corny kegs and every homebrewer I've ever interacted with does as well (probably 75-100 people). I did notice that if I want larger kegs they'd all almost entirely be sanke. Hell even the kegerator I bought (meant for commercial kegs) came with sanke adaptors and not ball lock adaptors. It was no big deal though cuz I was going to replace the garbage taps it came with with some nukataps and I switched to EVA barrier tubing and duotight adaptors. But in short, I think a majority of homebrewers deal with ball lock corny kegs so I think kegland is correct in providing standard fittings made for ball lock and not sanke.
 
Lol, yes @Biggz1313 I am fully aware most homebrewers use corny kegs. So do I for certain things. And the quick connects for cornies fit Torpedo and other kegs. The same goes for Sanke. Every American and most other tap fittings interchange because they all have the same thread and nut size. Bottom line in order to use the Fermzilla you must use Keglands fittings be it caps, quick connects or what ever. There is no interchangeable parts with American products. Brother this ain't my first rodeo, I've been doing this over 30 yrs but this is the first time I've stepped over the pond and purchased something all metric.

Don't get me wrong I like the G3.2 and plan to ferment under pressure and serve from it too. I have been fermenting in Sanke kegs since the 90s but I have yet to come up with a way to ferment and serve from the same keg. The G3.2 will allow me to do that. Even my CF5 can't do that IMO although some say you can. But I'm not going to tie that fermenter up for the time it takes to drink up a batch.

I have had the opportunity to see a G2 in action. That is what prompted me to go for the G3.2. And I am convinced Keglands is on to something good here but they need to be much more informative about their product. They should point out that while their fittings look the same as those we homebrewers are accustomed to they will not interchange. And you must purchase their attachments along with the fermenter in order to use it.

Oh, and to deliver a product such as the G3.2 with no instructions what so ever is plane unacceptable. How is one to know the soda bottle caps must be pried off. They appear to be made to stay on. Only to loosen to release pressure or something.

Plus those ball lock corny fittings you mentioned, look exactly like the fittings Kegland offers for their pressure lid in their ad photos. I bought the pressure lid and additional ball lock quick connects specifically to equip my G3. But I didn't know they were different and I only ordered the fittings without the floating dip tube as I have a sufficient supply of those.

Lessen learned.
 
Last edited:
believe me- im the last person to give kegland a pass on ease of use. but in their defense, they have a TON of videos where they explain pretty much all this stuff. i'm not one to watch them unless i am specifically trying to solve a problem, but they are there for anyone to view and get all the details about their products. tons of videos. so many damn videos.

its just a matter of the kids today wanting mobile-friendly content. they immediately go to google/facebook/etc for answers, and often that winds up as a video. so that's what kegland puts out.
 
Lol @SanPancho you are right there is a ton of videos out there. Trouble is there is not one single video, document nor picture that addresses the new Gen3.2 fermentation lid in detail. When you research it all the info that comes up about the Gen3.2 demonstrates the previous Gen3. They even say that the pictures are of the Gen3 not the revised Gen3.2. But the soda bottle caps are also on the older model but again they do not describe the caps and how to remove them. It doesn't take an engineer to figure out how to remove the caps but why would self locking plastic caps be installed on the ports of the lids? The lock rings are not perforated like soda bottle caps. Rather they are hard solid rings molded as part of the cap. When you unscrew the cap it will totally loosen up but not come off without considerable force. Common sense tells you it isn't supposed to come off. Keep in mind the problem is with the pressure fermentation cap. However my original cap also had one locking cap and one uncapped port.

Bottom line the lids should be TC clamps instead of the large plastic ring cap. Then the bottle caps wouldn't be an issue. Except to get them off so you can toss them in the trash and install quick connects.
 
ah yes, they are very much in the mode of "if product has no bugs you waited too long to launch" so not surprising they get ahead of themselves. but kinda weird they didnt have a video ready for the new version....

i havent seen the product in question, so i cant say much specifically. but there isnt really a need for any of this stuff to be tri clover. works perfectly fine in plastic, with soda threads. i have to assume their opinion on the subject is- "if you want tri clover fittings, buy stainless." they do plastic. and frankly, i'm totally fine with that. you dont wanna pay for stainless, you agree to work with plastic.

i'm not totally following what you're saying with the details about the parts, but again, all their ads, literature, videos and what not show their own plastic parts. i dont think you can expect triclover or sanke when it never mentions tc fittings or BSP threads.

that said, they've started making a few tri clover parts in plastic. some adapters for their hop bongs, i think a piece on the bottom of the fermzilla that connects to the valve maybe, etc. i think these guys could make a big push into making plastic tc parts and let their equipment be compatible with more from other makers. but i'd guess they're fine with having a moat around their ecosystem that keeps you buying their gear. kegland is a for-profit entity after all.
 
I think they are figuring it out as they go. Don't get me wrong I definitely like the fermzilla G3.2. It is an improvement over the previous model. They reconized a need to improve the catch container on the bottom an they did that on the g3.2. The new container and valve are attached via TC clamps. And the container itself is an improved version that is more user friendly. The preassure cap is a two piece item. The pieces are held together with a TC clamp.
16863103554059108179813036516214.jpg
Below is the pressure cap. The problem is in order to install this cap the lil black plastic soda cap and in this picture, the quick connect both have to be removed to install the big black plastic threaded ring over the top of the pressure cap. Why is that a problem? It's a pressure cap, the quick connects require a wrench to tighten then just tight enough to prevent leaking pressure. The lil soda caps have a history of leaking and you can only tighten them so so or they will still leak. IMO they need to redesign the top of the jug itself and the pressure lid so it attaches with a TC clamp also. Additionally they should eliminate the soda caps and replace them with quick connects. They offer their QCs in both plastic and stainless. Why not inform customers they will need quick connects in the first place. They should be included with both the yeast catch containers and the pressure lid. Add the cost to the purchase price, customers will be satisfied instead of frustrated.

16863102778946139674501572693529.jpg
 
I don't want readers to think I'm just a complainer so I'll try to explain my intentions better here. As I stated in an earlier post, I have been homebrewing for a long time. I have used almost every kind of equipment that has come along. And in my effort to minimize energy and lifting I am trying to eliminate steps along the way. I believe the Fermzilla fermenters can do just that once perfected. I have and still do ferment in everything from plastic to glass and stainless conicals. However I have not come across a fermenter that is clear, realitively easy to handle, can ferment under pressure and serve from that same vessel that is not a PIA.

I have fermented in Sanke kegs for many years. And you can serve directly from the same keg. But you have to shorten the dip tube and you still get a boat load of sediment with the first several pours. I graduated to a SS conical and I like it but in order to serve from it you tie it up for an extended time while you consume the contents. And it is expensive, I have over a grand invested in this thing with all the accessories it requires.20230609_070937.jpg
The Fermzilla is the answer IMO. While it has bugs to rectify with a few accessories it can ferment under pressure and be the serving vessel all in one. It fits in refrigerators easily and weighs much less than a SS conical. And you can get it and the needed accessories for under $200. If my plan works out I will get rid of some Sanke and Corny kegs and add a couple more Fermzillas to my brewery. Then I can reduce the clutter and physical labor of brewing.
20230609_071003.jpg
 
Today I am giving my All-rounder one more shot at pressure fermenting. Yesterday I had to dump out a blonde I brewed last weekend that went all sorts of wrong, mostly my own fault. Ale yeast does NOT like pressure, at least not the psi I tried which was about 10. Today's brew is a simple lager recipe, that will get a good starter of 34/70 and immediately have pressure set to 15; I did one in a keg at that pressure, same yeast with a starter, and it turned out fantastic. The reason I really want this fermzilla to work, is I love to see fermentation in action; with the keg about all I could do was sniff the spunding valve (delicious bread-doughy smell after one day, it was heavenly). That one was also started out about 73° (yes a bit high for a lager), and went grain to glass in six days with NO off-flavors, sulfur, esters, just a nice crushable beer.
 
Wow I've never turned a lager around that fast. I think I'll try that. On the ale under pressure, IME they will indeed ferment a very good ale but it takes twice as long to finish. But they are smooth effervescent and tasty. I have an APA in the fermenter that took two full weeks to finish. It has been cold crashing and clearing for a week at 54 degrees. I will keg it later today.
 
Well, it looks like my fermzilla has justified itself. The lager I brewed yesterday is currently going batsh*t crazy at 14psi, and 71°. To the point that it's blowing off from the spunding valve. If I didn't know better I'd say from the looks of it, it's a kveik yeast in there instead of 34/70. Smell from the spunding valve is nothing but bread dough; no sulfur, no sourness, just a beautiful aroma that evokes memories of bread dough rising. Previous WF lagers in my fermonsters smell sulfury at this point; I'm not getting any of that. With no sulfur or esters being produced whatsoever, this one will need minimal cleanup time; and might be ready by the weekend, or maybe earlier. Glad I gave it another chance.
 
And if kegland could use regular sanke type fittings on all the ports it would make their customers happier.

The Sanke fittings are designed for stainless steel. It's not really possible to get a robust plastic and re-usable product made with the sanke design. If the bayonets on the sanke spear are made from plastic they would snap off after some use.

The threads on the lid and also the threads on the PCO 1881 openings are specifically designed to work well as plastic threads.
 
Well my fermzilla G3.2 arrived and right out of the box I am less than impressed. 1st it came with a 3 piece fermentation lock but no cap came with it to fix it to the lid. More unsettling all of the ports are of a size that none of the normal quick connect or other fittings will fit it. The lid has two ports but only one cap came with the unit. Expecting to ferment under pressure and adding a hop dropper, I ordered the pressure lid assembly. It is a two piece cap, the bottom portion has two ports and a prv. The two ports came with caps that look like soda bottle caps that will loosen but not completely come off. The top half also has one of the same caps. It is supplied with a 2 inch tc clamp to attach the top and bottom together.

Now the real unsettling issue. This pressure cap assembly did not come with any type attachment ring as the standard lid. The lid hold down ring that came with the fermenter will not fit over the ports on the pressure lid. From the lame photos in the item description I thought maybe it attached via a tc clam but no it does not.

And finally no, zero, not, zilch directions was provided. Needless to say I am far from happy at this point. I am quite creative and I'm sure I could simply improvise and find a way to make it work. But it is not right to sell a bill of goods that is incomplete, unfamiliar and absolutely no instructions about the product.

Has anyone else had similar experiences with a Fermzilla G3.2?
View attachment 821850


Hello T Murphy.

These caps here need to be removed before you screw the neck ring down to hold the lid onto the tank. These caps should just require a pull and they should come off:
1686642342150.png

Then once the neck ring is down you can fit the carbonation caps to these threads as not many customers are using this under gravity or using the airlock. With that said you should have been provided with one of these caps with a hole drilled in one of these caps so you can push the airlock into the cap with the hole. If that hat not been provided that doesn't sound correct to me and possibly it was incorrectly packaged. The caps are easy to drill out yourself though and they are also the standard soda pop cap so you probably have some around the house. If you check with your retailer they should be able to give you a replacement but not sure how that has got missed.

90% or more of our customers are using this vessel under pressure with the blowtie spunding valve that looks like this. The blowtie spunding valve eliminates the need for the airlock and it's the best way to get the most out of this container.


I notice that a lot of photos of people using these are using the stainless steel carb caps like this:
1686642583655.png


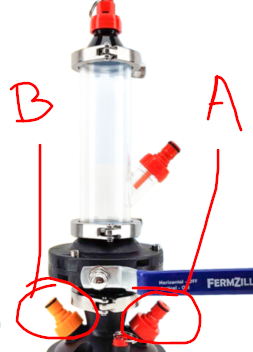
I personally prefer using these plastic carbonation caps here shown in position A and B:
1686642792587.png

The benefits of this is that the posts are color coded so you are less likely to mix them up. We recommend using yellow for liquid and red for gas. In addition to this these caps have other benefits such as:
1. They seal tight with minimal force as we use a newly designed wedge seal. We actually released a G2 design some time ago that required much less force to get an airtight seal when tightened with fingers.
2. The stainless steel ones use a face seal that if you overtighten the seal can roll out of place.
3. Due to the seals used the plastic ones have more chemically resistant seals so will handle wider range of chemical resistance with plastic.
4. The plastic ones are cheaper so you will save some coin.

Yes we should probably consider just including the ball lock carbonation caps in the kit as standard as almost all of our customers end up purchasing them anyway so this is a fair point. Many of our retailers like being able to give customers the option but in reality the cheaper plastic is the better way to go in my opinion.
 
Today I am giving my All-rounder one more shot at pressure fermenting. Yesterday I had to dump out a blonde I brewed last weekend that went all sorts of wrong, mostly my own fault. Ale yeast does NOT like pressure, at least not the psi I tried which was about 10. Today's brew is a simple lager recipe, that will get a good starter of 34/70 and immediately have pressure set to 15; I did one in a keg at that pressure, same yeast with a starter, and it turned out fantastic. The reason I really want this fermzilla to work, is I love to see fermentation in action; with the keg about all I could do was sniff the spunding valve (delicious bread-doughy smell after one day, it was heavenly). That one was also started out about 73° (yes a bit high for a lager), and went grain to glass in six days with NO off-flavors, sulfur, esters, just a nice crushable beer.

The Fermzilla All Rounder is still my favorite pressure brewing fermenter to be quite frank and we sell more than 60% all rounders in Australia.

I think a lot of customers feel they "need" a cone on the fermenter but in reality I think the necessity of the cone is getting less and less for these reasons below:
1. Historically fermentations took longer so you really needed to remove the yeast to avoid autolysis or dry hops decomposing on the fermenter. I think this is not really the case with many fermentation taking less than 10 days to complete and with oxygen free dry hopping techniques you can push the dry hop addition to the end of the fermentation process.
2. Yeast is pretty cheap and dry yeast in particular has got so good so it's really not worth collecting yeast and re-pitching.
3. The floating dip tubes work so well you can get clear beer from the fermenter without dumping out of the cone at all.

The All Rounder is also more compact and easier to fit into tight locations, it's easier to clean, and it's also easier to move around.

I mean don't get me wrong, if you need a cone the Tri-Conical is a great product but for many home brewers the All Rounder is probably more than adequate.

I also think that many customers really push the pressure think way too far. Generally speaking a few psi (1-5psi) is plenty to suppress off flavors so especially at the start of the fermentation there is no reason to go beyond this as it can have a negative effect as you have pointed out. I would only start to increase pressure above this toward the end of fermentation when you are specifically trying to carbonate.
 
Well, it looks like my fermzilla has justified itself. The lager I brewed yesterday is currently going batsh*t crazy at 14psi, and 71°. To the point that it's blowing off from the spunding valve. If I didn't know better I'd say from the looks of it, it's a kveik yeast in there instead of 34/70. Smell from the spunding valve is nothing but bread dough; no sulfur, no sourness, just a beautiful aroma that evokes memories of bread dough rising. Previous WF lagers in my fermonsters smell sulfury at this point; I'm not getting any of that. With no sulfur or esters being produced whatsoever, this one will need minimal cleanup time; and might be ready by the weekend, or maybe earlier. Glad I gave it another chance.

Have you ever considered using the Novalager? I have been getting great results with this one and would highly recommend it for producing sulfur free beers. A bit of pressure certainly helps but this yeast just makes it really easy.
 
Have you ever considered using the Novalager? I have been getting great results with this one and would highly recommend it for producing sulfur free beers. A bit of pressure certainly helps but this yeast just makes it really easy.
Thank you for replying! Yes I have tried the Novalager yeast, albeit not yet under pressure; I have plans to try it in a future beer. Just as an update, my lager in my Fermzilla is now crashing. Tested it this morning (four days post-pitch) and it was down to 1.009 and tasted great (using 34/70). I haven't taken the pressure higher than 15psi so far (and don't intend to), about 11-13 seems to be the sweet spot.
 
Bottom line in order to use the Fermzilla you must use Keglands fittings be it caps, quick connects or what ever. There is no interchangeable parts with American products
I'm not sure what you mean by this? The fermzilla, at least my all rounder, uses ball lock disconnects, which are the same found on all corny kegs? Are you referring to other adaptors/fittings?
 
I'm not sure what you mean by this? The fermzilla, at least my all rounder, uses ball lock disconnects, which are the same found on all corny kegs? Are you referring to other adaptors/fitt
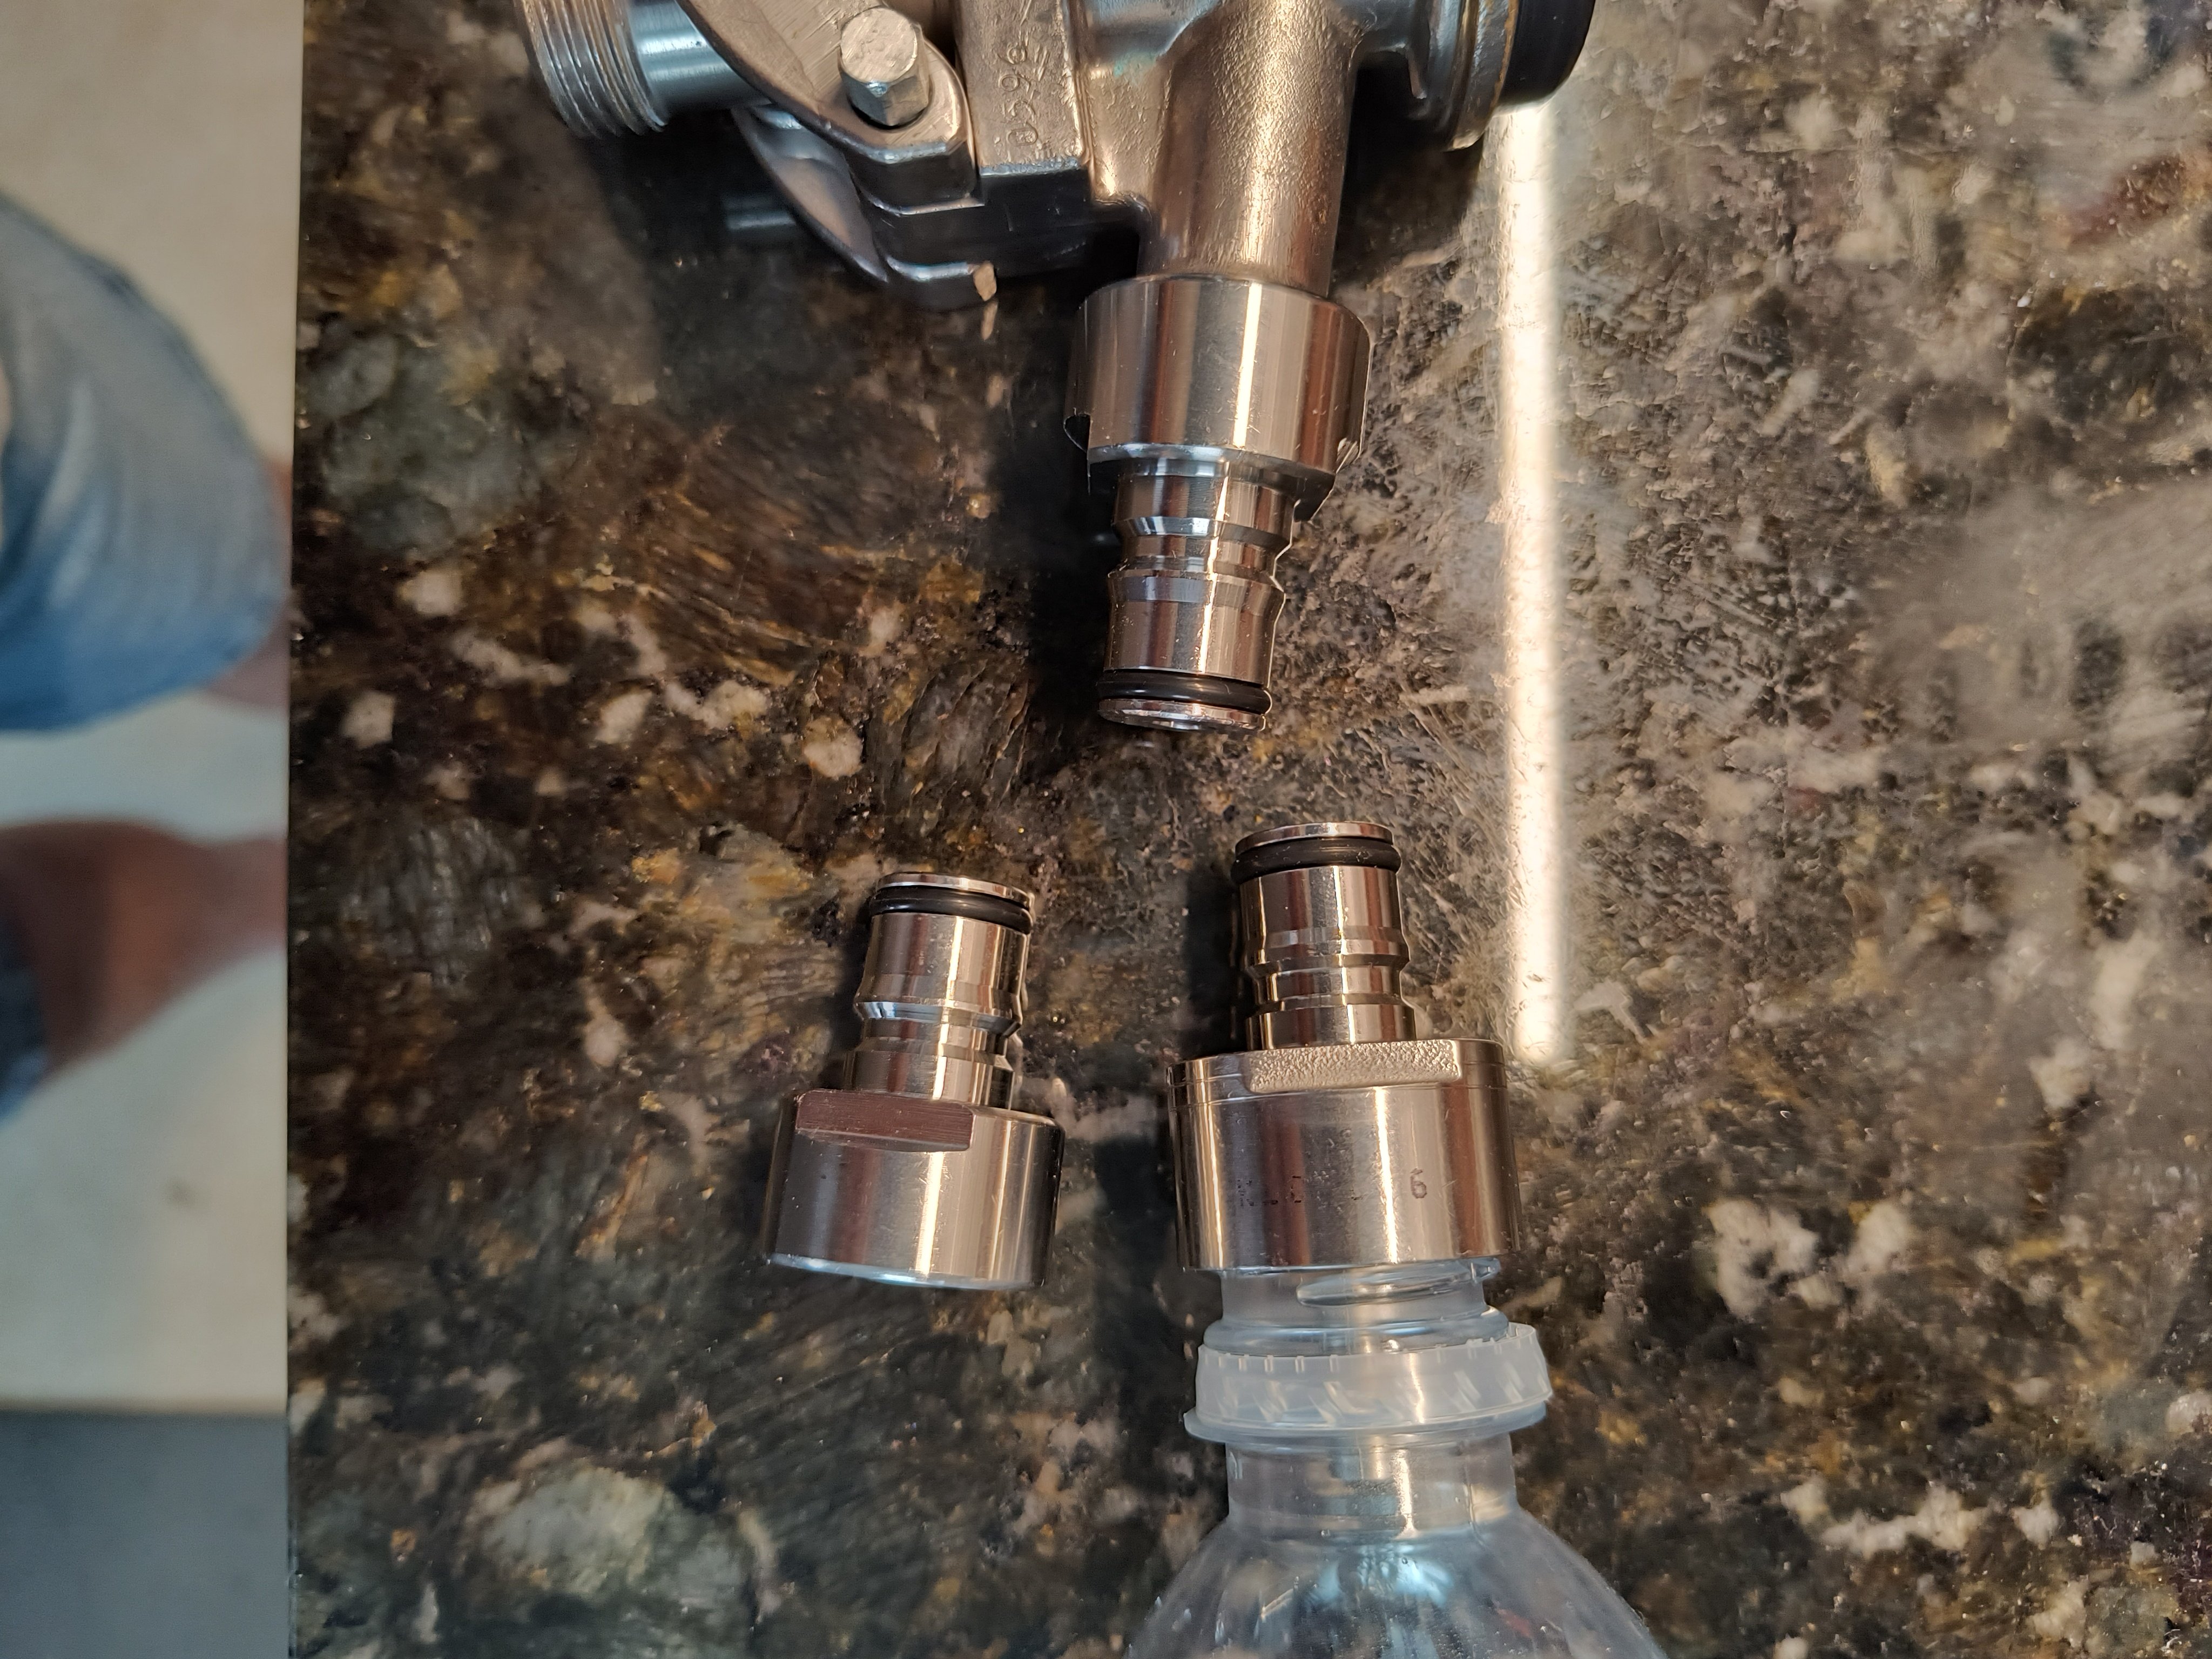
Yes the ball lock quick connects that come with the Fermzilla products are designed to fit the gas/beer quick connects post the same as corny and Torpedo keg post. However the Fermzilla quick connect mounting post and tap mounting post are NOT interchangeable. The thread and size of the mounting post are very different. Kegland quick connects are much larger, the exact same size as soda bottle caps. In their description and photos they show their QC fittings but do not mention that they differ from the fittings to attach quick connects to taps etc.

Because of this when I ordered my G3.2 I ordered additional QC fittings. Unknown to me I ordered the QCs that only fit taps and don't fit the Fermzilla. I also ordered the pressure cap. You would think if a customer ordered the G3.2 and the pressure cap that they would automatically send the correct fittings. But no, I had to wait until my shipment arrived to learn they don't fit therefore I was unable to use said fermenter until the correct fittings arrived.

I already have two floating dip tubes so I did not order their pressure fermenting kit which included two QC fittings. Once I acknowledged the screw up I ordered their pressure fermenting kit and now have 3 floating dip tubes of which I have only used one and only once. If I had known their QC post were the exact same as soda bottle threads I would have simply used old carbonation caps I had stashed away from back in the 90s. And by the way, how is a floating dip tube and two QC fittings a pressure fermentation kit?

Below picture bottom left is a typical QC post that fits all D Sanke taps. On the right the larger QC fits a soda bottle and Kegland QC post.
IMG_20230625_101932427_HDR.jpg
 
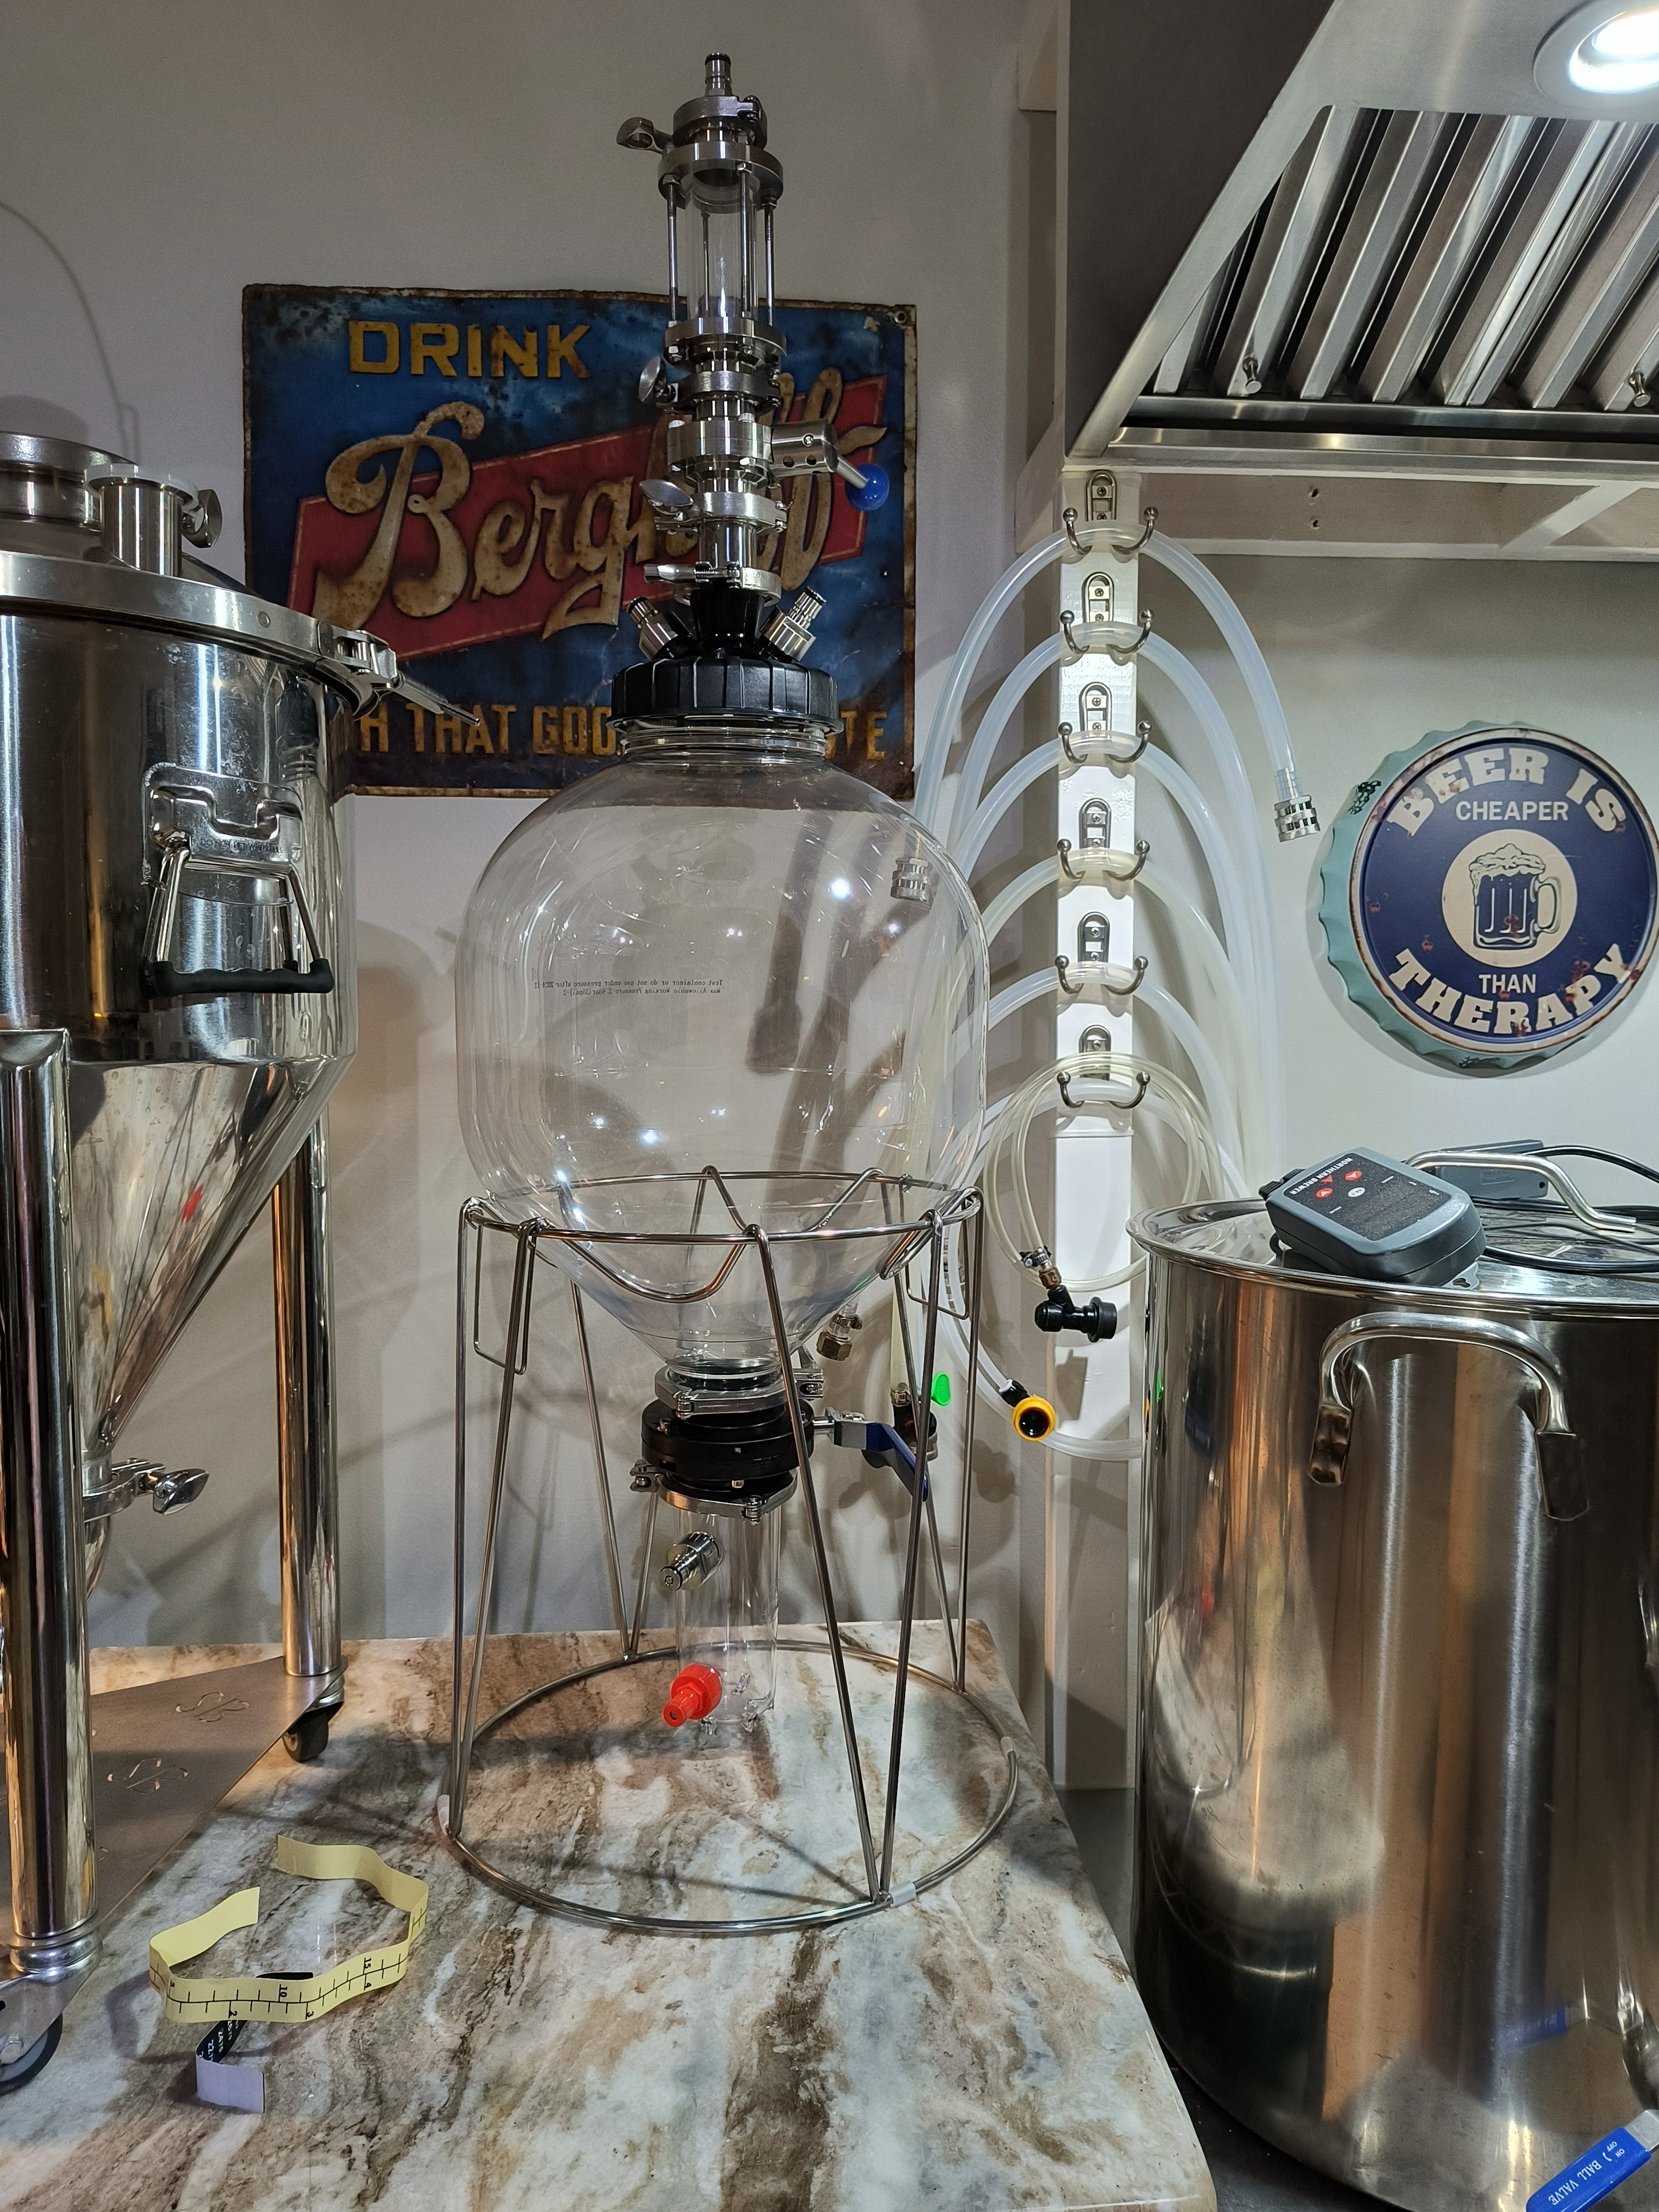
I finally got all the necessary fittings etc to get my G3.2 ready to ferment. I am planning to brew a basic pale ale on the 4th of July that will ferment under pressure, get dry hopped and finally it will be served directly from the fermenter. I see no reason it shouldn't be successful. I am a bit concerned as the top of the fermenter with the pressure cap and dry hopper is very top heavy. But it shouldn't be an issue once the fermenter is full of wort.

IMG_20230701_211115714_HDR.jpg
Aint it purdy? And thank you Kegland for responding.
 
Back
Top