Easy Wide Mouth Bubbler Modification

Homebrew Talk - Beer, Wine, Mead, & Cider Brewing Discussion Forum

Help Support Homebrew Talk - Beer, Wine, Mead, & Cider Brewing Discussion Forum:

This site may earn a commission from merchant affiliate links, including eBay, Amazon, and others.
Hello all, thought I would post a quick write up and a couple pics of my new favorite fermenter. A mash up of two popular designs.
I had been using the better bottles with racking adapter and valve for many batches. If you haven't used the racking adapters/valves before they are great, as transferring and taking gravity samples is a breeze. I use these coupled to the 'Out' post on my kegs to transfer after the keg has been sanitized and purged. This really helps minimize oxygen pickup.
Then I got a free Big Mouth Bubbler as a giveaway special on Northern Brewer. The big mouth bubbler is great as it has nice graduated markings, is easy to clean, and can double as a nice secondary. Though this did not have the racking adapter I had become accustomed to.
My dilemma, I did not really want to go back to using a siphon though was growing tired of cleaning carboys... Easy fix - modify the bubbler to accept the racking adapter.
Benefits: Easy cleaning, easy racking, clear beer, and less possible off flavors due to contamination.
Step 1. Acquire Big Mouth Bubbler
bublr-1-2090.jpg

Make Your Big Mouth Bubbler Easier To Use
Step 2. Acquire Better Bottle Racking Adapter/Valve
bublr-2-2091.jpg

Better Bottle Racking Adapter/Valve
Step 3. Mark And Drill The Hole
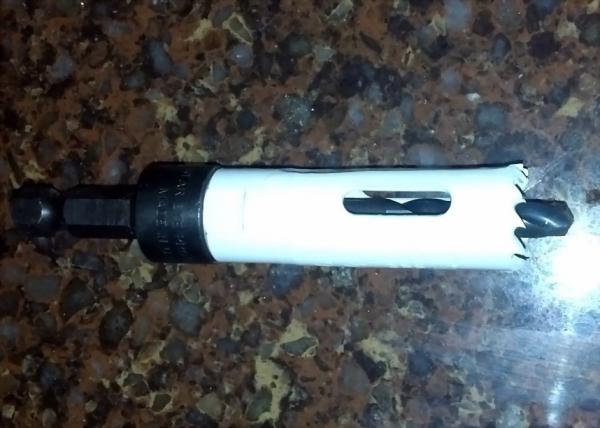
You will need a 3/4 inch hole saw (that's what I used) to drill the hole. The strip on the side of the bottle that has the gallon markers on it is nice and flat, mark the hole center an inch below the first gallon mark. This will allow the racking adapter nozzle to reach all the way to bottom of the bottle.
bublr-3-2092.jpg

Use A 3/4 Inch Hole Saw To Make The Hole
Step 4. Trim any loose edges, attach racking valve
bublr-5-2094.jpg

Finished Project Makes Racking Beer Better
Once the hole has been cleared of any sharp or loose pieces of plastic insert the adapter/valve and carefully tighten. Fill the Big Mouth Bubbler with water and let it sit for an hour or so then look for leaks.
This is one of those nice DIY projects that won't take a lot of effort but will make transferring your beer and taking hydrometer samples a whole lot easier.
bublr-5-2094.jpg
 
It should probably be noted in here that folks should ONLY do this to the PLASTIC version of the Big Mouth Bubbler.
Nice mod!
 
Did you consider placing it higher up so the pick-up is above the level of the trub? Does it rotate around to avoid this?
 
Do the big mouth bubblers still have issues with the top not properly sealing due to no gasket?
 
Hello All...1) Agreed - not for glass!. 2) The pick up tube/racking arm rotates 360 degrees. I like it low so if I want it can reach bottom. 3) I don't have issues with mine sealing, I have heard others mention it though. 4) I just held the bubbler with one hand and drilled with the other, a bit crude though worked. Good Luck!
 
I had the same idea, the cost of the valve is putting me off though.
I could go for the cheaper valve but i wont have that pick up thingy.
Are you having any issues with the flimsiness of the plastic?
 
I wondered about the flimsiness as well. I imagine one good catch on the drill bit could rip the fermenter up pretty good.
Holy cow! The racking adapter is $30 and the valve is another $20!!! Is that right?
 
For that price you could grab a stainless setup from ss brewtech.
$25 for valve and arm
Seem ppl put these in the caps on the low ports of spiedels.
http://www.ssbrewtech.com/collections/accessories/products/miniballvalvewnewrackingarm
 
I don't have any problems with it being flimsy, have to drill carefully-you can probably find a better drill bit with finer teeth designed for thinner materials though that's what I had on hand so used it. Yes the racking adapter and valve is a bit expensive. The cost was worth it to me...
 
The SSbrewtech looks cool, is that a complete assembly to be used on anything or just for their stuff ? Good thought though.
 
Yeah as much as I'd like one of these on each of my 4 big mouth bubblers...at $30ea, for that much money I could buy 3-4 MORE big mouth bubblers on sale and a cheap auto siphon
 
I've added a tap like that to all my plastic buckets - fermenters, bottling buckets, secondary, etc. It makes life SO much easier. I started out brewing with a Mr. Beer kit and it had the tap in it. When I "graduated" to five-gallon batches I didn't understand why the pails shouldn't have little taps in them - so I added them.
 
Oh...and I picked them up at the local hardware store - which also sells rudimentary beer and wine making stuff. It's not the fancy better bottle one, but it works just fine for me.
http://www.mrbeer.com/spigot-assembly
 
Not sure about that Bronco - when I get a chance I will try it out. I have an ale pale I can use for mock up and let you know. Won't be able to try it out for about a week though....
 
I really like this but every time I see something like this I wonder how the spigot can be sanitized. If I took a sample one week and racked to a keg the next, wouldn't there be nasty gunk dried up in the spigot somewhere?
 
From my experiences I have not had any contamination issues.
Prior to taking a sample or racking to keg I spray starsan solution with spray bottle into the spigot pretty good.
 
@ahariton
Seal is very poor on the big-mouth bubblers. I would never use one for anything other than a primary due to the lack of a good lid seal. Check the reviews on Northern Brewer and other places for the same story. If they make a better lid, it would be a great tool. Until then it may be a bucket replacment, but is not equivalent to a good carboy.
 
@ahariton, I have four. Had them about 5 months. Have not had a sealing issue yet.
 
If your worried about the hole saw catching and making a jagged edge you can find one with very fine teeth or run the drill in reverse after the center drill is through. The hole saw will still cut through the plastic but it results in a better cut. I done it before when drilling though plastic.
 
I've had sealing problems with my lid too, needs an o-ring or gasket. I like to use a step drill instead of a hole saw, just be careful to stop at the right size.
 
I had this idea also, but the BB racking adapter is way too expensive.
FWIW my plastic BMB seals just fine.
 
I guess I view the cost as relative to peace of mind and time. Considering the cost of SS conicals that are popular with home brewers - I find this cost minimal (not comparing it to quality of a SS conical.. :)
Minimal 02 pickup, no worries about opening fermenter to atmosphere, easy hydro samples, easy/clear racking and easy cleaning - for me is a good ROI.
Just my 2 cents!!
 
Use a bottling bucket valve mounted a bit high and tip the fermenter at the end to get the last drop. Cheaper. Take apart to clean.
 
@okbecker thanks for the insight. @singletrack has me thinking that maybe a typical bottling bucket spigot would be fine. There is even a mod to add an elbow to get more liquid. I suppose though that the benefit of the better bottle adapter is that it can be spun 360 so that you can get it out or off the trub. I would want this in a primary vessel because I don't really secondary.
 
If you buy a drilled bung that fits the mouth of a wine bottle (not sure the # size of that bung) and insert a curved rigid plastic or glass tube into the drilled hole and you then insert that bung into the spigot inside the bucket. You now fully control the nominal height of the spigot and you can swivel the tube 360 degrees. Total cost is probably no more than $5.00
 
Drilled #2 stopper - that fits on the inside of the spigot commonly used in the bottling bucket. That is, screw on the spigot, then inside the bucket push the drilled #2 stopper into the big opening of the spigot. A 90 degree plastic elbow bend goes into the stopper and an inch or two piece of tubing goes onto the other end of the elbow bend. Cheap & easy pickup tube for the bucket.
 
This looks like a great idea! The timing is perfect too as I just bought a BMB. I'm going to use my old kegerator to cold crash, now that I have a keezer, and I was trying to figure out how I was going to transfer to the keg since I can't use my auto syphon while it's in the kegerator.
What ID tubing size do you need to connect to the valve?
 
@J2W2 - sorry, do not recall the tubing size and away from home so cant help you out there. Mine is set up so that the tubing actually fits up/inside the spigot (vs around it), and hooks up to a liquid disconnect. It is the smaller diameter tubing; common keg tubing (I want to say 3/16"). No leaks, works fine.
 
It looks like NB also had this idea...
http://www.northernbrewer.com/shop/brewing/brewing-equipment/fermenting-equipment/siphonless-big-mouth-bubbler-ported-5-gallon
 
@Hello - Yes, they can be cleaned, run your favorite sanitizer through the valve when the bottle is empty and use a cap plug on the end to seal it when once its clean. Forethought is needed.
 
Man, I am so bummed out right now and this article could not have come at a better time. I have three 6 gallon Better Bottles that are ported w/ racking adapters. I too love them. I just kegged three beers, cleaned and santizied the BBs and (queue the what did you think was going to happen responses), laid them on their sides to dry on my deck. 15 minutes later I go out to get them, and they are absolutely ruined. Warped to hell, imploded on themselves. Thank you SO much for this writeup, I'm going to pick up three six gallon big mouth bubblers and add do exaactly what you've done here.
 
I had problems with my big mouth bubbler the first time I used it. I called up NB and they send me out a new-style lid for free. (Universal Lid - shown on p.17 in Midwest Supplies Catalog, Late Winter 2017). I've never had a problem since! The old style was screw-on, the new style has 3 seals around the edge and just pushes right into the bubbler, but has a wide lip to prevent it from going in too far. That worked swo well, I talked the guy from Midwest into sending me the same style of lid for my little big-mouth bubblers. No further problems with the 1.75 gallon "Little Big Mouth Bubbler" after that! It took some argument, because he said they had never had any leakage complaints for the small ones, but I did, so he replaced all three for me!
On another note, When I was much younger, I worked in a glass shop and used diamond drills to drill holes in glass - aquariums, mirrors, etc., but the difference here is that plate glass has a different makeup than bottle glass, especially if the bottle glass is meant for hand-blowing. I was thinking of maybe using one of my glass LBMB 1.75 gal and experiment at drilling a hole in it for one of these racking adapters. It would be a pretty costly experiment for me if I failed because they don't list them for sale anymore in the Midwest or the Northern Brewer catalogs that I can see, and they work just great for split batches/experimenting with different ingredients or yeasts; but if it works, it would sure be handy! I believe, at the time, they were only 12 or 13 bucks each, so I bought 3 of them. Maybe ABInbev decided they were not enough of a money-maker, shame, I was planning on getting a couple more!
Bill, Thanks for this article!
 

Latest posts

Back
Top