
Bill Becker
New Member
- Joined
- Apr 30, 2015
- Messages
- 1
- Reaction score
- 0
Hello all, thought I would post a quick write up and a couple pics of my new favorite fermenter. A mash up of two popular designs.
I had been using the better bottles with racking adapter and valve for many batches. If you haven't used the racking adapters/valves before they are great, as transferring and taking gravity samples is a breeze. I use these coupled to the 'Out' post on my kegs to transfer after the keg has been sanitized and purged. This really helps minimize oxygen pickup.
Then I got a free Big Mouth Bubbler as a giveaway special on Northern Brewer. The big mouth bubbler is great as it has nice graduated markings, is easy to clean, and can double as a nice secondary. Though this did not have the racking adapter I had become accustomed to.
My dilemma, I did not really want to go back to using a siphon though was growing tired of cleaning carboys... Easy fix - modify the bubbler to accept the racking adapter.
Benefits: Easy cleaning, easy racking, clear beer, and less possible off flavors due to contamination.
Step 1. Acquire Big Mouth Bubbler

Make Your Big Mouth Bubbler Easier To Use
Step 2. Acquire Better Bottle Racking Adapter/Valve

Better Bottle Racking Adapter/Valve
Step 3. Mark And Drill The Hole
You will need a 3/4 inch hole saw (that's what I used) to drill the hole. The strip on the side of the bottle that has the gallon markers on it is nice and flat, mark the hole center an inch below the first gallon mark. This will allow the racking adapter nozzle to reach all the way to bottom of the bottle.
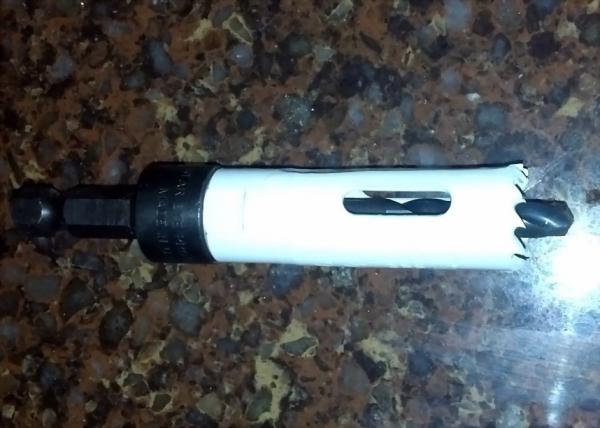
Use A 3/4 Inch Hole Saw To Make The Hole
Step 4. Trim any loose edges, attach racking valve

Finished Project Makes Racking Beer Better
Once the hole has been cleared of any sharp or loose pieces of plastic insert the adapter/valve and carefully tighten. Fill the Big Mouth Bubbler with water and let it sit for an hour or so then look for leaks.
This is one of those nice DIY projects that won't take a lot of effort but will make transferring your beer and taking hydrometer samples a whole lot easier.

I had been using the better bottles with racking adapter and valve for many batches. If you haven't used the racking adapters/valves before they are great, as transferring and taking gravity samples is a breeze. I use these coupled to the 'Out' post on my kegs to transfer after the keg has been sanitized and purged. This really helps minimize oxygen pickup.
Then I got a free Big Mouth Bubbler as a giveaway special on Northern Brewer. The big mouth bubbler is great as it has nice graduated markings, is easy to clean, and can double as a nice secondary. Though this did not have the racking adapter I had become accustomed to.
My dilemma, I did not really want to go back to using a siphon though was growing tired of cleaning carboys... Easy fix - modify the bubbler to accept the racking adapter.
Benefits: Easy cleaning, easy racking, clear beer, and less possible off flavors due to contamination.
Step 1. Acquire Big Mouth Bubbler
Make Your Big Mouth Bubbler Easier To Use
Step 2. Acquire Better Bottle Racking Adapter/Valve
Better Bottle Racking Adapter/Valve
Step 3. Mark And Drill The Hole
You will need a 3/4 inch hole saw (that's what I used) to drill the hole. The strip on the side of the bottle that has the gallon markers on it is nice and flat, mark the hole center an inch below the first gallon mark. This will allow the racking adapter nozzle to reach all the way to bottom of the bottle.
Use A 3/4 Inch Hole Saw To Make The Hole
Step 4. Trim any loose edges, attach racking valve
Finished Project Makes Racking Beer Better
Once the hole has been cleared of any sharp or loose pieces of plastic insert the adapter/valve and carefully tighten. Fill the Big Mouth Bubbler with water and let it sit for an hour or so then look for leaks.
This is one of those nice DIY projects that won't take a lot of effort but will make transferring your beer and taking hydrometer samples a whole lot easier.


")
