Danby Fridge for Kegerator

Homebrew Talk - Beer, Wine, Mead, & Cider Brewing Discussion Forum

Help Support Homebrew Talk - Beer, Wine, Mead, & Cider Brewing Discussion Forum:

This site may earn a commission from merchant affiliate links, including eBay, Amazon, and others.
They look essentially identical except for the shelving which gets removed anyway. I think I'll go with the one I linked to. Let me know what you think of one you ordered.
 
RandyAB, I noticed you are in Alberta. If you have a Costco nearby, the DAR125SLDD is approx $130 brand new, I picked up mine a few weeks ago.
 
Yes in-store. I got mine at the Winterburn location, give them a call before you head in, they had plenty left as of a few weeks ago.
 
This is my Danby DCR122BLDD 4.3 cuft mini fri.dge purchased from canadian tire. I noticed it was on sale today for $139, $20 cheaper than when I bought it 3 months ago. It was a simple conversion with my beverage factory 2 tap tower kit. A 5lb c02 bottle with regulator fits perfectly on the little shelf above the compressor behind the kegs.

photo 1 (2).jpg
 
My DAR125SSDD came in last night and I can't wait for the weekend to get working on it. As some have noted, it indeed is the version that removed the screws from the door assembly. Another user posted his build with this version on his blog (could not find the original forum post) and it provides some good pictures and ideas for handle the construction:

http://www.fattonytcl.blogspot.com/2012/12/how-my-little-kegger.html?m=1

I've never really taken on a project like this before so every little bit of advice and lessons learned I find is comforting. Also, due to a constrained budget and an impending move, I'll be doing the conversion in 2 stages where stage 1 is modifications on the door and and implementation of kegging system using picnic taps and stage 2 will be installation of the tower. Stage 2 timeframe is TBD.
 
If you don't care about having a flat door on the inside, I think you can get away with just cutting some of the door panel that is in the way and leaving the rest as is. I'm not doing it right away, but I was basically going to try this first (scroll about half way down the page): https://www.homebrewtalk.com/f51/kegerator-conversion-danby-dar440bl-98779/index10.html

If this doesnt work then taking out the entire panel would be the next step.
 
I just finished a build using the DAR125SLDD. do not remove the whole inner door panel. If you do you won't be able to put the door gasket back on. it installs in a groove at the edge of the panel.I just cut of some of the panel that was in the way and sealed up the surfaces with white silicone caulk. I also left the door panel on so the light will still work. 2 corny kegs and a 5 pound tank fit inside just fine.
 
Finished my first stage of this build today and it turned out well. If I had owned the correct tools it probably would have taken only a few hours, but since I was improvising with what I had, it took a while. Some tips if you choose to go with the flat door:

When you cut around the edge of the frame, try to leave a little lip all the way around. It makes the marker board look better once its sealed.

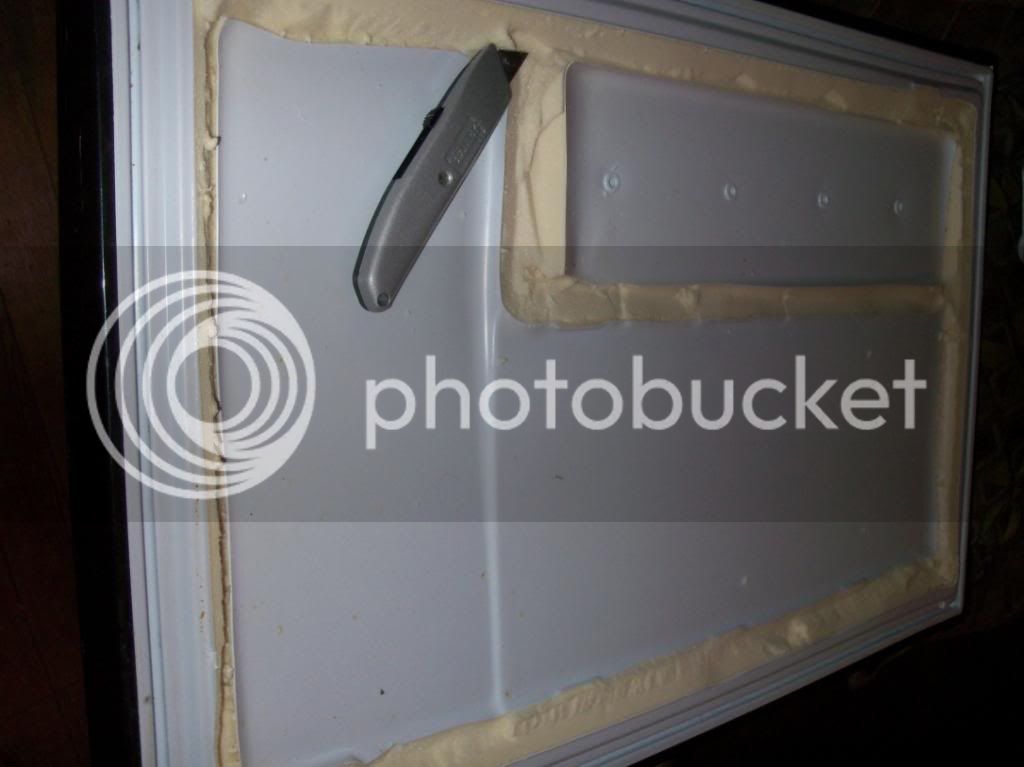
Once you've cut all the way around the door, don't try to just pull off the panel. I found that prying the plastic away from the foam and breaking it off in pieces was easiest. Then you can shave down the foam from there. I found a flex blade to be the best for this:

image-1107343521.jpg


Getting the outside frame out of the door took some patience with an exacto knife, slowly pulling the foam off the inside plastic. Once you have gone all the way around separating foam, you can use a flat head screwdriver and carefully pry the plastic from the outer side:

image-2663446119.jpg


image-415593811.jpg


Overall I learned a whole lot doing my first project like this, and enjoyed the heck out of it. My kegging gear should be here tomorrow. I can't wait to get it all inside my new kegerator! I have a few more pics if you have any other questions.

image-3577943328.jpg
 
If you don't have the kind of door that has the screws...you have to cut out the door protrusions.


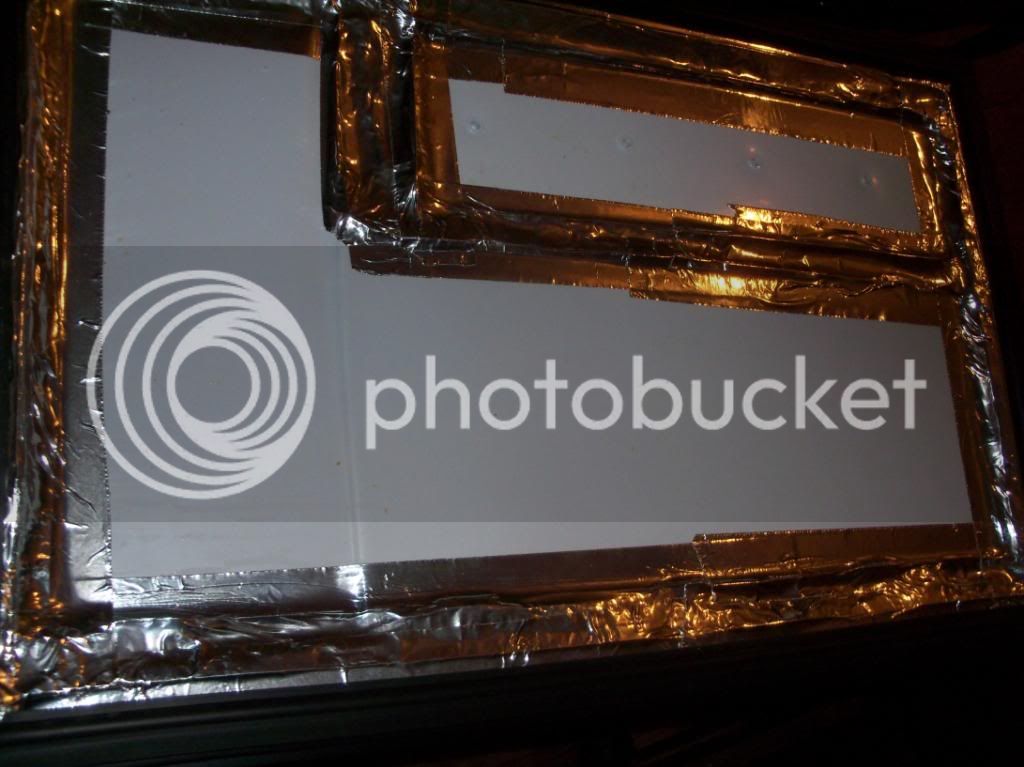
07 – Use the box knife to cut the inner edges of the plastic, and then smooth out any pointed plastic edges while also smoothing out any insulation that is not flush to the mini-fridge door. You can try to pry off the unwanted plastic section with a flat-head screwdriver, though it seems easier to just pull the entire thing off by hand after the appropriate cuts have been made. Use your waterproof aluminum tape to seal the open areas. Two to three layers will ensure that no moisture gets into the insulation. You do not want any mold to occur inside the mini-fridge door.


Latest posts

Back
Top