Closed-system pressurized fermentation technique!

Homebrew Talk

Help Support Homebrew Talk:

This site may earn a commission from merchant affiliate links, including eBay, Amazon, and others.

What do you guys think about pressure fermentations? Time for a poll.

  • I've done it and I liked it just fine!

  • I've done it, nothing wrong with it, but prefer normal fermentation techniques.

  • I've done it, hate it, and never will do it again!

  • I've never done it, but it is on my list!

  • I've never done anything. I only brew beer in my mind.


Results are only viewable after voting.
Can anyone post a pic of their setup with a brewers hardware set. I'm just now coming to understand that the system is designed not with compression fittings, but with o-rings made to pop off under pressure.

So I assume I would need a compression Ferrule for the racking cane and a second one for the blow off port that I will attach my spund manifold to?

Can anyone post what size compression fittings to buy? Since Derrin's instructions said the blow off port was 1/2", I bought a 5/8" compression fitting. It's too big, though. Is the 1/2" outside diameter, then? Is the racking cane 3/8" OD as well?

Many thanks.
 
I am still working in Corny's only, I don't own any Sanke kegs.

I have mostly been filling the primary fermenter Corny to about 4.5 Gallons, with a jump tube from the grey post on the primary to the black post on a second Corny with a bit of water in the bottom, perhaps a quart, and then putting the spunding valve on the grey post of the second Corny.

I'm interested in this process as described by Poindexter, however I would like to jump 2 cornys with 4.5 gallons each and a 3rd with the spunding valve riding on that. Has anybody done this? How would the jump tubes be configured? Thanks...
 
Can anyone post what size compression fittings to buy? Since Derrin's instructions said the blow off port was 1/2", I bought a 5/8" compression fitting. It's too big, though. Is the 1/2" outside diameter, then? Is the racking cane 3/8" OD as well?

Correct, 1/2" OD gas and 3/8" OD liquid.
 
Just an update on filtering. At this point I think that a week long cold crash is just as effective. For now, I'm retiring the filter. I'd be curious to hear anyone else's experiences, though.
 
I'm getting ready to make the plunge, but I have one question for you guys.

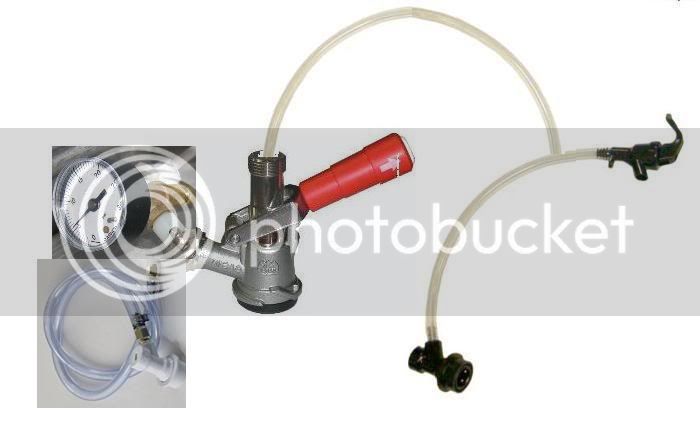
My plan is to ferment in a normal sanke keg using a modified sanke coupler.
I would like to mount a cross off of the air side of the coupler with a gauge, pressure relief valve and a gas line to a grey (gas) corny disconnect.
The beer side I would split with a t to a picnic tap and a black (beer) corny disconnect.

modifiedsankecoupler4.jpg

My apologies for the crappy edited picture.

I would then ferment under pressure, and use the picnic tap to remove the yeast.

Since my CO2 tank is in my kegerator (not in my garage where I ferment) Here is my question.

For transferring to a corny, since the sanke keg is at pressure, could I (without connecting to a CO2 tank) connect then disconnect the corny with the grey (gas) disconnect (off of the sanke coupler gas side) to equalize the pressure, then connect the black (beer) disconnect to transfer by placing the receiving keg lower than the filling keg venting pressure using the corny relief valve?

My thoughts are the initial pressure differential would get the transfer started, and then the siphon effect (from having the receiving keg lower than the fermenting keg) would finish the transfer without losing the carbonation in the beer.

Would this work? Or is my reasoning flawed?

Personally I don't think this setup will accomplish what you're trying to do. In my opinion there is no way to leave a closed pressurized system open to air and expect to keep the beer carbonated.

You either keep the system closed and carbonated and use CO2 to transfer; or open it up and use a siphon and gravity or one of those orange carboy caps and blow into it plus gravity to transfer the uncarbonated beer from sankey to corny then carbonate in your kegerator. Just my $0.02
 
As an update on dry hopping with this technique...

I fermented 15 gal in a sankey, placed my pellet dry hops in a 5 gallon paint strainer bag x 3 folded over and closed at the top with a wire tie into 3 cornies then pressure transferred on top of the dry hops and served. It turned out great.:rockin:

The first keg had a couple of very "grassy" pints for some reason. I don't know if the hop bag leaked, but the second 2 served fantastic Furious.

I plan to try this technique again with this same recipe.
 
I took apart the top of one of my sankey spears to clean it. Now the rubber O ring doesn't quite sit perfect on the spear like it did before and I can't compress it enough to get the metal ring all the way back in on top of the spear.

Has anyone else had this problem? If so how did you fix it?

I was considering buying the St. Pats sankey valve removal tool to compress the O ring but haven't read that many people have had to resort to this.:confused:
 
Here's the link to the relief valve

I put the spring in first, then the ball. Perhaps it goes the other way around?


Cheers, guys! Time for a homebrew.:mug:

Sorry to bring up an old portion of this thread but I have a question. What is the ball made of? Is it stainless steel? I seem to have lost mine on the (fairly dirty and uneven) garage floor somewhere and before I get on hands and knees trying to find it I wanted to see if it would be easily replaceable? Or maybe it is magnetic and I can use one of those finder wands to try to find it. If nothing else, I guess I just buy another relief valve and have backup parts, but I really dont want to put another mcmaster order in, those tend to get dangerous on the wallet.

You can see how dirty my garage is by my lack of hope of finding it.

Any help is appreciated.
 
I am doing my first pressurized fermentation and first fermentation in a sanke keg. I pitched my yeast yesterday afternoon and have not had any pressure build up yet (24 hours). I brewed 11 gallons of a Munich Helles with an OG of 1.052. I cooled the wort to 48 F. I oxygenated the wort with pure O2 and a diffusion stone. The yeast was from a single packet of Wyeast 2124 with a 4 liter stir plate starter that had been cooled and decanted. The morning of the brew, I added one liter of fresh starter wort to the yeast. The yeast was active at pitching time. I have used this yeast in the past with similar methods and not had any issues with lag times. Typically I am seeing airlock activity within 12 hours and krausen within 24 hours.

I am wondering how long it normally takes you guys to start having pressure in your systems for lager beers. Without pressure building up I have no way of knowing if I am having active fermentaion. Just wanting to know if I need to be worried at all. Thanks.
 
It can vary. I did a hefe recently and had nothing for about the first 20 hours. By 24 hours pressure had soared to 45 psi!

If you had active yeast going in, should take off soon. Let us know.
 
Sorry to bring up an old portion of this thread but I have a question. What is the ball made of? Is it stainless steel? I seem to have lost mine on the (fairly dirty and uneven) garage floor somewhere and before I get on hands and knees trying to find it I wanted to see if it would be easily replaceable? Or maybe it is magnetic and I can use one of those finder wands to try to find it. If nothing else, I guess I just buy another relief valve and have backup parts, but I really dont want to put another mcmaster order in, those tend to get dangerous on the wallet.

You can see how dirty my garage is by my lack of hope of finding it.

Any help is appreciated.
All the balls I have seen in the various types of devices are made of stainless steel to prevent corrosion. I don't think a magnet will do you much good, sorry. Now if they would just use stainless steel springs in them I wouldn't have to keep buying them myself. I'm going to buy a stainless spring myself, even if it makes the thing inaccurate to the numbers on it... I mean that is why we have a pressure gauge anyways, to read accurate back-pressure. Hope you find your ball soon!:mug:
I am doing my first pressurized fermentation and first fermentation in a sanke keg. I pitched my yeast yesterday afternoon and have not had any pressure build up yet (24 hours). I brewed 11 gallons of a Munich Helles with an OG of 1.052. I cooled the wort to 48 F. I oxygenated the wort with pure O2 and a diffusion stone. The yeast was from a single packet of Wyeast 2124 with a 4 liter stir plate starter that had been cooled and decanted. The morning of the brew, I added one liter of fresh starter wort to the yeast. The yeast was active at pitching time. I have used this yeast in the past with similar methods and not had any issues with lag times. Typically I am seeing airlock activity within 12 hours and krausen within 24 hours.

I am wondering how long it normally takes you guys to start having pressure in your systems for lager beers. Without pressure building up I have no way of knowing if I am having active fermentaion. Just wanting to know if I need to be worried at all. Thanks.
It sounds like you have done everything as I would. I don't think you will have any problems whatsoever. My lagers scared me the same way, and I believe it is due to these possible things:

1) Lager yeast is simply more sluggish compared to ale yeast (ie ales you see reactions faster such as pressure build up).
2) With such a large fermentor, and volume of product, it would take longer to see airlock activity anyway (under "normal" fermentation conditions)... take into effect you are under pressure and that the beer is absorbing some of this gas you would normally see coming out, and then you have another setback on visible activity.

Maximus, my advice is coming with my response to Dgonza9.
It can vary. I did a hefe recently and had nothing for about the first 20 hours. By 24 hours pressure had soared to 45 psi!

If you had active yeast going in, should take off soon. Let us know.
Exactly! It takes longer to see results from fermentation... which is why I am adding to what you said Dgonza9 for all reading. Make sure you have set your pressure relief to where you want release of pressure BEFORE you pitch and seal up your keg!!! Maximus, I have done exactly as Dgonza9 has done before and it is scary. When it happens... it happens, and it can be a big surprise, lol. I used to experiment with higher pressure fermentations (30ish psi), but after realizing how much gas is absorbed at the beginning (and understanding the damages it can potentially do) I do 4-7ish psi starts and then increase after I know growth phase of the yeast is done and they have finished the majority of their job. With a full fermentor, I get a mess at lower pressure starts. I am now having issues with pressure building due to these messes, and am in the process of introducing a collector prior to my pressure control devices so I don't get 45 psi surprises... or yeast spray painted walls.:eek:
 
Thanks for the replies and wortmonger thanks for starting this great thread, tons of great information here. I still have not managed to read it all. After 36 hours I am seeing pressure build up in the system. Just needed a little more patience on my side. I will let you know how the batch turns out in the end.
I need a relatively quick turn around for this batch (6 weeks) and here is my current plan. Ferment @ 50F with 5-7 psi until gravity is down to around 1.020. Increase temperature to 60F (diacetyl rest) over two days and bump pressure up to 20 psi (highest my spunding valve allows). Leave @ 60F until fermentation is complete. Slowly cool back to 50 F over two days. Depending on how long these steps take and how the hydrometer samples taste will determine how I proceed. I am planning on a 2-3 week primary fermentation , cold crash for 3 days @ 32 F, transfer and filter (1 micron) to serving kegs, lager for 2-3 weeks @ 32F, and serve.
Any advice would be appreciated. I have never had to brew a lager on a timeline before.
You are very welcome! Your ferment sounds fine and very sound. The only thing I think you might reconsider is the drop back down to 50*F after you think fermentation is complete. Instead, I would go ahead and slowly start lowering your temperature every day from 60-32*F. Lager your beer at this point on all that yeast if you want to, or transfer once down that cool and then lager your 2-3 weeks or longer if you can. I wish you had a refractometer since you will have really gassy samples that need to sit for awhile before they read right. I bet you get to 1.020 in the next couple of days and can go ahead and ramp up to 60*F for the D-rest, but that is completely up to the yeast of course. When you take your samples be sure and taste them... you may not need a D-rest at all and that would shave some time off your regiment.:mug:
 
Maximus, welcome to the pressure crew! My Helles took a full two 1/2 days before I saw pressure on my gauge at 48 degrees when I pitched my starter. MY OG was higher at 1.064 and I fermented it at 48 degrees for about two weeks at 48 degrees, and then lowered my temp down to 33 degrees and lagered for an additional 2-3 weeks. I never did a D rest because I never tasted it during the fermentation.

Unless you pre set your spunding valve in advance of fermentation keep an eye on it. Mine was set higher than planned and it ramped up very quickly.

You're going to have a fantastic beer on tap soon!
 
what yeast strains are you guys using? i would imagine that alot of this process is strain-dependent. if i used kolsh or cali-lager yeast, could i just do this at 65F?
 
I can't wait to do another kolsch! I have found my sweet spot with this type of ferment is APA. the other styles work great, but something about APA is just magic with my setup. I think you would have trouble with anything that needs esters unless you allow it to vent more pressure initially and then seal it up tighter later in the ferment. I don't do many styles that aren't "cleaner" anyways, so this isn't much of an issue with me. After I get the cropper attached I will be able to do anything I want with the closed setup and still have ease of carbonating later in the ferment with the remaining gravity points. Jamil doesn't like natural carbonation very much according to the podcast I listened to recently. But, I haven't noticed any off flavors from using what the ferment is doing to carbonate my beverages. Maybe more research is in order on my end to see if it is an issue though??? I can't wait to try higher temperature stuff like saison/etc with the closed system though. I'm drinking a Boulevard Saison with brett right now and it is making me want to try something along those lines. Also, just tried a Gose... wow! Very different and I have to say I liked the flavor of this Choc Brewing concoction.
 
Wort, are you still using pac man for your APA or did you use something else? I happen to like natural carbonation over force. It may be perception but the bubbles seem smaller and of course being able to pull a pint of fresh fermented carb'd beer is also a bonus.
 
Nope, never got dregs started from a bottle and the HBS didn't carry it. I think I am going to try again though with the stout. I have been using us-05 for most of my recent beers, and like it alright. I agree with what you said about the bubbles and don't see a problem with it. I wonder why Jamil said he didn't like it....
 
This fermenting under pressure is interesting but it would be helpful if the first post was edited and to summarize this 91 page thread. I know I would appreciate it WortMonger. I would like to see a few parts lists and maximum recommended pressure at room temperature and if that pressure varies between yeast strains.
 
The wiki is the place I chose to consolidate my information. The thread is meant to be as it is. I want anyone interested to read through and see what we have tried and how it worked... kinda like someone not telling you the end of a movie and ruining it for you. There is a lot of information from lots of people in the thread, and healthy debate that can help you make up your own mind and choose the best approach for your self. There is no "set" way to do this technique. Parts are still being discussed and discovered, but they are all in the thread and your choice would be made after analyzing the best approach for you. Yeast strains and maximum pressures are all just a matter of opinion, but there are experiments detailed within that can help you. I know it is a big read, and I wish I cut cut off the fat... but that is one hell of a job. It is easier to just answer the questions asked in the thread or pm's I get. Hope you choose to try it out at least once.:rockin:
 
i did read the whole thread (well... 98% of it) and there is alot of good info. i have purchased a adjustable valve and cant wait to try this on my next brew! im thinking a brown ale with kolsch yeast maybe?
 
I understand the benefits of reading through the entire thread. I have, and I still read all the new posts. However, I also would appreciate a summarization as trying to remember everything is very difficult and finding the information is also very difficult, even with my excellent Google searching skills.

It's also hard for me to ask questions, as I know they've been answered somewhere in the thread already, I just can't remember where...

Maybe I'll just have to read through it and summarize it as I go along sometime..complete with annotations to numbered posts..
 
i did read the whole thread (well... 98% of it) and there is alot of good info. i have purchased a adjustable valve and cant wait to try this on my next brew! im thinking a brown ale with kolsch yeast maybe?

This sounds interesting. I'm very curious about what can be made with Kolsch yeast, having done a few myself. If you can remember, post back or start your own thread.
 
I understand the benefits of reading through the entire thread. I have, and I still read all the new posts. However, I also would appreciate a summarization as trying to remember everything is very difficult and finding the information is also very difficult, even with my excellent Google searching skills.

It's also hard for me to ask questions, as I know they've been answered somewhere in the thread already, I just can't remember where...

Maybe I'll just have to read through it and summarize it as I go along sometime..complete with annotations to numbered posts..

I usually just post my questions at this point. Generally, they will get answered. Although this thread isn't as active as it was earlier this summer, a lot of the posts are just people starting a batch and posting as they go. So feel free to go at it!
 
.. on a summary (but then how will you find this after it's buried). Mind you, this is my take. Anyone who wants to refute what I'm saying is well, just plain wrong:D:


Fermenting under pressure is another tool in the belt. By gradually increasing pressure during primary fermentation, partial or full carbonation can be achieved. This is sometimes referred to in the pro world as 'capping the fermenter' which is kind of a misnomer because pros are using the same tool to achieve it - an adjustable pressure relief valve -aka spunding valve.

{McMaster Carr part #: 99045K44 (for the valve) and 3795K131 (for the stainless glycerin filled gauge to read the pressure). Those are the favored fittings so far. Some people like the 0-60 PSI range, but I like 0-30 PSI range.}

The increased pressure doesn't affect final attenuation but does affect yeast character and can make a beer a little cleaner, making this method something you might want to skip for the belgians (..er not). The increased atmospheric pressure is mimicking the increased hydrostatic pressure that a much larger professional fermenting vessel gives to beer and thus, higher temperatures can be more appropriate for a given yeast as the 'vigor' of the fermentation decreases with pressure, like it does with temperature. This is especially true with the height of the krausen. So, raising the temp as you raise the pressure might be a good idea - especially since this method apparently increases diacetyl production (as well as consumption at the end) and a higher finishing temp might help. Also, decreased krausen permits decreased headroom in primary - i.e. I do 14.5 gallons in a 15.5 gallon Sanke and get about a quart blow-off.

Professional fermenters are usually rated to 15 PSI and not higher like we have with kegs. Chris White says that if you want to ranch for a high number of successive generations, that going beyond 15 PSI in primary fermentation will result in a greater yeast mutation. For homebrew level harvesting and repitching, it's not a problem though as WortMonger has noted. I have yet to repitch more than 3 times before chucking a strain as I don't really ranch yet.

A general fermentation schedule might be to start wide open and 3 days later, after main yeast growth has occurred, crank it up 1-2 PSI every day (obviously depending on the yeast) so that by somewhere's close to the end you are at full (or partial) carbonation for your fermentation temperature. For ales, this means around 35 PSI at 70 degrees. {I go up to 30 PSI only ever as since I keg, I can 'top off' with the tank in the serving vessels no prob, and I appreciate the finer control that the 30's give me.} Beyond that, (and excluding that even), it's yours to have fun experimenting with and all of the pressure fermenters in this cult seem to have their own fermentation schedules that work for them.... like WortMonger and his room temperature lagers = carRRAAAZY!:fro:

Couple tips:

1) Find a way to prohibit krausen from getting all up in your spunding valve. Mine is to use a second pressure vessel (corny) that is ganged to my primary as a blow-off collector- and I put the spunding valve on it. Another way would be to just not fill as high as I do.

2) Your spunding valve has soooo many neat other uses like counterpressure serving keg filling, which you'll do having carb'd beer.

3) You'll get a kick out of slapping on your cobra tap to take a sample for gravity reading. After you cold crash, though, you'll want to find a way to transfer without depressurizing the keg first. This will kick up a lot of yeast from the cake. So, getting down with counterpressure kegging is a must, I think.

4) Why not just serve from the primary? I can say I've done that for a while with no problem as we all know autolysis is the proverbial boogie man. Harvest your yeast after that. It will stay sanitary and cold till then.


Anyhoo. That's my take.
 
This sounds interesting. I'm very curious about what can be made with Kolsch yeast, having done a few myself. If you can remember, post back or start your own thread.

i will, since the sealed fermentation will be a bit of an experiment for me. im anxious to play with different yeasts, and ive had some interesting beers made with kolsch yeast. one of the brewpubs in minneapolis has a tasty brew thats a brown ale with european hops and kolsch yeast : "the euro-trash brunette"
 
I want to attempt this soon, I just read the summary (thanks) and have been looking through this thread for a while now.

Couple questions:
Can you bottle from this setup?
I don't keg yet but I do have a sanke and tap lying around, and I like to do 10 gal batches. I haven't really read through the beer gun thread yet.

Should I wait until I have a functioning keg setup before attempting this?

What styles benefit from this technique, which do not?

If using a "modified" sanke tap, does the spear need to be shortened?

How do you collect yeast with this setup?
Harvest the cake or will it come up with the first pull from the keg?
 
Sure. I bottle for one off samples. I do counterpressure filling straight from any of my taps with the aid of the awesome 'Bowie Bottler' - which is just a nipple with o-rings that goes into Perlick 525s (I built the rest of the bottler).

I would wait till you have a kegging setup. The carbonation you seek in bottling is what you're going for in pressure fermenting, so why bottle for that. Also, you'll want to counterpressure fill anything (bottle, keg) and that will require a tank. Also, you will a couple times miss your opportunity for full carbonation and need to top off with the tank. WortMonger has a habit of shooting for over carbing and then bleeding off with the same spunding valve, likely to avoid this and because it's easy.

Styles? As I mentioned, styles dominant w/ yeast character (belgians) maybe not, but that's no rule. The only one I've ever done to 35 PSI full carb was a Belgian Wit and it came out fantastic.. although that's not a super yeasty belgian, but.

You'll have to read this tread thru for stock Sanke usage. I use a custom sanke.

I have a bottom dump, so pretend I have a conical re: harvesting yeast. I harvest after racking and after gradually depressurizing the two fermenters back to atmospheric pressure.
 
"Ohhhh, please. Well, allow me to retort!" LOL, sorry, favorite Pulp Fiction line.
i did read the whole thread (well... 98% of it) and there is alot of good info. i have purchased a adjustable valve and cant wait to try this on my next brew! im thinking a brown ale with kolsch yeast maybe?
LOL, 98% of this thread is meaningless... it's only the 2% that is worth reading, lol. I tip my hat to you sir, I don't/won't read this whole thread again. Let's hope I never have a head injury and have to re-learn Closed-System Pressurized Fermentation shall we?:D

I understand the benefits of reading through the entire thread. I have, and I still read all the new posts. However, I also would appreciate a summarization as trying to remember everything is very difficult and finding the information is also very difficult, even with my excellent Google searching skills.

It's also hard for me to ask questions, as I know they've been answered somewhere in the thread already, I just can't remember where...

Maybe I'll just have to read through it and summarize it as I go along sometime..complete with annotations to numbered posts..
Feel free to ask away. This thread has turned into everyone's experiences from a proposed method I decided to try years ago. This thread is as much yours as it is mine... I just started it is all.
I usually just post my questions at this point. Generally, they will get answered. Although this thread isn't as active as it was earlier this summer, a lot of the posts are just people starting a batch and posting as they go. So feel free to go at it!
Exactly! Dgonza9 hit the nail on the head about this thread. Also, it isn't as active because I haven't been posting every little thing my beers do... since I can't even reach my equipment now after the move. Ugggh, now I have to brew vicariously through you guys experiences, lol.
.. on a summary.... That's my take.
Wow, you're good! here's that 2% of the thread I was talking about earlier this post! LOL, well by now I guess it would make it .0002% for a single noteworthy post. That one is going on the wiki article as well as the first page of the thread. Perfect information and it tells it like it is, just another tool in the toolbelt of a brewer. Thanks a million SankePankey!!!
i will, since the sealed fermentation will be a bit of an experiment for me. im anxious to play with different yeasts, and ive had some interesting beers made with kolsch yeast. one of the brewpubs in minneapolis has a tasty brew thats a brown ale with european hops and kolsch yeast : "the euro-trash brunette"
Please, experiement and allow us to follow you with it. This thread is about your experiences with the method, so let it fly! Also, kolsch yeast is my favorite. I have not tried it with this method, but it should work great. At the brewery once we did an American Stout with kolsch yeast and it was outstanding. We even thought about making it the house strain.
I want to attempt this soon, I just read the summary (thanks) and have been looking through this thread for a while now.

Couple questions:
Can you bottle from this setup?
I don't keg yet but I do have a sanke and tap lying around, and I like to do 10 gal batches. I haven't really read through the beer gun thread yet.

Should I wait until I have a functioning keg setup before attempting this?

What styles benefit from this technique, which do not?

If using a "modified" sanke tap, does the spear need to be shortened?

How do you collect yeast with this setup?
Harvest the cake or will it come up with the first pull from the keg?
Oops, SankePankey got all of this one. I second his information.
Sure. I bottle for one off samples. I do counterpressure filling straight from any of my taps with the aid of the awesome 'Bowie Bottler' - which is just a nipple with o-rings that goes into Perlick 525s (I built the rest of the bottler).

I would wait till you have a kegging setup. The carbonation you seek in bottling is what you're going for in pressure fermenting, so why bottle for that. Also, you'll want to counterpressure fill anything (bottle, keg) and that will require a tank. Also, you will a couple times miss your opportunity for full carbonation and need to top off with the tank. WortMonger has a habit of shooting for over carbing and then bleeding off with the same spunding valve, likely to avoid this and because it's easy.

Styles? As I mentioned, styles dominant w/ yeast character (belgians) maybe not, but that's no rule. The only one I've ever done to 35 PSI full carb was a Belgian Wit and it came out fantastic.. although that's not a super yeasty belgian, but.

You'll have to read this tread thru for stock Sanke usage. I use a custom sanke.

I have a bottom dump, so pretend I have a conical re: harvesting yeast. I harvest after racking and after gradually depressurizing the two fermenters back to atmospheric pressure.
Yep, over-pressure at the end is easier to get rid of than adding carbonation for sure. I completely agree with everything else said... Of Course!
What post is the summary?
OMG, I pee'd myself laughing!
hahaha.... that's awesome!

This thread is so epic that the posts get lost a day after they were posted.! Didn't I call it?

LOL, This thread is so much fun to be a part of. Thanks for all of you contributing like you do. Ok, now I am off to edit the 1st post and the wiki for that summary... if I could only find it. Which post was that again, lol? j/k
 
Someday I hope to read all of this thread, but have skimmed most of it, enough to be sold on the concept. I brewed Sat, two days ago, and have my now pressurized keg fermenter hissing at me. I went with 10 gal of Amber Ale in my 15.5 gal keg. I wanted to share that I used an inexpensive ($5.09) variable pressure relief valve Part #50265K23 from McMaster that is working perfect so far.

Link:http://www.mcmaster.com/#order-history/=e4p9pr

I didn't see this option in the thread but maybe is was and I missed it. If someone has used this and there are pitfalls to this product I don't know about, please speak up so I don't lead someone astray, but I'm liking it!

I plan on transfering to corny kegs under back pressure for the secondary. I am still a bit unsure how this well work, it seems to me that I will be sucking all the crap from the bottom straight into my corny kegs? Do I first dump (waste) the first pint or so into a bucket to get rid of most of the trub or am I missing something?

SankeyPankey mentioned in post #914:
"I have a bottom dump, so pretend I have a conical re: harvesting yeast. I harvest after racking and after gradually depressurizing the two fermenters back to atmospheric pressure."

Now I'm really confused!? how do you rack then harvest the yeast? Do you have a photo or diagram of what you did? I looked but can't find anything yet, if you have post #s that would be great!
Thanks to all for a great thread!
 

Latest posts

Back
Top