Boil Kettle Improvements for BIAB (With Pictures)

Homebrew Talk - Beer, Wine, Mead, & Cider Brewing Discussion Forum

Help Support Homebrew Talk - Beer, Wine, Mead, & Cider Brewing Discussion Forum:

This site may earn a commission from merchant affiliate links, including eBay, Amazon, and others.

Gavin C

Supporting Member
HBT Supporter
Joined
Jul 21, 2014
Messages
7,036
Reaction score
3,486
Location
Dallas
Here are some useful ideas I have cobbled together mostly from this forum to augment my boil kettle for use with BIAB. Let me reiterate, I can claim none of these ideas as my own. The purpose of this little thread is to simply put the ideas all in one place so that others looking to do BIAB might benefit. There are no novel approaches here. Nonetheless, here it is.

Pictured below
• Megapot with its calibrated thermometer at the 3.5 gallon mark on the kettle and a 2-piece stainless steel ball valve with a camlock.

• Internally, a makeshift dip-tube using a 90 degree elbow and a hose barb is shown. This allows complete draining of the pot if desired.

• To allow easier and more precise volume measurements to be made the pot was etched in ¼ gallon increments. The Megapot comes etched at 1 gallon intervals. The additional markings allow measurements to an accuracy of 1/8 gallon with ease.

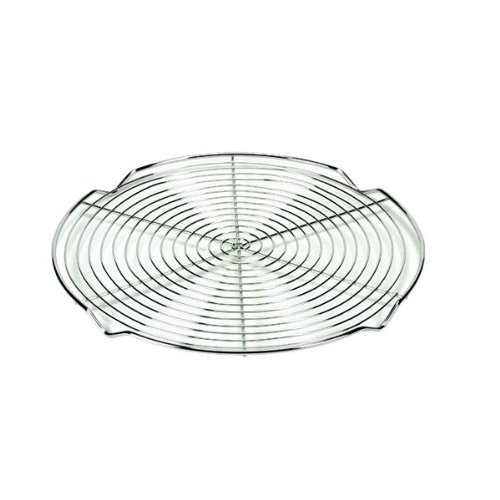
• A cooling rack is placed on the bottom of the pot following preparation of the strike water volume and additions and prior to bag placement. This protects the bag from scorching during application of heat to the base. (NB: I have not tried my process without the rack so I cannot say for certain that this risk exists.)
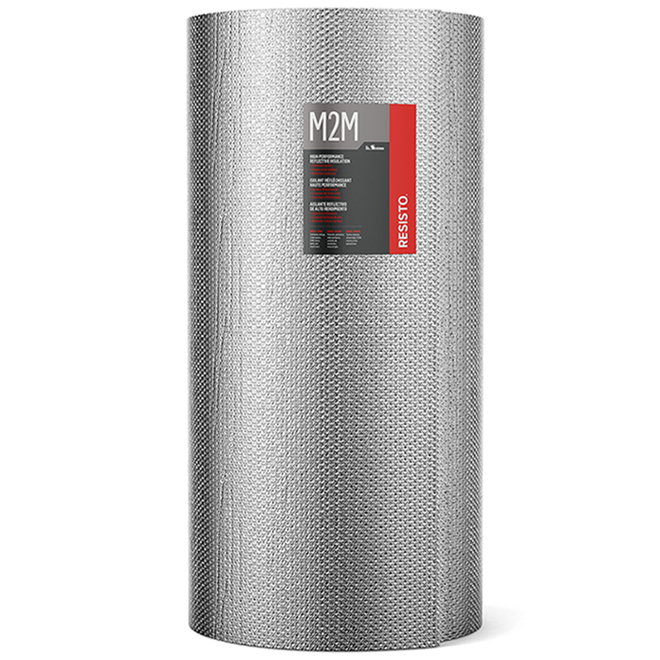
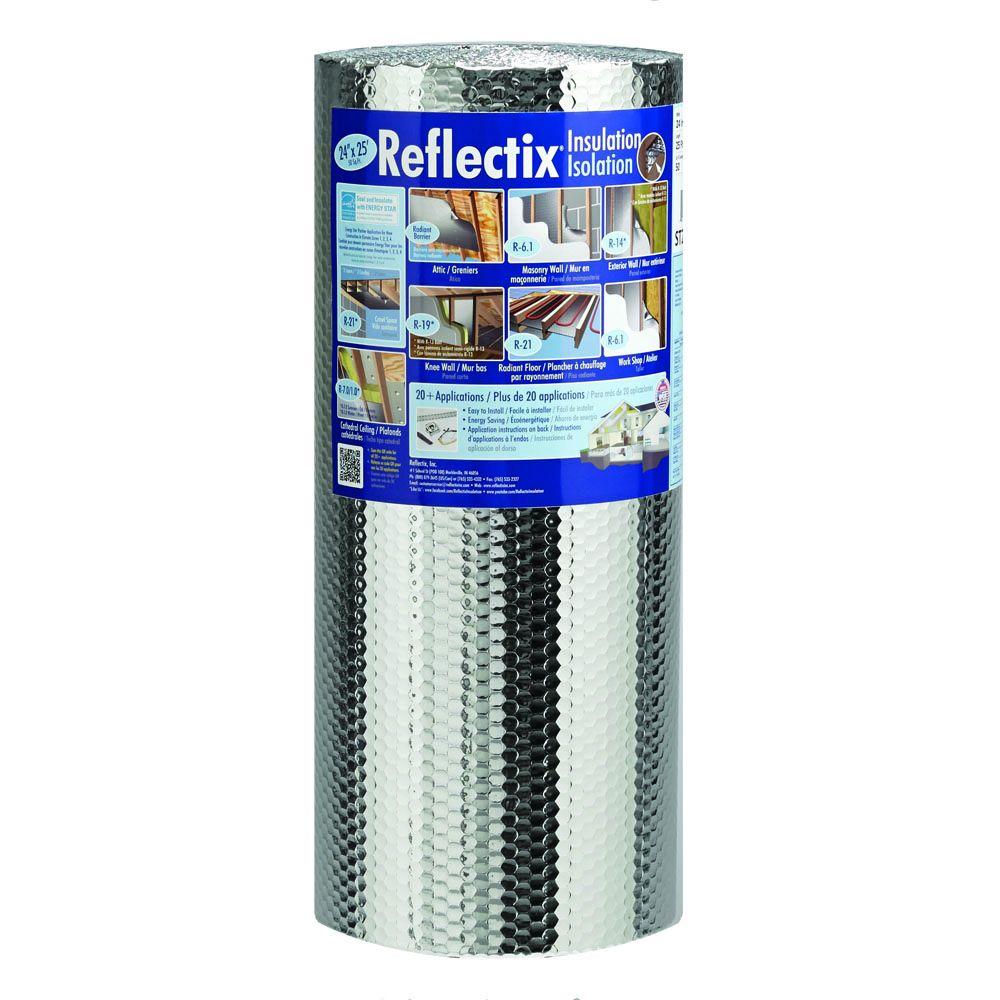
&#8226; An insulation jacket was tailored to fit the pot using Reflectix, Reflectix foil tape and <$1 of hardware to secure the 4 layers together. This is placed onto the pot after doughing-in. It seems to work very well. Minimal heat loss is noted over the course of a 60-90 minute mash. The jacket and bag are secured with bungee cords.

&#8226; Clamps. During cooling via a plate chiller I recirculate the sweet wort back to the pot. The use of two simple clamps secures the silicone tubing safely to the pot. The hose can be positioned to create a whirlpool potentially resulting in a more rapid cooling to 65F. This is far from an ideal way to create a whirlpool but does seem to work reasonably well. The clamps also largely eliminate the risk of the hose popping out of the pot and spraying hot wort everywhere. This safety consideration is especially important during the last 15 minutes of the boil.

DSC02291.jpg


DSC02288.jpg


DSC02281.jpg


DSC02279.jpg


Cooling Rack.jpg


DSC02261.jpg


DSC02264.jpg


DSC02266.jpg


DSC02248.jpg


Recirc Setup.jpg
 
I like the dip tube gavin, and the incremental markings are good but I think a linear unit would be more versatile than a volumetric unit. Did you mark it based on room temp? the cooling rack is a cheap solution to false bottoms, I assume it's full ss? I'm too afraid of tearing the bag on the thermometer when I pull the bag, cuz that's something I would do.
 
I like the dip tube gavin, and the incremental markings are good but I think a linear unit would be more versatile than a volumetric unit. Did you mark it based on room temp? the cooling rack is a cheap solution to false bottoms, I assume it's full ss? I'm afraid of tearing the bag on the thermometer.

I just marked the kettle evenly between the 1 gallon markings already supplied by the manufacturer after verifying the 1 gallon mark to be correct.

The cooling rack is absolutely cheap and nasty and is due for an upgrade to a stainless steel alternative. It gets a thorough clean in the dishwasher each time and is beginning to show some early signs of corrosion.

I've had no problems thus far, in avoiding snagging the bag with the thermometer probe at this level (3.5 gallon). I know it's there I guess, so a modicum of finesse when lautering is all that's needed on my part. It would certainly preclude the use of a basket however.

Good to know. Thanks for the info. I have to say the thermometer would be nice to have to ensure homogeneous temperature instead of stirring like mad and hope for the best.
 
Hey Gavin,

I am trying to build an isolating cover for my kettle like you did.
They don't sell reflectix brand here, so what is the material you are looking for?
Here is a list of material I'm considering

Nice setup, good to steal your ideas ;)
 
Hey Gavin,

I am trying to build an isolating cover for my kettle like you did.
They don't sell reflectix brand here, so what is the material you are looking for?
Here is a list of material I'm considering

Nice setup, good to steal your ideas ;)

No worries. None of them are mine. All stolen from folks on HBT much cleverer than me

This is the insulation I would get

It's sized nicely for my pot at 16" and long enough to get a few layers all around the pot.

7416070_L.jpg


Also I've since changed the cooling rack to a much nicer and robust SS one. Fits perfectly in the pot.

This one

41eyIOBtSDL.jpg
 
Last edited by a moderator:
Hey Gavin,

I am trying to build an isolating cover for my kettle like you did.
They don't sell reflectix brand here, so what is the material you are looking for?
Here is a list of material I'm considering

Nice setup, good to steal your ideas ;)

All of those are the same thing in different sizes, right? That bubble foil isulation stuff is it, Reflectix is just a brand name.
 
Cool! Do you put the isolation cover when you are warming up and boiling also? I figured it could save energy when heating/boiling (less heat loss) and I would just remove the cover when I need to cool down the wort.

Here is my buy list so far, probably going today:
Material:
http://www.renodepot.com/en/a2a-hi-performance-insulation-7416070
Tape
http://www.renodepot.com/en/aluminum-adhesive-tape-7416058
Bungee cords
http://www.renodepot.com/en/cords-18-stretch-cords-3729095

While I'm at it, I'm looking for a big funnel OR a tubing to help empty my wort in my carboy.
What would you recommend? the tubing is probably more expensive and I can't seem to find something that is compatible with my kettle spigot (bayou classic).
Thanks for the help!
 
Cool! Do you put the isolation cover when you are warming up and boiling also? I figured it could save energy when heating/boiling (less heat loss) and I would just remove the cover when I need to cool down the wort.

Here is my buy list so far, probably going today:
Material:
http://www.renodepot.com/en/a2a-hi-performance-insulation-7416070
Tape
http://www.renodepot.com/en/aluminum-adhesive-tape-7416058
Bungee cords
http://www.renodepot.com/en/cords-18-stretch-cords-3729095

I also used some bolts/nuts/washers to hold the layers together.

The insulation has to come off anytime I apply direct heat to the pot. This stuff will melt easily as I have a natural gas stove. The exception is the lid which remains insulated. It stays on during the mash and when heating the wort from mash-out to boil. Once boiling, lid comes off, gets a wipe and back into storage.

Its quick and easy to take the insulation on and off.

  • Heat water to strike temp
  • place insulation
  • dough-in
  • lid placed back on
  • mash +/- intermittent stirs, +/- infusions/decoctions
  • insulation removed
  • heat to mash-out
  • lauter
  • lid on
  • boiling reached
  • lid removed wiped and stored away.
 
I will have to check if the material can be heated to 100C (boil temp).
I plan to keep the material on since I just use electric element under the kettle, no flame so I think it would be safe! May even makes 10gal batches possible since I could heat more water with this on.

As a beginner, not sure I understand theses steps:
-heat to mash-out
-lauter

I usually just mash for 60min, then remove grain bag and bring to boil directly. Thanks
 
I will have to check if the material can be heated to 100C (boil temp).
I plan to keep the material on since I just use electric element under the kettle, no flame so I think it would be safe!

As a beginner, not sure I understand theses steps:
-heat to mash-out
-lauter

I usually just mash for 60min, then remove grain bag and bring to boil directly. Thanks


You shouldn't have any problems leaving it on if using an electric stove. I'm sure the pot diameter is going to be much wider than the stove element/induction plate. I've seen plenty of images where folks doing this leave it on throughout. Will make the whole process more energy efficient.
 
As a beginner, not sure I understand theses steps:
-heat to mash-out
-lauter

I usually just mash for 60min, then remove grain bag and bring to boil directly. Thanks

Heating to a mash-out is something I do but it is argued by many and with very good science to back up their view, that it is not needed with BIAB. Many argue it's not needed full-stop.

Essentially, after the saccharification rest when starches are converted to sugars, I heat the mash to 168F stirring all the while, allowing a short 5 minute rest at this temperature before I lauter.

Lauter: This is separating the wort from the grains. In BIAB this equates to pulling the bag and draining and/or squeezing the bag +/- a sparge step.

There are different ways a sparge (or rinsing out sugars from the grains) can be done. Plenty of threads on that topic.

Lautering is just a catch-all term for that separation step in the process. All brewers using all-grain must lauter, not all brewers drain/squeeze/sparge. Sorry for my lack of clarity earlier.
 
I would use caution if applying heat with aluminum foil bubble wrap in place. When heating on high you may get enough heat washing up the side of the kettle to melt the wrap and make a mess, hopefully I'm paranoid.
 
I would use caution if applying heat with aluminum foil bubble wrap in place. When heating on high you may get enough heat washing up the side of the kettle to melt the wrap and make a mess, hopefully I'm paranoid.


I'm equally paranoid and never apply heat to the pot with insulation on. With an electric stove element it might be less of a fire hazard but I have no experience with an electrical stove for heating.


If memory serves, @anoldR (can't spell it) has shown pics of his setup with an induction heater and a neoprene-like coozie for the entire kettle. Really slick setup. That stuff remains on throughout.


My rough and ready insulation is easy on easy off. It would almost certainly melt/catch fire with my setup. Not an experiment I want to attempt.
 
Sorry, I wasn't clear. Meant to say adding heat with an electric stove. Some electric stove elements throw a lot of secondary heat, I'd be afraid of that washing up the side of the kettle.

Induction is a different animal. The infomercials show the plate cool to the touch while a pot of water is boiling along side. Although I have repaired a bag melted by an induction plate.

User thought he could set the induction plate to mash temp, apparently doesn't work that way....maybe if you stir idk.
 
In my experience the induction plates most of us use pulse full power/no power at different rates when you say tell it 150f as a set temp. Not that it works, it has no thermometer to read temp with....
 
I will experiment with it and let you know if anything melt ;)
I think it will be safe, as the element is way under the kettle. Also the element does not create heat on the side of the kettle as far as I know.

Just did another brew this weekend but I haven't used insulation. Still need to build the thing. It was at 151F after 30min, down from 154F mash. lot of heat loss with this big 16gal kettle.
Still had a good 1.063 OG, that is OK for this brew.
 
Thanks for the run-down Gavin.
Any experience using the same insulating method with a converted 15 Gal Sanke Keggle?
 
Thanks for the run-down Gavin.
Any experience using the same insulating method with a converted 15 Gal Sanke Keggle?

No worries @brennanj11 . Sorry, I've no experience with a keggle setup. I can't see why it wouldn't work though. I'd look for a roll of material closely matching in width to your keggle's height.
 
The clamps are a good idea. When I add the plate chiller to my process I need to do the same.

In the picture with the kettle on the stove all wrapped, why does it look like there are bolts coming out of the wrap?

That stove top looks exactly like mine. Good to know it can heat a pot that big. I would have guessed it couldn't do it.
 
The clamps are a good idea. When I add the plate chiller to my process I need to do the same.


In the picture with the kettle on the stove all wrapped, why does it look like there are bolts coming out of the wrap?


That stove top looks exactly like mine. Good to know it can heat a pot that big. I would have guessed it couldn't do it.


The clamps are a great addition from a safety and neatness standpoint. It also serves to create a whirlpool of sorts. Useful for a few reasons.

There are indeed bolts coming through the layered reflectix. Nut, bolt and a washer each side keeps the layers together nicely. Less forces on the cut ends with metal foil tape.
 
Just an update on my setup.
I copied Gavin setup and it work perfectly.
Can now do 10 gal batch on the stove.

I just did a 13 gallons test boil on stove with this. Took 1h15 to bring to boil.
Here are some pics

Just had a problem while boiling with the bungee cord on, I suggest you don't put them on or remove the one at the bottom. I had one melt during boil. I don't even think the bungee cord is necessary, this stuff will stay on it all the time and it's already tight.

Will be now a bit harder to cool down in the bath with this I think, will need to invest in a cooler or learn how to make one later.
 
Cool! Do you put the isolation cover when you are warming up and boiling also? I figured it could save energy when heating/boiling (less heat loss) and I would just remove the cover when I need to cool down the wort.

Here is my buy list so far, probably going today:
Material:
http://www.renodepot.com/en/a2a-hi-performance-insulation-7416070
Tape
http://www.renodepot.com/en/aluminum-adhesive-tape-7416058
Bungee cords
http://www.renodepot.com/en/cords-18-stretch-cords-3729095

While I'm at it, I'm looking for a big funnel OR a tubing to help empty my wort in my carboy.
What would you recommend? the tubing is probably more expensive and I can't seem to find something that is compatible with my kettle spigot (bayou classic).
Thanks for the help!
I have found using a yoga mat works very well for my kettle. You can use a razor blade or scissors to make it fit. The material insulates very well and you can purchase a yoga mat for as little as 8 bucks (that includes shipping!) from banggood or ebay. Make sure to purchase the 1 cm thick mat if you go this route. My lid is insulated with plywood and insulated fiberboard.

kettle_jack.jpg
 
While I'm at it, I'm looking for a big funnel OR a tubing to help empty my wort in my carboy.
What would you recommend? the tubing is probably more expensive and I can't seem to find something that is compatible with my kettle spigot (bayou classic).
Thanks for the help!

@MaximumTrainer. It looks like your ball valve is 1/2 NPT (National Pipe Thread.) If that's the case, you can use this elbow and hex nipple (always use Teflon pipe tape,) and 3-4 Feet of 5/8" ID food safe tubing. You can always use a funnel, but I've found that I get splashing even with a large one. Another benefit of using fittings, is if you ever decide to add a recirculating pump, adding quick disconnects is a simple matter.

Fittings1.jpg


Fittings2.jpg
 
@MaximumTrainer. It looks like your ball valve is 1/2 NPT (National Pipe Thread.) If that's the case, you can use this elbow and hex nipple (always use Teflon pipe tape,) and 3-4 Feet of 5/8" ID food safe tubing. You can always use a funnel, but I've found that I get splashing even with a large one. Another benefit of using fittings, is if you ever decide to add a recirculating pump, adding quick disconnects is a simple matter.

Thanks for the info RedlegEd. I finally just purchased a small adapter for 1$ that screw in the spigot, then I hold a small vinyl tube with my hands from the spigot to the carboy. Your setup looks much better. I will try to build a quick connect like yours when I get better with tubing and stuff. Clearly not my field of expertise!
 

Latest posts

Back
Top