Keezer framework

Homebrew Talk - Beer, Wine, Mead, & Cider Brewing Discussion Forum

Help Support Homebrew Talk - Beer, Wine, Mead, & Cider Brewing Discussion Forum:

This site may earn a commission from merchant affiliate links, including eBay, Amazon, and others.

badandy519

Well-Known Member
Joined
Mar 16, 2015
Messages
48
Reaction score
10
Hi everyone,

I recently decided to try my own build after seeing a finished keezer on another site. I just purchased most everything to get started this past weekend but after getting my freezer out of the box, there were a few minor things that made me need to change my original plan.... The compressor is mounted on a footrail that can't be moved, there's a small lip around where the lid seals and both would have interfered with my framing plan, etc.

Anywho, Google led me here and I've found tons of better & more interesting ideas for what do to with my build and now I have a few questions. I am using a 7.1 CF Igloo that I got from Bestbuy for $180. Outside dimensions (without the hinges) are 37x33x20.

1) I would like to use this as my general frame template-
https://www.homebrewtalk.com/f252/hbt-members-inspired-me-my-keezer-project-150256/ (3rd pic down)

I will be running the 2x6 along the front and back, but I would rather use 2x4 on the short sides because i have a few laying around. I have 2" swivel casters rated at 90lb each, but I would prefer to use them on the 2x6 (just inside the 2x4) instead of on the stacked corners to (a) lower the height and (b) also the gap between the keezer and floor. Will that be good enough to support the weight? I have 6, so I can put one in the middle if needed, but is four probably enough?

2) The inside dimensions of my freezer is 23x15 not counting the compressor ledge. I want to be able to use three taps for 1/6 kegs (since I def can't fit a full half barrel), but it looks like it will be CLOSE.... Three 8.5" in plates sit on the bottom fairly easily, but graphing out 9"-9.25" on paper it looks to be hit or miss. I don't want to build it for 3 taps and never be able to use one of them.

Any thoughts on either point is much appreciated. Pics will def follow once I get started again (hopefully tomm)
 
I just built a simple collar for mine, so I don't have all the answers.

1) You should be able to mount the wheels there just fine. 4 wheels could probably take it, but they might be real close to maxing out. My keezer is about 160 lbs empty IIRC, 3x full cornies = somewhere around 130 lbs. Add the weight of wood, stainless, CO2 tank, and in your case larger vessels and you'd be pushing the limit. If you've already got them toss them on, preferably in the centre so the supports don't have a long run.

2) If you add a collar to the design as well you should be able to fit a keg up on the compressor hump easily. Since it's all being boxed in anyways it is something to consider. Might even make it a 4 capacity. Could always acquire kegs before the keezer is ready and do a trial test fit for how many you can squeeze in before committing to tap count.
 
Thanks for the reply.

RE: the wheels - that's what I was thinking. I'll just throw all 6 on since I have them. I was just wondering if there would be any structural problems since they'd be on the long board instead of the short, but since the total lbs are in line, and only 15" apart or so... I figured it would be ok... rather be safe than sorry though.

I was all set to do mine with a collar, but with the little lip around the lid and my original plans, it would have needed some mods for this particular freezer. After seeing the link in my OP, I realized I really don't need the collar and it looks like an easier build to do without. The extra height wouldn't really do anything for me anyways. If I added a 2x4, I'd be right at 22 inches on the hump side.. 2x6 would make it too tall (I think).

Idk if my freezer just has a smaller than normal usable footprint or what, but all the 7.0-7.2 freezers I've seen online can fit three if not four 1/6th barrels in them easily.
 
Frame base = done. 2x6 along the front and back. 2x4 on the sides. 2" casters with 2 lockable in the back corners.


Frame sides and front - glued and screwed. I'm about done for the night. Will put them on the base tomorrow and get to work on the lid.


Frame base = done. 2x6 along the front and back. 2x4 on the sides. 2" casters with 2 lockable in the back corners.

Won't having your locking casters in the back corners make it fairly hard to lock and unlock when it is slid against a wall? It doesn't look like you have much clearance for getting your foot under there.

Why not put the locking casters in the front?
 
My guess is that the "lock" part of the casters is to change them from a swivel caster to a non-swivel wheel. Then I looked more carefully at the photos and it seems it's a parking brake style lock. If this is the case front mount would be a better plan.

As far as the build goes just a friendly reminder to make sure you do something to allow airflow between the the coffin build and the freezer exterior to prevent overheating.

They are parking brake style locks. The casters will be just about hidden on the front and sides. There will only be about 1/2 inch clearance between paneling and trim and the floor. I like the no-wheel look, but wanted it easy to move the couple times a year I'll need to do that. They might be kind of a pain to get to in the back, but I figure I can deal with it.

Thanks for the airflow reminder. I already have the panel off the freezer. HD has some decently styled bronze floor/wall registers for under $20. I'll be using one of those and will add a usb PC fan if it still seems warm.
 
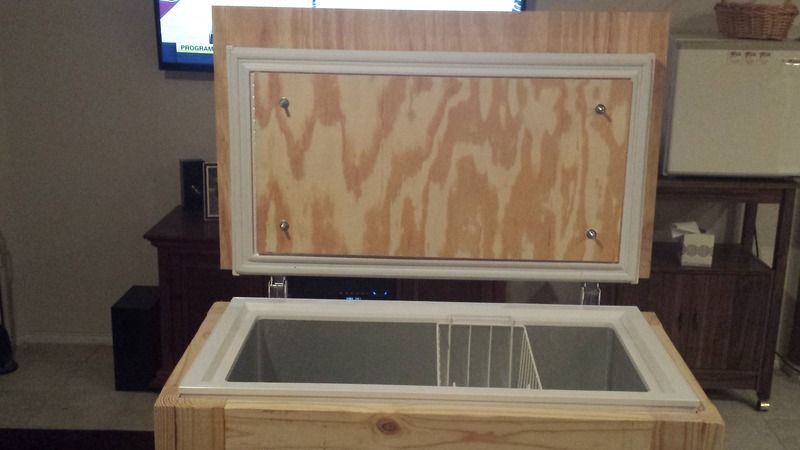
Main part of the lid is done and put back on. The bolts could be a half inch shoter, but I don't think they'll get in the way of anything. Now on to the tower.


Got the tower dimensions planned and all drawn out. I'm sure everyone knows, but just a reminder - measure 17 times, check it, check it again and then cut. If I had used the original fan and tap line centers on this pic, the 3" holes would have been half obstructed by the freezer wall.


On another note, I had originally planned to hook a little CPU fan to a USB coupler on the inside of the tower. Then, I could just run a regular USB cable from the coupler on the outside of the tower either to an A/C adapter or to a surge protector with USB inputs.

The fan I ended up with was just a random, last minute purchase on Amazon for about $10 - I needed like $8 to get to free shipping and I knew I would need it down the road. It has rubber mounting feet both up and down, has about a 6 foot cord with an on/off switch in the middle and also has an additional USB connection Y'd at about 4 inches from the fan.

Now, I'll be skipping the coupler and will probably add some lights to the tower powered by the extra USB connection. :mug:
 
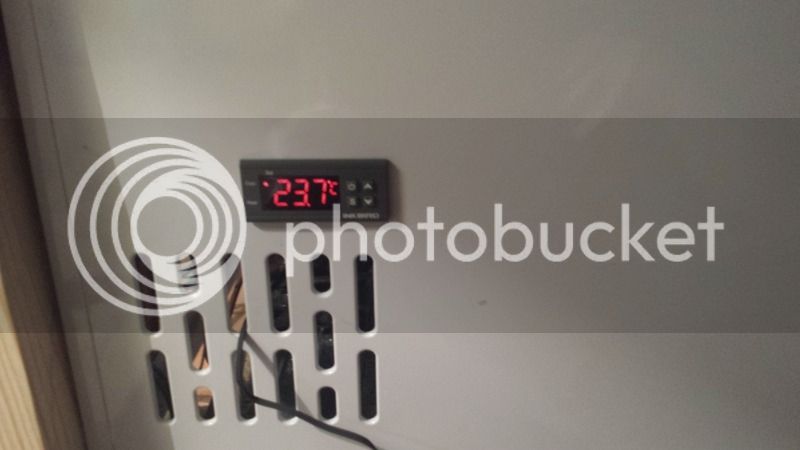
Temp controller is in and working. This is in the back also. I thought about putting it somewhere on the front, but figured I'd mostly set it and forget it. This one displays F*, I just haven't messed with the settings or clipped it in since I was just checking it.

 
First setback - I'm honestly surprised it's taken this long. Generic 3" hole saw just isn't cutting it... literally. Made it through the plywood sorta ok but once it hit the freezer lid, it just gave up. I'll grab a carbide bit this weekend and get back on it.

 
Kinda funny how easy it goes when you do it right. Picked up a 3" blade tonight for $20 at Lowes. The first one cost me $9 from Amazon. I shoulda learned a long time ago that it doesn't pay to skimp on tools, but what you gonna do?

Cleaned up the wiring with zip ties, locked the temp controller in with the clips, put the tension reliever back on the a/c cord and a few other minor things tonight.

Also grabbed the main piece of oak for the tower I'll need to get the tap lines in. Still kicking around ideas/$$ for the rest of the finish. I have everything I need to get it up & running and functional now... hopefully by Sunday.


A little slow going since April is busy time at work and then I've had relatives in and out for most of May so far. Back on it though.


Looking great; keep it up! I'm subbing to this thread for when my keezer time [eventually] comes!
 
Thanks! I'm still waiting on the darn 3rd tap to come... supposed to be here by Tuesday now. I need that in order to glue down and tape off the foam board inside the tower. I'm putting a rail on the top of the tower this weekend (maybe tonight) so glasses and liquor bottles can't fall off... hopefully I might get some stain on it tonight or tomm as well.

I'm hoping my dad or brother in law wants one of these. It'd be kinda fun to see how much better and easier a 2nd one turns out after figuring out all of the small mis-steps I've made on this one.
 
Couple more setbacks....

Went to HD today to get the rest of the stuff to finish this thing and sometime between March and now, they decided to stop selling the oak project panels in store. Came home to order them and they want like $40 shipping for two 24x48 and one 48x48. No thanks. Luckily Lowes has them and you can ship to store for free (and they're slightly cheaper than HD) but they won't be here for about a week.

Started working on the rail, the back of it just went way too easy, so I knew something was coming. Yep, as soon as I started drilling the side rails... splittsville... both of them, right down the middle. So they're out in the garage glued and clamped. I think I'll be able to save them. Either way, I probably should have drilled all of the holes then cut them. Chalk that up to another lesson learned.

Anyhow, here's where I'm going with it:

 
And for those of you with a keen eye, yes... the outside spindles are spaced about 3/32 farther out than the rest. Just one more thing I'd have done different. I should have just split the difference in the middle two. After the taps go on and stuff gets put up there, you'll never see it.... but still. It irks me.
 
Excellent.
I have a couple questions. It looks like I have the same freezer. Mine has an arched top. I was wondering how you dealt with that?

Would it be easier to just build your own top?

Do you worry about air movement between the walls? or is the space you have enough?

I rigged mine for the temp sensor to set at about 37 or so degrees... so far after 3 weeks... seems to be working well..

Frank
 
Yep, mine has the rounded top. I just used 3/4" plywood on top, 1/4" inside the lid and and when I bolted it down it basically self leveled. I thought I may need to shim it or something, but there's no play in it at all.

I thought about building a top and skipping the original, but it went surprisingly way easier than I expected.

Not sure what you're asking about the air movement? Cold air between the freezer and tower or warm air from the compressor running?

Rail is done and glued. Need to hit it with some 220 grit real quick and then get the stain out.

 
Ok great... so you just bolted the 3/4 on top to the 1/4 inside? seems like that would deform it... but I guess not. thanks for that. any pic of the lid close up?

sorry i meant air on the outside walls. Not sure how much heat they generate.

I will have to put a collar on mine to fit 4 kegs plus 10lb tank.
thank you!
 
Deform the lid? It's pretty sturdy. Besides, it's not like I cranked the bolts down to 1,872 ft lbs. Just make it good and snug and it won't go anywhere.

There's a few pics of the top in posts #10, #11 & #15... do you want something specific?

I unscrewed the hinges from the freezer side; left them on the lid, set the lid on the 1/4" sheet that was already cut to fit inside the plastic molding , put the 3/4" sheet on top of everything, squared it all up and drilled 4 holes at the corners with a 3/8 bit. Counter sunk the top with a spade bit and bolted it down.

For the airflow on the outside wall, I'm just getting a fancy 4x10 or something wall register for about $15 to go in the same spot the original one was on the side of the freezer. Other than that, nothing is insulated on the outside and the 2x4 depth should give it enough room to breathe (I hope).
 

Latest posts

Back
Top