2 x 2 16 gauge - OK for 15+ gallons?

Homebrew Talk - Beer, Wine, Mead, & Cider Brewing Discussion Forum

Help Support Homebrew Talk - Beer, Wine, Mead, & Cider Brewing Discussion Forum:

This site may earn a commission from merchant affiliate links, including eBay, Amazon, and others.
Generally your adjustments are Voltage (the obvious one) and Amperage (known as WFS on a mig/FCAW). The thing is you can't just add amperage, wire feed speed, without the appropriate voltage.

Look inside the door of the wire wheel and find the settings for your material. That should be pretty damn close to what you need.

I would highly recommend cutting all your scraps up and practice welding all the joints you are going to have before you get to the real deal. Do it until you are happy.
 
On the wire feed, that intuitively seemed weird to me but yep, that's what he said. I don't get it, but I'm not surprised. I have enough coupon material to mess with parameters, so my thought is to keep one parameter set and monkey with the other, then reverse - fix the other and change the other....? One thing I got was guidance from Miller's site - thanks on the idea. They don't have the exact thickness, my metal is 5/64 and the closest they have is 3/32, but seems like a good guide. For .035" flux core (what I'm using), they offer 145-155 ipm, 110-125 amps, and 14-15 volts.

Problem I'm having, for this machine, is nothing in the manual nor so far, what I can find elsewhere, correlates the wire speed or voltage setting (1-4) with their respective actual speed or voltage. Am I right in thinking that's how MIG works, they don't usually just say "150 ipm = dial setting 6", etc.? Any thoughts on a machine with 0-10 wire speed, and 1-4 voltage settings?
 
Good plan for practice welds. No way to figure what the numbers on your machine actually mean. The only use for them is, once you find the sweet spots, you can repeat the setting in the future. If you still want to weld after all this.
 
As you look at your weld, if it is building up, turn up the heat. If it is spattering like mad, slow down your wire. Remember your not just using the wire to glue it together. The metal has to get molten enough to flow and mix with your wire to an extent. I would rather you blow a hole in your test metal and turn the heat down, than stack it up with no penetration. When you get the setting right you should hear a steady sizzle, like and egg frying. When you find a place w the right electric and get it set up, run some beads and take some pics. People here can help you get it right.
 
That pile of blobs would tell me you need to up the power at least and get a decent puddle going.
Keep the stickout short, up the power without changing the wire speed and see which direction you move.
btw, are you running solid wire with gas or flux core without? Not sure what you settled on...

Cheers!
 
So that plastic tube has been foresaken? ;)

I'll confess I've never tried flux core on my MIG, started out with 25%/75% gas and never looked back.
But I don't think that matters wrt the basics of getting a puddle going and dragging/pushing it around.
Wire speed and temperature might be slightly different for optimal penetration but we're looking at Ground Zero right now...

Cheers!
 
Moi? The predecessor to the current Lincoln PowerMIG 180C.
Same machine, updated marketing brochure. Mine is ~5 years old.
Love it, it's a pleasure to use a metal squirt gun that's so easy to dial in...

Cheers!
 
Hey guys,

My son's 17th last night (not at all ready for him to be 18!). Thank you for your incredible help! My worthless memory, I'll have to work to incorporate some of your suggestions in to practice as I truly suck (see below). Angles, distance, etc. I believe I have the parameters going pretty well - perhaps you'll have some thoughts. I monkeyed around with both wire speed and voltage, isolating variables, then finally found with the wire speed fixed where it was and voltage goosed all the way up, I think I'm getting good penetration without burn throughs or other issues of overheating. If that's correct, from what you see, and the machine is now good, I need to work on a lot of technique because I'm getting a lot of rough fits and starts in the arc as I travel, and it seems to be cleaned up better as I change angle. Interestingly, Clarke recommends 45 Deg., where I've seen a usual 5-15 deg. from the surface - right? Well I found as I became more oblique relative to the surface, the arc tended to clean up and I got that nice, even, bacon sizzle. But I don't know if that was it.

Where the start is in the wrong place, yeah, I was blind. There's a lot of stops midway because the circuit blew (I thought I'd resolved it - was able to get some run time switching to another circuit. But I need a 20 amp breaker, I think).
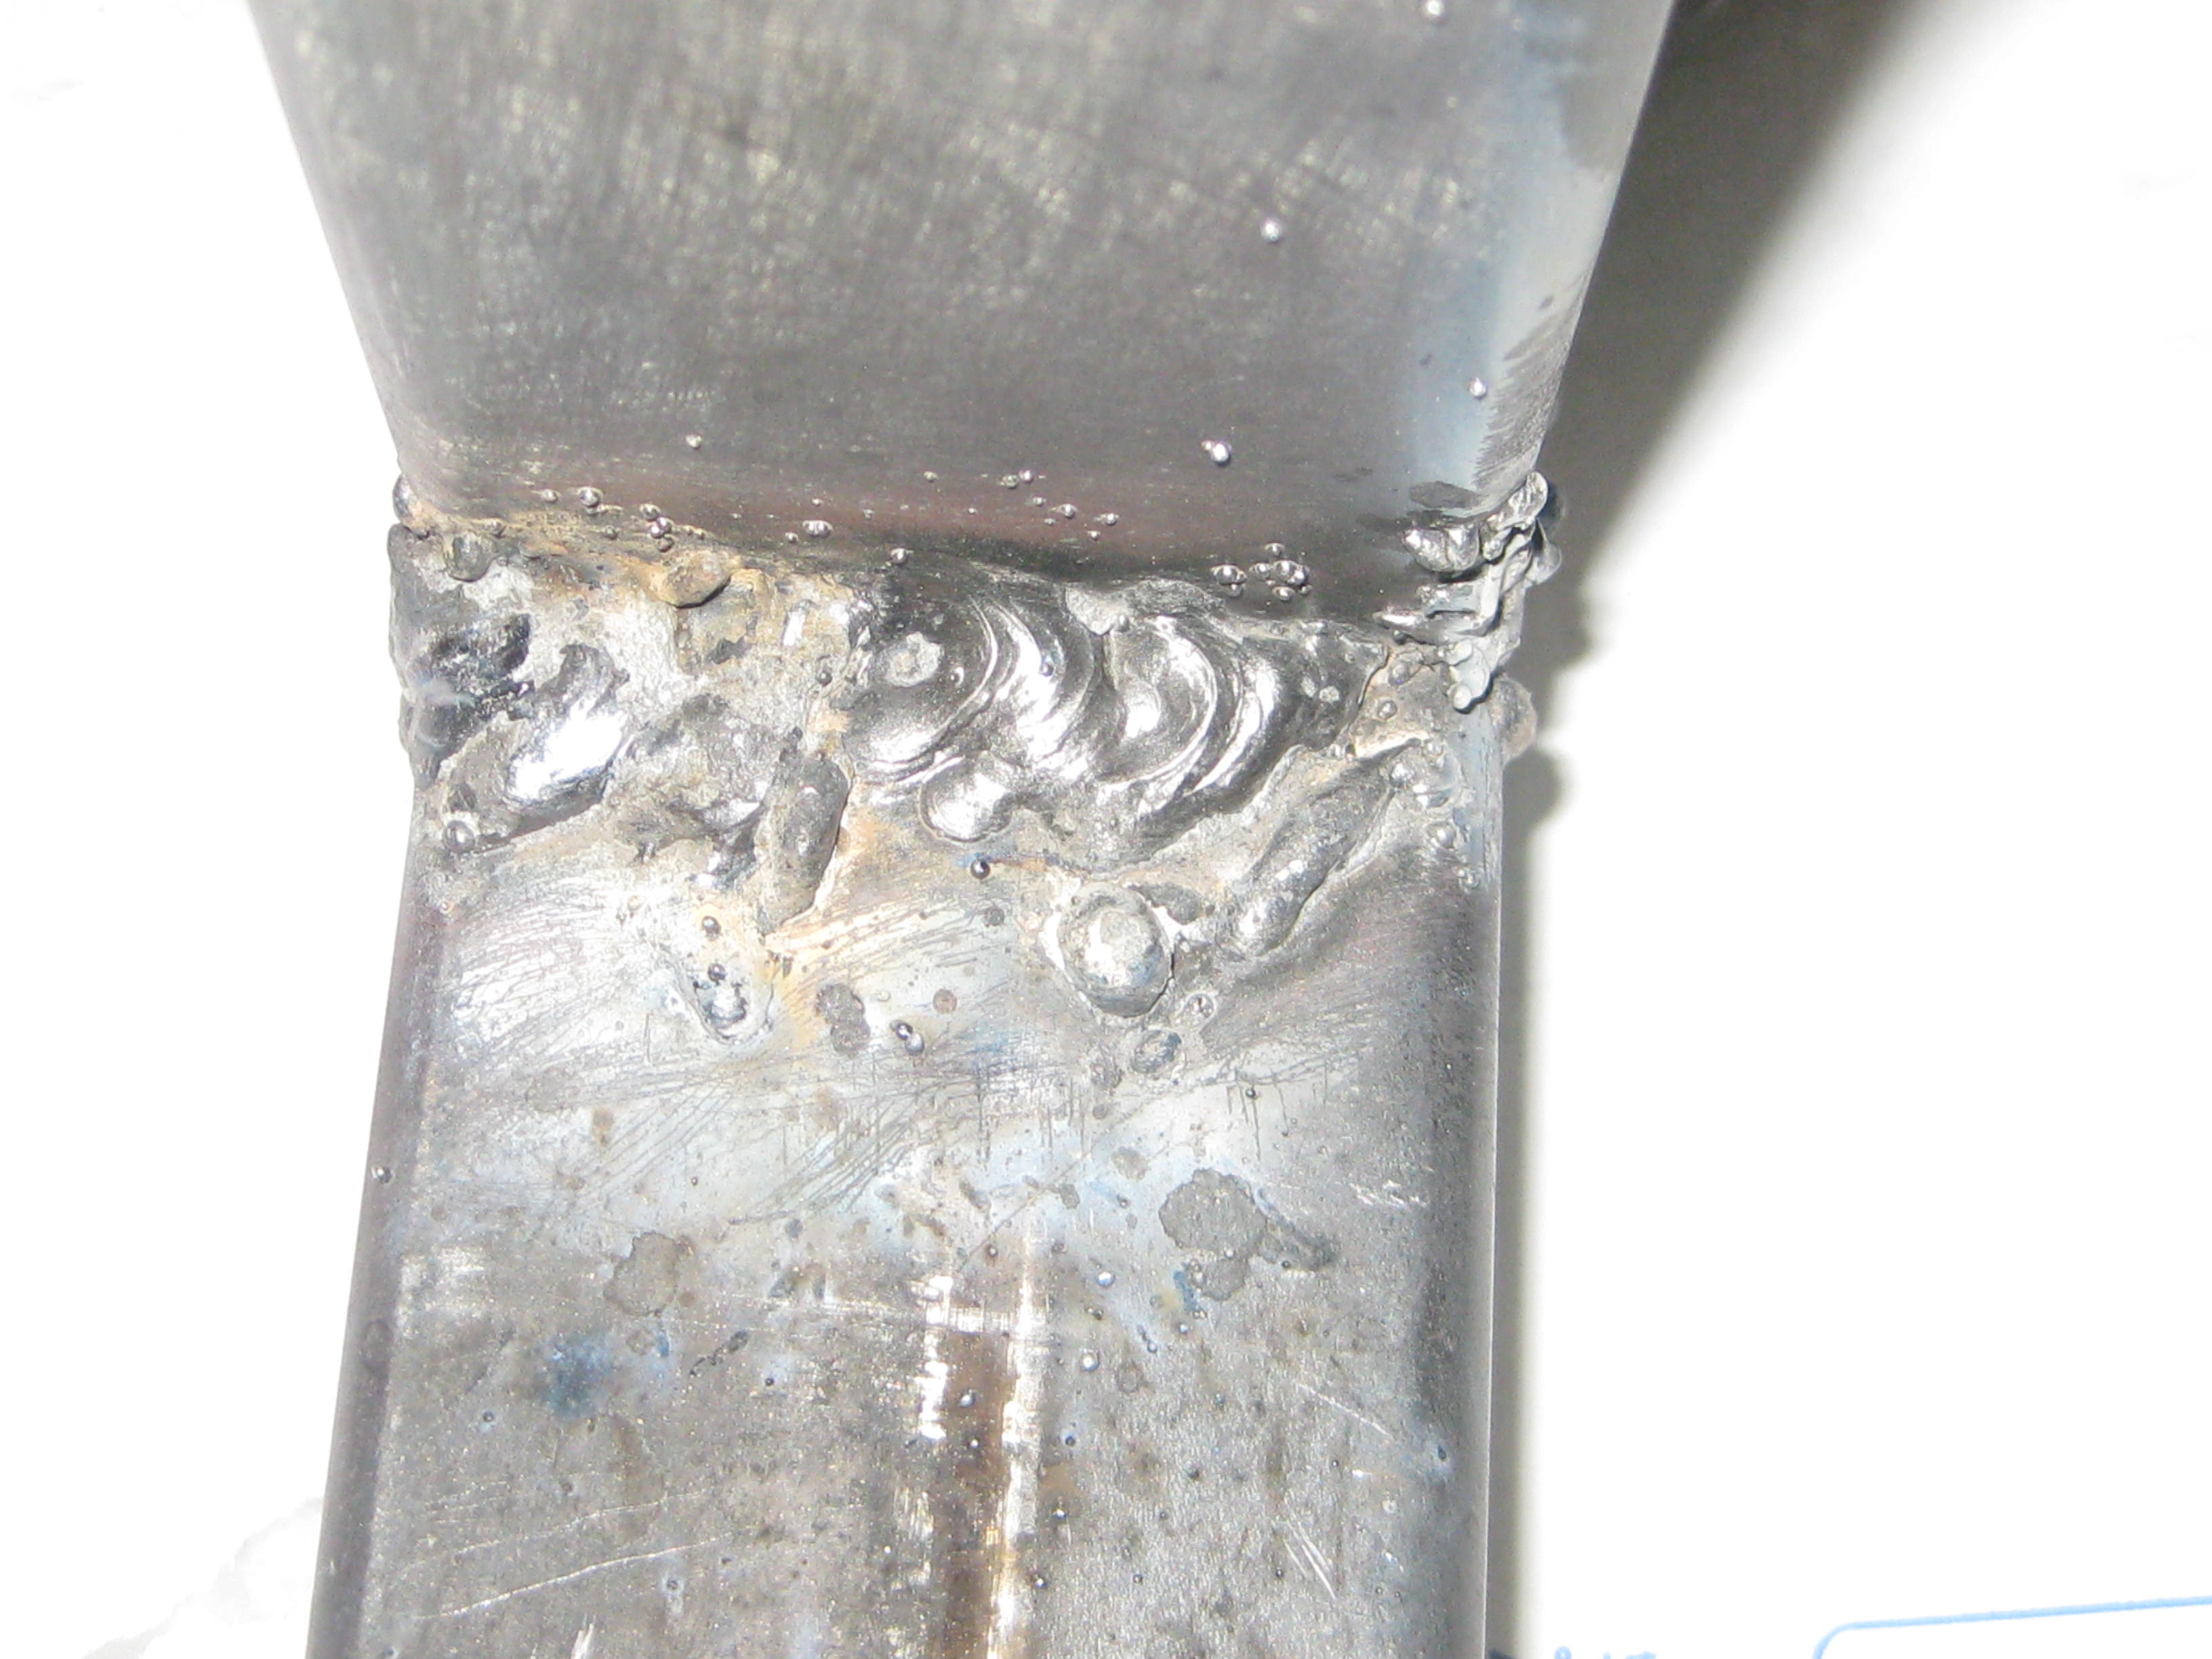
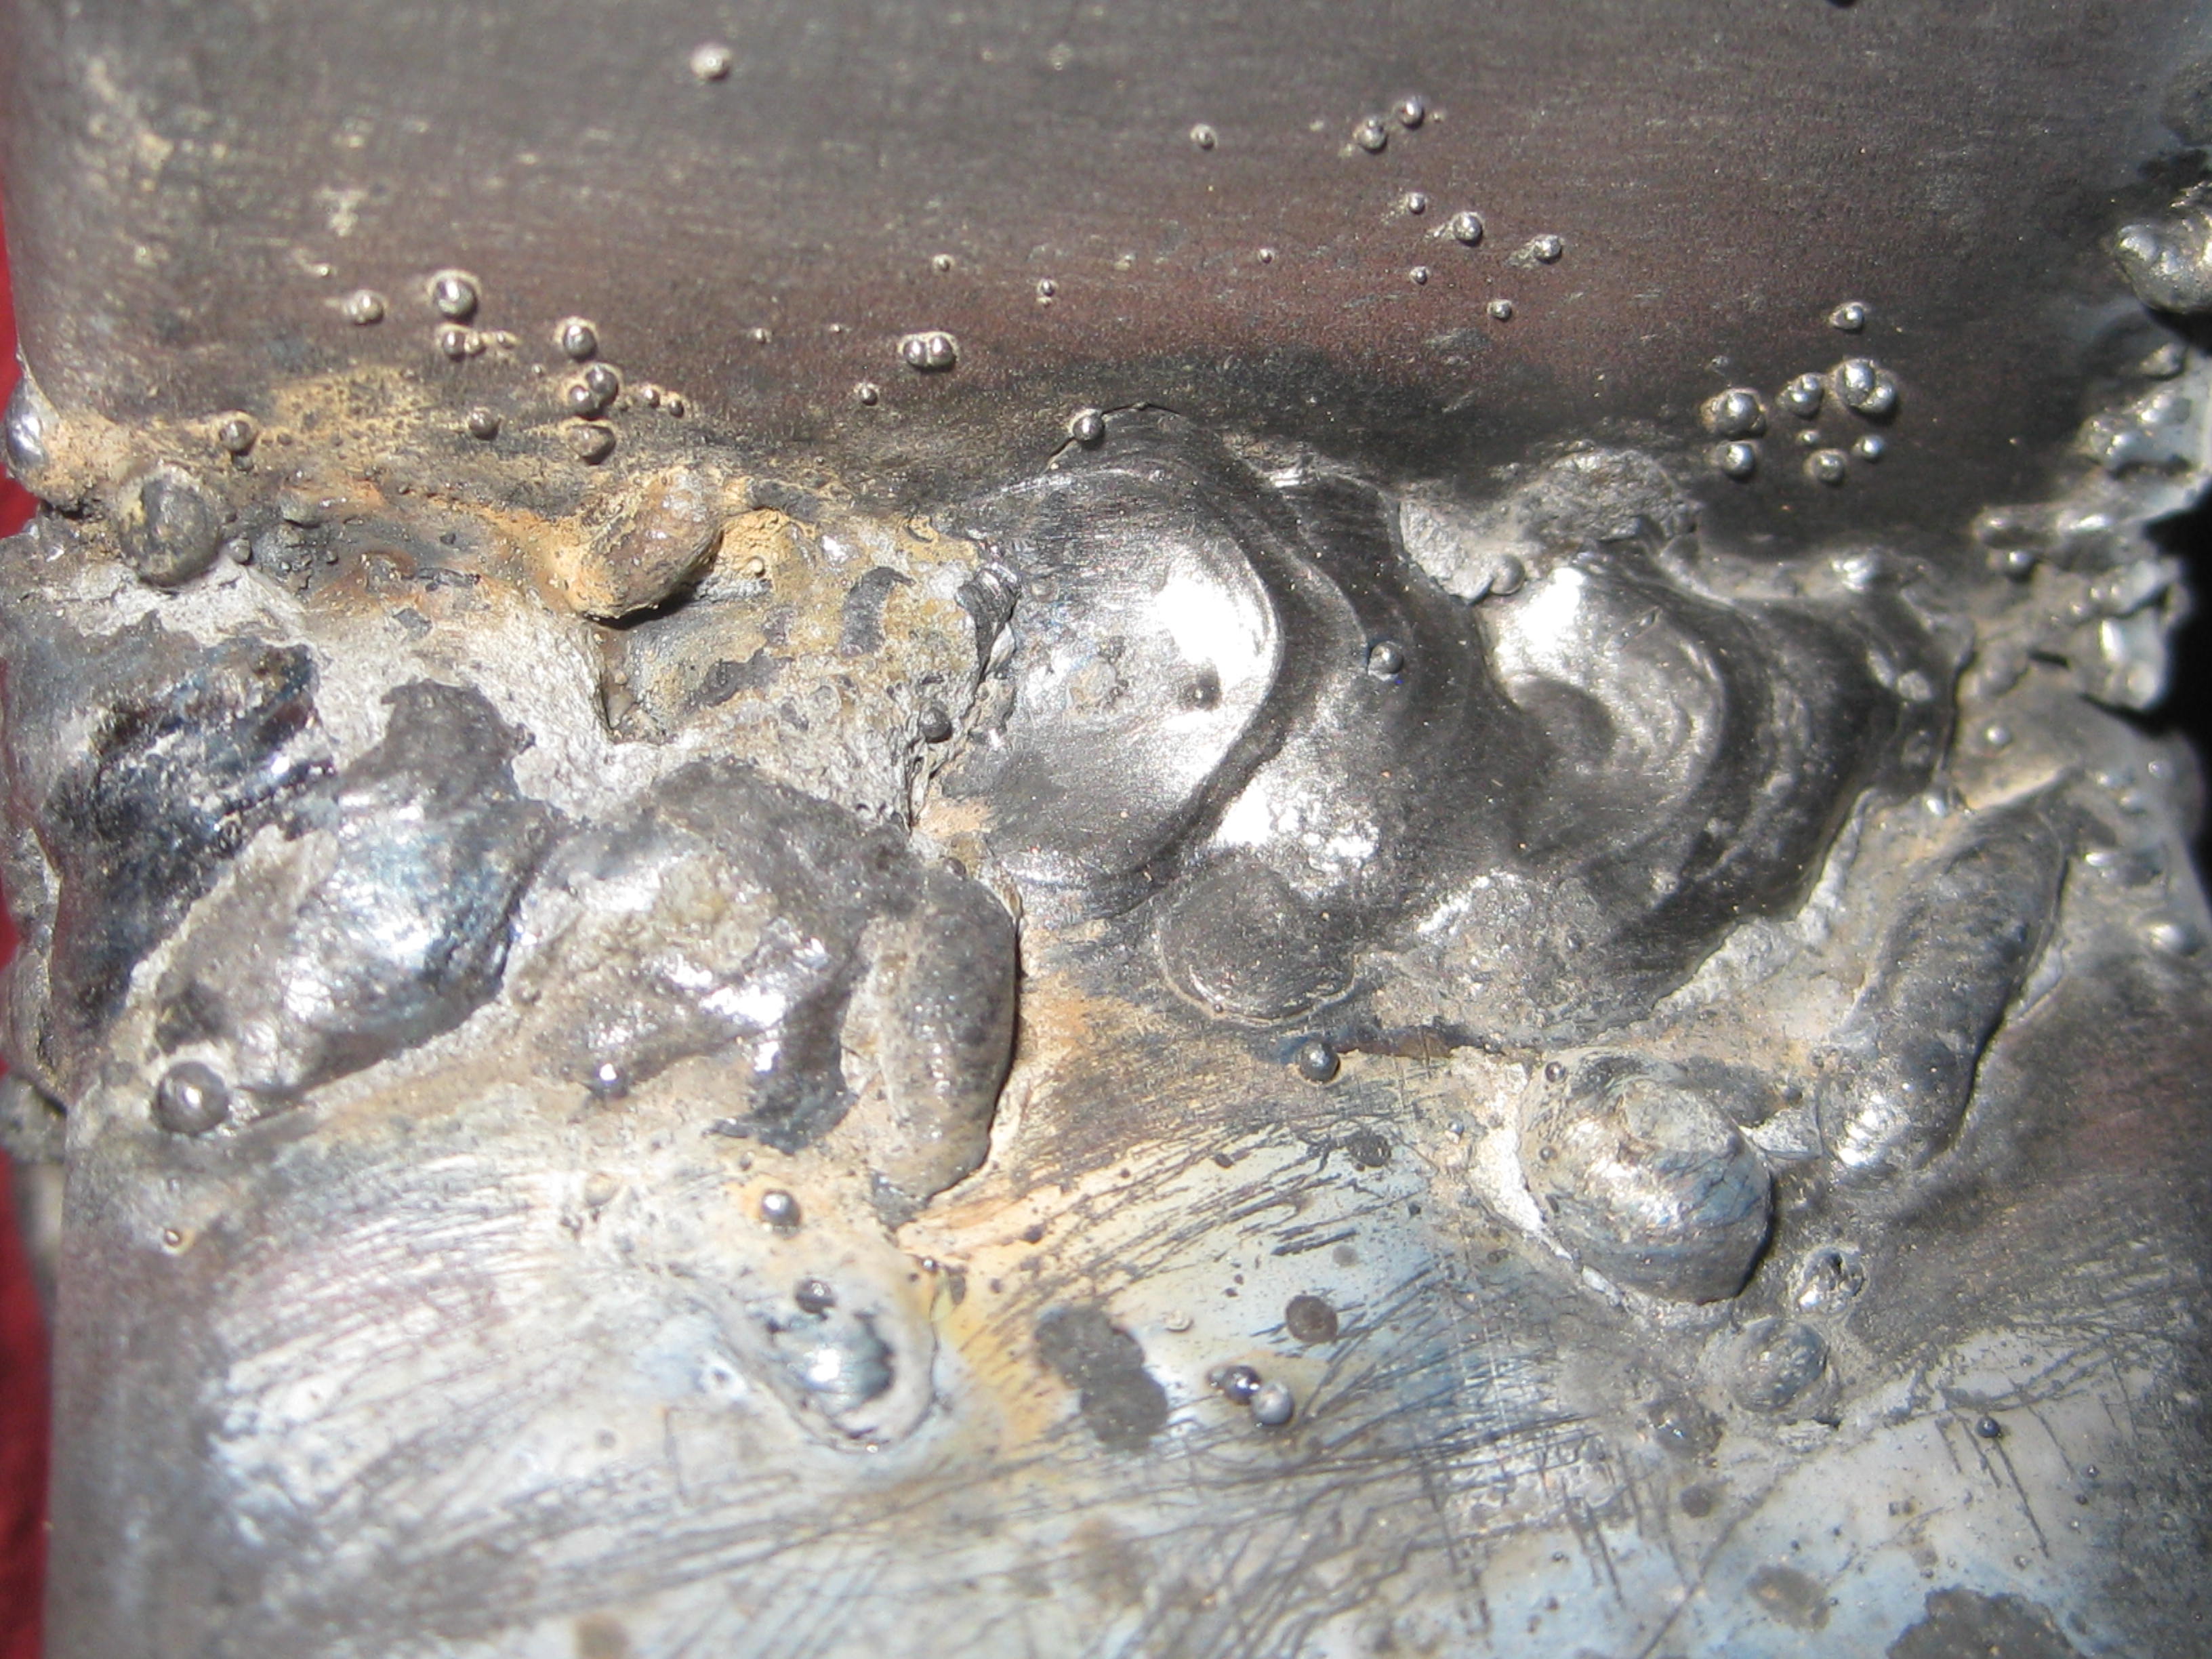
filet 1.JPG
filet other side.JPG
fillet alter.JPG


My helmet is nominally 10, but I have to say, I'm absolutely blind. Is that just me, not used to this? I try to freeze in place while I drop my helmet but inevitably I can't see anything whatsoever and have to start an arc, and equally inevitably, it's somewhere in foreign territory and I have to come back to the joint - which I can't see well anyway, nearly blind, despite the arc. Is this me, practice, etc., or would you suggest dropping down to a 9 or even 8?

Anyway, as embarrassing as they are, some just finished work after settling on this parameter. Very grateful guys, learning alot.

Oh, forgot. Tried to destroy the T and it held strong, despite being unfinished. So that's encouraging, again I think, in that I'll probably get a working frame out of this regardless of my ineptitude.

(ugh..prettyy bad, enlarged like this).
 
try putting a real bright light on the work area. Should allow you to see your start a little better and might help during the weld too.

#10 isn't too dark. I only go that light when I'm Tigging small gauge stuff. I can adjust because I have an auto hood but still, darker is nicer for the eyes. Less strain.
 
OK, thanks, Sandy. I didn't know if added light would somehow make things worse, glare. But I have a strong work light downstairs, on my (former) reloading table.
 
Not too bad, considering. Being in a comfortable position helps. I bet you are holding your breath, also. Gotta relax to get smooth results.

If this is a 120v machine, you may need a heavy duty extention cord. I had breaker trouble with my 120v plasma cutter until I got a 20 amp cord.
 
Excellent, ancient, I'm almost positive you nailed it. I'll watch to see if I'm holding breath, tense, etc.

I have a table, a long one, but it's not a wood top - whatever that fake wood skin is. I'd thought to use that as a work surface but I'm almost positive that's unsuitable - ? So I'm on the ground, using other scrap 2 x 2, so far, as supports to work. And my body, being in pretty bad shape, isn't a fan. So I'm positive I'm tensing up everywhere.

And thanks too on the extension chord. I don't know the amp rating on the chord but the machine is a 120v and the chord is 16 gauge, I believe? It might be a 14 gauge, have to look at it. But either way, I see that is way inadequate. Maybe a 12, or 10, from HD?
 
I just took a look at my cord, it's 12AWG. I don't recall where I bought it, but HD or Lowe's should have them.

I hear you about the body issues. If I get on the ground, I have to crawl to a tree to hoist myself back up. You might consider a pair of folding sawhorses and an adjustable stool to get yourself off of the ground. Your table would probably be ok, as long as you don't mind lots of little pits from spatter.

I'm heading for a mountain top to watch the meteor shower, so that's all from me tonight. Good luck!
 
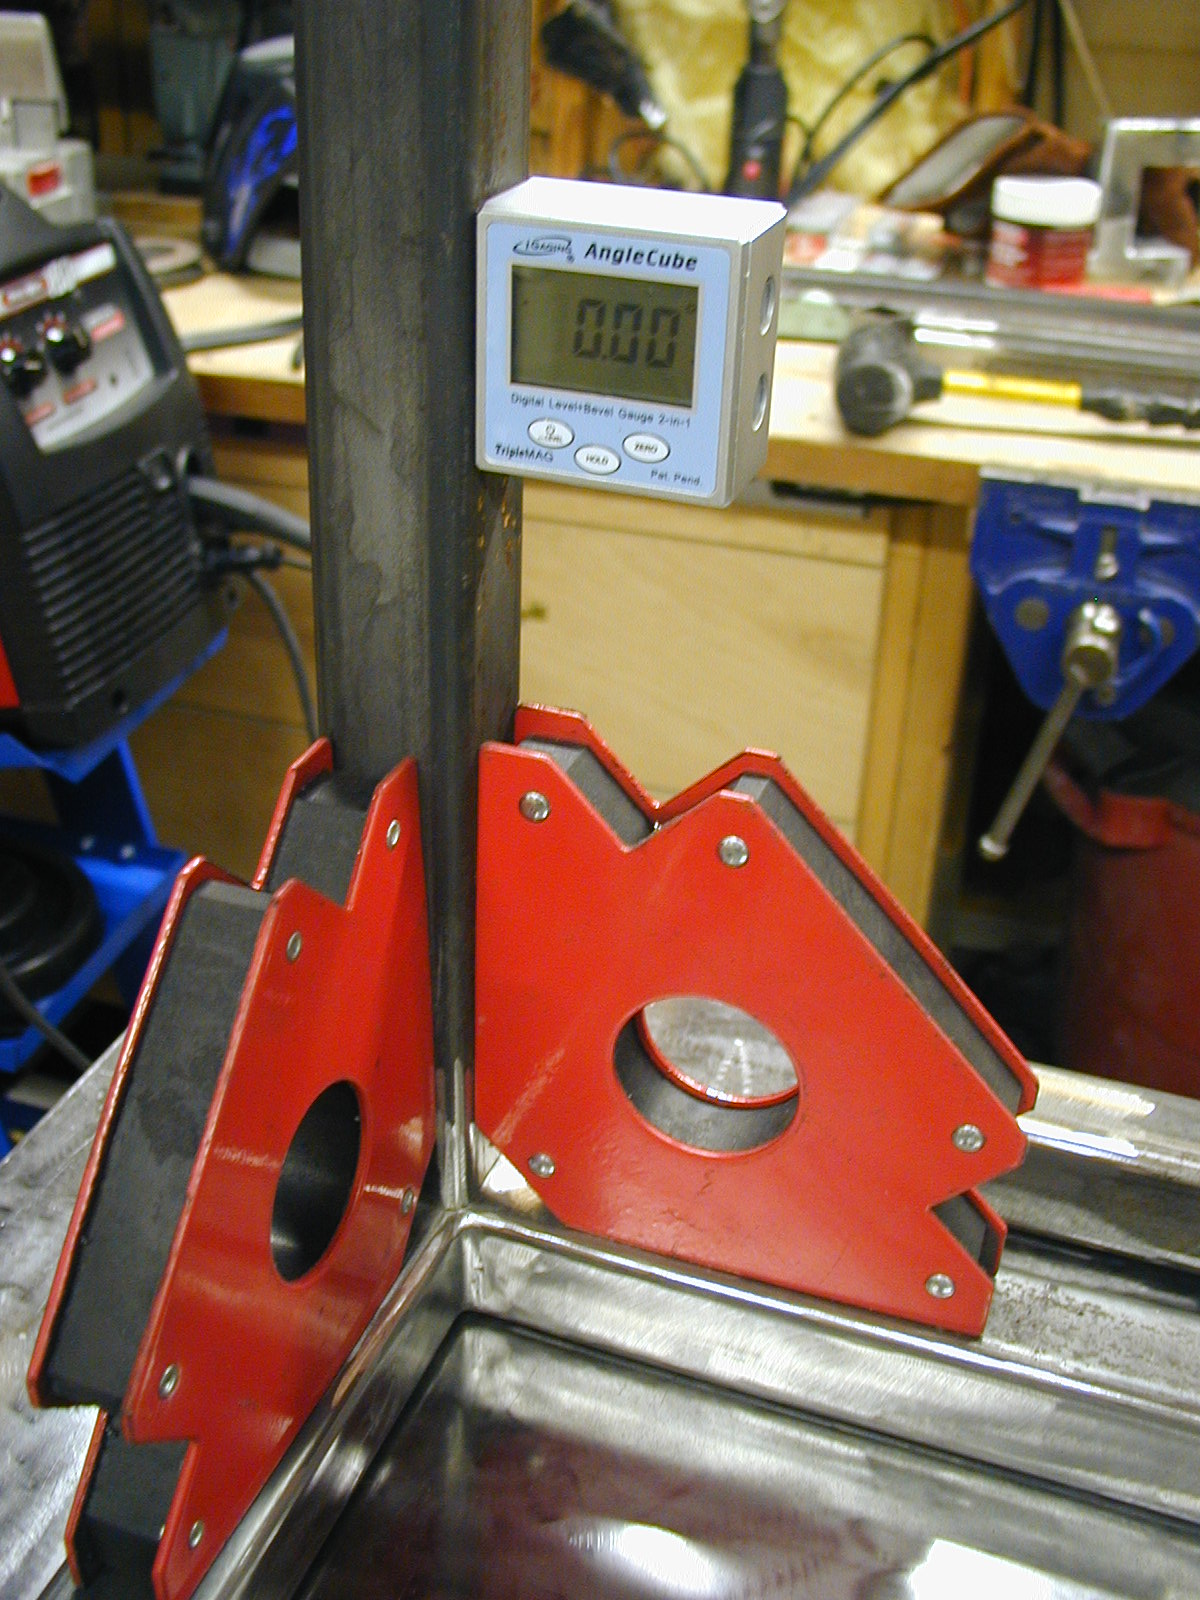
fwiw, I screwed a sheet of 14 gauge steel to an unfinished solid wood door and set it across saw horses when I fab'ed my frame.
Made for a nice level surface to set up angles using mag braces.

P1280010.JPG


It was an investment for sure - and a heavy one at that - but it sure made things easy...

Cheers!
 
I just took a look at my cord, it's 12AWG. I don't recall where I bought it, but HD or Lowe's should have them.

I hear you about the body issues. If I get on the ground, I have to crawl to a tree to hoist myself back up. You might consider a pair of folding sawhorses and an adjustable stool to get yourself off of the ground. Your table would probably be ok, as long as you don't mind lots of little pits from spatter.

I'm heading for a mountain top to watch the meteor shower, so that's all from me tonight. Good luck!

I'm sorry you have to suffer with that, ancient. I hope whatever regime you've got going helps you.

Thanks on the cord (I just realize I typed "chord" above....yeah, used to play gypsy swing alot I guess.... lol). Yep in looking through HD (we don't have Lowe's anywhere near us, which bums me out a bit as it's an option), they have a ton of 12 AWG. Great thought, thanks. Mountain top viewing - sounds awesome!
 
fwiw, I screwed a sheet of 14 gauge steel to an unfinished solid wood door and set it across saw horses when I fab'ed my frame.
Made for a nice level surface to set up angles using mag braces.

View attachment 549704

It was an investment for sure - and a heavy one at that - but it sure made things easy...

Cheers!

Thanks trippr. As usual, you present such an elegant solution. That is a great one to tuck in for down the road, if I want to continue welding. Afraid for now, I'm at the end of my "preparing" stage and just really needing to build this thing before I go bonkers, you know? I'm hoping to get a imperial stout in for conditioning to give to my friends in this neighborhood, most of whom are dark ale fans. I'd love to give it to them by early next month and I need to brew, man, lol!

Your angle cube is seriously cool. But if I were to be totally honest, the first thought that came to mind is how much it would show me what a loser I was in using the abrasive saw, lol. I have to go back on the two top-tier side pieces and re-miter them by a hair, as it turns out. Help me, brother, wave a wand and let this cutting and welding be done, so I can smell some mash again!

Oh, forgot to mention, ancient (and trippr), dumb of me to forget something so simple, but the table in the garage is just a folding laminate table (in excellent shape - flat). Aesthetically, couldn't care less what happens to it; so long as nothing poisons the weld or metal surface in upcoming welds. Just confirming - OK?

One thing in re-watching the Weldfever flux-core video: this globular buildup. He seems to fly, relative to how fast I'm going. Is it possible I'm just going too slow? That if I pull the voltage back to "3" out of 4 but up the wire speed and travel faster, I can achieve good penetration but a cleaner bead?

-and sandy, sorry, I think it was you. But I do have the Mig Welding Tips and Tricks and going through those. Thanks for directing me there. Maybe before I hit the machine again I get this stuff down better.
 
OK, learned a couple things from Jody at Welding Tips and Tricks.com, as well as from a search on the web and wonder if you guys might offer a thought on this. First of all, the company recommends starting with a WFS of 6/10, then adjusting. For my metal's thickness, they'd recommend a voltage setting of 3/4 on the machine.

Now, taking Jamie's way, which sounds great to me, if I go with the WFS based on metal thickness (.078) and amps needed, that gives me 78 amps, and with .035 wire and burnoff rate of 1.6, that gives me about 125 ipm needed.

I haven't yet found what the max WFS is on the machine. Whether it's 700 ipm, or 800 ipm, using this 125 ipm need, that brings me way down below a starting speed of 6. Assuming the machine tops out at 700, that's a setting of 1.8/10 ipm, and if 800, about 1.6.

If I start this low, am I not in danger of possibly welding back to the tip?

These parameters are much lower than I was playing at. It did occur to me - man, maxing the voltage up to 4 and going into 6-7 out of 10 on speed; isn't that just a bit nuts, given I'm only on 14 gauge, not even 11 gauge tubing? So I may have been going in the wrong direction - so try maybe recommended voltage 3/4, but pull speed back to 2.5/10 or so?

Oh - something else I learned. This machine is old, and there's a good amount of rusting in the guide tube, other internal parts. The 10# flux core wire is itself sort of lightly streaked with rusting. The ground clamp is not in great shape though I presume contact is copper, right (it's outside, and I need to look again tomorrow to check its condition), so whatever rusting is happening elsewhere on the clamp isn't really an issue? And after today's session, the nozzle and tip are both looking pretty ugly. I also didn't know any better when replacing and tightening both the wire wheel knob, and the tension knob. So I may have under or overtightened either or both, when re-feeding wire prepping today.

Now that I have learned this from Jody - it seems like many of these things can result in a pretty crappy weld, right? Fits and starts, even if everything else is set great, they can cause these little time-gap misses that can make for a bad bead? Suggestions?

Finally, duty cycle. Knowing what it might be (e.g., 20% at 100 amps. Just example), how do you guys deal with that in terms of welding and resting time - this is manual, right? You weld a bead, keeping in mind about how long you've been running, and then rest it according to the cycle?

Thanks. Jamie's vids are great, thanks again, sandy.

Edit: "Jody" not "Jamie."
 
Last edited:
If you overheat then it will shut off. HAHA. Just try to keep in mind how long two minutes of welding in a 10 min period. I've had to deal with it on small welders and I've overheated them as well. It happens but it isn't great for the machine.

On the settings I'd start with the 3/4 and 6/10 settings and run some test beads and show us the pictures. Those are pretty close to what you want I'd bet. I have actual readouts on my MIG so I can see real welding voltage and WFS. If I use the machine settings from the chart it welds way better than the "calculators" that you find online or slide charts.
 
OK, thanks guys. I grew impatient (dumb) and started in on the frame itself. I dropped the speed down to 3/10, so everything was 3 - 3/10, 3/4.

Here's the weird thing - I was getting better beads. Stickout was very small, and I have the tip actually protruding just a hair, per Jody/Mig Welding Tips and Tricks. I'm pretty frustrated that at one point, near the end for some weird reason, I got burnthrough in fact, on the - what do you call them, just T joint, the joints next to the fillet joints?

I watched Jody and saw that a simple drag actually got a slightly better weld than any circular technique, etc. I don't need a stack of dimes, just want to have this thing strong, and done, so I can begin brewing. Truly bummed about the burn through and I'm afraid I already know the answer - but it seems the rest of the welding is sufficient. Can I ignore that, and keep it?
 
Burn through is no big deal. At least you know your getting penetration. I would just go to your hole and use the gun like a spot weld and fill it.
You should not have to be doing any weave or circle stuff. I would just do a simple drag and pause, drag and pause. When I say pause, I mean a fraction of a second. It will keep you from dragging too fast and stacking up your weld.
.
 
Hey all -

Been AWOL while I work on this, and I'm afraid to say I don't believe it's going well at all. It's funny, because I don't recall having this much trouble the last time (20 years ago, lol), unless I was just clueless as to accepting what would be unacceptably weak welds then, and I was just lucky.

You've all been extremely helpful in this thread, and I know especially without pics (I hope to post some), you can't do much more. I am grateful but I'm feeling like I blew it, and given the ease with which FCAW is to dive in and do, I feel like a rube.

I continue to get issues with burnthrough whenever doing a tee joint. I have tried to increase stickout and lower heat, and it's still almost bankable that I hear that "air tube" and sure enough, a hole or many. I'm sure this is wrong, but I've allowed to cool, and tried to just overlay more wire, weaving to get it to fill in. Often, it just makes the hole worse. Dog House, I know you mentioned treating it like a spot weld and I probably shouldn't have been too embarrassed to ask. I've got a lot of tee joints with undercutting and burnthroughs.

Fillets don't have this problem. Despite bringing light down to bear, I still can't see well and often get a start by sticking the wire in the joint, pulling back a measure, bringing helmet down (not at all happy with this HD helmet, but I'm in at this point), and giving it a whirl. Sometimes OK, sometimes it looks like cold lapping on the bottom member, with little inclusion on the upper member, and nowhere near the proper looking bead I had even on day 1. I don't get why I'm having such an issue with burnthrough on the Tee Joint, and having an issue - I think - with a good, strong bead on the fillets. I even have resorted to minor circling to try and draw the puddle up more on the vertical member. Basically, I still can't see. I won't do it at this point, one because it feels like the kind of thing of "it worked forever, without needing it," but Jody on the website strongly urges getting an auto-darkening helmet from Northern Tools, for currently $60. "Ensures good starts," and right now, it feels like this noob could use all the help he can get. Anyway, worse welding than on Day 1, and I can't figure it out.

Finally, though I've tried to tack diligently and watch for heat distortion effects, whatever they're called, I've...blown that one, too. Horizontal vessel supports, struts, for instance, that "rest" on the rear horizontal member, are off by as much as, 3/8" or so I'd say, so that rear support is useless in terms of supporting vessels. I'd thought to try and clamp the crap out of everything when I finish all main parts, assembling them together (meaning, forcing any misaligned parts by mere clamping and welding, if possible) but then I'd imagine all I have are - what would it be called, internal stresses? - so that's a further weakening.

Anyway, pretty frustrated with myself because I honestly feel like my rig of 20 years ago was a better rig, with 1 x 1, and I knew literally nothing then. I don't get why this one blows as much as it does, unless it's some combination of my body (pretty messed up by end of day - pain:tension:bad welding?), vision less than it once was....but I know that's probably b.s., since I know alot of you are pros who continue to weld, though I might be many years your junior.

Sounds like excuses reading it, but just half tempted to keep this all for scrap, buy another 3 x 24', and try again, as an expensive lesson. The other half says forget it, pay a welder, and learn for next time via a course (found out our local tech has definitely changed policy, and all classes are open to outside students not in the pro track program). I'm not sure this rig is safe, though at 20 gallons it's little more than my previous 1/2 bbl keggle system.

Thanks for reading a rant, I guess I'd call it, and for all your generous help, guys.
 
Last edited:
Grind your welds and put your support back on. You have to use a small tack on one side in the middle. Go to the other side and tack on each side. When the weld cools it will draw you support and get it out of wack. Your tacks on the other side will draw it back straight.
You should be able to tack w/o being able to see. I usually hold my gun right where I want it, close eyes, pull the trigger for about a second, let off. On your Tee joint problem. Why run a bead? You can just get it all tacked, and repeat tack welding it in a line. Your getting it too hot when running your bead. Why not just put the gun right where you want it and put a nice tack weld, and repeat?
 
Dog house, sorry, just want to be clear.

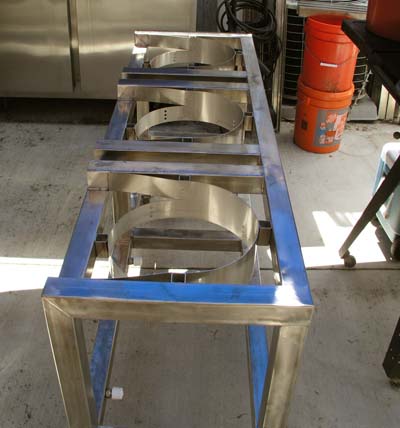
This build is identical to what I'm shooting for, but it's going to look nothing like it....:(

Sorry to ask, but using this photo, would you mind gong in a bit more as to which pieces you're talking about? And by grinding, do you basically mean, grind and sever the welds, and start over? The horizontal support member I'm talking about is to the left; the vessel struts I mean are the 6 struts going L-R starting in the foreground (pretty certain we're on the same page, just wanted to make sure). My vessel struts do not rest on the support member; or several don't, I should say.

I don't know if it was you, or someone else. But did I blow this by not just first tacking the entire frame before welding main structures? (e.g., right now I have the top, front, and back; planned to install the remaining and the frame is done, if completely screwed up).
heat shield with back support lower.jpg
 
If I was building something like that, I'd definitely tack it all together, and once I was satisfied everything was level/plumb/square, then weld it completely. :yes:

...and Ya, if you've got some part of it totally hairball, don't be fraid to grind off the welds and straighten it out. (it's not permanent until you say so )

Lastly, don't be so hard on yourself Gad, it's entirely possible the welder may be to blame. Heck, I don't used flux core cuz I cant see a dang thing through all the smoke either.
 
Last edited:
I don't know why I didn't pick up on it sooner, it's right there in the thread title. 16 gauge! That's auto body metal, or used to be on my old Internationals. Trying to run a bead without burn through is very difficult.

I would use a series of very short tack welds, maybe 1/8" long, say 1/2" apart. Grind flush, then repeat, overlapping the last tacks a bit. A sanding disc is good if you find the grinding wheel too agressive. Keep filling in until the weld is complete. Same process for filling holes. Fill a bit, grind or sand, fill a bit more.


I completely agree with Sleepycreek, tack everything before you commit to final welds.

There comes a point in every major project where you wish you'd never started the damn thing. You just have to push on, and suddenly it's all down hill.
 
Guys, both, thanks very much. Ancient, I'm sorry, if I can change the title I will, as I'm using 14 gauge, not 16 (in mild, this is all the co. offers). I don't know how much this was an issue yesterday but I only noticed today the tip had wound all the way back to deep recess inside the nozzle. I pulled it back it to a hair outside of flush and we were back in business, at least more so. T-joints (is this what you call them? around the corner from a fillet joint) were still not pretty but I'm getting a better feel so less burnthrough and some with cleaner beads. Fillets better, vertical fillets nice.

Tacking everything first and checking much more today (thanks), finished the back vertical assembly of the frame and have the front tacked for tomorrow (do you guys get nasty migraines? Along with another thing, I've a pretty messed up back and I have a weird tendency to migraines when low back pain starts roaring on. But I wondered if that's just welding fumes, or something. (Welding outside, though no respirator). Anyway, do you get migraines? Have to knock off daily when these and my other stuff come on).

After that, it's connecting the front and back with horizontals, and laying the already-completed top on top, and see where we are. Thanks on knowing nothing's set in stone, because I know I'll want to do over at least 1 of the vessel supports. Feeling much better today and you said it so well, ancient - I actually think I'm going to live through this one and taste a brew from it eventually!
 
Don't want this to sound like a flogging ;) but a lot of this learning-curve ascension should have occurred during "play time".
I kept practicing on scraps making butts and miters until I was comfortable with dialing-in the machine and confident I could do a passable job, and that took a good three weeks of play.
The fails and near-fails also sharpened my grinding skills, so that was kind of a win, too :D
Like nearly everything to do with brewing beer, being long on patience helps...

Cheers!

Trippr, you're totally right. And in just about everything patience, probably more accurately perfectionism, is something I take to a sincere fault (I'm not trying to say it's a good thing - I'm saying it's something I've had to unlearn). Not trying to overpaint it but as a traditional French chef who for example maintained 15 or so meat, poultry, fish, shellfish stocks and sauces derived from them, brooked not a speck of surface scum to sit (i.e., trained my cooks, skim relentlessly - nothing is allowed to "simmer overnight"), blah blah, or as a live-in apprentice to a Japanese martial and zen master, receiving daily a$$-kickings to "hone" self and technique, I get it.

I'm being very honest here. And it goes against everything I spent the last decades doing. But with what's happened to my physical self over the last 10 years, I don't know how long I can do any of this. Total crap shoot. I loved brewing like we all do, with a driving passion. Get up in the middle of the night to do an idea for an outdoor Helles at -10F kind of mania. I've said them too much and all of you probably know these bits of memory lane. But I want to get going.

Meaning, this stuff, as necessary as it is, doesn't grab me. I seriously need to get brewing as quickly as a safe build will allow. Kind of sheepish saying all this, but it's just the truth.

I should also say, I made a "MIG" (FCAW - I called it MIG) then, as I've said, without issue. So I thought, well, with good instruction and advise here, and a bit of practice, this will go easy. I was wrong, but I can't back up. I'm in. At any rate, like ancient and doghouse have kindly advised, new day. Everything came out really well today and I see it coming together - knock on metal - rather easily from this point to finish. All thoughts deeply appreciated, though - and you should know I'm very grateful to you trippr for everything you've contributed.

Oh, if I could, one more. The stainless heat shields to the mild 1 x 1 stubs. How much do you guys who use these do, in terms of securing them? I was going to try the mixed metal techniques I've researched (meaning, proper tweaking of the machine and technique to deal with the thinner ss-thicker mild, but welding otherwise fully on all side, as per normal), but I don't know how much these need and was actually thinking of just doing a line along the tops, and maybe a tack on each side, along the vertical of the 1 x 1's. I honestly don't know what would be recommended so thanks for any thoughts.
 
I get it, the best game plans have to adjust for health stuff. Hope you have better days ahead :mug:
Wrt to the shields, 14 gauge will take a stainless sheet metal screw. Might consider that...

Cheers!
 
Pace yourself, man. If it stops being fun, go do something else for a while. We'll wait for ya.

Concerning heat shields and such, I wouldn't be in too big a rush. It might be best to do just enough to make it usable and do a test burn. You'll quickly find out where you need guards and where you don't. You're almost certain to find something you want to change, add, subtract. Best to find it before paint.

I like Day_trippr's suggestion about sheet metal screws. Use short pieces of metal tube for standoff spacers. That would make for a very clean installation.
 
Back
Top