RIMS for Dummies

Homebrew Talk - Beer, Wine, Mead, & Cider Brewing Discussion Forum

Help Support Homebrew Talk - Beer, Wine, Mead, & Cider Brewing Discussion Forum:

This site may earn a commission from merchant affiliate links, including eBay, Amazon, and others.
So a question not related to what you guys are currently talking about.

With a RIMS setup, does it really matter how fast or slow you sparge considering your extracting most of the sugars when your mashing and recirculating?

During recirculation not all of the sugar is extracted, so a slow sparge should still be effective. There is still sugar in the grain after the mash, and it will take some time to rinse it out of there using clean hot water.

I brewed a porter recently, and when I had enough wort for the boil I closed the MLT drain. The runoff was pretty thin and did not taste sweet at that point. 30 minutes later I opened the drain again and now the runoff was darker and sweeter than before. I had done a 60 minute sparge, but either it was not sufficient time or the grain bed had channeled.
 
The hardest thing I think right now, for me as a newbie, is trying to figure out just what my flow rate should be to get a 1 hour sparge. I can let it trickle but I know it would be way over an hour. I guess I just need to play with it for the first few gallons and see how long it takes to sparge 1 gallon and adjust accordingly.
 
On another note, for those that have a rims tube from Derrin at brewershardware.com, have you noticed any rusting on the tri-clamp ferrules that are welded to the larger portion of the tubing? The ferrules I am talking about would be where you connect your in and out. After my brewday on sunday, I cleaned everything really well and then did a inspection. If you hold up each half of the rims tube and look at where the weld is on the inside of the tube, I can see rust forming right on those joints.
 
On another note, for those that have a rims tube from Derrin at brewershardware.com, have you noticed any rusting on the tri-clamp ferrules that are welded to the larger portion of the tubing? The ferrules I am talking about would be where you connect your in and out. After my brewday on sunday, I cleaned everything really well and then did a inspection. If you hold up each half of the rims tube and look at where the weld is on the inside of the tube, I can see rust forming right on those joints.
I would just scrub it out very well with Bar Keepers Friend. It will clean it up and passivate the SS.
 
I'll just add that i agree with the tri-clamp. I don't have one yet but these things need to be cleaned every time. This is the reason i chose not to go herms, you can't clean what you can't see.
 
I've had luck using extreme heat tape applied to the outside of the tube. A couple of end-caps on some tees makes it easy to run a brush through the setup.


Joel
 
I think using the heat tape around a RIMs tube is brilliant and have a lot of ideas floating around for using it. My only concern would be the distance through heated pipe that the wort would travel before it got to the sensor, probably not a problem with maintaining heat but could overshoot if trying to step temperature. I guess it is more of a question of the diameter of the tube, you either go with trying to increase the volume being heated, or go with using the same diameter as the rest of your plumbing to maintain max flow rate.

Also thought it might be cool to use it for some type of inline steam generator using water and 1/8" copper tubing for step mashing.

Any reason why you went with stainless instead of copper? Would think copper would conduct the heat more efficiently.

I used 1/2 inch pipe throughout. I have been running at max flow rate, and getting about 1 degree per minute rise on 3 gallons of mash as measured at the exit of the mash tun. The liquid leaving the heating tube is roughly 5 degrees hotter (at max flow rate, and when the system has been constantly calling for heat (step change)). (see the plot)
347k0fq.jpg


I have used both, but in the recent tube build I went with stainless for structural concerns.
The heaters are mounted one above the other.
Here is the finished build (with the PID)
hupo9f.jpg


Joel
 
Just got my RIMS tube from Derrin at Brewers Hardware, and it is as everyone else has said, excellent. Shipping was lightning fast as well. Added a 4500w 240v ultra low density element (running with 120v) from the hardware store ($18) and connected my Ranco ETC 111000 controller. Brewed the same afternoon after some water testing. Kept within about a degree once everything was stabilized and even got to mashout after a bit of a wait.
Incoming temp to outgoing was only a few degrees rise, so not any danger of scorching. When getting near the final temp I had to set the controller a bit higher to continue the full power heat, but that's the only issue with not using a PID and a SSR I can see at this time.

It was nice to not have to wrap the mash tun with blankets for a long mash and just be able to walk away and do other things.
 
I'm planning on building one of these soon. I'll be getting the tri clover tube from Brewers Handware and using a 1500 watt 120v element. I already have two of these auber PIDs that I was planning on using in a direct fire RIMS:
http://www.auberins.com/index.php?main_page=product_info&cPath=1&products_id=14
I'm going to repurpose them for this application and will upgrade my direct fire RIMS with larger PIDs when it comes time to build it. The direct fire RIMS will be used for bigger 15 gallon batches, but I like that the tube allows me to brew smaller 5 gallon batches in the house. That's nice in this hot Louisiana weather!

I haven't used SSRs before. Could I use this one for my application?
http://cgi.ebay.com/ws/eBayISAPI.dll?ViewItem&item=400177630068

It's a 40 amp, instead of a 25 amp, but I'm guessing that won't make a difference for this build. All the rest of the specs seem to be in order. I feel pretty confident that it'll work, but I'd feel better if someone else gave it a nod.
 
Do you know alot about PIDS or any of the other components you are going to use?

From the sounds of it you don't.. Take my advice, use the pid and other components that most of us have used. If you don't, most of us can't answer your questions. Some can.

I built a nice system like what you are trying to do but i didn't use the components you want to use.

Do whatever you want but i ran into this situation and I returned a bunch of stuff so i could get the advice..
 
Thanks for the advice, but since I already have the PIDs in question, I'd rather use them if at all possible. Looking at the instruction manual here:
http://auberins.com/images/Manual/SYL-1512A2instruction%201.0.pdf
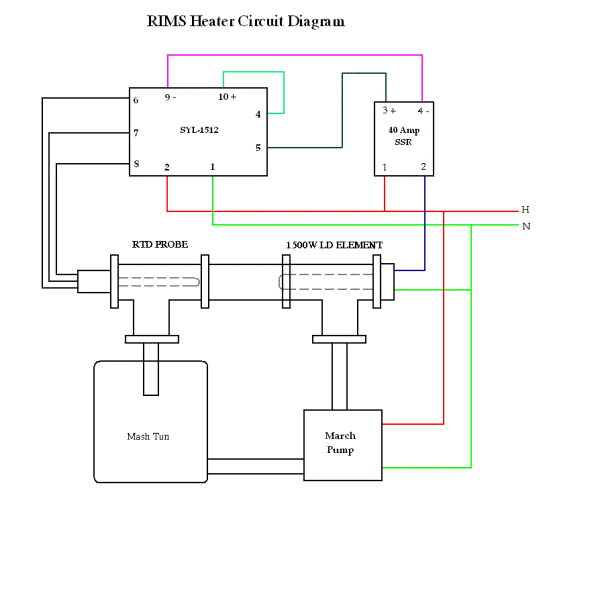
I see that terminals 9 and 10 can be used for SSR control. The J1 relay on terminals 4 and 5 can be configured as either a high or low alarm when the SSR control option is being used. Terminals 6, 7, and 8, will be used for the RTD probes that I own.
The only real question I have at this point (I'm sure I will think of more later) is about using the Low alarm relay to shut down the heating element.
In order to use the Low alarm to shut down the heating element, I would route the PID's SSR + out to the J1 relay at terminal 4, then attach the other end of the relay (terminal 5) to the SSR +?

See attachment below.

RIMS.GIF
 
I can't help you there. I don't use any of the alarms on my pid. I just set the target temp and it has a +1 -1 degree swing. Works perfect.
 
I can't help you there. I don't use any of the alarms on my pid. I just set the target temp and it has a +1 -1 degree swing. Works perfect.

Same here. When you use your RIMS for the first time you will know what your differential is as far as heat loss goes also. On my system it is about a 1 - 1.5 degree differential in heat loss. So if I want to mash at 156 I will set the PID for 157.5 and walk away and have a beer
 
I just completed my rims with this same set-up and brewed two beers on Sunday. Works great. The only modification I made was I put a switched receptacle in the box for the march pump. I can flip the pump on and off right on the control box.
More importantly I wired the heating element that it can only get power if the pump is on. No pump=no heat=no scortching.
Just cuase i was scared lol
 
Cool! So you used the low alarm as an element shutdown? It was wired like in the attachment?

Here's the entire layout I intend to use. It allows me to use the march pump without having to energize the entire panel. It's wired so that the element can't come on unless the march pump is engaged. It also has a switch just for the element as an emergency shutdown. The element switch isn't really necessary as the on/off switch and march pump switch would both switch off the element in case of an emergency, but I felt the need to balance the aesthetics of the panel with a third switch.

RIMS2.GIF
 
I just completed my rims with this same set-up and brewed two beers on Sunday. Works great. The only modification I made was I put a switched receptacle in the box for the march pump. I can flip the pump on and off right on the control box.
More importantly I wired the heating element that it can only get power if the pump is on. No pump=no heat=no scortching.
Just cuase i was scared lol

yeah, i really need to do this. Can you tell me how you did it?

It is so important to do this, I can't tell you how many times already i needed this feature. A few times I would turn off the pump for whatever reason and a few minutes later a light bulb goes off and i say oh **** the element is still on!
 
DO you basically make the pump wiring inline with the element wiring so when you turn the switch it completes the loop giving it power?
 
You need a DPST switch to do what you want. The Pump Switch on my diagram below is wired so that the element can't come on as long as the pump is not engaged. One pole of the DPST will switch power to the pump, the other pole will be used to switch power from the SSR to the heating element. When the switch is open, no power is going to the pump, and the SSR is no longer connected to the element. When the switch is closed, the pump and element are both engaged. Just make sure that the switch you use is rated for the amount of amps your element will draw. The switches I'll be using in my panel are rated for 125v and 20 amps:
http://www.allelectronics.com/make-a-store/item/STS-59/DPST-ON-OFF-HEAVY-DUTY-TOGGLE-SWITCH/1.html

RIMSSwitch.GIF
 
FYI, in the case it helps someone. The 1500w Extra Low density element from plummers supply does barely fit in a 1.5" RIMS tube (fittings from Murray). No bending required -- there's about 1/16" of clearance between the element and the wall of the pipe.
 
FYI, in the case it helps someone. The 1500w Extra Low density element from plummers supply does barely fit in a 1.5" RIMS tube (fittings from Murray). No bending required -- there's about 1/16" of clearance between the element and the wall of the pipe.

This is what I have as well. I love it. How much "White hazzy stuff" is on your element after a brew session? The reason I ask is that I have noticed with mine that I have a minimal amount compared to other photos I have seen on here after a brew session. I only take my element out every other brew to clean it. I do run PBW through it though after every use though.
 
This is what I have as well. I love it. How much "White hazzy stuff" is on your element after a brew session? The reason I ask is that I have noticed with mine that I have a minimal amount compared to other photos I have seen on here after a brew session. I only take my element out every other brew to clean it. I do run PBW through it though after every use though.

Only about 4 batches so far. I've taken the element out once, and it didn't look bad at all. I've been cycling 190* oxyclean through the system during clean up though. I'm pretty happy so far.
 
Just got the last pieces that I was waiting on for this build. Hopefully work will cooperate and I will have time to put it all together this week so I can brew next weekend.
 
Hi all,

I built my RIMS with the SS hardware and it leaks. Even if I can get that sorted out I want a cleaner set-up. I'll use it so I can try to dial-in the concept and see if I like RIMS, but here are the two options that I'm looking at.

I was going to go with the Brewers Hardware set-up but it looks like it's only 1 1/2". Is this true? The conical-fermenter is 2" which I like better, mainly to help with the heating element > tube wall clearance issue. Has anyone used the conical-fermenter's RIMS tube? They both look like an excellent set-up.

TIA

https://www.brewershardware.com/RIMS-Tube/
http://conical-fermenter.com/wp-content/uploads/2010/05/RIMS-Module.jpg
 
So I have successfully built a RIMS system with 100% the help from this forum…specifically this subject. Thanks everyone for the years’ worth of feedback this has provided. My circuits are all run safely and well, and my hydraulics are sound.

Everything works like a charm with one MAJOR problem: I can’t figure out the PID SYL 4342 controller. I thought it would be as simply as setting the process temperature to my desired mash temperature…but this does not seem to be the case. I splurged for the ramp/soak option and I think that all the available programs (or “steps” if you will) may be confusing things.

Is anyone familiar with setting a 4342 that is equiped with the ramp/soad option? If so, is there any basic procedure to setting things to my desired mash temperature? I got the ramp/soak option thinking this would be great for adjusting step mashs automatically but now I would just like to get her going. The manual - while it appears to have much information - seems to be a bit techinical for me (I'm a civil engineer and I think it's written for the smarter mechical, electical and chemical types). Any help would MOST CERTAINLY be appreciated!

Thanks again everyone for the wonderful gems of knowledge this forum provides!

Initially I would want to make sure you have the correct temperature sensor you are using configured in the PID. Then I would autotune the PID on your running RIMS at or near the flow rate you are expecting from your MLT. Get autotuned first so the PID knows how quickly your system can apply heat, then go from there.

Also - looks like you got the model that works for Relay contact output and not the one for SSR control output - the 4352P. This could be the real problem. Is the PID controlling a relay contact or an SSR?

Thanks for the reply stlbeer. I am using an SSR and my output configuration option is "SSR Control, Ramp/Soak" so, unless they sent me an incorrect model from what I purchased, this should be the correct controller. My problem is that I can't even figure out how to run autotune. The instructions on't give any clear direction.
 
How is everyone's efficiencies using this RIM system? Just using a batch sparge in an igloo I typically get 75-80%. I now have this RIMS set up using a false bottom in a 10-gallon igloo. I have mashed with and without increasing to sparge temps but and still only get 62-65% efficiency. Is that the norm? If so, I can always just throw in additional grain but I'd love to find a method to be more efficient (perhaps turning off the system for a part of the time).

Aside from that, this system is great. Clearer wort than I've ever seen!
 
So you lost efficiency wwhen going to rims? Interesting. Channeling perhaps?
 
How is everyone's efficiencies using this RIM system? Just using a batch sparge in an igloo I typically get 75-80%. I now have this RIMS set up using a false bottom in a 10-gallon igloo. I have mashed with and without increasing to sparge temps but and still only get 62-65% efficiency. Is that the norm? If so, I can always just throw in additional grain but I'd love to find a method to be more efficient (perhaps turning off the system for a part of the time).

Aside from that, this system is great. Clearer wort than I've ever seen!

I saw a huge uptick in my efficiency batch sparging on a rims system. I don' tremember the numbers, but it was cool.
 
So you lost efficiency wwhen going to rims? Interesting. Channeling perhaps?

Is "channeling" when most of the flow goes through one column of the mash instead of evenly? If so, would I me able to visually confirm this? I don't see any depressed area in the mash as if everything was being sucked from one area. And all of the spent mash appears to be the same color. Also, my false bottom seems to be designed hydraulically to avoid such channeling because the water falls through the holes then gets sucked from the bottom of the false bottom.
 
I saw a huge uptick in my efficiency batch sparging on a rims system. I don' tremember the numbers, but it was cool.

So did you run the RIMS normally then turn it off and do a typical batch sparge as you would a mash without any RIMS? I simply set my mash temp to 170 for 10 minutes...didn't add additional hot water to the system.
 
Liebz15 said:
Is "channeling" when most of the flow goes through one column of the mash instead of evenly? If so, would I me able to visually confirm this? I don't see any depressed area in the mash as if everything was being sucked from one area. And all of the spent mash appears to be the same color. Also, my false bottom seems to be designed hydraulically to avoid such channeling because the water falls through the holes then gets sucked from the bottom of the false bottom.

Sometimes you can see it. The last brew I did to I looked at the mash after I finished sparging, and there was a 1/8" gap in between the mash and the cooler walls. Supposedly it doesn't matter when you batch sparge, but if the flow from the recirculation is constantly channeling, you wont be getting freshman sugars from the middle of the mash. Does that make sense? I've yet to build my rims system yet, so maybe I don't know what I'm talking about, but just a thought.
 
So did you run the RIMS normally then turn it off and do a typical batch sparge as you would a mash without any RIMS? I simply set my mash temp to 170 for 10 minutes...didn't add additional hot water to the system.

Re-circ at temperature for 60 mins, then ramp up to 168 for mashout for 15-20 mins. Drain the wort.

Then, add a second batch of sparge water, stir the mash, recirculate for 15 at 168.

Perhaps your problem is that you are doing a single sparge?
 

Latest posts

Back
Top