ventless condensation hood

Homebrew Talk - Beer, Wine, Mead, & Cider Brewing Discussion Forum

Help Support Homebrew Talk - Beer, Wine, Mead, & Cider Brewing Discussion Forum:

This site may earn a commission from merchant affiliate links, including eBay, Amazon, and others.

Lucky_Chicken

Well-Known Member
Joined
Jul 1, 2011
Messages
795
Reaction score
41
Location
Bloomfield
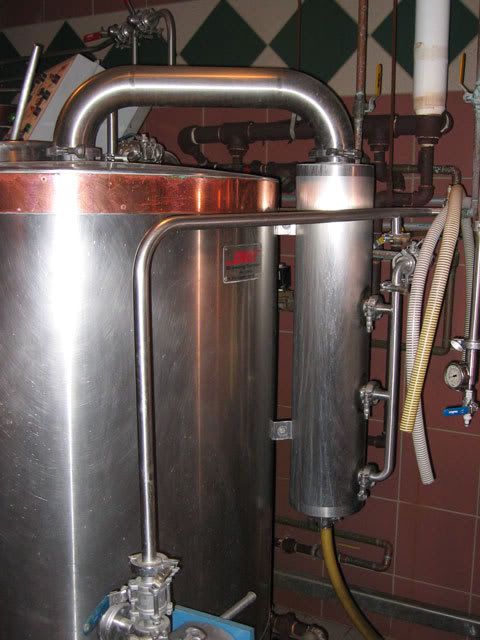
You see some commercial breweries use them like this small one: Steam condenser for the boil kettle. Cold water sprays in and condenses the steam from the kettle so it can just run into the drain instead of smelling up the neighborhood.
condenser.jpg


Quote from Kal:
For home use I don't see this really working because:

- You'd need to run water through it during the entire boil (very wasteful).

- Nothing is 100% efficient so you'd still get *some* humidity in the room which will build up. How much, I don't know.

- Heat: None of the heat escapes the room so the room would likely get very warm over time.

I'm still curious to hear about experiences with a steam condenser however. It's an interesting idea.

Kal
end quote

My plan will just get most of the steam, in the summer its not a big deal I'll just leave a window open and in the winter a little humidity will be good!

for running water my plan was to recycle water from a large bucket with a pond pump.

with my system yes heat would build up and again in the winter that's good, and in the summer a fan will fix/ help with that.

sorry for the hijack! I should probably start a thread on it.... so here it is
____________________________________________________________

My plan: have a column with a copper coil in it the the pond pump pumps up to, then at the end of the coil spray the cooling water out into the steam flow. the condensed steam and the spray water falls back down into the bucket, like the commercial condensers the steam will be drawn in the top from the cool air pulling down and out the bottom.

the only question I am unsure of is how much cooling water is needed, and if i will be able to generate enough airflow.
 
humm... no comments, I am having concerns about the amout of cooling water needed. I realize that with the pump and the water it would probably be about the same if not cheaper to use a vented hood but thats not very portable (i have two buildings i brew in). Ideas anyone?
 
I just saw your thread now. I have to take an approach like this for my setup. I am brewing in my utility room in my townhome, but it is sandwiched in between other units so I have no direct link (window) to outside. The good news is there are two vent lines already plumbed in (intake and outtake) for a washroom that was never built. The bad news is the vent lines are probably a good 30~40 feet long. They go through the utility room, around and along the garage to the outside.

What I fear is directly connecting my well underpowered range hood to the vent lines and just mercilessly filling the vent tubes with condensation. I fear water, rust, damage to walls, ceilings and whatever is near the vent lines.

So I'm thinking I have to modify my existing plan and go with a steam condenser.

To comment on Kal's thoughts...

- You'd need to run water through it during the entire boil (very wasteful).
* I run a pond pump on a reservoir (a rubbermaid garbage pail full of cool water). This saves water as you are recirculating and not dumping directly. However, when the water warms up you need to either dump a bit and add cool water to the reservoir or switch to another reservoir. I'm sure there are heat transfer calcs out there somewhere to show how much water is required.

- Nothing is 100% efficient so you'd still get *some* humidity in the room which will build up. How much, I don't know.
* True, and this is the big quiestion, but if you knockdown most of the steam with cool water you can achieve decent results. For me, I have no choice given the location of my brew room.

- Heat: None of the heat escapes the room so the room would likely get very warm over time.
*Most of the heat is exchanged to the water reservoir. This can warm up the room, but in my experience this hasn't been an issue at all.


What I am planning is a steam condensor connected directly to my brew range hood. The underpowered fan will be far more efficient on the shorter run of pvc/abs piping of the condenser rather than the 30~40 ft length of steel vent tubing. I will also install a bathroom fan on the existing vent lines to get a bit of circulation going if I need it. At least this keeps most of the heavy condensation out of the vent lines, and I won't have to run the vent none-stop which would cool/heat my entire house.

I'm thinking of either two ideas, a large pvc pipe with several 1/2" copper pipes and/or coiled 1/4" copper coil running cold water to act as the condenser, or a simple shower head/garden spray attachment rigged up to create a physical shower/mist spray in the pvc tube to directly come into contact with the steam vapor. I foresee an issue with both of these methods: The copper coils may not have enough surface area to knock everything down an still let vapor out into the room, not to mention that more copper = more money. The shower tube idea is more economical and most likely exhibits the most amount of surface area for steam/cooling water conversion, but this might likely push cooled moist air out of the outlet.. Not sure really, but I think I might run some experiments first.

I'd love to hear your comments!!
 
nice... I am looking at a combination of those two ideas. I have a small amount of copper coil left over, so I plan on doing a copper coil that has a spray at the end. Gross condence on the coils, then spray below them. Might get the best of both? or might just be a waste but I'm trying it anyway.

I also plan on using a pond pump in a tub. How often do you have to change out your cooling water on the still? Might give me an idea on how many tubs I will have to have around.
 
Yeah, a shower head of something to spray around the water would be cheap and easy to add on.. if it adds too much mist in the air then you can simply cut it out. My only concern is the fan will be pushing the steam/air fairly quickly through the condenser and any misting that is going on might end up coming out the outlet. Maybe try for more of a shower than a fine mist? That one needs tinkering for sure..

Steam at 212F will carry a lot more heat energy at a much higher rate (fan pushing) so I'm really not sure what to expect.

I think I'm going to go with a shell and tube type of design for this. I'm thinking 4ft long copper pipes x 12 to make the bundle all inside a 4" pvc tube. I will put in directional baffles to help circulate/turbulate the steam so I can make sure I achieve a better heat exchange. I will post up a cad model of what I'm thinking.

Make sure you go with a countercurrent flow for your water,, that is cold water goes in the coil closest to the steam/air outlet, and the hot water in the coil exits near the steam/air inlet. That will achieve the maximum heat exchange.

I've also looked into a bunch of charcoal air filters that I'm thinking I could add to the de-vapoured air outlet to possibly help kill some of the odor (odor to some, aroma to others..)

Should be a fun project Lucky Chicken. I'm glad someone else is trying the same thing.
 
- You'd need to run water through it during the entire boil (very wasteful).
* I run a pond pump on a reservoir (a rubbermaid garbage pail full of cool water). This saves water as you are recirculating and not dumping directly. However, when the water warms up you need to either dump a bit and add cool water to the reservoir or switch to another reservoir. I'm sure there are heat transfer calcs out there somewhere to show how much water is required.
I think the problem is you'll find that the efficiency of the condenser drops fast as the cooling water heats up. This is why commercial breweries use a cold water supply only.

Using cold water submersed in ice would help. Sort of like a wort pre-chiller of some sort. But then that's a lot of work to set up, ice to make, etc.

In the end it would certainly be the easist and most efficient to just use cold water from the tap. Maybe there's a way to save the water for next brew day? Laundry? Something else?

- Heat: None of the heat escapes the room so the room would likely get very warm over time.
*Most of the heat is exchanged to the water reservoir. This can warm up the room, but in my experience this hasn't been an issue at all.
But unless the reservoir is in a different room, the heat's still in the same room so I don't see what difference it makes where the heat is in the room (heat is heat). When you exhaust to the outside a lot of the heat goes out that way. And more importantly you have (or should have) cool make-up air coming in. (You can't expel air without make-up air coming in to replace it).

Not trying to rain on anyone's parade, just trying to figure out how do-able this is myself. It's certainly an interesting idea.

I'd be careful with the pump as well. Most pond pumps have very little static pressure and won't be able to push well through a long copper coil. Something a bit strong may be needed to get adequate flow.
 
Thanks for the comments Kal. You are absolutely correct on both accounts, but I suppose the level of acceptability comes from how much energy is going to be exchanged. I only do 5 gallon batches and plan on running a rolling boil, but not too vigorous to produce excess steam.

From what i've run in the past a rubbermaid garbage pail with cool water was adequate enough. I'm not all to certain with the amount of steam I will be facing though, but I will give it a shot. I can always direct heated water from the heat exchanger to the drain and top up the reservoir with cool tap water once in a while. I may even have to employ the use of a radiator to help keep the water from heating up too quickly.

What I was getting at with the heat build-up in the room is that the shear amount of heated water/steam release wasn't enough to heat up my room to uncomfortable levels. Since the transfer of warm water to air is slower than just releasing vapor right into the room it gives me time to drain most of the reservoir when it gets hot. If I were to leave the reservoir hot in the room then yes the room will get hot overtime. Again, I'm not sure what the overall level of heat exchange will be (I must find some calculations) but I hope they won't be unreasonable. Again, I have no real choice, so I'm the guineapig on this one.

I do have a pond pump, but its more of the industrial variety for large fountains. Hopefully that will do the trick.

I will be sure to document and test whatever rig I set up. I will be taking moisture and temperature readings and report the results for all. If it doesn't work, at least I can brag that I have a nifty heat exchanger.
 
Good luck! I'm looking forward to hearing how the tests go. The concept is certainly plausible (it's used in commercial breweries). Like you said the question is how well it'll translate to home use and at what cost/complexity.

Kal
 
Hopefully I can shed some light on if it will work for home-use as well as answer the unknown questions well all have. I will document the build so that if it works, others can expand and improve on it.
 
I'll tell you what.

If you put finished beer (unhopped) back in there and bring it up to temp slowly, and condense the vapors, you'll make moonshine!

What is picture, is essentially a pot still!
 
Okay, I completed my build on this project. I did a test run on the system and the pump is circulating the cool water perfectly. I am still waiting on my new boil kettle, so once it arrives and I have it set up I will do a full boil steam test. I will post up the picture after the testing is completed. But I did do a smoke test (smoke from burnt paper) to see what the uptake is like with the range hood through the system and it seems to quickly pull everything up into the steam condenser. I created a 2 stage system: stage 1 is a shower tube, stage 2 is a shell/tube type heat exchanger with baffles. Its a pretty good system for just a bunch of home depot plumbing parts.
 
Okay, I completed my build on this project. I did a test run on the system and the pump is circulating the cool water perfectly. I am still waiting on my new boil kettle, so once it arrives and I have it set up I will do a full boil steam test. I will post up the picture after the testing is completed. But I did do a smoke test (smoke from burnt paper) to see what the uptake is like with the range hood through the system and it seems to quickly pull everything up into the steam condenser. I created a 2 stage system: stage 1 is a shower tube, stage 2 is a shell/tube type heat exchanger with baffles. Its a pretty good system for just a bunch of home depot plumbing parts.

I'm glad to hear someone has more time than I do to work on this project! Cant wait to see your pictures.
 
Me too. this is on the cusp of my own decision on how to handle ventilation for my system when I brew int he basement. I do 11g batches, but would love to see how this turns out!
 
subscribed for sure...i have a vent hood i was going to setup in my brewshed however i like this idea a little better. i was already anticipating using a 55g drum for wastewater (grey water for stuff that will never touch wort) to be used for the plate chiller or other such tasks...
 
The number of items that I still have on my task list is quite daunting.. My kegs are empty and as much as I love working on projects I will be really happy when they are all complete. I'm still working on making a manifold, setting up the element in my new kettle, making a stir plate...

My plan at the moment is to start with cool water in a reservoir and when it has been heated I will change the connection on my pump to my spray hose for washing/cleaning. I will try to do the full scale test this weekend so I can post up the pictorial and component list.

I can relate on many levels! :D Looking forward to it
 
Okay, so here is a picture of my tiny brew space. Its between my hot water tank and the washer and dryer. Pretty pathetic, but the space is all mine so I might as well try to make beer here. Basically I just brew right on top of my fermentation chamber with a few cork insulation hot pads.
attachment.php

attachment.php


First off I mounted my range hood to the wall above my fridge.
attachment.php

attachment.php


DSC04637.jpg


DSC04639.jpg


DSC04714.jpg


DSC04715.jpg
 
Next I assembled the Stage 1 - Cold Shower Tube. The entire system was built with 4" PVC drain pipes and attachments because they are inexpensive and can be built watertight. This picture shows the finished stage 1 assembly. The steam/hot air comes in through the inlet tee junction in the bottom right, travels upwards and exits to the top left tee junction. At the top you will notice a fitting, this is attached to a tube that extends down past the upper tee fitting. The tube is then attached to a simple button 360 sprinkler. The fitting, tube and button sprinkler were all found in the home depot lawn sprinkler section. The button sprinkler head was $2 I believe, and it works wonderfully by making a nice mushroom effect with water that the steam has to travel through. This should knock down much of the steam. There is also an added length of tube that extends down from the lower tee junction, this is to allow space for the water to collect so it doesn't flow back into the range hood. By the way, the lower tee junction fitting is not like the upper fitting. The lower fitting has an angle in it, which is pointed downwards to keep any down-flowing water from traveling into the range hood. You can see this better in the completed assembly pictures.
attachment.php

Here is a view inside the upper tee fitting. You can see the pipe that extends downwards into the tube.
attachment.php

Here is a view of the button sprinkler head inside the tube.
attachment.php


DSC04718.jpg


DSC04719.jpg


DSC04720.jpg
 
Next was the Stage 2 - Shell and Tube Heat Exchanger. This stage knocks down the remaining steam vapor and cools the air. This stage took longer to build than Stage 1. Stage 1 was very simple.

The internals of the steam condenser are made up of 12 x 4 foot lengths of 1/2" copper pipe ($13 for 12 feet lengths at home depot, 3 x 12 foot lengths, each 12 foot length yields 3 x 4 foot lengths). To organize the 12 pipes in a nice pattern I took 2 x 4" PVC caps and laid out a pattern. I drilled 12 holes from my pattern with a 5/8" drill bit and slid the pipes in. I then took 12 x slip-on copper couplers and glued them on the ends of the pipes. The copper couplers keep the copper pipes from sliding out of the cap - basically locking the internal copper pipes in position.

You will also notice that I created a bunch of half baffles that are placed in a staggered formation. These help direct the moving air/vapour along a longer and more turbulent course around the copper pipes instead of allowing the air to travel in a direct and path-of-least-resistance manner. These half baffles were made from the same 4" PVC caps, but I just cut the slip portion of the cap off. All the caps where drilled at the same time so I could easily repeat the pattern for all the caps... And remember to mark the caps so that you know the orientation for making lining up easier during assembly ( I wish I had done that.. what a pain that was).
attachment.php

Shows all 12 copper pipes assembled with half baffles in place.
attachment.php

This picture shows the pattern for drilling the caps.
attachment.php

This picture shows the copper couplers being installed on the ends of the copper tubes to secure them within the PVC cap. I just used super glue to hold them inplace - I didn't want to solder them because the PVC would likely catch fire and melt. The large amount of grey glue you see is PVC cement. I had gobbed quite a bit there to seal up the copper pipes to the PVC cap. This sort of worked, but it does not adhere to copper well. So I ended up using silicone adhesive caulking around the copper tubes/couplers and the PVC cap, which worked well.
attachment.php

More explanation will follow about the water channeling. The item on the left is a cap with a quick connect for the pump water in that feeds the heat exchanger. The item in the middle is the lower cap that holds the bottom potion of the heat exchanger tubes in place. There is a plastic fitting on it - this is a drain port for the condensed water. The item to the right is a cap with a plastic fitting on it. This cap goes on the top of the heat exchanger system. The water that has traveled up through the heat exchanger will collect in this cap and exit through the fitting. It then travels along a hose to feed the Stage 1 Shower Tube upper fitting that connects to the button sprinkler.
attachment.php


DSC04716.jpg


DSC04717.jpg


DSC04638.jpg


DSC04721.jpg


DSC04723.jpg
 
Here is the almost completed Stage 2 assembly. At the bottom of the picture you can see the copper pipes/couplers sticking out of the drill pattern cap. There is now silicone adhesive around each copper pipe to create a water seal (does not have to be perfect for this application). You can also see the plastic fitting that protrudes from the drill pattern cap - this fitting is the drain port for the condensed water.
attachment.php

This picture shows the now completed Stage 2 assemble, but the other way around so you can see the top of the system. You can see how its really a double-cap method - the first cap (drill pattern cap) holds the copper tubes in place and separates the inside of the condenser to the internal inlets of the copper pipes. The second cap allows for water to be pumped in (for the bottom cap) and collected and pumped out (for the top cap). I initially glued the caps on with PVC cement, but added a layer of epoxy around each of the caps to added extra security. I also added a foil tape around each of these joints for even more security, and to hide the glue to give a bit of flashiness.
attachment.php

This is a view inside the upper tee junction showing the copper tube bundle. Just inside there you can see the first half baffle to the left of the opening.
attachment.php


DSC04724.jpg


DSC04727.jpg


DSC04725.jpg
 
Next I PVC cemented the Stage 1 and Stage 2 elements together with the connecting PVC pipe. I lifted it into place and secured it in place with 5" diameter hose clamps that I had screwed into the ceiling beams (or floor beams if you prefer)..

This picture shows the connection of the range hood to the Stage 1 Shower Tube. Here is where you can see the tee junction fitting is directing the steam downwards, where it then will travel upwards. Again, this is to prevent water from the sprinkler from traveling into the range hood. I also just used the foil tape to secure the range hood vent to the PVC coupling.
attachment.php

attachment.php

You can see the large hose clamp holding the system in place. I used 3 of these in total and the unit is rock solid. In this picture you will notice that I have attached the drain lines (cheap 1/2" hose) to both Stage 1 and Stage 2. These drain lines are joined together with a tee fitting (all fittings are plastic home depot fittings from the lawn sprinkler section) and then to a single hose that is placed in my laundry sink.
attachment.php

This shows the tee junction between the drain lines with a single line going to the laundry sink.
attachment.php


DSC04730.jpg


DSC04729.jpg


DSC04734.jpg


DSC04731.jpg
 
This picture shows the pump feed line into the Stage 2 Heat Exchanger. I used a quick attachment because I hate screwing/unscrewing traditional garden hose attachments.
attachment.php

This is a picture of my pump in the laundry sink. Its a 600GPH pump from home depot. It is adequate for the job in my opinion, but if I were to buy a pump again I would go for a sump pump 1/6 or 1/4 hp pump to increase the head-height flow rate. But for now I'm happy with this.
attachment.php

This is a picture of the Stage 1 & 2 systems installed.
attachment.php

I had also added an exhaust fan to the system since I had one sitting around. Its a simple duct booster fan ($19 home depot) which is hard wired into the range hood fan switch. Both the range fan and this exhaust fan run on low and high speed settings. Unfortunately the exhaust fan is for a 6" duct, so I had to improvise, but I ended up with a 90 degree PVC elbow directing the exhaust air upwards into the exhaust fan. Simply put, the range hood fan pushes and the exhaust fan pulls. This is a fairly short run of pipe for the steam to travel through, but there are a few obstacles and redirection that reduce the air flow. But with this push/pull fan system I am achieving excellent results.
51793d1331324661-ventless-condensation-hood-dsc04746.jpg


DSC04738.jpg


DSC04739.jpg


DSC04741.jpg


DSC04746.jpg
 
So, does it work? I ran a 4 gallon pot of water at a vigorous boil for 30 minutes and took these readings.
Right above the pot and below the range hood: 42.9C (109.2F)
attachment.php

At the outlet of the system: 23.7C (74.6F)
attachment.php


I then went ahead and made a 5 gallon batch of a very simple pale ale. I ran a 90 minute boil at a very vigorous boil (80% power on the PID) to boil down extra water that somehow made its way into the pot (+8 gallons pre-boil)...
attachment.php

And here is the set-up post boil with the heat exchanger all set up.
attachment.php


So, how did it go? Well I'm still alive, so that's good. Great news is the dual stage steam condenser system works wonderfully. The range is powerful enough to pull up all of the steam (its pretty fun to watch) and the output is fairly cool and dry. I didn't notice significant moisture in my little utility room, though it did heat up. At the end of the 90 minute vigorous boil-off type of boil my room (8' x 10' utility room with a closed dor) was reading 26.7C (80F). I think that I can improve upon this because I did identify a weakness - the range hood.

The range hood is nice because it looks clean and it was in-expensive ($24.99 on sale), but it is not designed for capturing steam and dealing with condensation. This is mentioned by others, most notably Kal, and I am just confirming this. There are a few problems, the hood has many steps and curves in the underside, so any moisture that develops will form drops in various spots. Many of these drops form in the middle of the range hood and drop back into the boiling pot.. Its annoying and tireless to try to wipe the all away in time. The other problem is the range hood does not extend downwards enough to trap the steam. Fortunately the fan quickly whisks away most of the steam (+90%), but there is a turbulence that is created towards the back of the hood. This is perhaps because the design of the fan and its mounting do not direct the flow of air directly into the outtake ducting. The air is sort of forced into a square box area behind the fan and then it makes its way into the duct above. This square box area allows for multiple exhaust porting options, either directly behind the range, directly above, or slightly above and forward to recirculate air above the range hood. This design kind of sucks, but its cheap and works.

I think I will either build a drop shield that extends down around the back and sides of the hood to help capture the steam better and perhaps think of a way to modify the hood so it doesn't drop condensation back into the pot.... or I will just build my own hood from plastic, painted sheet metal or stainless sheet (my work stocks this stuff) if I can't find a cheap one online.

I think that a modified range hood or a better hood would probably help keep the room a bit cooler. I am also setting up a bathroom fan in the existing duct lines to help move a bit of air in and out of the room. Now I can use this fan without the fear of pumping the ducts full of heavy condensation.

The pump works just fine in the system, but I think a higher power pump would improve efficiency a tad. I just used my laundry sink as the reservoir on this run and it heated up slightly after 90 minutes. I was surprised as I thought that it would be smokin' hot. I ended up using the water to wash all of my pots at the end, I just wish the water was a little bit hotter :p .

All in all I say mission accomplished though. I can brew indoors without fear of condensation destroying my house. I can live with a slightly hotter room for now, but I think that a modified hood, bathroom fan for the utility room, and perhaps a higher powered pump in the future will definitely improve upon this.

DSC04753.jpg


DSC04772.jpg


DSC04769.jpg


DSC04758.jpg
 
Very nice. I don't know that I could go to all the trouble you did, but kudos for doing so!
 
Thanks guys! I didn't have a choice - I had to knock down all the steam vapor or I would be forced to brew outside. I like inside.
 
How tall are your ceilings in that room? Looks like a great project but I'm not sure I would have the vertical space to build a hood then add the condenser to the top of it.
 
9 ft ceilings. But vertical height is definitely not necessary for this, you could have the unit sitting on the floor if you wish. I only mounted my unit to the ceiling because I have no space in my tiny brew area since the water heater is in the way. Also, the ceiling provided me with a good way of mounting the unit.

In fact, if I mounted the unit lower I would have better efficiency from my pond pump. Vertical height really starts to restrict the output on pumps (head height).. If you can mount the unit lower, do it. There are endless ways that this system could be designed.
 
Could this system function effectively if it were installed upside down from your configuration? Obviously, the location of the drains would change. Doing this would put the "in" for stage 1 close to the top, and the crossover tube near the bottom.

I'm just wondering about how to modify this for use with a hood that is closer to the ceiling. Trying to decide between this system and the vent system to the exterior that others are using.
 
If you made a lid that sealed on your kettle, and plumbed the steam to a bucket of water with a diffuser at the bottom, you could accomplish the same thing for much less time/money. Just like a bong, er sorry "water pipe".
 
Perhaps getting a hood similar to the one below to completely cover the kettle and force the movement of the steam into the fan that pulls the steam. Any condensate that is near the boil can just drop back in without touching something that you wouldn't want it to be touching and returning to the boil.

Clicky.
 
Could this system function effectively if it were installed upside down from your configuration? Obviously, the location of the drains would change. Doing this would put the "in" for stage 1 close to the top, and the crossover tube near the bottom.

I'm just wondering about how to modify this for use with a hood that is closer to the ceiling. Trying to decide between this system and the vent system to the exterior that others are using.

That should work either way it is forcing the air/ steam through the tubes
 
Stellar work. I need to come back to your design right after I wrap up a couple brew projects and consider this design for a fall build! Very cool.
 
Yep, like Lucky_Chicken said, you can orientate this system anyway you want since your are forcing air/steam through an Open System.

Unfortunately klyph, I think that the setup that you mentioned is a Closed System. A closed system like this would require a higher pressure within the piping to 'break though' the water, kind of like when you blow bubbles in a glass of water with a straw. I think the difficulty with this system is that you would need a fan that is capable enough to create this higher pressure - this would be a challenge with my setup since the range fan is just powerful enough to push the vapor through open tubing. Now you may be able to do this is you had a lid that sealed onto your pot, a la pressure cooker. Then you wouldn't need a fan at all.

But as far as I've read and understand, its best to whisk away unwanted boil-off/vapor as it prevents DMS from getting back into your brew. That's why I'm thinking that an open system is maybe the best since it will have a reasonably higher flow rate.

Oh! I did forget to mention with my setup that I did position the Stage 2 heat exchanger like that for a reason *Steam comes in at the top and exhausts at the bottom... I am feeding the cool water from the bottom of the Stage 2 copper pipes, reason being that I want to have even distribution of cool water traveling up the pipes. If I fed cold water from top, the water would just fall down the copper pipes, and most likely only through a few pipes instead of evenly filling all of them at the same time. Also, this creates a counter-current method of heat exchange, which is most efficient, being that the cold water flows one way and the hot vapor flows in the opposite way.

So, if you just flip my system you will have to feed the water from the top, which isn't going to be as effective. But with some changes this can be solved. Maybe the cross over pipe can go from the bottom to the top, so instead of an " U " shape (my system is an upside-down " U "shape) you can make an " N " shape. But like I said before, there are many ways to approach this.

If you can just easily run a fan through your wall to the outdoors, I would definitely recommend doing so (like most people do). Its by far the easiest to do. I would only be considering the steam condenser method if you are stuck in a spot where you can't directly or easily plumb your exhaust outside.

...

As an update, I did another brew this weekend and used the steam condenser system again. I again was stuck with another situation where I had to boil-off a lot of liquid, but the steam condenser just gobbled all the vapor up. Once I was able to run the boil at a normal light rolling boil I saw a reduction of ambient temperature to a very comfortable level. I expect that once I get my liquid volumes dialed-in so I don't end up having to boil-off over 2 gallons in 60 minutes, I will have a very efficient system and only see a slight increase in ambient temperature.

Also, I made a 'quick fix' for extending my range hood lower to the pot. I took a tea towel and two magnets (left over from making my stir plate) and fixed it to the back of my range. It greatly improved range and its ability to capture all of the steam - I would say 99% now. Also, the tea towel seemed to catch many of the rouge-drops that collect and fall from the range. For now I think I will stick with this until I think of something better.
 
Thanks for the detailed response. Your system is clearly engineered very well. I am amazed at how effectively it operates.

phertwo said:
If you can just easily run a fan through your wall to the outdoors, I would definitely recommend doing so (like most people do). Its by far the easiest to do. I would only be considering the steam condenser method if you are stuck in a spot where you can't directly or easily plumb your exhaust outside.
I think I understand why you say this. You have invested many hours into the design and fabrication process. Does this sentiment still hold true when you consider the elimination of a fresh air make-up system? The risks of pulling a downdraft in the flu of a furnace or hot water heater?
 
Back
Top