
I designed my very own induction brewing system that is based on a traditional 3 kettle system design. I wanted a way to brew great tasting beers, with the ease of brewing them in my basement. To do so I used 3 induction cookers and 2 pumps, powered by 3 dedicated electrical circuits run directly to my brewing area. I custom built my brew table from scratch since I couldn't find a table that matched exactly what I wanted. I also had to design a way that I could use the brew pots on the induction cookers without breaking them. I figured a brew pot full of wort or water would crack a standard 1800 watt glass top induction cooker. After searching the web for some ideas, on how to either build a base around the induction cookers, or how to mount the induction cookers in an area that was lower than the table top.
It all came down to building my own table because I couldn't find anything out there that looked like it would work. When I planed how to build my homebrew table I knew that I wanted the table to withstand weights over 300 pounds and also provide room for storage shelves. When I brew beer I like to have all of my ingredients and supplies close at hand, just like the chefs in professional kitchens. I made a crude design drawing of how I wanted to frame out the table top. I actually made a lot of drawings, before I figured out where everything would need to go. It took me several months of planning, designing and redesigning in order to get the final drawing to look exactly like what I had in mind.

Finished table top without induction cookers or brew pots
I built the table top using a 72 inch length of 2X4 running down the center, to provide added support for the weight of the lower shelves and the induction cookers. The induction cooker shelves are recessed 2.5 inches lower than the table top. Since 2X4's are only 1.5 inches thick, an additional piece of 1 inch thick wood was used to make up the correct height. The corners were built from a pair of 2X4's made into an L shape. Originally I planned on using 4X4's but they would have been too big to cut using the tools I had. The lower shelves use support boards that run width-wise instead of the 72 inch length.
The four 2X4's were centered about 16 inches apart and provide the shelves with plenty of support. The 2X4's were cut 14 inches long, in order to allow clearance around the sides of the induction cookers. The cookers measured 12 inches wide and their instructions recommended leaving a 1 inch space all around them for proper air flow. If I were to build this table over again I would make the clearance even larger. Induction cookers produce a lot of heat and when brewing I now have to run fans in order to move around the hot air. I wish that I had previous experience brewing with induction cookers before I built my brew table. If I had known beforehand how hot the cookers would get I would have left more clearance around them.

Finished table top with 3 induction cookers and brew pots
I included 2 shelves in the build that measured approximately 36 inches wide by 72 inches long, so that my empty kegs, yeast and other supplies could be stored in one area. Having a work area that is dedicated to storing brewing supplies saves a lot of time running around the brew room for looking for things. I was able to custom build the height of the table so I could easily brew on it without having to use a ladder to look inside the kettles.
I recommend having each of the induction cookers setup to run on its own separate 120 volt circuit. The induction cookers used in my build can draw up to a maximum of 1800 watts and the circuits they use should be sized large enough to safely handle the load. Induction cookers are very energy efficient and can create enough heat to produce a boil, but I think an 1800 watt cooker is best for brewing 5 gallon batches at most. I've heard that there are higher wattage induction cookers available, but in the United States 1800 watts was the highest powered cooker I could fine. When working with induction cookers the brew kettles must be magnetic in order for them to generate heat. Induction cookers will not work with non-magnetic pots or kettles, before buying yours make sure they are compatible for use with induction cookers.
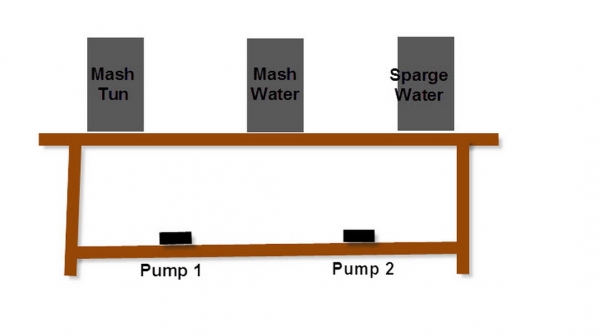
I put my mash water in the middle, and my sparge water on the end
When the mash water reaches my target temperature I transfer the water from the hot liquor tank to the mash tun and then dough in the grains. Making sure to stir the grains well so that all of the grains are wet and mixed well and that there are no hot or cold spots. I also like to stir the grains every 15 to 20 minutes during the mash to eliminate any hot or cold spots. The kettle I use for the mash tun has an all metal false bottom inside it, I also leave the induction cooker set on low during the mash, to keep the water hot.
Once I have finished sparging and have all of the wort collected in the boil kettle, I pump half of the wort into what was previously used as the hot liquor kettle. Using 2 induction cookers will get the boil going much faster when there is only 3.5 gallons in each kettle. A single induction cooker can take a long time to bring 7 gallons to a full boil and my idea was to divide full volume in half and then use 2 cookers to bring them both to a boil in half the time.

Mash pot on induction cooker and view of storage shelves
My thought with having 3 induction cookers was to use one as the mash tun, and the other two as a hot liquor tank and a boil kettle. I plan to use 1 pot for heating the mash water and the other pot for heating the sparge water. After the mash and sparge 2 of the pots will be empty, they will then be used to split the total wort in 2 to speed up the boil. The induction cookers used are very energy efficient, but they lack the overall cooking power of propane burners, so it takes about 30 minutes before the wort begins to boil.
One of the nicest features of my new setup is the improvement it makes in wort chilling. Wort chilling was always kind of a pain for me before and it took a long time to do. I used to slowly gravity feed hot wort through a plate chiller, or use an immersion chiller to cool the hot wort, then use tap water to cool the wort down. My new design is similar to how the Brutus 10 works where the hot wort is pumped into the hot side of the wort chiller. Then using 22 pounds of ice for cooling, cold water is pumped into the cold side of the chiller, greatly reducing the time it takes to chill the wort. Please excuse my crude image, but it does provide you with the basic idea.

Using ice to cool the wort greatly reduces the amount of time needed
I was able to get wort chilled down from boiling to 75 degrees Fahrenheit in around 20 minutes. I brew 6 gallon batches and I don't worry about running the wort at too high a speed when cooling it. I also put the hose connected to the pump outlet all the way down in the wort and there was hardly any splashing. The good news is I haven't noticed any off flavors at all in my beer.
Bio:
My name is Adam Best and I live in Ohio. I've been brewing for 10 years and also have a bachelors degree in computer information systems. I started home brewing using Mr. Beer extract kits while still in college. I later started brewing outdoors using a turkey fryer, but soon found an electric turkey fryer to use indoors. I currently enjoy brewing indoors on my custom DIY 3 vessel induction brewing system. I also enjoy bowling in my Tuesday night bowling league. I'm not the greatest bowler, but I am improving. To get more information on my current brewing setup, some great homebrew recipes and other equipment check out my website at www.brewout.com

It all came down to building my own table because I couldn't find anything out there that looked like it would work. When I planed how to build my homebrew table I knew that I wanted the table to withstand weights over 300 pounds and also provide room for storage shelves. When I brew beer I like to have all of my ingredients and supplies close at hand, just like the chefs in professional kitchens. I made a crude design drawing of how I wanted to frame out the table top. I actually made a lot of drawings, before I figured out where everything would need to go. It took me several months of planning, designing and redesigning in order to get the final drawing to look exactly like what I had in mind.
Finished table top without induction cookers or brew pots
I built the table top using a 72 inch length of 2X4 running down the center, to provide added support for the weight of the lower shelves and the induction cookers. The induction cooker shelves are recessed 2.5 inches lower than the table top. Since 2X4's are only 1.5 inches thick, an additional piece of 1 inch thick wood was used to make up the correct height. The corners were built from a pair of 2X4's made into an L shape. Originally I planned on using 4X4's but they would have been too big to cut using the tools I had. The lower shelves use support boards that run width-wise instead of the 72 inch length.
The four 2X4's were centered about 16 inches apart and provide the shelves with plenty of support. The 2X4's were cut 14 inches long, in order to allow clearance around the sides of the induction cookers. The cookers measured 12 inches wide and their instructions recommended leaving a 1 inch space all around them for proper air flow. If I were to build this table over again I would make the clearance even larger. Induction cookers produce a lot of heat and when brewing I now have to run fans in order to move around the hot air. I wish that I had previous experience brewing with induction cookers before I built my brew table. If I had known beforehand how hot the cookers would get I would have left more clearance around them.
Finished table top with 3 induction cookers and brew pots
I included 2 shelves in the build that measured approximately 36 inches wide by 72 inches long, so that my empty kegs, yeast and other supplies could be stored in one area. Having a work area that is dedicated to storing brewing supplies saves a lot of time running around the brew room for looking for things. I was able to custom build the height of the table so I could easily brew on it without having to use a ladder to look inside the kettles.
I recommend having each of the induction cookers setup to run on its own separate 120 volt circuit. The induction cookers used in my build can draw up to a maximum of 1800 watts and the circuits they use should be sized large enough to safely handle the load. Induction cookers are very energy efficient and can create enough heat to produce a boil, but I think an 1800 watt cooker is best for brewing 5 gallon batches at most. I've heard that there are higher wattage induction cookers available, but in the United States 1800 watts was the highest powered cooker I could fine. When working with induction cookers the brew kettles must be magnetic in order for them to generate heat. Induction cookers will not work with non-magnetic pots or kettles, before buying yours make sure they are compatible for use with induction cookers.
I put my mash water in the middle, and my sparge water on the end
When the mash water reaches my target temperature I transfer the water from the hot liquor tank to the mash tun and then dough in the grains. Making sure to stir the grains well so that all of the grains are wet and mixed well and that there are no hot or cold spots. I also like to stir the grains every 15 to 20 minutes during the mash to eliminate any hot or cold spots. The kettle I use for the mash tun has an all metal false bottom inside it, I also leave the induction cooker set on low during the mash, to keep the water hot.
Once I have finished sparging and have all of the wort collected in the boil kettle, I pump half of the wort into what was previously used as the hot liquor kettle. Using 2 induction cookers will get the boil going much faster when there is only 3.5 gallons in each kettle. A single induction cooker can take a long time to bring 7 gallons to a full boil and my idea was to divide full volume in half and then use 2 cookers to bring them both to a boil in half the time.
Mash pot on induction cooker and view of storage shelves
My thought with having 3 induction cookers was to use one as the mash tun, and the other two as a hot liquor tank and a boil kettle. I plan to use 1 pot for heating the mash water and the other pot for heating the sparge water. After the mash and sparge 2 of the pots will be empty, they will then be used to split the total wort in 2 to speed up the boil. The induction cookers used are very energy efficient, but they lack the overall cooking power of propane burners, so it takes about 30 minutes before the wort begins to boil.
One of the nicest features of my new setup is the improvement it makes in wort chilling. Wort chilling was always kind of a pain for me before and it took a long time to do. I used to slowly gravity feed hot wort through a plate chiller, or use an immersion chiller to cool the hot wort, then use tap water to cool the wort down. My new design is similar to how the Brutus 10 works where the hot wort is pumped into the hot side of the wort chiller. Then using 22 pounds of ice for cooling, cold water is pumped into the cold side of the chiller, greatly reducing the time it takes to chill the wort. Please excuse my crude image, but it does provide you with the basic idea.
Using ice to cool the wort greatly reduces the amount of time needed
I was able to get wort chilled down from boiling to 75 degrees Fahrenheit in around 20 minutes. I brew 6 gallon batches and I don't worry about running the wort at too high a speed when cooling it. I also put the hose connected to the pump outlet all the way down in the wort and there was hardly any splashing. The good news is I haven't noticed any off flavors at all in my beer.
Bio:
My name is Adam Best and I live in Ohio. I've been brewing for 10 years and also have a bachelors degree in computer information systems. I started home brewing using Mr. Beer extract kits while still in college. I later started brewing outdoors using a turkey fryer, but soon found an electric turkey fryer to use indoors. I currently enjoy brewing indoors on my custom DIY 3 vessel induction brewing system. I also enjoy bowling in my Tuesday night bowling league. I'm not the greatest bowler, but I am improving. To get more information on my current brewing setup, some great homebrew recipes and other equipment check out my website at www.brewout.com
