What is the consensus on how to attach the 1" heating elements? I bought a 1" NPS locknut from bargainfittings before I found this thread. I saw that someone had soldered the same 1" locknut to the outside of a keg. I would be worried that it would fail at some point and make quite a mess. Anyone put the locknut on the inside? That way it wouldn't be hanging on by the solder. I would be interested to hear how the solutions have worked after being put to use as well. I didn't see a 1" NPS SS coupling on McMaster or bargainfittings, but I saw a post that at least one person was pulling a 1" hole, so I am assuming that is for a coupling.
You are using an out of date browser. It may not display this or other websites correctly.
You should upgrade or use an alternative browser.
You should upgrade or use an alternative browser.
Soldering Stainless steel
- Thread starter BargainFittings
- Start date

Help Support Homebrew Talk:
This site may earn a commission from merchant affiliate
links, including eBay, Amazon, and others.
slakwhere
Well-Known Member
i did a half coupling for 1" that worked out fantastically. you need a much bigger dimple tool but it works exactly the same way.
slakwhere
Well-Known Member
it was a NPT (the opposite of the element) but with a hefty coating of teflon tape and some torque it holds liquid just fine.
What is the consensus on how to attach the 1" heating elements? I bought a 1" NPS locknut from bargainfittings before I found this thread. I saw that someone had soldered the same 1" locknut to the outside of a keg. I would be worried that it would fail at some point and make quite a mess. Anyone put the locknut on the inside? That way it wouldn't be hanging on by the solder. I would be interested to hear how the solutions have worked after being put to use as well. I didn't see a 1" NPS SS coupling on McMaster or bargainfittings, but I saw a post that at least one person was pulling a 1" hole, so I am assuming that is for a coupling.
All my half-couplings are just soldered to the outside (not even pulled through like many are doing here). They have been that way for many brews now and are not going anywhere.
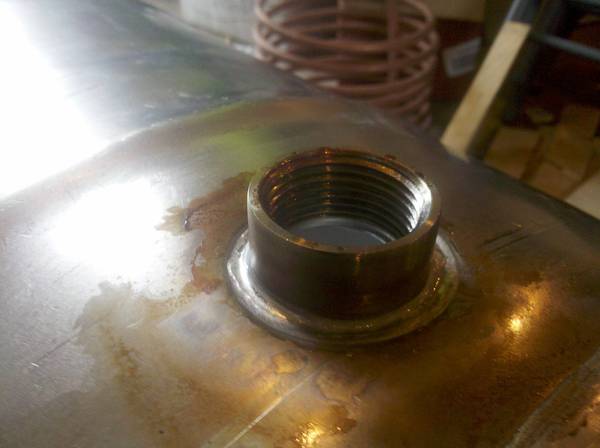
A good solder joint is a lot stronger than many give it credit for. Here is a shot of a 1-in half coupling for an element. If you took a hammer to it, I bet the keg would be in bad shape before the coupling ever came loose.
I have been gathering stuff for a new brew system, and just realized the pots I got have "Encapsulated 5mm thick aluminum" in the bottom, and I was planning on silver soldering the drain in the bottom.
Has anyone tried silver soldering something with aluminum sandwiched between stainless plates before? Is it possible and safe?
Has anyone tried silver soldering something with aluminum sandwiched between stainless plates before? Is it possible and safe?


$7.79 ($7.79 / Count)
Craft A Brew - LalBrew Voss™ - Kveik Ale Yeast - For Craft Lagers - Ingredients for Home Brewing - Beer Making Supplies - (1 Pack)
Craft a Brew


$33.99 ($17.00 / Count)
$41.99 ($21.00 / Count)
2 Pack 1 Gallon Large Fermentation Jars with 3 Airlocks and 2 SCREW Lids(100% Airtight Heavy Duty Lid w Silicone) - Wide Mouth Glass Jars w Scale Mark - Pickle Jars for Sauerkraut, Sourdough Starter
Qianfenie Direct


$10.99 ($31.16 / Ounce)
Hornindal Kveik Yeast for Homebrewing - Mead, Cider, Wine, Beer - 10g Packet - Saccharomyces Cerevisiae - Sold by Shadowhive.com
Shadowhive


$58.16
HUIZHUGS Brewing Equipment Keg Ball Lock Faucet 30cm Reinforced Silicone Hose Secondary Fermentation Homebrew Kegging Brewing Equipment
xiangshuizhenzhanglingfengshop


$22.00 ($623.23 / Ounce)
AMZLMPKNTW Ball Lock Sample Faucet 30cm Reinforced Silicone Hose Secondary Fermentation Homebrew Kegging joyful
无为中南商贸有限公司


$53.24
1pc Hose Barb/MFL 1.5" Tri Clamp to Ball Lock Post Liquid Gas Homebrew Kegging Fermentation Parts Brewer Hardware SUS304(Gas MFL)
yunchengshiyanhuqucuichendianzishangwuyouxiangongsi

$53.24
1pc Hose Barb/MFL 1.5" Tri Clamp to Ball Lock Post Liquid Gas Homebrew Kegging Fermentation Parts Brewer Hardware SUS304(Gas Hose Barb)
Guangshui Weilu You Trading Co., Ltd


$45.74 ($45.74 / Count)
Brewer's Best Home Brew Beer Ingredient Kit - 5 Gallon (Grapefruit IPA)
Amazon.com


$82.50
Wilbur Curtis Brew Cone Assembly with Splash Pocket, High Volume - Commercial-Grade Brew Basket - WC-3422 (Each)
Global Commercial Parts


![Craft A Brew - Safale S-04 Dry Yeast - Fermentis - English Ale Dry Yeast - For English and American Ales and Hard Apple Ciders - Ingredients for Home Brewing - Beer Making Supplies - [1 Pack]](https://m.media-amazon.com/images/I/41fVGNh6JfL._SL500_.jpg)
$6.95 ($17.38 / Ounce)
$7.47 ($18.68 / Ounce)
Craft A Brew - Safale S-04 Dry Yeast - Fermentis - English Ale Dry Yeast - For English and American Ales and Hard Apple Ciders - Ingredients for Home Brewing - Beer Making Supplies - [1 Pack]
BellaRae

$176.97
1pc Commercial Keg Manifold 2" Tri Clamp,Ball Lock Tapping Head,Pressure Gauge/Adjustable PRV for Kegging,Fermentation Control
hanhanbaihuoxiaoshoudian
KWiK said:I have been gathering stuff for a new brew system, and just realized the pots I got have "Encapsulated 5mm thick aluminum" in the bottom, and I was planning on silver soldering the drain in the bottom.
Has anyone tried silver soldering something with aluminum sandwiched between stainless plates before? Is it possible and safe?
Never done it but if the solder wicks through the hole, I cant see an issue. Do it.
Thanks for the replies. I know it isn't recommended for Aluminum, but I am soldering Stainless that has aluminum sandwiched in it. Depending on if I can flare the hole good enough or not, the solder may never even touch the aluminum. I am just wondering, if it does touch it is it going to adversely affect the joint? Or is the Aluminum going to suck to much heat away from the stainless and cause problems?
Just trying to avoid ruining a brand new Kettle.
Just trying to avoid ruining a brand new Kettle.
For that application I would strongly recommend using this flux with the Harris Stay-Brite-8 solder:
Stay-Clean Aluminum Flux
It works very well for soldering Stainless Steel AND Aluminum.
Do a Google on "Harris Stay-Clean Aluminum" to get a listing of a lot of places to get it.
Stay-Clean Aluminum Flux
It works very well for soldering Stainless Steel AND Aluminum.
Do a Google on "Harris Stay-Clean Aluminum" to get a listing of a lot of places to get it.
dutchoven
Well-Known Member
I've gotta say, this thread is awesome  ... much thanks to BargainFittings and everyone else who contributed to this thread.
I recently soldered a washer on my sight glass fitting (bargainfittings weldless sight gauge) so I could use an external silicone gasket. Used Harris Stay-Brite Solder and Stay-Clean Flux. After a little practice, I was able to make a clean bond ... this stuff is great.
Here's the finished product ...

Testing the seal in my kettle (this was installed the hole for my bulkhead/ball valve ... I'll be positioning the sight glass as low as possible on the kettle) ...

... much thanks to BargainFittings and everyone else who contributed to this thread.I recently soldered a washer on my sight glass fitting (bargainfittings weldless sight gauge) so I could use an external silicone gasket. Used Harris Stay-Brite Solder and Stay-Clean Flux. After a little practice, I was able to make a clean bond ... this stuff is great.
Here's the finished product ...

Testing the seal in my kettle (this was installed the hole for my bulkhead/ball valve ... I'll be positioning the sight glass as low as possible on the kettle) ...

cornhole
Member
Finally!!! :rockin:
It's not pretty at all, but I finally got a good solder all the way around. I soldered a washer to a street elbow for a bulkhead fitting. My 5 keys to success: 1. Oatey liquid soldering flux (clear liquid), when it boils off, it pulls the contaminants off of the pieces in salt-like flakes. 2. Don't heat the joint directly. It seems carbon deposits form where the flame is applied and that is no help in soldering. 3. Use gravity. The flattest piece in your work should be horizontal to help keep all your solder from running away. 4. A tight joint. Prevents solder from running through. 5. work just above the melting temp. be able to move your work off the flame easily.
It's not pretty at all, but I finally got a good solder all the way around. I soldered a washer to a street elbow for a bulkhead fitting. My 5 keys to success: 1. Oatey liquid soldering flux (clear liquid), when it boils off, it pulls the contaminants off of the pieces in salt-like flakes. 2. Don't heat the joint directly. It seems carbon deposits form where the flame is applied and that is no help in soldering. 3. Use gravity. The flattest piece in your work should be horizontal to help keep all your solder from running away. 4. A tight joint. Prevents solder from running through. 5. work just above the melting temp. be able to move your work off the flame easily.
I pulled a dimple in two 1/2" holes today and both of them cracked on the bottom. It looked like it was pulling the bottom more than the top. I was able to solder them anyway. I soldered a 1" half coupling to the outside without pulling a dimple. It looks strong as others have made similar comments. I am not sure that I am going to pull dimples for my other keg.
slakwhere
Well-Known Member
what did you use to drill the hole for your 1" half coupling?
I pulled a dimple in two 1/2" holes today and both of them cracked on the bottom. It looked like it was pulling the bottom more than the top. I was able to solder them anyway. I soldered a 1" half coupling to the outside without pulling a dimple. It looks strong as others have made similar comments. I am not sure that I am going to pull dimples for my other keg.
What size hole did you drill for those dimples that cracked? Which reducer did you use for the tool? I just got everything together to start this project, but this concerns me. I really don't want to mess up my new stainless pot.
I punched a 1 1/4" hole and used the reducer from McMaster Carr that was listed on this site. I even used graphite lube to try to prevent the cracking. For some reason it was not pulling straight, and that was the cause of the crack. The soldering was able to fill the crack enough that it is not a big issue. Just cosmetic. Probably need to solder all of the couplings and washers together to give it the best shot of puling straight through. I saw a post where this was done.
slakwhere
Well-Known Member
yeah you need to be sure that both ends are centered and that the whole thing is square against the side of the vessel. otherwise you get wandering. soldering the washers to both ends of the reducer definitely helps this.
Quick question. I've got this silver soldering thing down, but am wondering if it'd be a good or bad idea to solder in a half coupling in the side of a pinlock keg.
I use them for pressure fermenting. I'd like to add thermowells to them.
Under normal circumstances, it would never go over 30psi in the keg.
I'm just not sure if the silver soldering can hold the pressure.
I use them for pressure fermenting. I'd like to add thermowells to them.
Under normal circumstances, it would never go over 30psi in the keg.
I'm just not sure if the silver soldering can hold the pressure.
wyzazz
Well-Known Member
Quick question. I've got this silver soldering thing down, but am wondering if it'd be a good or bad idea to solder in a half coupling in the side of a pinlock keg.
I use them for pressure fermenting. I'd like to add thermowells to them.
Under normal circumstances, it would never go over 30psi in the keg.
I'm just not sure if the silver soldering can hold the pressure.
My pressure tank (on my home water system) cuts on @ 30PSI and off at 45PSI with soldered copper pipe in there, if you are only going up to 30PSI then I imagine it would hold just fine. If you Spundig valve gets stuck though, you may be in for a pressurized shower, or a fermentation chamber full of beer.

wyzazz said:My pressure tank (on my home water system) cuts on @ 30PSI and off at 45PSI with soldered copper pipe in there, if you are only going up to 30PSI then I imagine it would hold just fine. If you Spundig valve gets stuck though, you may be in for a pressurized shower, or a fermentation chamber full of beer.
Heh. That's why I said normal circumstances. Normally, my ferments aren't even near 30psi.
Thanks for the input! Now I just need to grow the balls to cut into my perfectly good pinlocks.
Not sure how well that would work with a thermowell as deep as the keg.... you know, getting the lid out.
It sounds like you should consult the cure for a short hose thread.
It looks like if you offset the thermowell on the lid you could go pretty deep. I bet 10-12 inches is very doable. Maybe more.
I saw somewhere in this encyclopedia of a thread that someone preferred to butt solder the 1" coupling for a heating element. What about the curve of the vessel? Two of the sides of the coupling won't be making very good contact with the vessel. Is this and issue? While the whole pull through "tool" technique looks rock solid, I really really fear cracking a brand new SS pot.
nostalgia
Well-Known Member
Well, I used the Harris Stay-Brite 8 solder, which I believe is supposed to be better for filling gaps. However, with the 1" nut, there's not a whole lot of a gap anyway - my first one was done with regular Harris Stay-Brite, and it's been in service for over a year now.
Long story short, at least with my vessels the curve isn't an issue.
-Joe
Long story short, at least with my vessels the curve isn't an issue.
-Joe
Well, I used the Harris Stay-Brite 8 solder, which I believe is supposed to be better for filling gaps. However, with the 1" nut, there's not a whole lot of a gap anyway - my first one was done with regular Harris Stay-Brite, and it's been in service for over a year now.
Long story short, at least with my vessels the curve isn't an issue.
-Joe
Roger that. Thanks. The Stay-Brite 8 is what I was planning to use. I'm going to do this on a thinner 9 gallon kettle so I was thinking about using something kinda similar to the "tool" to squeeze a flat spot where the nut or coupling would lay. Sounds like I might not need to, though a lot of these mods seem to be happening on converted kegs which have a couple more inches of diameter. I'll have to check it out when my kettle arrives in a couple days.
cornhole
Member
I am looking for ideas to solve a small problem. The first solder I did the joint was fairly tight and the solder stayed at the joint. The second joint wasn't so tight so solder flowed through onto the threads of the fitting. Has anybody found a material to back and plug up the backside? Just temporarily / removeable. Would plumbers putty work or would that burn? Thanks.
wyzazz
Well-Known Member
You'll likely need to pick up a plug, getting one in Brass will probably be cheaper than SS.
Similar threads
- Replies
- 41
- Views
- 4K
- Replies
- 0
- Views
- 2K

Latest posts
-

-
-

-

-
-
-

-
Side quest! Hobby talk including beekeeping
- Latest: redrocker652002