• Please visit and share your knowledge at our sister communities:
  • If you have not, please join our official Homebrewing Facebook Group!

    Homebrewing Facebook Group

RIMS for Dummies

Homebrew Talk

Help Support Homebrew Talk:

This site may earn a commission from merchant affiliate links, including eBay, Amazon, and others.
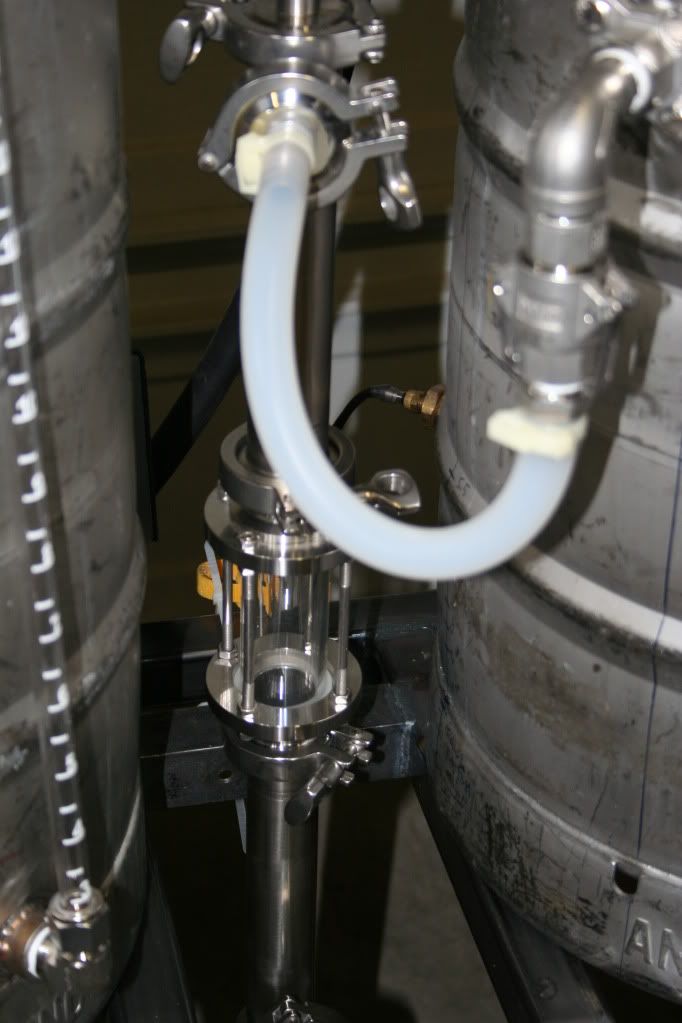
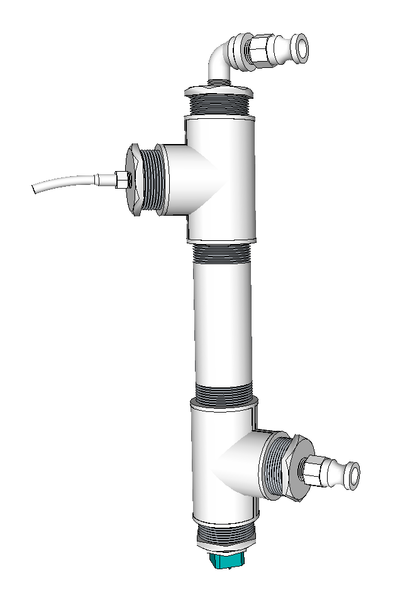
I would think a horizontal tube with I/O pointed up would be best. If the tube is vertical, you'll always have a bubble at the base of the sensor. And if the sensor isn't submerged, you'll have problems as well.

Depends on the configuration of the tube. If the outlet is on top then there will be no air bubble. This probe is mounted at upper left, it is always submerged.

 
I wanted to share some pics of my RIMS setup since I relied so much on the information in this thread to build it.

100_3802.jpg
Front of control box, the PID is a SYL-2362 from auberins.com. There is a 25A SSR and a heatsink in the control box. The two switches control the PID and the pump.

100_3796.jpg
RIMS tube purchased from brewershardware.com using camlock quick disconnects, a 1500 watt low-density heating element from plumbingsupply.com, and an RTD sensor from auberins.com.

100_3797.jpg
Plug that is connected to the PID/element switch.

100_3798.jpg
Plug that is connected to the pump switch.

I wanted to send out a huge thank you to everyone who has shared information on this thread, there is no way I would have been able to do this without this thread.:mug::mug:
 
The pic of the rims tube. Is that how you keep it orientated when you use it? If so, have you had any problems as the gentleman did a few posts ago? Such as have air in it, etc. Do you have a diagram of how you wired the pid? I have the same one, or where did you find your diagram?


For everyone else, i also have a rims tube from brewers hardware as well and i would really like to leave my rims tube in the horizontal position based on my setup. (i have not used it yet) For sake of operating correctly i would rather have it vertical and i can but i want to prevent going down that road. So, i would like your opinion. Stpats.com sells a sight gauge that is only 4" or so long but its the same dia as the rims tube. I was thinking about buying one and placing it between the 2 halfs of the rims tube. This would allow you to see if wort has completely filled up the rims tube and to obviously see if there is any air in it. Is this a good idea? Would there be a downfall for making the rims tube longer? The idea would be to run wort through it until you see it completely full and then kick on the element. I think its a good idea but i may not be seeing the bigger picture. Thanks guys
 
The pic of the rims tube. Is that how you keep it orientated when you use it? If so, have you had any problems as the gentleman did a few posts ago? Such as have air in it, etc. Do you have a diagram of how you wired the pid? I have the same one, or where did you find your diagram?

I do keep it horizontal when I use it. The pic was taken during the mash and I did not have any problems with air getting in. My biggest problem was too fine of a crush that caused my grain bed to get a little compacted during the recirculation. Next time I am going to open the gap on my mill a little bit more. As far as wiring, I used the wiring diagrams on this thread. I'm not sure which one but I'm pretty sure there is one that has the 2362. If you can't find it let me know and I'll open my box up and walk you through what I did.
 
The pic of the rims tube. Is that how you keep it orientated when you use it? If so, have you had any problems as the gentleman did a few posts ago? Such as have air in it, etc. Do you have a diagram of how you wired the pid? I have the same one, or where did you find your diagram?


For everyone else, i also have a rims tube from brewers hardware as well and i would really like to leave my rims tube in the horizontal position based on my setup. (i have not used it yet) For sake of operating correctly i would rather have it vertical and i can but i want to prevent going down that road. So, i would like your opinion. Stpats.com sells a sight gauge that is only 4" or so long but its the same dia as the rims tube. I was thinking about buying one and placing it between the 2 halfs of the rims tube. This would allow you to see if wort has completely filled up the rims tube and to obviously see if there is any air in it. Is this a good idea? Would there be a downfall for making the rims tube longer? The idea would be to run wort through it until you see it completely full and then kick on the element. I think its a good idea but i may not be seeing the bigger picture. Thanks guys

I bought the same site glass offered by St.Pats off ebay and installed it in the middle of my Brewers Hardware RIMs tube.

It's actually a Glacier Tanks product:
http://cgi.ebay.com/ws/eBayISAPI.dll?ViewItem&item=200586400450

My tube is mounted vertically and worked flawlessly after I Installed the site glass.

Ed
 
Ed do you have a picture of it? Also how did just adding a sight glass make it work better. Or did it make it easier for you to know it was working well.

Wow, if you thought about it then someone else has too or already done it. Or however that saying goes.
 
Ed do you have a picture of it? Also how did just adding a sight glass make it work better. Or did it make it easier for you to know it was working well.

Wow, if you thought about it then someone else has too or already done it. Or however that saying goes.

Picture of the site glass is in the link. I don't have a pic of MY tube with it installed. I wanted to get a pic of it in operation during my last brew but just never grabbed the camera, sorry.

I had been considering the one from St. Pats for sometime when SawDustGuy posted the link to this one on Ebay. At the time, the auction said there was 2 available. I snatched one immediately. Looks like they have plenty and keep re-listing them in small quantities.

The site glass did not improve the RIMs tube. I used to have a section of 1/2" polycarbonate inline as a site glass and replaced it with this siteglass. I like to see how well the grain bed is filtering during recirculation.

Ed
 
Ed,

Thanks for the link to Glacier Tanks! If I would have known about this website before I purchased all $500 worth of tri-clamp gear, I would have save about 35-40%. They sell all their tri-clamp products are very low prices and I would be willing to put money on it that a lot of the brewing websites that sell tri-clamps buy them from Glacier and re-sell them.

I got the sight glass on order, I will post pics after it's installed. I hope this will get rid of my fear that air can still be in the chamber by just looking through the rims tube. This will also be great to see how clear the wort is running before sparge.
 
So, I think I found the heating element I want to use. I found it on boston plumbing supply and here is the description.

Rheem SP10868KL 120V 1700W 12-1/2" LWD Resistored Stainless Steel Heating Element

Anyone see a problem with 1700 watts?
 
Would having a threaded terminal welded to my rims tube be a sufficient means of grounding it? Also I'm thinking of having the welder weld a small length of tube to the electrical end of the element and then covering the terminals with jb weld. Is that an ok way to pot the elenent?
 
Ed do you have a picture of it? Also how did just adding a sight glass make it work better. Or did it make it easier for you to know it was working well.

Wow, if you thought about it then someone else has too or already done it. Or however that saying goes.

The overall length of the site glass is about 6.5", there is about 3.5" of glass and it is about 3" in diameter. Here is a picture of it mounted in my RIMs tube:

IMG_3598.jpg


Ed
 
Thats very nice, what did you use to mount it in the horizontal position. I ordered the light glass and it will be very useful to me but it sure does add another bling factor! Do you have a pick of your whole system?
 
Thanks for everyone's input on my earlier dilemma. I ended up ghetto mounting it vertical for the test. I let it run for AWHILE to be sure no air was in it before turning element on. No meltdown this time =)

Here's a video I took.


Seem's to work. Think I'm gonna break in the RIMS and new brewstand I just finished Thursday or Friday, weather permitting.
 
Last edited by a moderator:
Nice music in the video. So, you have your heating element at the inlet of the rims tube and temp prob at the outlet. Wouldn't you want the temp probe on the inlet so it's measuring the wort temp as it comes out of the kettle? The way you have it, it's measuring the wort coming right off the heating element but as soon as it enters the kettle it will drop back down until everything is heated up.
 
So, you have your heating element at the inlet of the rims tube and temp prob at the outlet. Wouldn't you want the temp probe on the inlet so it's measuring the wort temp as it comes out of the kettle? The way you have it, it's measuring the wort coming right off the heating element but as soon as it enters the kettle it will drop back down until everything is heated up.

No, you want to measure the output of the RIMS. You don't care what temperature the wort enters at, just how high to heat it.

On the horizontal/vertical issue, I set my RIMS horizontal and let it fill. With a clear hose on the output I then started to rotate it and watched for air bubbles. The last bubble came out when the tube was 5 deg. from horizontal. I then let the tube drain while at that angle and removed the element. There was no water surrounding the heating element, so I permanently mounted the RIMS at 5 deg. from horizontal. My RIMS is made from 1 1/2" pipe and tees. Things might be different for commercial units.
 
Regarding where to place the temp probe, if it is placed before the wort enters the kettle wouldn't you get false readings since what you really want is the wort inside the kettle to be at the target temp. I have not used mine yet but it seams to me that the wort would pass over the heating element and after it passed the heating element it would be at a temperature that is higher than your target temp which would then relay back to your PID to shut the element off.

If what you do works then it is what it is, i'm just trying to understand the science.

I have a temp probe in my MT and at the Output of my RIMS tube. The one in the RIMS tube is the one used to control the heating element, the one in the MT is for reference only.

If you controlled by the temp in the MT, you would basically boil the small volume of wort in the tube to try to heat the larger volume in the MT. You want to "gently" maintain and adjust the temps in the MT.

I typically have about 1 or 2 degree difference between the RIMS temp and the MT temp. So I start with my set point 2 degrees higher than my mash target. Over time, the difference gets smaller and I adjust the setpoint accordingly.

Ed
 
The overall length of the site glass is about 6.5", there is about 3.5" of glass and it is about 3" in diameter. Here is a picture of it mounted in my RIMs tube:

IMG_3598.jpg


Ed

Nice sight glass Ed. Is that the one I spotted on Ebay. When I was looking I bought mine for $64.00 from Vintners Vault. Thats my luck, I always find bargins when I have already spent the money. :cross::D
 
Nice sight glass Ed. Is that the one I spotted on Ebay. When I was looking I bought mine for $64.00 from Vintners Vault. Thats my luck, I always find bargins when I have already spent the money. :cross::D

Guy,

It sure is!!!

I snatched one within a couple minutes of the time you posted the link. I had been looking at the one from St. Pats and your post was enough to tilt the scale.

Thanks for the heads up.

Ed
 
Just a heads up, if you want one of these sight glasses you need to purchase it now. i called the company selling these because the price listed on Ebay is cheaper than the one on their website. I wanted to make sure i wasn't getting a different or cheaper version of what I wanted and the guy told me they made a mistake. So purchase one if you want to save a few bucks now.
 
Just got my sight glass in and installed it. Here are pictures. Thanks for the lead ED.

4111 004.JPG


4111 005.JPG
 
Just got my sight glass in and installed it. Here are pictures. Thanks for the lead ED.

Thanks for the pics! I have all the same on order including glacier bay sight glass and love how it looks. Did not order the 90's but like your layout and may order a couple.

Couple of questions: Do you plan on putting the tube at a slight tilt (element / wort in end lower than temp sensor / wort out end)?

It looks like your temp sensor is on the right end, but there is a triclamp with barbed fitting on left end - is that where element will go?

I'd be interested in seeing the element installed and how you safe that up (i.e. epoxy, waterproof housing, etc)?

Thanks again for posting these pictures.
 
I am using the fixture from brewers hardware to house the element. See link below.

http://www.brewershardware.com/TC15F10NPSCOV.html

I don't know if those elbows will stay there. I bought a lot of 3 from ebay and i only need 1. They are used but stainless is stainless and they are in good condition. I bought all 3 for 14 bucks! He had 2 more lots of 3 elbows left when i bought mine and i bought mine on tuesday. Take a lot on ebay.

I was just playing around with them when I took that picture yesterday.
 
So my element arrived today. Not real sure how I arrived at this model (SP10867GL stainless), but I'm pretty sure it was from this thread. In looking at it, it's 208V, not 110, not 240. Anyone kind enough to educate me on whether this is going to work? I've read here that you can run 240 at 110 but it's 1/4 the output. Isn't 208 typically a 3 phase power source, not single phase? And if it will work, where does it put me output wattage wise running off 110? Any input / advice is greatly appreciated.

Don't worry, still in the planning stages and have no intention of going hot prior to having everything reviewed by someone who knows what they're doing.

Yes, 208V is a standard 3 phase voltage. In a 3 phase setup you'd have three of these elements, or one unit with three elements. I assume yours is just one heater with two terminals, right?
The following post has a 3 phase heater element in one unit.
https://www.homebrewtalk.com/f51/i-...brewing-system-106668/index8.html#post1238731

If you run a 208V element on 110V, you will get (110/208)² = .280, or 28.0% of the power it has at 208V. At 120V we get 33.3%, or a third.

It is safest not to try to run a 208V element on 240V. The manufacturer has the last word on this, but it is probably safe to assume they will not like it. 110 or 120V is fine though.
 
Quaffer said:
Yes, 208V is a standard 3 phase voltage. In a 3 phase setup you'd have three of these elements, or one unit with three elements. I assume yours is just one heater with two terminals, right?
The following post has a 3 phase heater element in one unit.
https://www.homebrewtalk.com/f51/i-decided-start-building-brewing-system-106668/index8.html#post1238731

If you run a 208V element on 110V, you will get (110/208)² = .280, or 28.0% of the power it has at 208V. At 120V we get 33.3%, or a third.

It is safest not to try to run a 208V element on 240V. The manufacturer has the last word on this, but it is probably safe to assume they will not like it. 110 or 120V is fine though.

Thanks for the info. Sounds like I will be short on heat then - 28% of 2000w =560w. Guess I'll continue the build and I can always change the element out later when I confirm it's not enough to hold temps.

Thanks again for the explanation.
 
So i got my element and pid wired up and im doing some testing. But, i am having problems. The 7amp fuse i use to protect all the components keeps blowing. Anyone know why?

Next question, does anyone else have the auber 2362 PID? Can you share the program settings?

One thing i thought was odd was that the pid would turn the ssr on for 2 seconds and shut off for 2 seconds while it was cycling, to me it seems like it should run constant until it reaches the set valve and then run on/off for 2 seconds. It seems like its on manual mode but its not. This is the first time using a pid so im not sure if this is normal.
 
So i got my element and pid wired up and im doing some testing. But, i am having problems. The 7amp fuse i use to protect all the components keeps blowing. Anyone know why?
Your components are drawing more than 7 amps, or there is a short.
Next question, does anyone else have the auber 2362 PID? Can you share the program settings?

One thing i thought was odd was that the pid would turn the ssr on for 2 seconds and shut off for 2 seconds while it was cycling, to me it seems like it should run constant until it reaches the set valve and then run on/off for 2 seconds. It seems like its on manual mode but its not. This is the first time using a pid so im not sure if this is normal.
Use the auto tune feature on your setup, and it will run full blast until it's hot, then brake like an F1 driver.
 
Back
Top