klyph
Well-Known Member
If you mounted a RIMS tube vertical on the side of the vessel with the input toward the bottom of the vessel and the output at the top, you could probably boil without a pump using convection to circulate.

If you mounted a RIMS tube vertical on the side of the vessel with the input toward the bottom of the vessel and the output at the top, you could probably boil without a pump using convection to circulate.

If you mounted a RIMS tube vertical on the side of the vessel with the input toward the bottom of the vessel and the output at the top, you could probably boil without a pump using convection to circulate.
klyph said:I dunno, it was just a thought, though I have seriously considered mounting a RIMS tube to the outside of the mash tun to make a standalone mashtun with strike/sparge water on demand.


I've done it, a 5500w 240v element can give you a 100 degree temperature differential at a pretty decent flow rate. If you are using room temp water or even hot water from the heater, it's definitely possible.
Here's a terrible video I made using a 5500w element to achieve a 110 deg differential with a decent enough flow rate for sparging.
I need to redo it with a gate valve and with the RIMS in/out ports facing up. I also need to definitively measure the output, but from the looks of it, you could sparge or strike with it.
http://www.youtube.com/watch?v=u9X8s07MJ-A
It is definetely not "on demand". It took almost 5 minutes to get to temperature. You may get enough for fly sparging but you will still need an HLT because it looks like it could take a very long time to get any volume of strike water. If you need an HLT for strike water you may as well use it for sparging so what would be the benefit?
It only took the time for me to get the valve set at the correct flow, otherwise it was instantaneous as it was flowing in a single pass. I'll measure the flow rate next time, as until then, this is all conjecture. However, if you consider the time it takes to fill the HLT and then heat to strike temps, I doubt it will be significantly less time than slowly filling the mash tun with water that's already up to temperature.
And even if it only works for sparging, there's no reason you can't use your kettle to heat the strike water and eliminate the HLT altogether.
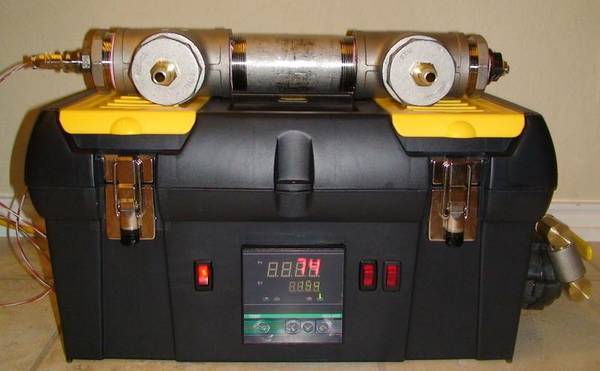
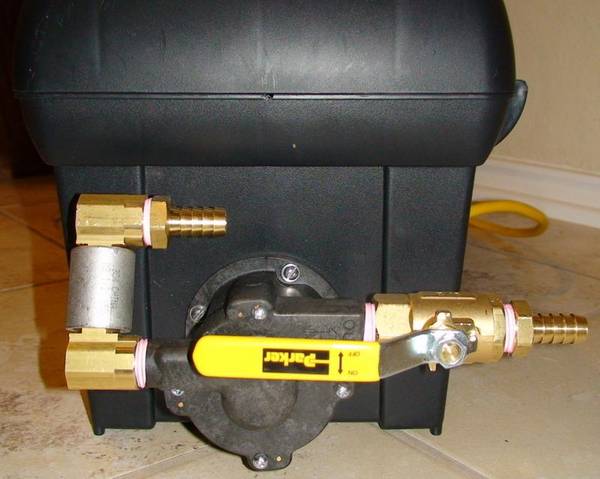
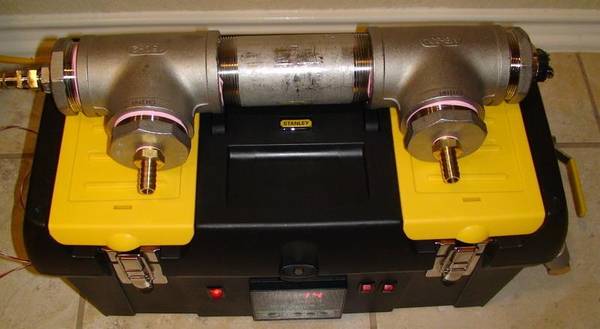
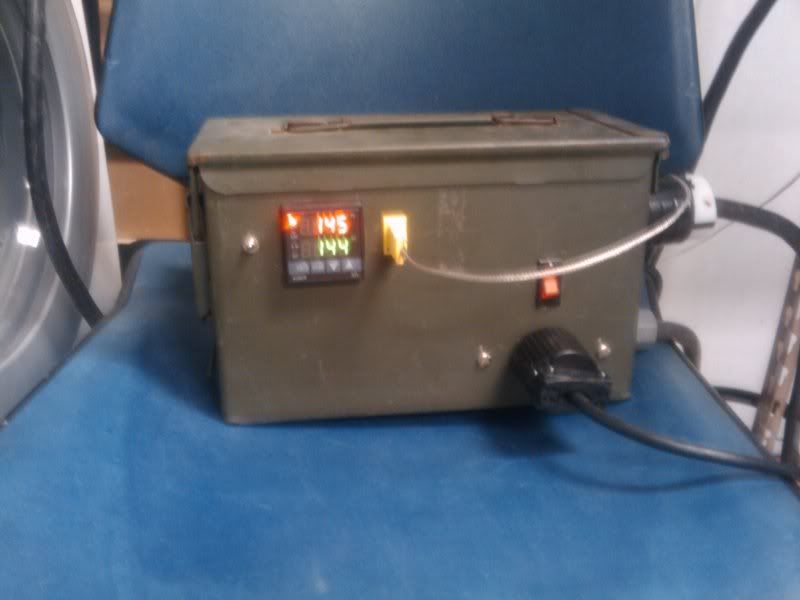
Got most of my build done today after the replacement RTD probe & 1/2 to 1/4 adapter arrived. Here are some pics. I'll likely start my own thread to detil the build once I get it completely done. Idea is a tabletop-type design that can store in minimal space. The RIMS will not rest on top of the control/toolbox during use. It will hang vertically on the side of my 10 gallon rubermaid, with the element-end on the bottom. Thanks Sawdustguy for the inspiration.
The toolbox:
Pump mounted on toolbox:
Detail of RIMS manifold:
Detail on wiring:
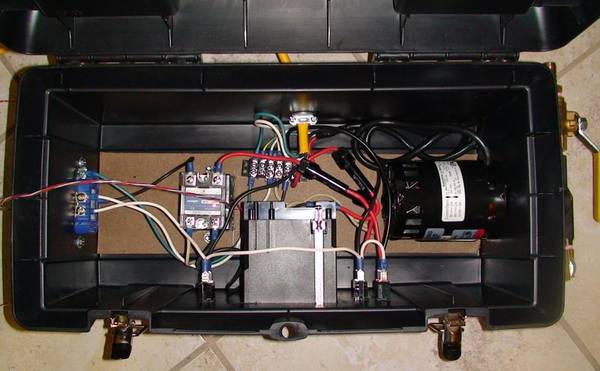
but what is that part just north of the pid? Is that what is called a bus and if so what is it's purpose? What is the part on the left side of the tool box oppisite of the pump?
Thanks
The bus is kind of like a power distribution center for the toolbox. You hook up your load wire to the tab and jumper the connections on one side. You can then add several load lines to each device needing power without having to twist them all together.
Hmm. On the "left side of the box" the device is the back side of a standard duplex outlet.The thing opposite is the SSR if that is what you are refering to...otherwise it appears to be a connectior for the temp probe
Hmm. On the "left side of the box" the device is the back side of a standard duplex outlet.
Hmm. On the "left side of the box" the device is the back side of a standard duplex outlet.

Paul,
I brew beer, but I am not an engineer, nor an electrician. I need a panel to run electrical on a heater and keep the heat er at the right temp. I run propane burners to bring the water up to strike temp. Perhaps a simple Johnson controller that I have will keep the right temps I need.
My specialty is stirring the mash and boiling the wort. I just moved up to a double pump single tier after twenty + years of brewing and would like to have a tighter control on mash temps. I have no desire to automate just have stricter control on my temps.
Clean up is easy as add'l unused sparge water can be pumped through the RIMS tube.

I'll bite!

Paul Murphy
I too am a member of the ammo can control box club.


![Craft A Brew - Safale BE-256 Yeast - Fermentis - Belgian Ale Dry Yeast - For Belgian & Strong Ales - Ingredients for Home Brewing - Beer Making Supplies - [3 Pack]](https://m.media-amazon.com/images/I/51bcKEwQmWL._SL500_.jpg)


