My Mini Fridge to Fermentation Chamber Build

Homebrew Talk - Beer, Wine, Mead, & Cider Brewing Discussion Forum

Help Support Homebrew Talk - Beer, Wine, Mead, & Cider Brewing Discussion Forum:

This site may earn a commission from merchant affiliate links, including eBay, Amazon, and others.

chumpsteak

Well-Known Member
Joined
May 15, 2011
Messages
897
Reaction score
113
Location
Meridian
A buddy and I just started brewing a couple months ago and have officially gone off the deep end with this new hobby. After 2 extract batches we went to all grain. After 1 all grain batch we bought a new 15 gallon kettle. After the 4th all grain batch we decided we needed somewhere better to ferment than the exercise room of his house, and so the idea of building a fermentation chamber came up.

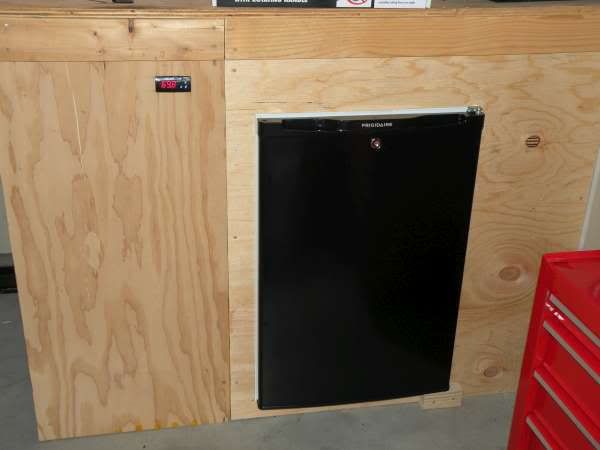
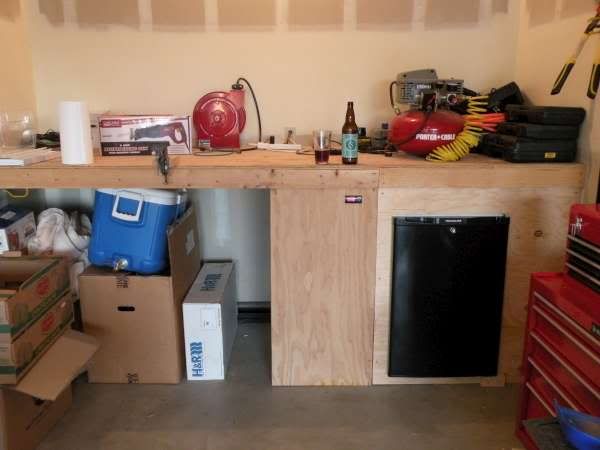
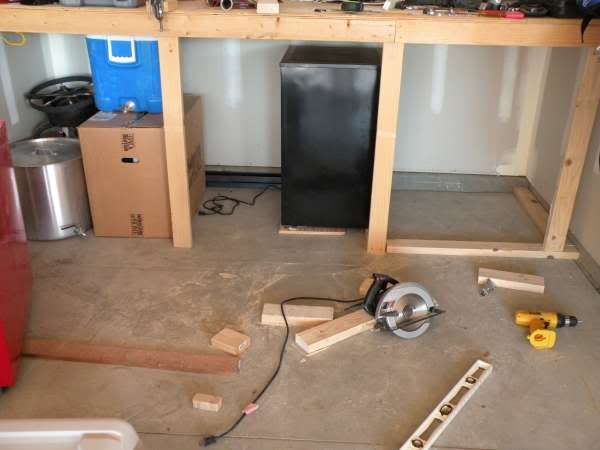
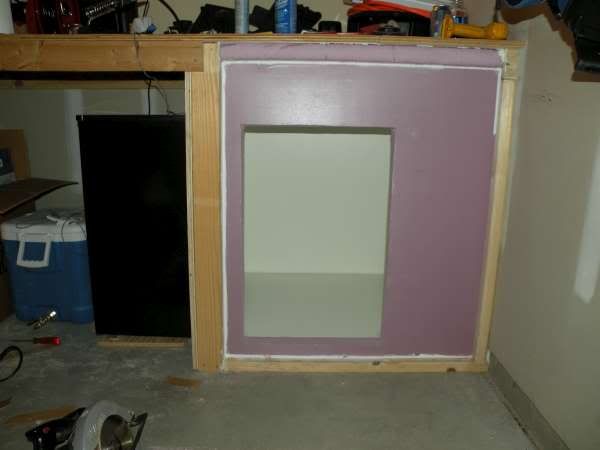
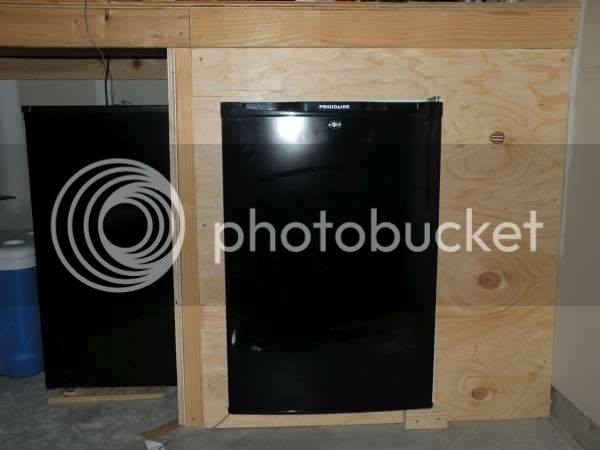
My wife didn't really like the idea of another fridge/freezer in the garage, so after looking on the HBT forums I decided to clean the crap out from underneath the work bench and build a chamber there.

Step 1 was finding a cooling source. Since my garage gets to around 100 degrees some days in the summer it was important to find something big enough to cool yet still fit under the workbench. I decided a 4cf mini fridge ought to work so I set out looking for one.

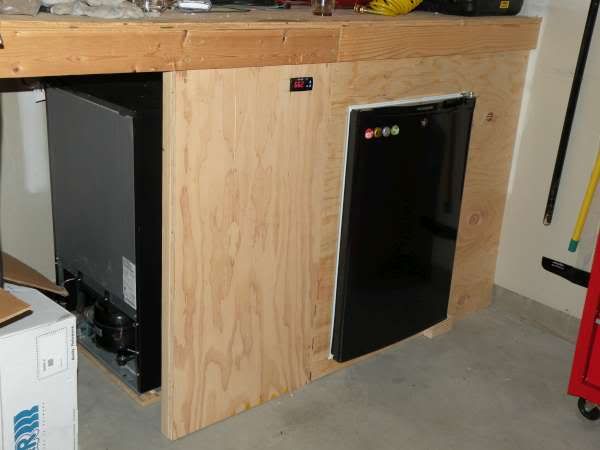
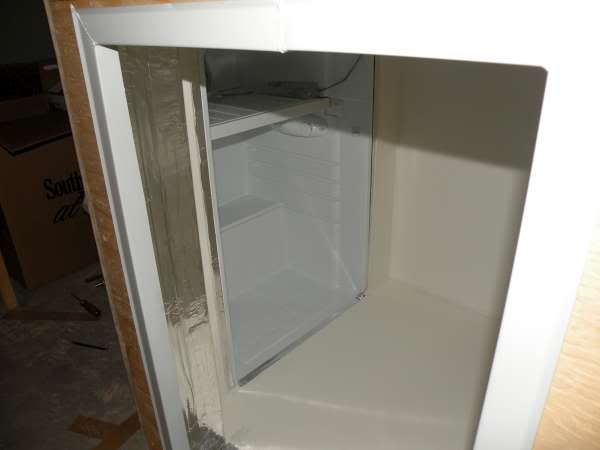
After a couple weeks of looking I got really lucky and got an almost brand new frigidaire mini fridge for 50 bucks on craigslist. The guy had just spent almost 200 on it 2 months ago but needed to get rid of it.

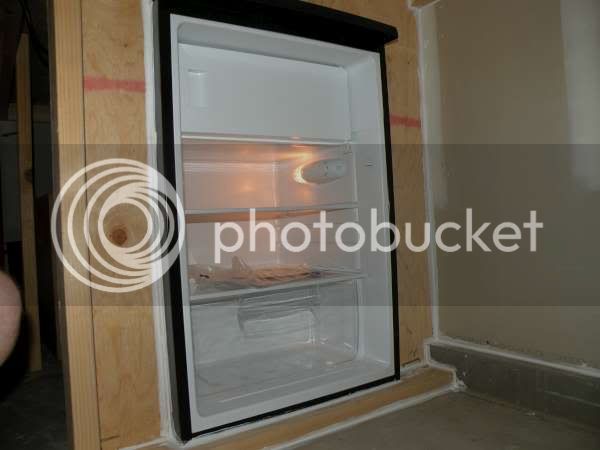
Its a super nice mini fridge and I feel kind of bad about basically destroying it, but it had to be done. If I was ready for kegging I'd have built a kegerator out of it instead.

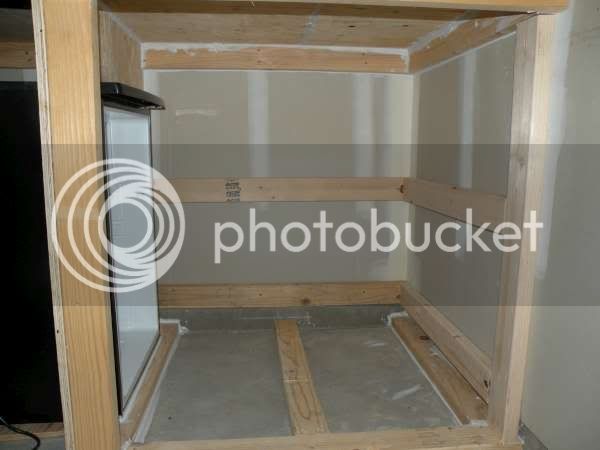
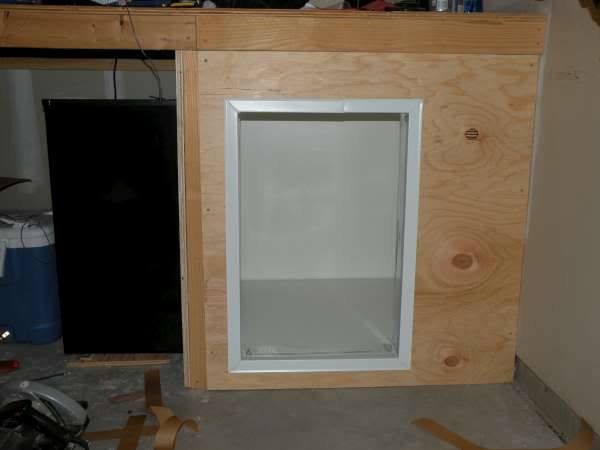
Anyway, the next weekend I went to home depot for materials and got to work.

DSCN4832-600.jpg


DSCN4848-600.jpg


DSCN4841-600.jpg


DSCN4855.jpg


DSCN4870-600.jpg


DSCN4879-600.jpg


DSCN4886-600.jpg


DSCN4889-600.jpg


DSCN4893-600.jpg


DSCN4896-600.jpg


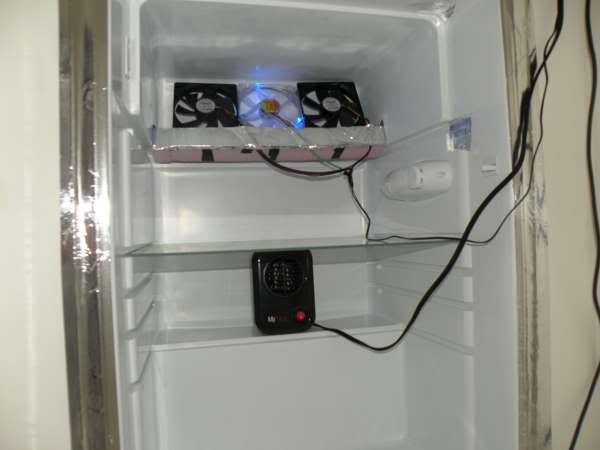
My love 2 stage controller will be here this week, so I hope to have it installed and controlling temps by next weekend.

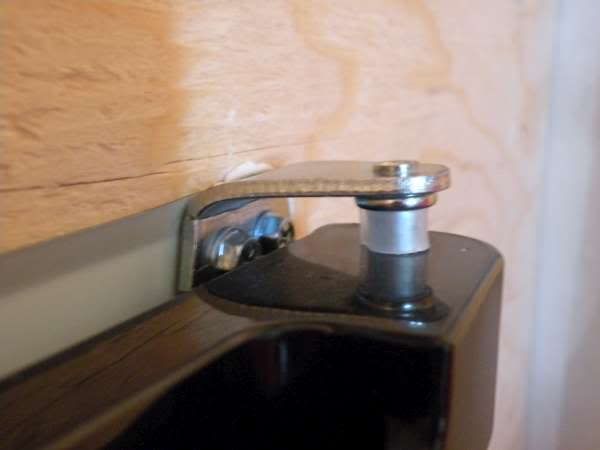
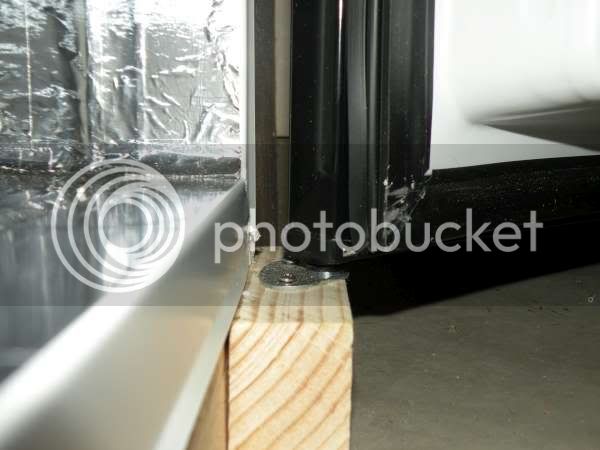
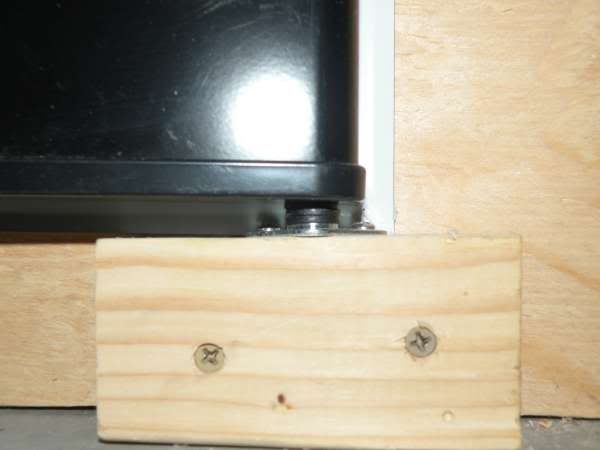
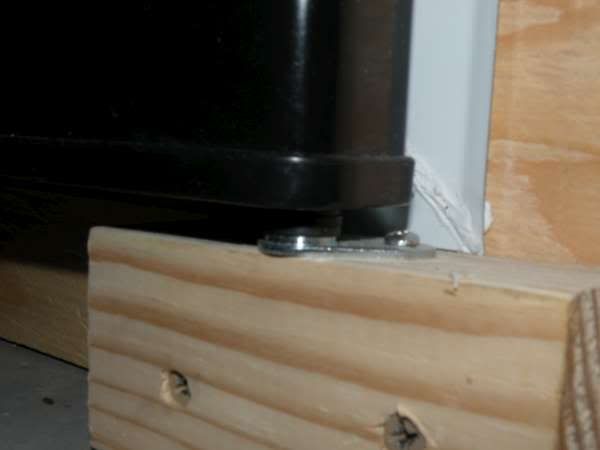
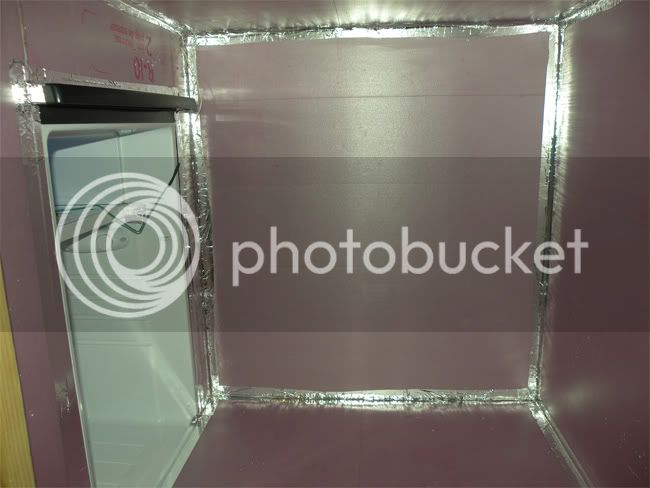
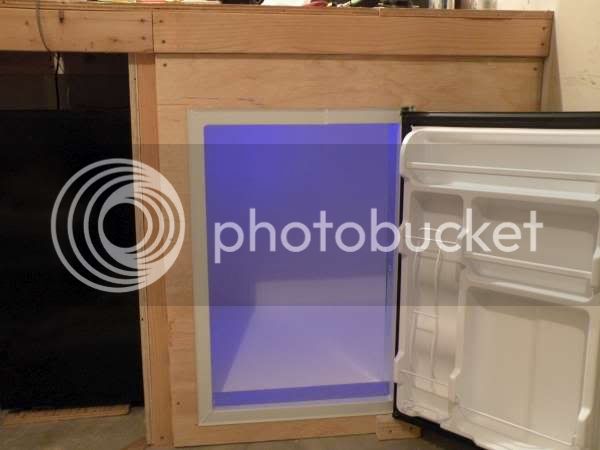
The space is a little bigger than I originally wanted, but I decided if I made it as airtight as possible and insulated it really well with 2in foam it would probably work. I can fit at least 5 buckets/carboys in it and yesterday I had a jar of water cooled down and stabile at 41 degrees with a fridge temp of 37 in a 85 degree garage. Not too bad considering I really only built it for fermenting ales at 64. With the fridge set to it's highest temp setting the chamber stabilizes around 57 degrees and the compressor barely runs.

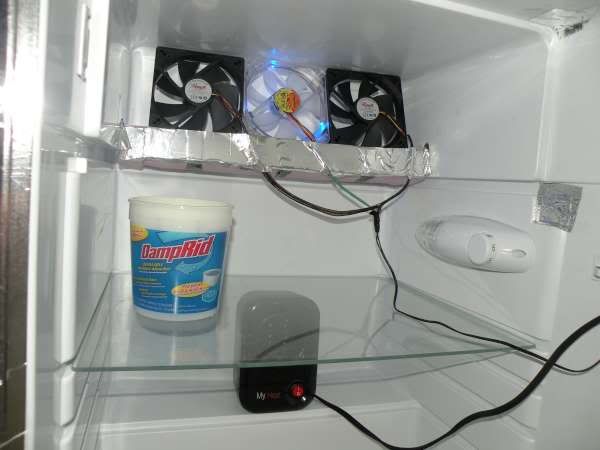
Right now I only have 1 pc fan running in there, but I ordered 2 more higher cfm fans to hopefully circulate for air and make the chamber more efficient at cooling. Also ordered a little personal ceramic heater that will be used later this year to help maintain temps when the ambient temp drops.

Anyway, thanks for looking and let me know if there are any questions.

I'd also like to thank everyone who posted their builds and provided lots of ideas and inspiration for this project. Almost none of the ideas used to build this chamber were my own. All were pretty much taken from this forum. I'm new to this hobby, but thanks to you guys I feel like I've already learned so much.
 
The door surround is just roofing metal from the home depot. The door already has a magnetic strip in the weather seal so it just needs something metal to grab onto.

The hinges are the original ones that came on the fridge, but I put the top one on bottom because it was more robust, and I hacked up the bottom one and made a new bracket out of it to mount the top of the door. Basically cut it in half, bent it so that it stuck out the right distance, and drilled 2 new holes to mount it. Not that hard if you put the door in the hole and then figure out how far your brackets need to stick out. Oh, and the bottom bracket is mounted in a block of wood I cut down to get the door at the right height. The door opens and closes super smooth and shuts tight. In fact I got in there last night (yeah it's that big) to do a little more finish work and when I shut the door it was like being in a vault. It seems pretty air tight.

Let me know if you need pictures of the door brackets and I'll see what I can do.
 
Looks great man! I'll be building something similar in the next couple weeks. Did you leave an airspace gap between your insulation and outside frame? I think I remember reading somewhere that a gap makes it insulate better, but don't now why and if that is even true. Is the part you built actually connected to the fridge? My brew room isn't completely built yet, so if I build a fermentation chamber I'll probably have to move it a few months down the road. Not sure if moving it would possibly break it apart or not. I also love your idea for the door! I'll have to figure that out as well
 
forgot to mention I used 2x2's to build the door frame. I attached it to the 3/4" plywood and then foamed around the opening with spray foam and caulked all the seams. Then once I had the plywood screwed into place I caulked everything again and then put aluminum tape around the door opening including the roofing metal that's inside the door frame.
 
Nootay,

There is a 1.5" air gap between the 2" insulation panels and the walls. Basically the thickness of the 2x4's I installed to give the foam something to stick and to get the foam around the house foundation.

The fridge is only attached by caulk. I set the front half way on a 2x4 and built a plywood surround that fit pretty tight. I then caulked everything in place. The idea was to be able to remove the fridge if I had to in case the compressor dies or something. I'd basically have to cut through 3 inches of caulk, foam, and plywood, but I think I could get it out without wrecking the box if necessary.

As for the door, I'd like to take credit for that, but I got the idea from a couple of other builds on these forums. I liked the idea and figured the door was always going to be the hardest part to make air tight, so why not do it like the fridge manufacturers do?
 
I don't see why not. I'm no Thermodynamacist, but I don't believe the wood really adds any insulating properties to the fermentation chamber. The foam board along with lots of calk, spray foam, and aluminum tape help to keep the thing air tight and well insulated. The plywood or OSB is just used for framing and structural purposes.
 
so did you lay the foam boards directly across the 2 x 4's on the floor? will the weight of a full bucket not break the foam boards in the gap between 2x4s? im not sure how stiff that stuff is. how big is the gap between your 2x4's on the floor?
 
Im beefing up my chamber and this is essentially what im going to do, yours looks great! I was at a loss for how to get the door to seal, ur idea is perfect. What are you using above the insulation for the floor and walls?
 
so did you lay the foam boards directly across the 2 x 4's on the floor? will the weight of a full bucket not break the foam boards in the gap between 2x4s? im not sure how stiff that stuff is. how big is the gap between your 2x4's on the floor?

It's not in the pictures, but I laid more 2x4 pieces on the floor of the garage before I put the foam down. Between the 2" foam and the 2x4's and the vinyl covered 3/8" paneling on top the floor is plenty rigid. I can sit in there without breaking it. The foam by itself might be pushing, although it is pretty sturdy stuff, but it would definately dent.
 
good deal, i believe i am going to do the same. i started construction of mine today. got all the framing done and have started the osb on the outside. where did you get the 3/8 vinyl covered paneling? is that exactly what its called? i need to find something similar to mine. i was thinking about a sheet of OSB over the foam, then finding some scrap linoleum to lay over the osb.
 
Im beefing up my chamber and this is essentially what im going to do, yours looks great! I was at a loss for how to get the door to seal, ur idea is perfect. What are you using above the insulation for the floor and walls?

If you're referring to the white stuff, it's some white vinyl covered gypsum or something like that. I think it's 3/8" and it comes in 4x8 sheets at the home depot. it's like 10 bucks a sheet and I used 2. It covers all walls/floors/ceiling. Wanted to protect the foam and also make the whole chamber somewhat waterproof in the event of a spill or blowout.

I used other builds as inspiration for the door. I just couldn't see how I was going to be able to make the door airtight and insulated well and still keep it easy to use. The fridge door solved the problem. I get a really good seal and it's super easy to open and close.
 
good deal, i believe i am going to do the same. i started construction of mine today. got all the framing done and have started the osb on the outside. where did you get the 3/8 vinyl covered paneling? is that exactly what its called? i need to find something similar to mine. i was thinking about a sheet of OSB over the foam, then finding some scrap linoleum to lay over the osb.

I think you could probably put just about anything over the foam and it would work as long as the foam is well caulked and even aluminum taped. I originally wanted to use melamine, but I couldn't find any in thin enough sheets or cheap enough. I found the white vinyl covered stuff at home depot and the price is right. I'm really happy with it, buckets/carboys slide on it easy enough and it looks finished inside. This thing is basically part of my house now and I wanted it to look nice.
 
i am still unsure when it comes to the door. I made my framing that connects to the fridge 50 inches long. With this, i can fit 3 fermenters in to the chamber. Do you find that with the fridge door you have to pull fermenters out to put more in? i was thinking of making one large door so that i could easily slide stuff around and not have to take anything out. only issue is it will not seal as well as the fridge door idea.
 
I have yet to actually put any fermenters in mine since I just got it done last week. I put the door on the left side of the chamber so I'd have access to the fridge and fans and heater and whatnot that are in or will be in the actual fridge. There is a couple feet to the right of the door that will hold fermenters, so I will most likely have to do some shuffling when I add/remove fermenters to the chamber. Didn't seem like a big deal to me, maybe it will when I actually start doing it. However having the vinyl on the floor will help the fermenters slide and should make manuevering much easier. Having the door not be the overwhelmingly weekest link seemed like the more important thing to me.
 
Very cool! I would like to do something like this in my house but since it's worth less than a third of what I paid for it I'm trying to dump it.
 
I got the Love TSS2-2100 controller wired in and a couple more fans running now and the chamber seems to be doing very well. I have a bucket of water in there now and I'm able to keep it at a pretty constant 66 degrees with the compressor only kicking on a couple times an hour. It's 95 outside here today and at least 85 in my garage so I feel pretty good about how it's performing. Just need to figure out the best settings for the love to keep the compressor from running too much, but it's able to completely cool down between runnings, so it's probably ok right now. Will update with pics of how I mount the controller soon.
 
Finally received the last of the necessary parts today and finished the chamber:

Mounted the Love 2 stage controller
DSCN4940-600.jpg


The fans and heater in place. The fans are angled up at about a 30 degree angle to blow air across the fridge ceiling. This pushes cold air into the chamber and also almost eliminates condensation. The heater I ordered from home depot for under 20 bones. I taped it down and installed a glass shelf above it to protect it from any drips.
DSCN4938-600.jpg


Shot of the probe taped to a bucket full of sanitizer. This method keeps the fridge from cycling too often.
DSCN4939-600.jpg


Here's the Love controller wired to an outlet. The top is for the fridge and the bottom is for the heater.
DSCN4935-600.jpg


Last shot shows how well everthing integrated into my garage. Still room under the workbench for all my brewing equipment. I'm happy and SWMBO is happy. At least until she see's the credit card charges.
DSCN4941-600.jpg


Considering smoothing the plywood with something and painting it, but that sounds like more work. Not really minding the plywood right now. It is my garage after all.

I have the day off tomorrow, so I'm making beer. Can't abide by an empty chamber any longer.
 
Great work. This is what I'll be doing with my bar build whenever motivation kicks me in the butt. or the wife. whichever happens first. Any picture to the left and at an angle of the last one? Is the mini fridge completely enclosed?
 
Great thread. Controlling fermentation temp is my next big project. I too would like to know if the fridge is completely enclosed. Looks very nice and seems well integrated into the house.
 
Any chance of a closeup of how your door hinges are mounted? I'm starting work on mine tomorrow after a talk with the wife and design simplification last night.
 
Thanks for the nice comments guys.

The mini fridge is not enclosed. The sheet of plywood that the temp controller is mounted on is just hiding it. There is about 6 inches of open air on both sides and the back of the fridge is open. The sides get very hot when the compressor is running, so you don't want to enclose them. The fridge documentation said to leave 6 inches open on the sides and 4 inches in the back I think. I'll go get you some close up pics of the door hinge setup.
 
Here's a shot showing the back of the fridge. The pic makes it look like the side of the fridge is right against the back wall, but it's not. There's about 6 inches back there.

DSCN4949-600.jpg


Top Hinge closeup. I basically hacked up the original bottom hinge of the fridge. Had to cut it down, bend it, and drill some new mounting holes in it. Maintained the original post and plastic bushing.

DSCN4965-600.jpg


DSCN4952-600.jpg


DSCN4951-600.jpg


Bottom Hinge. This was the original top hinge of the fridge. The best way I could think of mounting it was to cut down a block of wood to the exact height I wanted and then mounted the hinge to the block of wood. Not really a hinge I guess, it's just a post mounted to the block of wood.

DSCN4960-600.jpg


DSCN4958-600.jpg


DSCN4955-600.jpg


Put some damp rid in there yesterday because there was some condensation on the ceiling of the fridge due to the coils and the fermenting beer. Checked this morning and there is zero condensation in there. Very happy with it.

DSCN4967-600.jpg
 
Have fermented 2 batches in the chamber now. The only time I had any issues was with getting the primaries down to ferm temps initially. Have had to bring them down to 66 from around 80 since my ground water is pretty warm due to summer. After transferring the wort to the primary and pitching I just stuck the primary in the 66 degree chamber to cool down. The next morning (12 hours) I put the temp probe on the new primary and it was sitting at 73 instead of 66 because fermentation had already started. The fridge then had to work pretty hard for the next hour to get the primary down to the correct temp. The only issue from the fridge working that hard is a lot of condensation on the roof of the fridge. I just wiped it off with a towel to get the bulk of the water, and the damprid did the rest. Once I get them down to ferm temp the chamber keeps them nice and stabile. Was almost 100 out today and the chamber was fine. Seems to be working great.
 
Your fermentation chamber looks great!
We built (or tried to build) one last week as well. The fridge is working REALLY hard. I've noticed that the outside of the fridge itself gets really hot. Do you have this issue as well?? Should I be worried?
Any advice would be appreciated!
Thanks,
Sarah.
 
The sides of my mini fridge get pretty hot when the compressors been running for 5 minutes or so. The compressor itself gets even hotter though. It's 100 degrees outside this week and close to that in my garage. I have the temp in the chamber set to 68 and have the fridge kicking on at 68.5 degrees. It's having to run about every 15 minutes for 5-10 minutes, so it's working pretty hard. It does cool down pretty good in between so I'm not too worried about it.

I've been trying to optimize my Love controller settings, but I'm not having much luck finding the answers to my questions. I'm just wondering if it's better for the fridge compressor to run more often for short bursts or run less often for longer durations?

Maybe I'm doing it wrong and I should have it kicking on at 68.2. Not sure, but it hasn't burned up yet so maybe it's doing ok. This is the hottest weather we've had this year, so if it makes it past the next couple of weeks it should be good to go.
 
Thanks for your response and the advice. I'm in South Florida and it's been HOT! I don't mind the heat, but it makes fermentation a little difficult.
I've seen the garage get up to 90; its usually holding at about 85. I don't have anything in the chamber (I moved everything inside until the chamber is up and working). The ambient air inside has been at about 75 (quite a feat for a garage in Florida in August!!) and water is holding at about 62!!!
Fermentation can't be any worse than what college kids do to mini-fridges!!
Thanks again,
Sarah.
 
Just wanted to post and say that I changed my diff temp from .5 to 1.0 on the Love controller. This is letting the temp swing 1 degree before turning the compressor back on. This is allowing the compressor to fully cool between cycles. I think this is a better method that will hopefully prolong the life of the compressor.
 
Started using a small fountain pump and have been pumping ice water through the immersion chiller once we bring it down to 100 using the hose. This has helped us get a much better cold break and has also allowed us to get the wort down to 70 degrees or so depending on how much ice we have on hand. Once the wort is down to 70 or lower I pitch and then put the primaries in the ferm chamber. I usually set the chamber to 60 or so and put the probe on a bottle of beer to get it nice and cool in there. When I check in the morning the primary is usually fermenting and sitting around 65 or so. I then tape the probe to the side of the primary with a piece of foam insulation around it and then set the chamber to whatever temp I want to ferment at. Has been 64 or 65 for ales and has been working great. The beers are coming out so clean tasting. No funk, just great beer. Oh, it's been 100 outside here and 90 plus in my garage and the chamber is working great. The compressor gets hot as hell sometimes but it hasn't shut itself off yet and the chamber is always at my setpoint when I check it.
 
Just want to update this thread and say that I have now successfully fermented about 20 batches in the chamber without a hitch. It's now winter here in Idaho and I'm able to easily maintain 60-70 degrees in the chamber using a MyHeat personal heater. The heater cycles every hour or so and never has to work very hard. This chamber is by far the best investment I've made in my brewing habit....err hobby.
 
I have a mini fridge and space about the same. Thing is i want to use it as a fridge to cool my kegs. If I made the space smaller do you think it'd get cold enough? Or even in the low 40's?

Have you tried to see how cool yours can get? It rarely gets to 80 around here.
 
I haven't tried going below about 55. This time of year ambient in my garage is probably about 50 most days so I think this time of year I could probably get it to the low 40's or even high 30's with no problems. As for summer time though, my garage temp can get into the high 90's so the fridge has to work pretty hard just to stay at ale ferm temps.

I've thought about aging kegs in mine as there's usually plenty of room, but I think if I do I will just use CO2 to purge the O2 out and keep the kegs at around ferm temps or 65. From there it would just take a few days to force carb them when a spot opened in the keezer.

I build a 5 tap keezer a few months ago though, so having room for kegs in there isn't usually a problem.
 
Back
Top