My attempt at a 20 gallon, future-prrof system with stout tanks

Homebrew Talk - Beer, Wine, Mead, & Cider Brewing Discussion Forum

Help Support Homebrew Talk - Beer, Wine, Mead, & Cider Brewing Discussion Forum:

This site may earn a commission from merchant affiliate links, including eBay, Amazon, and others.
Damn dude that is CRAZY....

Best of luck and congrats on getting a system that should be your last... unless you go pro HEHE
 
Just bought em! super stoked.

I have never had a kid, but i feel like these pots have a due date and I have so much to get done before then. haha. Time to start hounding ebay for some cheap tri clamp fittings. Hopefully santa helps out a little as well.


Dayuuummmm!..........I would have thought that was Santa Claus right there!
 
bemerritt said:
Just bought em! super stoked. I have never had a kid, but i feel like these pots have a due date and I have so much to get done before then. haha. Time to start hounding ebay for some cheap tri clamp fittings. Hopefully santa helps out a little as well.

Plan on about $200 in shipping as well about 4 months down the road. If you're on the west coast it probably won't be as bad as it was for me ($250 to South Dakota).
 
Plan on about $200 in shipping as well about 4 months down the road. If you're on the west coast it probably won't be as bad as it was for me ($250 to South Dakota).

Four months total? Or four months from purchase? I'm hoping for late April. And I'm just down the coast in California, so hopefully shipping won't be too bad.
 
How about another recirculation port on the MT for sparge?

I thought about it, but I will just unclamp the hose on the recirculating port and put on the spathe arm when the time comes. Much cheaper than a three way valve.
 
This is awesome. I've been thinking about doing a Brutus 20 electric with a stout mash tun and bk (20 gal). I'll be following your build!
 
So, I have a couple of tri clamp questions. Hopefully someone has some insight.

All of the tri clamps on the pot are of the 1.5" variety(except for the element ports which I requested to be 2"). Now, even though a 1" will mate fine with a 1.5", it is considered bad practice and takes away from them being considered sanitized fittings. Is that statement correct?

The cost savings of going with 1" seems negligible, so I will probably stick to 1.5".

Next, ill be using the standard silicone tubing for this rig as that is what I currently use. But it seems silly to go down to the traditional 1/2" I'd tubing since the I'd of the tri clovers is so much larger. Thoughts?

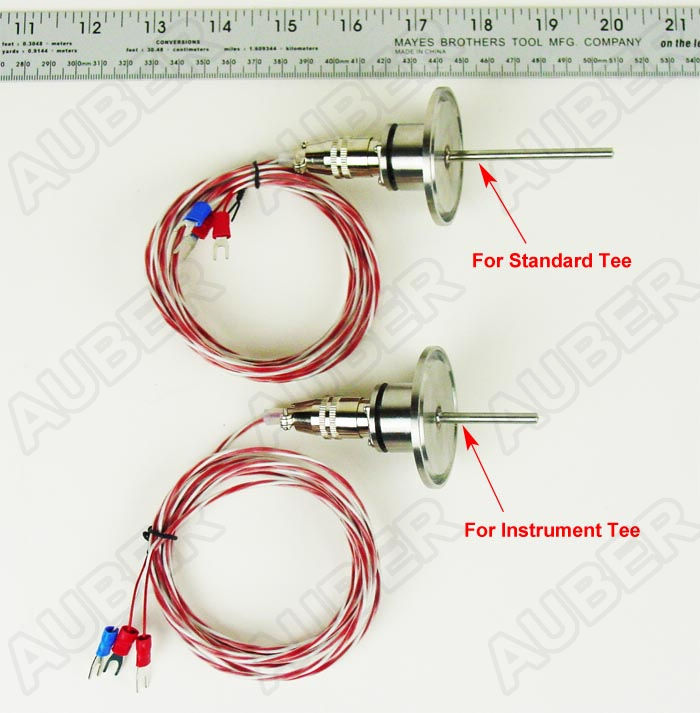
Lastly, (for now) is there any benefit to using an instrument tee with a short thermocouple rather than a normal tee with a long one?

Thanks for the input!
 
The fittings are not 1.5"...the outlets and recirculation ports are approximately 1", the whirlpool is around 3/4" and I believe the HERMS connects are even less. 1" and 1.5" TC fittings do share the same size ferrule, but the gaskets are different. You will have lots of dead space with 1.5" fittings as well as being more expensive (usually). The setup is not going to be sanitary in any case and there's plenty of mismatch elsewhere. The main benefit of triclovers is that they are easy to take apart and relatively easier to clean than other threaded fittings or quick disconnects. 1" is reasonable for homebrew setup, but even then it's bigger than optimal. The typical march homebrew pumps have 1/2" ports.
 
Ok. That's what I thought. 1.5 seemed massive. I got this email from them:

"Hi Brian,


Your latest revised order is below, please review it and confirm everything is correct.


Also, all of our standard TC ports are 1.5”.


Please let us know if you need anything else. Thanks!


Cheers,


Kristin

Stout Tanks and Kettles, LLC"

Just emailed back asking for more clarification.
 
Ok, looks like they are all 3/4" with an ID of .62". I'll be sticking with the 1/2" ID tubing for sure.

But I cannot find a 3/4" tee for the life of me. Any ideas? I'd rather not use a 1/2" tee.
 
No, the tubes are not all the same size.

Their fittings are not standard but the ferrules are 1/1.5" TC (1.984" OD).

1/2" and 3/4" TC share a different, smaller sized ferrule.
 
Well I guess I am just confused now. Look at this fro their site for the bk:

20+ Gal. Brew Kettle with Tangential Inlet, Thermowell & Sight Glass

Combi Brew Kettle/Whirlpool
Tangential Inlet
Sight Glass with Tri Clamp Fittings
Thermowell with Thermometer
(2) Sanitary 3/4" ball valves (5/8" ID)
(2) Sanitary Hose Barbs – 1/2"
Tri Clamps and gaskets
Actual total capacity approx. 21.5 gal.

Those two 3/4" ball valves with a 5/8 ID seem pretty standard size to me. Hopefully I get an email from them tomorrow.

Edit: after re reading your post and looking at the spares on their website, they definitely seem custom. Can't decide how annoying that is quite yet. But I don't think I like it. How am I supposed to put in a properly sized tee with a thermocouple? I guess a 1" tee is close enough. Not too jazzed about the larger ID though.

If I'm not misunderstanding your plan, you'd have to basically splice your T into the hoses on the "out" side of your vessels with TC barbs. I'm imagining you'll do something like Kal did but he used weldless fittings and three piece ball valves so he could just use a threaded nipple to attach his T. Check out the picture from his website below.

Since you have the welded TC fittings standard you'll have to make some sort of adapter either by using a 3 piece ball valve like his clamped to your vessel or by building TC hose barb adapters. Or you could just put thermocouples in your tanks like I did.

T setup.jpg
 
Use outlet from the mlt, as that is the point most related to the temp you want to control

Ya, the only problem is that then you are effectively heating it up more than that and will end up with less fermentable sugars. But The opposite can be said of adjusting temp based off of the herms exit. I'm still weighing the pros and cons. Curious what the temp difference really is. The good thing is, I have months to decide.
 
In my experience, using the outlet of the MLT for your RTD/TC results in a time lag that caused the actual mash temperature to run higher than the set point. This was confirmed with a separate temperature probe on my system.

This was also most noticeable when making temperature step changes.

The temperature of the mash is what you want to control, so I moved the RTD to monitor the top 2 " of the mash.

Now the mash temp stays at the set point temp with no overshoot or time lags.

My thoughts exactly of why I want to monitor the temp of the recirculation at the MLT inlet.
 
So yesterday I spent some time down in my brew garage and thought I would show you some pictures of where this setup will live. Also some pics of all the projects this wonderful site has helped me complete.

I will be building a new table opposite the current table (where the surfboards are) for the new set up. I want the table to be lower to keep the pot heights optimal.

c4y9.jpg


As you can see, it’s not too bad of a setup for a 1.5ish car garage. The surfboards will be hung from the ceiling to make room. It has seating for 4+ around to old restaurant tables that my mother found for free.

This is the main work table/bench, also scored for free. Keezer to the left, BIAB pot to the right and dual fermenters below. All in one compact package.

2vws.jpg


Finally have all four taps flowing simultaneously!

gd2a.jpg

Dual stc-1000s controlling the wine coolers

j7op.jpg


auvq.jpg


And of course the obligatory stir plate

o43a.jpg

So that is where it is living. And a big thank you to all of the posts that inspired the above!
 
Nice work! The controls on your boxes are nice and clean and well laid out. If I can make one suggestion: Add some panel tags. They're cheap (under $2/each usually) and helps given that most of us don't brew every day . Makes things a lot safer I find.

They look like this:

panel_tags_126.jpg


Available at many locations - just google "panel tags" or "electrical tags".

Kal
 
Kal, on the next revision of the panel I will most definitely have labels. I have a laser marking machine at work so I am thinking a brushed stainless panel with laser etched tags would look sharp.

On another, more annoying note, does anyone have John's email address at stout? Is it as simple as [email protected]? I am getting tired of asking their sales support the same question 3 times to get a pretty simple answer about their tri clamp sizes.
 
Yeah, the plan is one of these:

TC10TEE-SL.jpg


from brewers hardware (http://www.brewershardware.com/1-Tri-Clover-Clamp-Instrument-Tee.html)

and one of these:

PT100-Clamp.jpg


from auber (http://www.auberins.com/index.php?main_page=product_info&cPath=20_15&products_id=267)

for the HLT and BK I will put it at the outlet. The MLT I am still deciding on. THe three choices are the outlet, outlet from the Herms or the inlet back to the MLT.

that's awesome! I missed that over at brewers hardware:mug:. I almost wish I had used them..
 
Alright, I the long awaited dimensions of the inlets and outlets:

"As for a port ID, I was told they are roughly 1/8” smaller than the OD, therefore here are the OD for each of the ports on 20 gallon tanks, the ID will be about 1/8” smaller.


Outlets – 1”

Recirculation fittings – 1”

HERMS inlet – 1”

Tangential inlet – 3/4"

2” element ports – 2”"
 
Check out the ones from Still Dragon. They're cheaper and their design supports RIPP elements. I did upgrade to a better strain relief (aluminum from grainger)

http://www.stilldragon.com/element-guard-kit-and-adapters.html

I use the stilldragon element guard kit, too; but your grainer strain relief looks SOO much better. The Still dragon one has driven me crazy- if I put a decent bend into the cable the sheath pops out. Do you happen to have a link to that part on the Grainger site? (or a PN?)

Did you use 10/4 or 10/3 wire? (I bought all 10/4 wire which was a mistake as obviously the elements don't need it / can't use the 4th wire anyway and the OD of the cable makes it a huge PITA to install with the stilldragon elements.


Adam
 
A strain relief is used whenever an electrical wire is to be moved or manipulated somehow (in this case by the user) and you don't want to place any strain on the wiring connection points. It "relieves the strain".

Without it if you pulled on the cord or even just the weight of the cord would put strain on the electrical connection points. Not good.

You see them in everything from a table lamp, to your TV, to your IPOD charger.

Kal
 
Alright, hopefully will be making some more purchases soon, but still a lot of planning going on. Need some input on pump connections.

I already have one stainless chugger with camlock connections, and will be adding a second one once the pots get here. But I cant decide what to do for connections.

I can either buy four 1"/1.5" Tri Clover Compatible X 1/2" Female NPT, and have everything be tri clamp connections

or

I can buy four 1"/1.5" Tri Clover Compatible X 1/2" Male NPT and some camlock fittings and keep it camlock connections for hoses.

any thoughts?
 
I'm torn on camlock fittings still. Much easier to use that tri clamps. I kept my old fittings around in case I want to use them for hose changes. I'm getting more used to the tc though, so the motivation to go back is limited.
 
I Think I am just going to stick with the tri-clamps with female npt thread. If for another reason, it will keep it much more simple and the hoses won't have to be attached a certain way.

Currently I am planning out the Panel. It will have to power inputs of 120 V 20 A controlling four 2000 watt elements. Most of the components from my previous panel will be used. I have attached the drawing below. It is similar to Kal's but I made some changes. Let me know if you think I am missing something or have some questions.

rqwq.jpg


SW stands for switch, L stands for light.

My question for anyone that has used the control panel that he uses; what is the dimension and location of the hole for the latch on the front of the box. I want to make sure I don't interfere with it.
 
I don't really get the use of a timer permanently mounted in the panel. I'd swap another PID for the timer to monitor chiller output, herms coil output, or temp somewhere else. I use kitchen timers that I can stick anywhere I want, even take with me if I want to go do something else in another part of the house.


Also you don't need alarm switches for each controller.
 
Need? definitely not. Helpful though. I use the timer, and the alarms on the controllers. It is nice to know when the kettle is 'about' to boil, or when the strike water is ready, etc... And I use the boil PID to measure temperatures elsewhere during the mash, particularly when I was tuning in the system and tracking down temp control problems

I bought the box off ebrewsupply, so it might not be the same panel. I'll measure tonight, anyways, and give the dimensions. Based on your drawing, though, I'm sure you are fine.
 
As you can see below, my current panel has almost every switch and light that I plan on putting on the new panel.

snc2.jpg


I do agree that the time mounted on the panel is excessive. But since I already have it, I will use it. It is nice to have it all in one place. Most panels are based more off want than need.
 
Also, sold some stuff on ebay last night so now it is time to buy the enclosure. Do most people just buy it off of Amazon for $99 plus shipping? (don't worry Kal, I will for sure go through your link if this is where I end up picking it up)
 
bemerritt said:
Also, sold some stuff on ebay last night so now it is time to buy the enclosure. Do most people just buy it off of Amazon for $99 plus shipping? (don't worry Kal, I will for sure go through your link if this is where I end up picking it up)

I went with the enclosure from eBrewSupply.com. About the same price and free shipping over $50.

What's nice with the one from them is there is already a grounding post inside the enclosure.

Mine had a few small dents when it arrived. Not sure if I was an anomaly or the norm.
 
The guy selling the panels on eBay is a criminal. He was arrested for selling counterfeit breakers, and got a slap on the wrist. I don't buy from him...
 
That said, I bought my panel from him, messed up the door and he sent me another one for shipping. So maybe he's not a bad guy anymore.
 
There was a long thread about it. The guy managing his company was trying to win back the homebrewer community, explaining how this guy doesn't run the show anymore (but still owns the company, it seems). Eventually, the thread was locked as the moderators said it was turning into an advertisement by a non-sponsor. (which it was)

Lots of different opinions were stated. I was in the 'he's not getting my business' camp, but everybody makes their own choices. The panel from ebrewsupply worked out really well for me. It is probably identical, from the same manufacturer in China.

No dents in mine, it was packed obnoxiously well... I had a house full of packing peanuts after the dog ran into the box. Greyhounds aren't bright. Fast, but not bright.
 
Back
Top