You are using an out of date browser. It may not display this or other websites correctly.
You should upgrade or use an alternative browser.
You should upgrade or use an alternative browser.
Grainfather!!
- Thread starter BrewMeister49
- Start date

Help Support Homebrew Talk - Beer, Wine, Mead, & Cider Brewing Discussion Forum:
This site may earn a commission from merchant affiliate
links, including eBay, Amazon, and others.
elreplica
Well-Known Member
I have a question for those using the Grainfather inside. I'm in Canada and I don't have a garage, so I would most likely have to use it inside (in the kitchen) from October to May, roughly.
How do you handle the humidity during boil, since the unit is not directly beneath the hood?
I'm on the east coast and use mine in the kitchen beneath the hood. That being said, I don't find that the boil releases copious amounts of steam. My ceiling is 8' and I do run the range fan but not really sure if it is removing any great deal of potential condensation. All my brews have been between January to now.
Pantherjon
Well-Known Member
Well, I did my very first brew with my Grainfather today..Things went rather well for the most part then all went to hell quickly at the end of the boil...I did Piney The Welder kit, clone of a beer from some west coast brewery that sounds very similar to it..
I did do one thing differently this brew, and won't do this again in the future..I had this really brilliant idea(not in hindsight) that I would put my grains in the basket and then rest the basket above the water as it warmed to mash in temperature, on the belief that doing this would warm the basket and grain and the water temperature wouldn't drop drastically when added..Well, that was true, what I didn't take into account for was that the only holes were on the bottom so the basket wanted to float until I pushed it down..Not good..Pushed the center rod 'thingy' down into the grains- damn, fish out of hot water so all those grains don't get into the mash- some did..Dang..Go on with mash..Unit kept the temperature pretty rock solid right at 152..Good..Okay, mash out, bump up to 170 for 10 and then lift basket and start sparge..Goes pretty good..Get done with sparge and now time for boil..I switched unit to boil mode while I was sparging so water was up to like 190 when I was done with the sparge..
Boil went well..As you can see in picture 1 I was able to achieve a pretty vigorous rolling boil- inside an air conditioned house at almost sea level..Cover on control panel prevents the numbers from being seen but the temp was at 213 when this pic was taken..Boil went splendid, never a threat of a boil over- which made me happy!") The trouble began once I hooked up the CFC and began cooling the wort..As you can see in picture 2 I have brought the temp down to 119, and in pretty quick time..I DID get it down(according to the readout) to like 98 when things went haywire..Temp started going back up! WHAT?!?! I have the element OFF! Pull the tube up out of the wort and see I have ZERO flow..Sheesh, filter must be plugged up..Grab the plastic paddle, try to scrap at the filter assembly..No good..Gads..Unhook, unscrew check valve, and see it it is plugged at the spring with grain...Ok, remove spring and ball, re-assemble, turn on pump and still no flow..Now temp is back up to like 145! Needless to say the **** hit the fan..Okay time for plan 'B'...Unplug everything get out my kettle..Drain wort from GF into kettle through my big strainer..OMG! There is a TON of grain in there..Sheesh..To shorten this novel, when I emptied out the grain basket, I found that the damn silicon gasket had some how slipped off at about a 3" section allowing all that grain freedom into the wort- also didn't help that at the very beginning of the mash I let a bit of grain into the wort as well..Had to put the wort in my kettle, then into a ice bath in the sink and then finally into the fermenter which went into the fridge for like 2 hours to get the wort to pitching temperature...Whew!..
The trouble began once I hooked up the CFC and began cooling the wort..As you can see in picture 2 I have brought the temp down to 119, and in pretty quick time..I DID get it down(according to the readout) to like 98 when things went haywire..Temp started going back up! WHAT?!?! I have the element OFF! Pull the tube up out of the wort and see I have ZERO flow..Sheesh, filter must be plugged up..Grab the plastic paddle, try to scrap at the filter assembly..No good..Gads..Unhook, unscrew check valve, and see it it is plugged at the spring with grain...Ok, remove spring and ball, re-assemble, turn on pump and still no flow..Now temp is back up to like 145! Needless to say the **** hit the fan..Okay time for plan 'B'...Unplug everything get out my kettle..Drain wort from GF into kettle through my big strainer..OMG! There is a TON of grain in there..Sheesh..To shorten this novel, when I emptied out the grain basket, I found that the damn silicon gasket had some how slipped off at about a 3" section allowing all that grain freedom into the wort- also didn't help that at the very beginning of the mash I let a bit of grain into the wort as well..Had to put the wort in my kettle, then into a ice bath in the sink and then finally into the fermenter which went into the fridge for like 2 hours to get the wort to pitching temperature...Whew!..
Brew is currently in the closet and I am doing my best of RDWHAHB..Hopefully I will see airlock activity in the morning..


I did do one thing differently this brew, and won't do this again in the future..I had this really brilliant idea(not in hindsight) that I would put my grains in the basket and then rest the basket above the water as it warmed to mash in temperature, on the belief that doing this would warm the basket and grain and the water temperature wouldn't drop drastically when added..Well, that was true, what I didn't take into account for was that the only holes were on the bottom so the basket wanted to float until I pushed it down..Not good..Pushed the center rod 'thingy' down into the grains- damn, fish out of hot water so all those grains don't get into the mash- some did..Dang..Go on with mash..Unit kept the temperature pretty rock solid right at 152..Good..Okay, mash out, bump up to 170 for 10 and then lift basket and start sparge..Goes pretty good..Get done with sparge and now time for boil..I switched unit to boil mode while I was sparging so water was up to like 190 when I was done with the sparge..
Boil went well..As you can see in picture 1 I was able to achieve a pretty vigorous rolling boil- inside an air conditioned house at almost sea level..Cover on control panel prevents the numbers from being seen but the temp was at 213 when this pic was taken..Boil went splendid, never a threat of a boil over- which made me happy!
The trouble began once I hooked up the CFC and began cooling the wort..As you can see in picture 2 I have brought the temp down to 119, and in pretty quick time..I DID get it down(according to the readout) to like 98 when things went haywire..Temp started going back up! WHAT?!?! I have the element OFF! Pull the tube up out of the wort and see I have ZERO flow..Sheesh, filter must be plugged up..Grab the plastic paddle, try to scrap at the filter assembly..No good..Gads..Unhook, unscrew check valve, and see it it is plugged at the spring with grain...Ok, remove spring and ball, re-assemble, turn on pump and still no flow..Now temp is back up to like 145! Needless to say the **** hit the fan..Okay time for plan 'B'...Unplug everything get out my kettle..Drain wort from GF into kettle through my big strainer..OMG! There is a TON of grain in there..Sheesh..To shorten this novel, when I emptied out the grain basket, I found that the damn silicon gasket had some how slipped off at about a 3" section allowing all that grain freedom into the wort- also didn't help that at the very beginning of the mash I let a bit of grain into the wort as well..Had to put the wort in my kettle, then into a ice bath in the sink and then finally into the fermenter which went into the fridge for like 2 hours to get the wort to pitching temperature...Whew!..Brew is currently in the closet and I am doing my best of RDWHAHB..Hopefully I will see airlock activity in the morning..
d-bone
Well-Known Member
- Joined
- Jul 19, 2015
- Messages
- 79
- Reaction score
- 15
Please tell me any advantages of the micropipework. None of my beers likely will be less than 10 lbs. - if anything I'd want to increase capacity and output. I guess if you wanted beer less than 5% or doing small batches perhaps? Other than that, I'm not sure why it's a great accessory.
with the micro pipework, I can get the top overflow pipe and top plate in the grain basket down closer to the grainbed when my grain bill is small, unlike with the normal pipework, which doesnt allow you to get everything down far enough. I have found avoiding a buildup of wort on top of the grain bed to be a key factor for me avoiding a stuck sparge, which is what happpens when using the normal pipework. I have brewed a couple beers now with the GF using small grain bills; Belgian Wit 8lbs, peach cream ale 8.5 lbs, alt beer 9.75 lbs, as well as a couple of session IPA's that range between 7.5 and 8.25. All of these had problems with stuck sparge, excpet the cream, which was the only that I brewed with the micro pipework. Anyway, I am just reporting my experience, hopefully its helpful. If you are knot brewing with small grain bills often, than it probably is kot necissary, as long as you make sure to use the small grain bill calculator.However, I brew a lot of "session" or lowish ABV beers, as I tend to host the occasional "kegger" when I run out of empty kegs and need room in my keezer.
d-bone
Well-Known Member
- Joined
- Jul 19, 2015
- Messages
- 79
- Reaction score
- 15
Well, I did my very first brew with my Grainfather today..Things went rather well for the most part then all went to hell quickly at the end of the boil...I did Piney The Welder kit, clone of a beer from some west coast brewery that sounds very similar to it..
I did do one thing differently this brew, and won't do this again in the future..I had this really brilliant idea(not in hindsight) that I would put my grains in the basket and then rest the basket above the water as it warmed to mash in temperature, on the belief that doing this would warm the basket and grain and the water temperature wouldn't drop drastically when added..Well, that was true, what I didn't take into account for was that the only holes were on the bottom so the basket wanted to float until I pushed it down..Not good..Pushed the center rod 'thingy' down into the grains- damn, fish out of hot water so all those grains don't get into the mash- some did..Dang..Go on with mash..Unit kept the temperature pretty rock solid right at 152..Good..Okay, mash out, bump up to 170 for 10 and then lift basket and start sparge..Goes pretty good..Get done with sparge and now time for boil..I switched unit to boil mode while I was sparging so water was up to like 190 when I was done with the sparge..
Boil went well..As you can see in picture 1 I was able to achieve a pretty vigorous rolling boil- inside an air conditioned house at almost sea level..Cover on control panel prevents the numbers from being seen but the temp was at 213 when this pic was taken..Boil went splendid, never a threat of a boil over- which made me happy!
Brew is currently in the closet and I am doing my best of RDWHAHB..Hopefully I will see airlock activity in the morning..
Firstly, sorry to hear about the mishap. I removed the spring and ball long ago and never put it back.
Where you recirculating you wort back into the GF when chilling?
elreplica
Well-Known Member
with the micro pipework, I can get the top overflow pipe and top plate in the grain basket down closer to the grainbed when my grain bill is small, unlike with the normal pipework, which doesnt allow you to get everything down far enough. I have found avoiding a buildup of wort on top of the grain bed to be a key factor for me avoiding a stuck sparge, which is what happpens when using the normal pipework. I have brewed a couple beers now with the GF using small grain bills; Belgian Wit 8lbs, peach cream ale 8.5 lbs, alt beer 9.75 lbs, as well as a couple of session IPA's that range between 7.5 and 8.25. All of these had problems with stuck sparge, excpet the cream, which was the only that I brewed with the micro pipework. Anyway, I am just reporting my experience, hopefully its helpful. If you are knot brewing with small grain bills often, than it probably is kot necissary, as long as you make sure to use the small grain bill calculator.However, I brew a lot of "session" or lowish ABV beers, as I tend to host the occasional "kegger" when I run out of empty kegs and need room in my keezer.
Thanks for the feedback. I haven't had any stuck sparge issues yet but certainly will take your "exbeerience" into consideration.
gotbeer74
Well-Known Member
- Joined
- Dec 21, 2015
- Messages
- 281
- Reaction score
- 131
Well, I did my very first brew with my Grainfather today..Things went rather well for the most part then all went to hell quickly at the end of the boil...I did Piney The Welder kit, clone of a beer from some west coast brewery that sounds very similar to it..
I did do one thing differently this brew, and won't do this again in the future..I had this really brilliant idea(not in hindsight) that I would put my grains in the basket and then rest the basket above the water as it warmed to mash in temperature, on the belief that doing this would warm the basket and grain and the water temperature wouldn't drop drastically when added..Well, that was true, what I didn't take into account for was that the only holes were on the bottom so the basket wanted to float until I pushed it down..Not good..Pushed the center rod 'thingy' down into the grains- damn, fish out of hot water so all those grains don't get into the mash- some did..Dang..Go on with mash..Unit kept the temperature pretty rock solid right at 152..Good..Okay, mash out, bump up to 170 for 10 and then lift basket and start sparge..Goes pretty good..Get done with sparge and now time for boil..I switched unit to boil mode while I was sparging so water was up to like 190 when I was done with the sparge..
Boil went well..As you can see in picture 1 I was able to achieve a pretty vigorous rolling boil- inside an air conditioned house at almost sea level..Cover on control panel prevents the numbers from being seen but the temp was at 213 when this pic was taken..Boil went splendid, never a threat of a boil over- which made me happy!
Brew is currently in the closet and I am doing my best of RDWHAHB..Hopefully I will see airlock activity in the morning..
I put the basket in right after I add the water. This way the only thing affecting temp is the grains.
AkBrew907
Well-Known Member
- Joined
- Jan 27, 2015
- Messages
- 621
- Reaction score
- 196
You can always add the mash water at a couple degrees higher than what you plan to mash at. The grains will help bring it down a little and then when you recirc your wort it will come down a hair also. Then if if falls below your mash temp the heater will bring it back up and maintain temps. This should reduce the temp swings.
I only have one brew under my belt on the GF but I set my temp at 152, added grains, stirred the crap out of it and it was back to 152 in 5 or less minutes and held for the full 60 minute mash.
I only have one brew under my belt on the GF but I set my temp at 152, added grains, stirred the crap out of it and it was back to 152 in 5 or less minutes and held for the full 60 minute mash.
it was back to 152 in 5 or less minutes and held for the full 60 minute mash.
Just curious, did your actually measure the temperature of the grain bed or were you going off the controller temp reading? I have a hunch that if you weren't independently measuring the grain bed temp your mash temps didn't recover as quickly as you might have thought.
AkBrew907
Well-Known Member
- Joined
- Jan 27, 2015
- Messages
- 621
- Reaction score
- 196
Just curious, did your actually measure the temperature of the grain bed or were you going off the controller temp reading? I have a hunch that if you weren't independently measuring the grain bed temp your mash temps didn't recover as quickly as you might have thought.
Was what the controller was displaying.
Was what the controller was displaying.
If you have a spare thermometer laying around that you trust, next time try measuring the grain bed temp directly. Might be an eye opener!
I know there are GF owners who participate in this thread that have started mashing in at "typical" strike temps because the grain bed temps lag far behind the temp reading of the controller if you dough in at mash temp, effectively reducing the true temp at which you think you're mashing.
AkBrew907
Well-Known Member
- Joined
- Jan 27, 2015
- Messages
- 621
- Reaction score
- 196
If you have a spare thermometer laying around that you trust, next time try measuring the grain bed temp directly. Might be an eye opener!
I know there are GF owners who participate in this thread that have started mashing in at "typical" strike temps because the grain bed temps lag far behind the temp reading of the controller if you dough in at mash temp, effectively reducing the true temp at which you think you're mashing.
Good idea. I have a nice digital thermometer. Will give it a check next brew
MeanLowerLow
Well-Known Member
- Joined
- Feb 18, 2016
- Messages
- 84
- Reaction score
- 22
If you have a spare thermometer laying around that you trust, next time try measuring the grain bed temp directly. Might be an eye opener!
I know there are GF owners who participate in this thread that have started mashing in at "typical" strike temps because the grain bed temps lag far behind the temp reading of the controller if you dough in at mash temp, effectively reducing the true temp at which you think you're mashing.
I've started mashing in at the strike temp BeerSmith tells me after reading the discussions earlier in this thread... I believe it has helped my efficiency.
Pantherjon
Well-Known Member
Firstly, sorry to hear about the mishap. I removed the spring and ball long ago and never put it back.
Where you recirculating you wort back into the GF when chilling?
Yeah..Probably another misguided 'brilliant idea' I had to get the wort temp down to pitching temperature by going thru the CFC and then back into the GF..I just didn't see it getting down to pitching temperature with 1 pass thru..Guess it IS possible tho...
Pantherjon
Well-Known Member
I put the basket in right after I add the water. This way the only thing affecting temp is the grains.
Am going to do it that way on my next brew...
Pantherjon
Well-Known Member
Good idea. I have a nice digital thermometer. Will give it a check next brew
Funny...I don't have a digital thermometer, but I had set my mash temp to 154, then when I added the basket with grains it dropped(according to the controller) to 151..I stirred the grain(after recovering the center post
) and checked with my dial thermometer..It read 150...I also went into the controller setting prior to my brew and set my 'hysterisis'(however it is spelled) to 1 so I ended up with very little temp fluctuation..A couple times I checked the grain bed against the controller and every time was within 2 degrees..Pantherjon
Well-Known Member
Oh, one more thing...I checked before heading to work this morning and there was airlock activity!  And still going when I got home tonight! So, I guess 1st 'dry hopping' will go as planned tomorrow then!
Hops are going in muslin bag..learned my lesson the 1st time I dry hopped on a whim..No floaters in THIS beer!
And still going when I got home tonight! So, I guess 1st 'dry hopping' will go as planned tomorrow then! Hops are going in muslin bag..learned my lesson the 1st time I dry hopped on a whim..No floaters in THIS beer!
AkBrew907
Well-Known Member
- Joined
- Jan 27, 2015
- Messages
- 621
- Reaction score
- 196
Yeah..Probably another misguided 'brilliant idea' I had to get the wort temp down to pitching temperature by going thru the CFC and then back into the GF..I just didn't see it getting down to pitching temperature with 1 pass thru..Guess it IS possible tho...
Depends on tour tap water temp. That's the one beauty of Alaska water is its damn near a hair above freezing when coming out of ground. I go from boiling to in the 50's in a single pass if I don't throttle back the incoming water.
Funny...I don't have a digital thermometer, but I had set my mash temp to 154, then when I added the basket with grains it dropped(according to the controller) to 151..I stirred the grain(after recovering the center post
Hmm I remember reading about that, will have to adjust that. It just controls the swing allowed before heating or cooling right?
Pantherjon
Well-Known Member
Correct..By putting it to 1 means 1 degree + or - of the set temp..I was attempting to find the link to the youtube vid I watched that showed how to do it..
Going from cryptic notes I took to set mine up :
Hold down both the up and down arrows at the same time until it says FAC1, then use the up arrow to set 231(password), then press set..Use up arrow to go to F04, up arrow to 221 - this sets the highest allowed 'SET' temperature, then press 'SET'..Up arrow to F05, down arrow to 1 then press 'SET' - temp variance..Then UP arrow to F08 and put to 'HOT', press set...Then let it sit and reset- you will know when it does as it will flash 3 dashes '---' on the display..And you're set up..
elreplica
Well-Known Member
Correct..By putting it to 1 means 1 degree + or - of the set temp..I was attempting to find the link to the youtube vid I watched that showed how to do it..
Going from cryptic notes I took to set mine up :
Hold down both the up and down arrows at the same time until it says FAC1, then use the up arrow to set 231(password), then press set..Use up arrow to go to F04, up arrow to 221 - this sets the highest allowed 'SET' temperature, then press 'SET'..Up arrow to F05, down arrow to 1 then press 'SET' - temp variance..Then UP arrow to F08 and put to 'HOT', press set...Then let it sit and reset- you will know when it does as it will flash 3 dashes '---' on the display..And you're set up..
I believe this is the link you're referring to:
http://youtu.be/NTIxjCD07vU
[/http://youtu.be/NTIxjCD07vU
AkBrew907
Well-Known Member
- Joined
- Jan 27, 2015
- Messages
- 621
- Reaction score
- 196
Correct..By putting it to 1 means 1 degree + or - of the set temp..I was attempting to find the link to the youtube vid I watched that showed how to do it..
Going from cryptic notes I took to set mine up :
Hold down both the up and down arrows at the same time until it says FAC1, then use the up arrow to set 231(password), then press set..Use up arrow to go to F04, up arrow to 221 - this sets the highest allowed 'SET' temperature, then press 'SET'..Up arrow to F05, down arrow to 1 then press 'SET' - temp variance..Then UP arrow to F08 and put to 'HOT', press set...Then let it sit and reset- you will know when it does as it will flash 3 dashes '---' on the display..And you're set up..
I believe this is the link you're referring to:
http://youtu.be/NTIxjCD07vU
[/http://youtu.be/NTIxjCD07vU
Awesome!! Thanks!
Pantherjon
Well-Known Member
Correct..By putting it to 1 means 1 degree + or - of the set temp..I was attempting to find the link to the youtube vid I watched that showed how to do it..
Going from cryptic notes I took to set mine up :
Hold down both the up and down arrows at the same time until it says FAC1, then use the up arrow to set 231(password), then press set..Use up arrow to go to F04, up arrow to 221 - this sets the highest allowed 'SET' temperature, then press 'SET'..Up arrow to F05, down arrow to 1 then press 'SET' - temp variance..Then UP arrow to F08 and put to 'HOT', press set...Then let it sit and reset- you will know when it does as it will flash 3 dashes '---' on the display..And you're set up..
I believe this is the link you're referring to:
http://youtu.be/NTIxjCD07vU
[/http://youtu.be/NTIxjCD07vU
Yep! That's the one! Thanks!
Wow, after a couple weeks of reading here and there, I have finally gotten through all 163 pages of this thread!
I saw this thread in its infancy and started looking at the GF as an option for when I decided to go all grain. Ive been extract brewing for a couple of years now and really want to make the jump. About a month or two ago, my favorite home brew store down in Texas, Stubby's Texas Brewing Inc., was going to demo the GF one Saturday. I told my wife, hey lets grab our friends and go spend an evening in Denton and catch this demo at the beer store in ft. worth. So glad we did! The 4 of us were the only ones there for the demo so I got to ask a lot of questions and do a lot of the brewing work. The employee that was running the demo made a cream ale with vanilla bean additions later in the fermentation process. He did such a good job that my wife said after we get back from vacation in June, I can start looking around and get one ordered! I have been reading and watching every video I can find ever since. I had thought I would skip the jacket and sparge heater, but I think i am going to go ahead and get them. I may look at the coffee boilers that I have seen mentioned, might be a cheaper route, we'll see. I always brew inside, but maybe this fall when it is cooler out, I might go to the garage for a few brew sessions.
I'm a big wheat beer guy and so are my friends, so I want to perfect some sort of wheat beer. I am in love with a beer out of Mustang Brewery in Oklahoma City called Wa****a Wheat and I want to do something close to that. From everything I have read, it is easy to replicate your recipes with the GF, so I am hoping I can accomplish this.
Ill be sure to post more in this thread once I am up and running. CANNOT WAIT!!!!
edit- not sure why it moderated the beer name... Sorry about that.
scallopking
Well-Known Member
- Joined
- Sep 23, 2015
- Messages
- 198
- Reaction score
- 46
Right on! Welcome  I brew on my GF almost every weekend so if you have any questions let us know. I have the graincoat, had the reflectix before but this looks way better and easier to remove and clean. I'd get the jacket. I also have the GF sparge water heater which I want to put a vavle on but so much nicer not having to use propane to heat sparge water. I brew indoors so I have to heat sparge water outside or have on my stove which is too far. can't wait to see your wheat recipe and how it came out. Ever in the need for an IPA recipe let me know.
I brew on my GF almost every weekend so if you have any questions let us know. I have the graincoat, had the reflectix before but this looks way better and easier to remove and clean. I'd get the jacket. I also have the GF sparge water heater which I want to put a vavle on but so much nicer not having to use propane to heat sparge water. I brew indoors so I have to heat sparge water outside or have on my stove which is too far. can't wait to see your wheat recipe and how it came out. Ever in the need for an IPA recipe let me know. Pantherjon
Well-Known Member
Silly question for y'all..I am not sure this is what caused all the grain to escape and plug my filter when I brewed for the first time on my GF or not..BUT, on the Grainfather website it shows what's pictured as the TOP plate
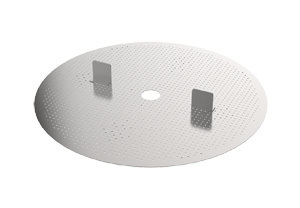
I used it as the bottom plate as it has those 'legs' to keep the basket off the filter assembly...Does anyone else do that, or do you use it properly per the website as the top plate?? Just curious...
I used it as the bottom plate as it has those 'legs' to keep the basket off the filter assembly...Does anyone else do that, or do you use it properly per the website as the top plate?? Just curious...
singybrue
Well-Known Member
Silly question for y'all..I am not sure this is what caused all the grain to escape and plug my filter when I brewed for the first time on my GF or not..BUT, on the Grainfather website it shows what's pictured as the TOP plate
I used it as the bottom plate as it has those 'legs' to keep the basket off the filter assembly...Does anyone else do that, or do you use it properly per the website as the top plate?? Just curious...
I use mine as designed by the mfg-as a top plate
Pantherjon
Well-Known Member
I use mine as designed by the mfg-as a top plate
With the 'legs' up or down? I will try it that way on my next brew, and hope the seal doesn't come dislodged and allow a **** ton of grain escape into the wort...
Lazer Wolf Brewing
Well-Known Member
With the 'legs' up or down? I will try it that way on my next brew, and hope the seal doesn't come dislodged and allow a **** ton of grain escape into the wort...
I would recommend not trying that.
treacheroustexan
Well-Known Member
I would recommend not trying that.
I second this.
The same thing happened to me yesterday. I think I messed up something while setting the controller to Celsius and cannot enter the menu -- holding down the two arrow buttons gives me a number, usually "0".Although I was successful for my second brew, I now run into another issue. the temperature control unit, which is a ETC-512B, shows OFF and temperature reading intermittently. It seems like to be in OFF status and doesn't control the heating element. The heating element works fine if I control it by put the switch in "Boil" position. I am looking for solution before sending it back.
Thanks in advance.
Does anyone have a fix?
Cheers!
Silly question for y'all..I am not sure this is what caused all the grain to escape and plug my filter when I brewed for the first time on my GF...
I used it as the bottom plate as it has those 'legs' to keep the basket off the filter assembly...Does anyone else do that, or do you use it properly per the website as the top plate?? Just curious...
The "legs" are "arms"!
They are for you to place the top plate down on the top of the grain bed both at mash and then lower down prior to sparge. Yes that's why you got grain in boiler. If you use as designed, fit bottom plate well and throttle back the wort flow to stop from going thru the overflow you will get no grain in boiler.The same thing happened to me yesterday. I think I messed up something while setting the controller to Celsius and cannot enter the menu -- holding down the two arrow buttons gives me a number, usually "0".
Does anyone have a fix?
Cheers!
Follow the manufacturers instructions precisely, especially if you are doing something advanced. Read them all the way through first!
Here is a link to the Grainfather hysteresis and temperature settings instructions:
http://media.wix.com/ugd/e8b8c7_0c7caceab63b48ffa6317ba31ae2d1db.pdf
Pantherjon
Well-Known Member
The "legs" are "arms"!
Okay..That makes sense now..I guess I didn't 'examine' the workings closely enough to realize the top of the basket rested on the support angles and that I needed the 'legs/arms' to keep the weight off the filter assembly..I didn't have many grains that floated on top going down the overflow tube..
And I had thought thru ALL the things I did during the brew, that I may have been the culprit of the seal coming dislodged..I stirred the grains a couple time and pushed my plastic stirrer down til it hit the bottom plate. With me doing that could have pulled the gasket in creating the gap whereby the grains fell out..But it was weird that it didn't clog up until AFTER I had lifted the basket and started the cooling process..Guess I will just have to refine my procedures some on the next go around..
The same thing happened to me yesterday. I think I messed up something while setting the controller to Celsius and cannot enter the menu -- holding down the two arrow buttons gives me a number, usually "0".
Does anyone have a fix?
Cheers!
Mine sometimes shows "2".
I called Grainfather customer support, they requested me to contact the retailer. The retailer told me to wait. No response since then, and it was three months ago.
Pantherjon
Well-Known Member
Should come up saying 'F01'..Are you holding the up and down arrows until the display changes?
elreplica
Well-Known Member
Brewing_CSU_Ram_Fan
Member
- Joined
- Feb 18, 2016
- Messages
- 20
- Reaction score
- 8
When I first purchased the grainfather back in February I pounded out 6 batches within a two to three week period. After a couple of months break because of work travel, I did my 7th batch this past Wednesday. It was a kolsch. My target OG was 1.049 but I ended up with 1.046. After changing sparge process, this is much closer to my target OG than what I was getting on the first 6 batches. For my recipe I had the Total Efficiency in Beersmith set at 75%. When I set it to 70% that puts me spot on for my target OG.
Plan on brewing an IPA tomorrow. I am going to set Tot Efficiency at 70% and see if that will be closer for helping me dial in my recipes. Any thoughts? Are others seeing higher efficiency and what are your processes in getting those numbers... i.e. how are you sparging, milling your grain, mash temps (noticed that there are a lot of discrepancies on this thread about grain bed), etc.
Thanks
billmiller007
Member
- Joined
- Nov 20, 2014
- Messages
- 18
- Reaction score
- 2
Last night she finally arrived! I got her hooked up and cleaned. I have been extract brewing for years and finally made the jump to GF for the ease and space saved. Sparging will be something new. Can I just bring the water up to temp on the stove and then add it to the GF and circulate after my mash is done then pull up the basket? I know this might sound elementary but I wash hoping not to have to get yet Anouther piece of equipment just to sparge.
The first all grain batch I am going to do tomorrow has me mashing at 148 and that seems very low. Any thoughts?
The first all grain batch I am going to do tomorrow has me mashing at 148 and that seems very low. Any thoughts?
Last night she finally arrived! I got her hooked up and cleaned. I have been extract brewing for years and finally made the jump to GF for the ease and space saved. Sparging will be something new. Can I just bring the water up to temp on the stove and then add it to the GF and circulate after my mash is done then pull up the basket? I know this might sound elementary but I wash hoping not to have to get yet Anouther piece of equipment just to sparge.
The first all grain batch I am going to do tomorrow has me mashing at 148 and that seems very low. Any thoughts?
How you heat your sparge water doesn't make any difference. I saw one pic in this thread where they had an induction hot plate and a pot on a stand higher than the Grainfather. If your stove is high enough or you don't mind pouring hot water it will work.
Not sure on the circulation procedure since I do not own a Grainfather.
148 is not low - depending on the recipe. It will give you a drier beer than mashing at a higher temperature.
Similar threads
- Replies
- 7
- Views
- 662
- Replies
- 44
- Views
- 6K
