Fridgenstein Side-By-Side Kegerator / Fermentation chamber

Homebrew Talk - Beer, Wine, Mead, & Cider Brewing Discussion Forum

Help Support Homebrew Talk - Beer, Wine, Mead, & Cider Brewing Discussion Forum:

This site may earn a commission from merchant affiliate links, including eBay, Amazon, and others.

mistercameron

Well-Known Member
Joined
Jan 9, 2011
Messages
388
Reaction score
17
Location
SD
FRIDGENSTEIN


Synopsis: I'll show you how I took a craigslist refrigerator and turned it into a rockin side-by-side kegerator and fermentation chamber using some inexpensive controllers, a little bit of know-how, and a whole lotta elbow grease.

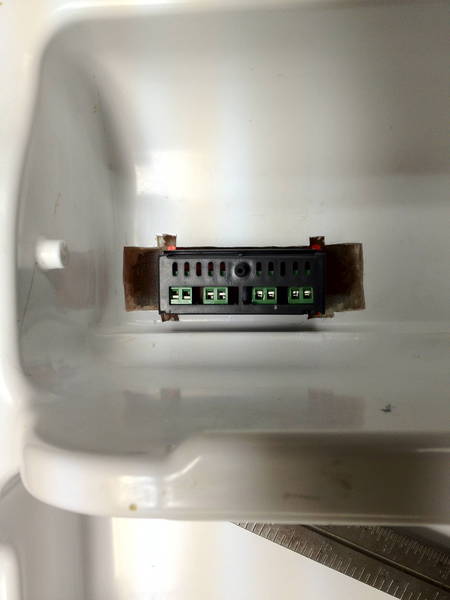
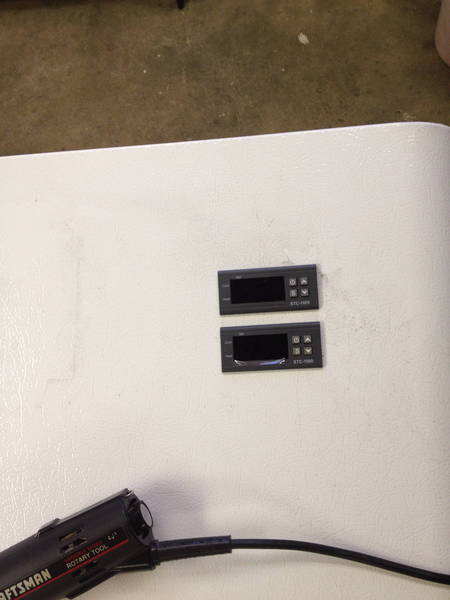
You need to be comfortable with things that can cut plastic and metal, and you have to be comfortable with wiring electronics. It's basic and not hard to learn, but this might be a bit confusing if this project is your learning material. Above all, be patient and plan it through. Know what you're going to do before cutting.

-------

I've been working on this build for the last couple months, and though it's not 100% done, it's 100% functional. I got most of my information and inspiration from three threads:
Side-by-Side Kegerator/Fermentation Chamber, by Forbein11
Sibe By Side kegerator/fermenting chamber conversion, by rtrevino
ebay aquarium temp controller build, by android

-------

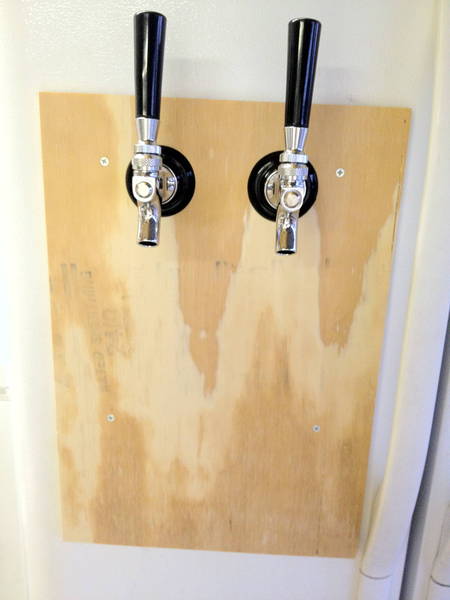
Here's a "Done" version of fridgenstein so reading this thread is worthwhile

IMG_05544.JPG


First things first... locating the fridge. Do your research. I think both Forbein and rtrevino both have Frigidaire side-by-sides. I did some digging and found out that similar looking Kenmore fridges are made by the same manufacturer. The similarities are uncanny. I was willing to spend up to $100 on the fridge so I started visiting craigslist frequently. After a week or two, the fridge I wanted showed up in a listing. It had a bunch of broken shelves, so I talked the seller down to $50. It smelled like a bait shop. Don't worry - nothing a few applications of a good strong bleach solution can't take care of. I was told this one was about 10-11 years old, so roughly a 2000/2001 ANALOG controls model. Make sure it's analog that the controls are dials, not some kind of LCD+button display - it's vitally important.

What does the fridge look like? Well, I thought I had photos from the early parts of the build, but I don't after all. See the photos from the above threads. The inside of my fridge looked identical in every way. It will be easiest on you if you get something like the ones you're seeing here, though it's not impossible to set up your own controller rig.

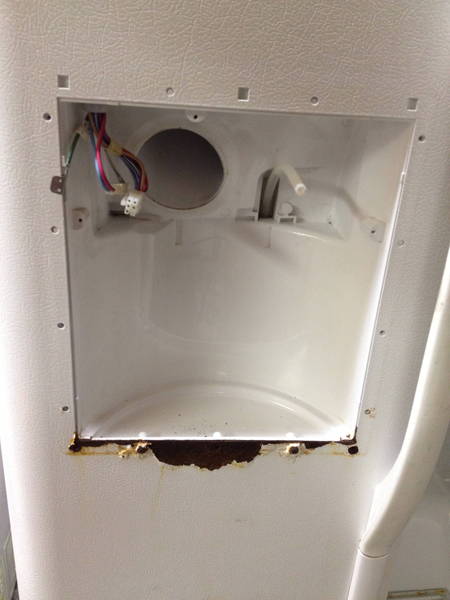
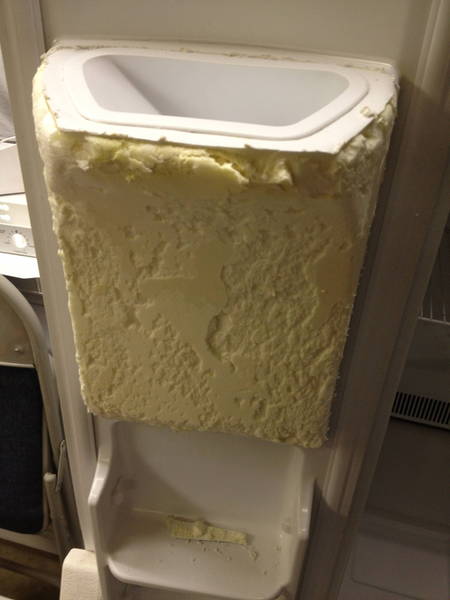
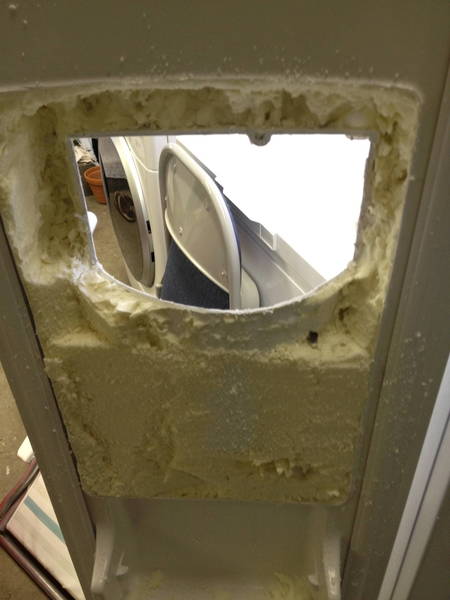
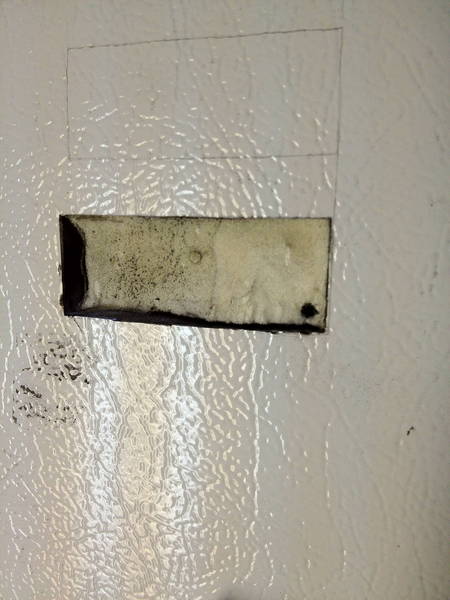
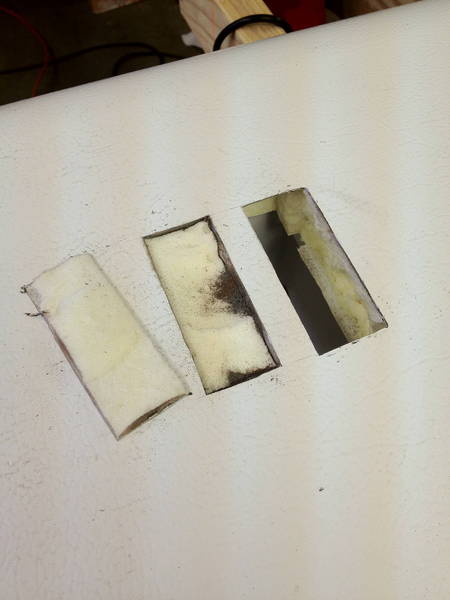
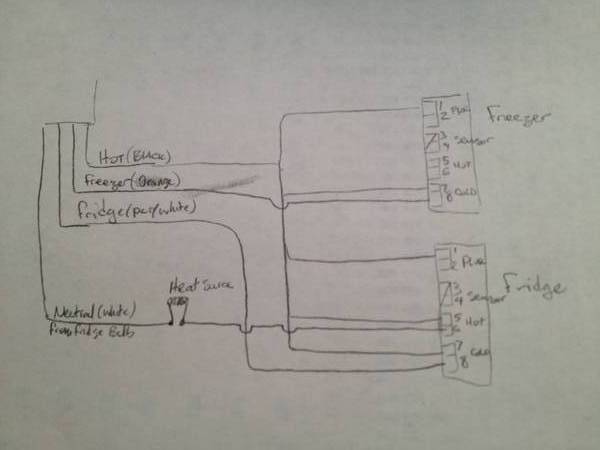
Take it all apart: If a part could reasonably be unscrewed and taken off, I did. I used a strong bleach+vinegar solution (add 1oz of regular bleach to 5gallons of water, then add 1oz of white vinegar) to spray and wipe down every surface that was going to end up anywhere near the beer. This included removing the shelves, water filter, the control panel in the fridge, the wire racks, ice maker, the back sheet metal paneling in the freezer... everything. I got it all dripping wet with the bleach solution and let it air dry overnight. I did the same thing the next day with starsan. Only the necessary items made it back into the final fridge. It wasn't much.


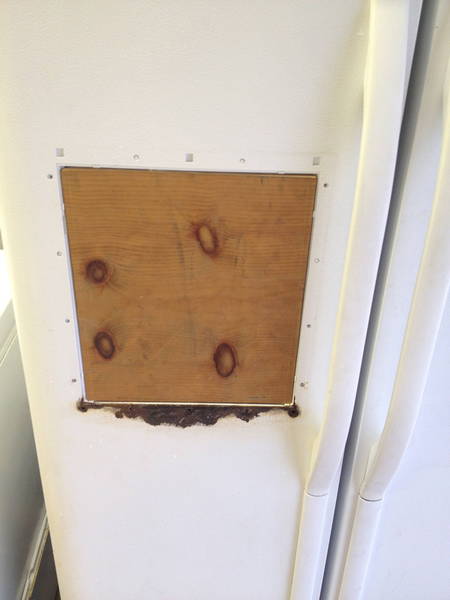
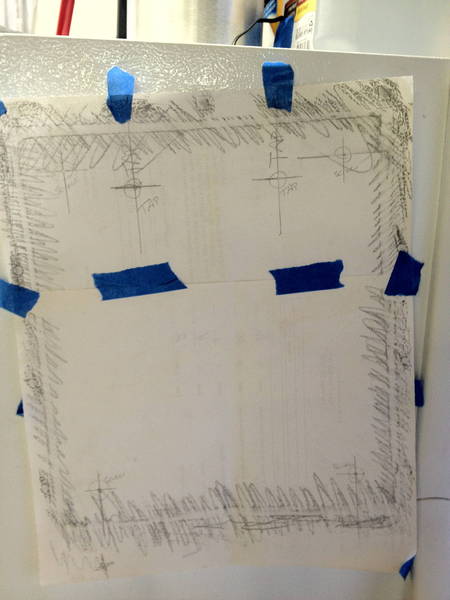
Take note: One reason I took photos was to document what parts went where. Once you spend time around it you'll get more comfortable.
 
Making a Mess: Remove the dispenser
Get rid of the ice/water dispenser, make a hole, etc.

On the inside of the door you need to remove the shell plastic surrounding the inset where you'd put your glass for water. You also want to remove the chute and anything else on the outside that might be in the way. Observe.

IMG_00752.JPG


Using a box cutter utility knife score around the dispenser bump (inside the door) until you've cut it out. The foam is kinda glued to the plastic, so don't be surprised that it's not just falling off.

IMG_00762.JPG


Remove all the foam - as flush as you can - and cut out a rectangular hole where the dispenser mechanism used to be

IMG_0094.JPG


IMG_00955.JPG


You might find it easier to remove the door and work on it horizontally. Whatever. I didn't (maybe I should have). You should know there are some wires up top that need disconnecting. Since I won't be needing them, I actually ripped them out - no need to have electricity in that door. Also - I had already ripped out all the water lines, so you may have to do that first if you haven't already.

IMG_00813.JPG
 
The Tap Door
There's now a big hole in the freezer door. Time to fill it. This is where the project got hairy. Buy some expanding foam from Home Depot, Lowes, wherever. It's often used for filling holes in walls around pipes, cracks, and filling gaps around window installations. Also buy some wood or plywood and cut it down to fill the dispenser area. I had to bevel and notch the inside so it would fit snugly. Play with it until it works. At this point, it might help to reinstall the door on the fridge.

IMG_02832.JPG


IMG_0285.JPG


This is the first of two pieces of wood you need. The other piece should be a relatively thin piece of plywood, hardwood, or even metal. I had some leftover plywood so I ran with it.

Now this is where I had minor regrets. Actually, it was inexperience with expanding foam. PUT NITRILE OR LATEX GLOVES ON. This stuff is so sticky you're going to wish you had gloves. It took a few days and a lot of scrubbing to get the hardened foam off my hands.

Hold that board in place and squirt some of the foam into the void. I would suggest just putting enough just around the seam. As it expands it will want to push your board out of the hold. Who cares about leakage - you just want that board flush with the door. I didn't do this (again - I didn't know any better) but I would just stop there until the foam has had some time to harden a little bit. I probably could/should have used some screws to affix the board to the ice maker compartment. That would have been a better idea. Read the directions - the stuff I bought suggested spraying a little bit of water to speed curing. The goal is to have that board attached and not falling out half-way through as the foam is expanding and putting pressure on. I may or may not know what that is like - i plead the fifth. Just go slow with the foam - a little bit at a time or you will be sorry. Have a spray bottle of water handy to help it cure. Be patient. This stuff will expand a LOT more than you think it will. Anyway... you've been warned.

Now that the whole area has been filled. Wait. There might be sticky foam inside the hardened shell. Try it out and maybe just come back to it tomorrow. RDWHAHB

Now. Trim it up. I told you it would be messy. Use whatever kind of cutting tools you think you need. I had one of those Japanese pull saws that worked pretty decently. Box cutters work surprisingly well - just score it and pull chunks off as needed.

IMG_0286.JPG
 
Making Holes

Now, it's time to make a template. Tape two pieces of paper together and do like you did in elementary school - lay the paper over the wood where you foamed it in place. Rub the side of a pencil or crayon to record where the various screw holes are and more importantly, where the wood is in relation. I know what you're thinking. It'll be handy later.
(This is taped here so I could photograph it).

IMG_03092.JPG


On the paper I marked where the holes for the taps would go, plus where screw holes could go for securing the exterior piece of plywood.

Now measure out where you want your second piece of plywood to be placed on the door. It's the backsplash for the taps. There was some rust I wanted to cover, so I made mine a bit taller. Just take the dimensions and cut.

Next, you take that imprint you made earlier and affix it to the backsplash. Using something small and sharp make indentations through the paper and into the wood where you need to make drill holes. Remove the paper and drill just the screw holes at first. It will help if you counter-sink them, too. At this point it's probably more helpful to have the door horizontal. You know - gravity on your side. With the backsplash firmly attached to the wood in the door, line up a 7/8in spade bit for your taps and drill. Go all the way through the foam.

IMG_02906.JPG

IMG_03053.JPG


Using the same template, make a backing board for the inside of the fridge. It doesn't have to be big and it might take some foam shaving to get it to fit correctly.
IMG_02963.JPG


Painting
I used Krylon chalkboard paint. for the backsplash. Just remove all the hardware and detach the backsplash for painting. In hindsight, I should have used a sanding sealer.. or something. By the way - make sure your wood is properly sanded and prepared first. I sanded, but had no sanding sealer. It took a few extra coats to get a uniform finish. Still cheaper, I guess. Follow the directions. It's easy.

IMG_03212.JPG

IMG_03188.JPG


Gas Line
You know where that water delivery chute was for the ice maker? Take it out - it just unscrews from the outside. This is where the low pressure line from your tank will come in.

Outside, going in:
IMG_01937.JPG


Inside:
IMG_01925.JPG
 
Temp Controller Holes

We need to make some room in the fridge door for the 2 temperature controllers. Start by making a template with thin cardboard cutouts. I left enough room between the two for the bezel plus a little bit because you need a tiny bit of room between the two - clips and such need to fit. I don't recall exactly how far apart the holes are, but the overall height from the top of the upper hole to the bottom of the bottom hole was an easy fractional distance.
IMG_01022.JPG


Do some measurements to make sure the bottom unit will be just above the door shelf, and the edge far enough in that you'll clear the rest of the door molding. Mark in pencil. Grab a dremmel. Be gentle, go slow, and cut inside the lines. That's actually kinda important. The bezels aren't very big, so your margin of error is a bit small. I had to make a few passes with the cutoff wheel to shave the edge down enough to where the controller just slipped in.

IMG_01044.JPG

IMG_01261.JPG


I put a drill bit through the corners into the door to find roughly where I needed to cut the fridge insides out to fit the temp controller
IMG_01124.JPG

IMG_01145.JPG


You don't need to get fancy with the notches like I tried. In the end you'll cut it all out anyway -the plastic is too thin and tends to tear. BUT you do need room for your fingers to fit in and disengage the clips.
IMG_01323.JPG


This is what it will look like with the two installed
IMG_01296.JPG
 
Wiring

First things first. I'm not an electrician. If you're uncomfortable around electricity, find somebody who is. Always unplug the fridge from the wall before working on any of the wiring. Seriously. Also, label all the wires as you're doing cuts. It's easy to forget which is which. Finally pick up wiring that matches what's installed in your fridge - it should say somewhere along the length of wiring. Mine was 18AWG stranded.

Remove the whole control panel. There are a couple of screws. hold on to them. You should see something like this inside
IMG_05444.JPG


These are the thermostats you're replacing
IMG_05384.JPG


Side note - I left the actual thermostat/dials in even though they aren't hooked up to anything any more.

The green/yellow wire on the side is ground. There's nothing in the new system that you'll be hooking up to ground, so just remove it and tape it off or something. Your hot will probably be black. The other colors go to the defrost board. In my fridge orange was the freezer controller, and the purple/white was for the fridge. DON"T take the colors as gospel. yours could (probably will) be different. There was a diagram on the box containing the circuit board. Made it easy. You also need to know which wire is a plain neutral. If I remember correctly it was one of the wires coming off the light bulb.
IMG_05372.JPG


Wiring Diagram
The wiring diagram isn't too hard, but it will take a bit of thought and planning. One you understand what needs to happen everything falls into place. This is the idea:
You want to take the hot lead and split it off to the main power supply for both controllers, to one terminal on the freezer size, and two terminals on the fridge side. Five total, if my math is correct. Doing this gives you power to each terminal so the next part makes sense. Remember - you are simply replacing the control dials (thermostats) and running the wires over to the new digital controllers. Simpler, once you think of it that way. I also think of the colored wires as specific neutral wires so I didn't get confused.

To control the freezer, run a wire between the orange (mine) freezer control coming out of the circuit board (was previously attached to the freezer thermostat), and send it over to the empty terminal on the freezer/cool controller.
Fridge cool control: Same idea - control board to the empty fridge/cool terminal.

Fridge/heat: A little bit trickier, but you need two lengths of wire that will give you enough slack to put your heating device (probably) in the bottom of the fridge. One of those wires will connect the controller (heat) to the heat source (I used a CERAMIC bulb base from HD with a ceramic reptile heater- 100W). The other wire goes from the other terminal on your heat source to the neutral wire back in your wire bundle. You remembered which one was neutral, right?

photo117.JPG


You need to run all these wires through a hole somehow. Make a hole.
IMG_01375.JPG


And run all the wires through (this is a good time to make a hole in the center wall for you freezer probe)… run your probe wires, too. It might be helpful to organize all these same-colored wires with small zip ties. It keep everything neat and tidy.
IMG_01413.JPG


Since you labeled all your wires it should be easy to connect them to the proper spot on the controllers. Put the retainer clips in place, and pack the empty spaces with styrofoam or some other kind of insulation.
IMG_03014.JPG


See what I did there? "FG Control" is the wire that leads back to the fridge control wire.

It might be helpful to check to make sure everything is working before buttoning up all the way. I tested with a light bulb.
IMG_01543.JPG


Here's my black IPA with the ceramic heater. I bought a 120VAC mushroom fan to keep the circulation going when the heat is on. If you do that, wire it in parallel with the heat lamp (make a Y-split off the two wires coming from the bundle and attach).
IMG_03031.JPG


Making kit look nice
I wrapped the wires in some spiral-cut sheathing I picked up from… I don't remember. Home Depot has it. Fry's has it. It's common stuff. Cheap.

Done. Make some beer
Settings

Here are some suggested starting points on the settings. You may find you want something different.

Freezer:
F1: Cold. What's your preference
F2: 1.0C
F3: 10 (minutes)
F4: don't touch

Fridge:
F1: Depends on your yeast
F2: 0.5C
F3: 10 (minutes)
F4: don't touch
 
FAQs

Why doesn't it turn on!?!? I'm going to freak out!!!
Chill. There's a compressor delay built into the controller. It will kick on after a few minutes. That's why that light is blinking - it's the compressor delay function. I wigged out at first before realizing why all the lights were on but nobody was home.

What do I do with the probes?
I insulate the probes with a piece of styrofoam, and tape it to the side of the carboy / keg. It gives you a better reading because you're not getting air temps.

My Fridge "cool" light is on (solid) but nothing is actually running
I figured that one out by accident. Apparently my refrigerator doesn't like to run a ton (again it doesn't know I've abused its internals). After running a while the fan turns off. As soon as I open the fridge door the fan kicks back in. This is actually something I plan on changing in the future. My next revision will involve me removing the damper completely, making a hole big enough for another mushroom fan, and just wiring it up directly to the hot/neutral and the controller - bypassing the fridge's blower fan altogether. Rtrevino did that. It's a great idea.

Why the reptile heater?
It makes heat and not light. Light can bad for beer. Can you make one of the contraptions with a paint can and an incandescent light (there's a thread)? Yup, but I didn't want to. This is a little more compact and there's zero chance of light getting on the beer unless I'm opening the door.

Temp Stability?
It's great. Like your refrigerator in the kitchen - it's well insulated.
 
Thanks! Hopefully this fills in enough holes for people that they can do something similar.
 
Nice job. I think that I'm also going to add a heating element on the right side so that I don't worry about the temp swing.
 
rtrevino said:
Nice job. I think that I'm also going to add a heating element on the right side so that I don't worry about the temp swing.

Thanks. It's definitely useful for year-round fermenting. I used a 60w element for one brew and felt it took longer than I wanted to heat up, so I exchanged for a 100w and was happy with the results. Amazon is your friend with those reptile heaters - about half the price of local mega pet stores.

Would you mind if I cross-posted a link on your build thread?
 
Update: I replaced the damper with another fan because the fridge's controller would shut it off after a while of not hitting the target temp. The only way to reactivate it was to open the door for a moment, then the fan would kick in. I sealed the fan around the hole with styrofoam (from the damper unit) and some weather stripping.

That was a mistake. Sort of.

The problem is that the fan can't block any of the air getting blown around when the freezer kicks in, so now the fridge side has fairly wild temperature swings and the freezer has to cycle more often because half the cold air is getting blown over to the wrong side. The heating element can't keep up to maintain.

I need to re-think my solution here.

perhaps you can incorporate a delay timer relay
 
perhaps you can incorporate a delay timer relay

I'm not really sure what that would mean.

But here's what I've done - I added a bit of a damper of my own - manual. I leave it cracked just enough to let air flow. It's not enough to really affect the ferm side when the freezer kicks in, but it's open enough that the new fridge fan can pull cool air through indefinitely. If I need to crash cool or get the temps down faster, I can remove the damper and let 'er rip.
 
great write up... im planning to do this with my side by side, however, Im going to try to turn the internal thermostat down to fridge temps on the freezer side, and use a 2 channel love controller to run a fan (to pull cold air) and a heater to dial in temps on the ferm side.

also, FYI, you should never mix bleach and vinegar... it creates poisonous chlorine gas.
 
I don't have the same fridge, but my wiring is identical (as opposed to the other linked thread that appeared to be the exact fridge, but had some additional wires from the fridge side thermo), and I've ordered the stc-1000's. When you say you had issues with the fan running all the time probably due to not being able to hit target temp, I'm assuming that was trying to hit a fairly cold target temp? I was hoping to just wire up as you initially wired up, leaving damper/fan as is. I'm initially only attempting to ferment ales, and my garage probably doesn't get warmer than 80's in the worst summer months. Think that will be fine without adding a PC fan to pull in from freezer side?

Todd
 
I don't have the same fridge, but my wiring is identical (as opposed to the other linked thread that appeared to be the exact fridge, but had some additional wires from the fridge side thermo), and I've ordered the stc-1000's. When you say you had issues with the fan running all the time probably due to not being able to hit target temp, I'm assuming that was trying to hit a fairly cold target temp? I was hoping to just wire up as you initially wired up, leaving damper/fan as is. I'm initially only attempting to ferment ales, and my garage probably doesn't get warmer than 80's in the worst summer months. Think that will be fine without adding a PC fan to pull in from freezer side?
Todd

What happened is that the refrigeration side controller would close the damper and turn off the fan, even though the STC was signaling the target temp hadn't been reached. I don't know why, but I have a feeling that it's related to the defrost circuitry. Refrigerators are usually set to the mid 30s, so you could see how constantly running it that cold might mean a problem. The temporary remedy is opening the door. For whatever reason the fridge thinks that's good enough reason to start cooling again. So, it's not that the fan was always running - it's that it wasn't running long enough despite the STC. That's why I did the override and put my own fan in.


So, to answer your question about the extra setup... 80° isn't too bad, but you still might need to keep an eye on it for the first couple days of fermentation until the fermenter reaches equilibrium. After that you'll probably be fine. I'm the set & forget kind of guy and sometimes go on vacation while I have something in there, so I didn't want to have to worry about heat, being on vacation, etc.

I picked up the fan from Fry's for about $17, which was worth it. It was maybe a couple hours extra work since I had to disassemble my previous work and hack out more internals. If I were doing the same thing from the get go, it wouldn't have been that much more.
 
Since our wiring seems to be identical, can you clue me in on where you bypassed the fridge's fan?

Thanks!!!
 
Great thread, and thanks for linking to the others you used as inspiration. I picked up a stainless 25cf side by side on craigslist last night and am about to start the conversion process. The wiring is pretty similar, so this post is very helpful.
 
A word of caution, here. I've discovered (I'm sure I'm not the first) that not all fridges with analog control dials are actually controllable by this method. I picked up a slightly newer GE stainless (should have been my first clue, but you know, stainless is shiny!) side by side. Before buying I checked to be sure that it had analog control dials, but after getting it home I discovered that it is in fact computer controlled (the dials act as digital inputs to the computer controlled thermostats). The wiring to them is low voltage DC, and more importantly they seem to use pulse signaling, as I was unable to 'short' any two leads together to create the on/off control I wanted for my HTC-1000 controllers.

My advice is when you are looking at a fridge to convert, ask the seller if it's ok for you to open up the panel where the control dials are. Take a close look and make sure each dial has the two wire/ground 120v wiring as described and photographed by the OP in this thread. Mine, despite having analog looking control nobs, has a digital circuit board and a series of data cables leading back to the main board.

All is not lost however, there are still ways to hack up even the newest fanciest fridges to work, but more effort and modification is involved. I will start a new thread, or use my brewery build thread to detail the ways I am working around these challenges, but I wanted to make a note here too since this thread is (rightly) prominent for folks looking to convert side by sides.

Cheers
 
NoH20 said:
Since our wiring seems to be identical, can you clue me in on where you bypassed the fridge's fan?

Thanks!!!

There is no fan just for the fridge. The way it cools the fridge side is by opening the damper door and running the fan inside the freezer compartment often times without turning on the compressor.

To install my fan I took a hot lead off of one of the circuits and ran that down to the AC pc fan and back up to the switch.

If you are trying to bypass a fan in you fridge you can either install the STC cool switch inline on that circuit or just remove the fan and do your own thing
 
My side by side fridge has a digital control board also, but with buttons instead of dials. Rather than wire the STC controllers into those, I wired the cooling side of each controller to the control board power. For heating, I elected to use the 60W incandescent appliance light bulbs already present and spliced the heating side of each control into the bulb circuit for the corresponding side. (By splicing into the existing connection, they continue to provide illumination when the doors open.)

The only drawback I've encountered is the one that I expected: since both STC controllers are wired to the appliance control board, the appliance has to fight itself to warm one side while the other side cools. Generally the cooling overwhelms the single 60W bulb on the freezer when on, but it resumes its temperature reasonably soon afterward. I could reduce or eliminate the resulting swing by introducing a more powerful heating element, but the kegs I will put in there will have enough mass to be practically unaffected so I will almost certainly leave it as is.

I felt this approach was the best compromise I could achieve with digital controls and am so far pleased with the results -- in fact it produced my best beer yet on its trial run. When I get a keg system installed and perform some more testing, I plan to do a more thorough write-up.

Thanks, mistercameron, for providing such a great walkthrough! I borrowed much from what you have provided.
 
Once you have more mass on each side you should notice that both are more thermally stable ... The fridge won't cycle as often
 
Any idea if there is a way to make it work with a digitally controlled fridge/freezer? I bought a (once fancy I guess) GE model and wouldn't mind making it a "fridgenstein". I can post the model number later if necessary.
 
Any idea if there is a way to make it work with a digitally controlled fridge/freezer? I bought a (once fancy I guess) GE model and wouldn't mind making it a "fridgenstein". I can post the model number later if necessary.

That's a bit harder because typically the digital controls won't allow you to set it outside of normal fridge temps. You could try to wire the the compressor directly and add fans and vents like I did, but you're fighting an uphill battle since there are a lot more sophisticated controls. Mine has a circuit board, but the bypass to the analog thermostat means I can trick the fridge into thinking it's time to cool whenever appropriate.

Keep an eye out on Craigslist for a couple weeks and you'll probably find something. If not, I'd start looking toward chest freezers and mini fridges.

Thanks! I am not very good with electronics and I'm afraid I'd ruin a perfect appliance. However, I realized this morning that I could swap the appliance with our tenant; I have an older analog fridge/freezer in the basement. I'll think about it since I don't really need a "Fridgenstein" quite yet ;)
 
My side by side fridge has a digital control board also, but with buttons instead of dials. Rather than wire the STC controllers into those, I wired the cooling side of each controller to the control board power. For heating, I elected to use the 60W incandescent appliance light bulbs already present and spliced the heating side of each control into the bulb circuit for the corresponding side. (By splicing into the existing connection, they continue to provide illumination when the doors open.)

The only drawback I've encountered is the one that I expected: since both STC controllers are wired to the appliance control board, the appliance has to fight itself to warm one side while the other side cools. Generally the cooling overwhelms the single 60W bulb on the freezer when on, but it resumes its temperature reasonably soon afterward. I could reduce or eliminate the resulting swing by introducing a more powerful heating element, but the kegs I will put in there will have enough mass to be practically unaffected so I will almost certainly leave it as is.

I felt this approach was the best compromise I could achieve with digital controls and am so far pleased with the results -- in fact it produced my best beer yet on its trial run. When I get a keg system installed and perform some more testing, I plan to do a more thorough write-up.

Thanks, mistercameron, for providing such a great walkthrough! I borrowed much from what you have provided.

I am getting started on converting a newer GE side by side to a kegerator and ferm chamber. My GE has dials connectors to a digital encoder and I am trying to decide how to wire up the STC-1000s. Did you install a fan to move air from the freezer to the fridge side or are you leatting the fridge do its own thing in that respect?

Thanks,
Sean
 
I have done this with great success. I took out the main board all together. I replaced it with a replacement defrost timer and a relay. I also added 2 120 volt pancake fans. I used 2 eBay controllers. I am able to keep both chambers at what ever temp I want down to the freezer temp. Defrost is not an issue.

I will take pictures tomorrow to show the end product.

Maybe you could post some instructions too? Thanks!
 
I have done this with great success. I took out the main board all together. I replaced it with a replacement defrost timer and a relay. I also added 2 120 volt pancake fans. I used 2 eBay controllers. I am able to keep both chambers at what ever temp I want down to the freezer temp. Defrost is not an issue.

I will take pictures tomorrow to show the end product.

Awesome, thanks. :mug:I look forward to seeing the result
 
Here is the schematic.
The parts I used are as follows:

2 - 120 volt fan
http://www.amazon.com/gp/product/B004YUKWSW/?tag=skimlinks_replacement-20
2 - Damper
http://www.amazon.com/gp/product/B002FB65GK/?tag=skimlinks_replacement-20
2 - temp controller
http://www.ebay.com/itm/Digital-STC...030?pt=LH_DefaultDomain_0&hash=item20c5c422f6
defrost timer
http://www.ebay.com/itm/UET120-Supc...779?pt=LH_DefaultDomain_0&hash=item460f579913
Relay
http://www.grainger.com/Grainger/OMRON-General-Purpose-Relay-4FE15?Pid=search


I removed the mainboard. Placed the defrost timer and relay in its place and wired one temp controller to the relay and one to the fans and a heater.

If you need anyother help please ask

SCAN0027.jpg
 
Last edited by a moderator:
I am getting started on converting a newer GE side by side to a kegerator and ferm chamber. My GE has dials connectors to a digital encoder and I am trying to decide how to wire up the STC-1000s. Did you install a fan to move air from the freezer to the fridge side or are you leatting the fridge do its own thing in that respect?

Thanks,
Sean

Sorry for this late response; I missed your question when it was posed. I opted to let the fridge do its own thing with respect to cooling. The only issue I have is the need to manually defrost every 3 to 6 months and I know it's time to do this when cooling the refrigerator side becomes sluggish. I believe the source of this issue is due to the fact that every time I cut power to the controller at the completion of cooling, the auto defrost timer resets before it has an opportunity to run.

Blakeseven's strategy of utilizing the defrost mechanism seems like a good approach and I may consider running my freezer side heating to the defroster as well. The main reservation I would have would be the additional cycling due to the defroster necessarily cutting out the compressor which currently runs for any cooling on my system. (I'm happy with my setup so am not prepared at this point to gut the controller to the extent that Blakeseven did.) On the other hand, (as I just learned) many refrigerators (including my own) allow the auto defroster to also be run manually through the control panel or toggling the door switch and, depending on the setup, this may be a simpler and more desirable approach to rewiring the defroster.
 
Thanks, Bradley! I'm very happy with it. I think mistercameron deserves a great deal of the credit for his write up. My main deviations were the primitive adaptation of a digital controller, squeezing out every millimeter in determination to have a three keg system while maintaining as much of the existing shelving as possible, the reliance on the existing appliance light bulbs for heat, the routing of the wiring through the door, and leveraging existing screw holes for attaching the mounting plate which made that step very manageable.
 
Looking at the hand drawing in post #6, what would port #2 used for with the STC1000? Is that a switched leg? I would think a neutral leg would go here. #1 powers the unit but no return leg out. I see it is empty.
 
OK, brought the neutral leg from the light over and into #2 and all is well.
 
rxp said:
Thanks, Bradley! I'm very happy with it. I think mistercameron deserves a great deal of the credit for his write up. My main deviations were the primitive adaptation of a digital controller, squeezing out every millimeter in determination to have a three keg system while maintaining as much of the existing shelving as possible, the reliance on the existing appliance light bulbs for heat, the routing of the wiring through the door, and leveraging existing screw holes for attaching the mounting plate which made that step very manageable.

Thanks for the kind words. Your build looks great as well! It definitely took a lot of work researching and figuring out if this would all work. I'm glad it has paid off to help others. My next upgrade I'd to add a shelving on the freezer side so that I candor 4 kegs... Barely. The downside is I can't produce and drink beer that fast!
 
Back
Top