FastFerment conical fermenter??????

Homebrew Talk - Beer, Wine, Mead, & Cider Brewing Discussion Forum

Help Support Homebrew Talk - Beer, Wine, Mead, & Cider Brewing Discussion Forum:

This site may earn a commission from merchant affiliate links, including eBay, Amazon, and others.
As for cleaning & sanitizing...I fill them with a little hot water & oxy-clean & wipe them softly with a sponge to remove the heavy grit. The "Marks Carboy Washer" is versatile enough to wash & sanitize a five gallon bucket as well as Corny's & carboys; so I sacrificed one of my food grade buckets & cut a hole in the bottom & walked away. Works great for cleaning & sanitizing with or without the collection ball...:mug:

Brilliant, thanks for this idea!
 
I'm seeking some advice. I've only used my conical once a few months back and would like to have a better strategy when I brew again this spring.

My first time using the FF conical I had a ball on and the valve open and the yeast clogged up above the valve. People have recommended waiting a few hours and dumping the trub before pitching the yeast to prevent clogging. Will the trub naturally collect into a ball or would it be better to simply open the valve and purge a few pints into a pail?

I have essentially the same question for dry hopping. I plan on using pellets (maybe made into a hop tea first). After removing the yeast ball, have people had better results attaching a second ball and allowing the hop sediment to settle in or leaving the valve closed and doing a quick dump at the end of the dry-hop?
 
Modified a rack for my fridge when lagering.. Also hung the mounts in the fermentation for ales...


10991733_10206000747607493_2181437135687045577_o.jpg


10974245_10206000748527516_6948432017562286721_o.jpg
 
New issue I noticed when I transferred a cyser to keg. Half of the thermowell has changed color and I can not get it removed...will definitely be swapping out for a stainless thermowell

 
New issue I noticed when I transferred a cyser to keg. Half of the thermowell has changed color and I can not get it removed...will definitely be swapping out for a stainless thermowell


Using brass was dumb on their part. But cheaper than stainless...

I changed it to a sample port and will use a thermowell from Stainless Brewing through the lid & held in place with a stopper.
 
Last edited by a moderator:
Taking gravity samples up until now has been a PITA. Should be a bit easier now :ban:. Will be testing it out this upcoming weekend :mug:

This is brilliant! I did the same but used the port for the thermowell, can you share the source for your ball valve and the method you used to attach it?

The valves I have from US Plastics are NPT thread not straight, so I cant screw any nuts or washers on to it to form a seal inside the FF,I would love an alternative .

Thanks for posting the pics, hope it works well!!!
 
A 1/2" NPT male will fit into the same hole formed into the FF for the thermowell.

I used a 1/2" X 3/8" reducing adapter & a 3/8" valve with 3/8" barb.

10991733_10206000747607493_2181437135687045577_o.jpg
 
A 1/2" NPT male will fit into the same hole formed into the FF for the thermowell.

I used a 1/2" X 3/8" reducing adapter & a 3/8" valve with 3/8" barb.

10991733_10206000747607493_2181437135687045577_o.jpg

I did the same thing with a 1/2 x 1/4 reducing adaptor into the thermowell hole, but it looks like GREM made a second hole just next to the thermowell, since he still has his thermometer attached.
 
I've been thinking about these ferm chambers and stands. This device presents some challenges with the shape and needing top and bottom access along with the weight of the full vessel.

My wish list: 2 fermenters, can roll when full and able to move to wet room etc, tall enough to keg from, yet still small enough for mobility and storage footprint.

I am conceptualizing some design the allows me to plug a mobile chamber into the doorless mini-fridge when cooling, and then to separate like a booster rocket when it is time to service the fermenters. As much as I would like to use the provided stands, I think a more workable design involves the circular openings in some kind of raised platform that I can wheel in and out of the garage. I would like an access panel below the fermenters to hook up the hose or remove the collection ball.

In short, I am thinking about a double stand, mounted on a square dolly that is a self-contained ferm chamber, with top door-all capable of mating with the min-fridge . This will obviously require a raised location for the fridge, but I don't want to move the fridge with the chamber when I have to wheel the fermenters down the hall to the laundry room.

Stay tuned.
 
Has anyone attached handles to their fastferment? I was thinking carrying handles attached where the mounting bolts go would make it easier to move from where we brew to where we ferment. Anyone have any ideas of any handles that would be usable for this that could be mounted with the mounting bolts?
 
I will definitely be replacing the brass thermowell with SS. It doesn't feel smooth anymore and I just don't trust it.

I also have the problem that the metal FF holder I bought makes the fermenter sit too low and I can't remove and reattach the collection ball. The fridge the FF goes in is huge so I wouldn't have a clearance issue at all with something different. Why didn't they make them tall enough to remove the ball!?

Do I talk to Adventures in Homebrewing to see if they have a newer model to exchange it for? Do I do the half ass cut tube around it to raise it hopefully 1/2" or so? Rather not have to put time and money into fixing it since I bought it to just work well and be able to fit 2 in my fridge easily...

The metal stand has 2 sized rings, the larger ring is the bottom, the smaller ring holds the FF at the right height to remove the ball easily.
 
The metal stand has 2 sized rings, the larger ring is the bottom, the smaller ring holds the FF at the right height to remove the ball easily.

Larger ring is at the bottom, more stability that way...

They resized the stand at some point so the new ones are shorter I believe.
 
Has anyone attached handles to their fastferment? I was thinking carrying handles attached where the mounting bolts go would make it easier to move from where we brew to where we ferment. Anyone have any ideas of any handles that would be usable for this that could be mounted with the mounting bolts?

I use the strap from the accessory kit. It works great. If you start to put things in the screw holes that torque, it will rip the fermenter in half.
 
What about a 5gal bucket handle with adjusted ends?

Thought about this but it wouldn't be big enough to connect both ends and still have room for hands.

I use the strap from the accessory kit. It works great. If you start to put things in the screw holes that torque, it will rip the fermenter in half.

I doubt it would rip it in half, worst case it would rip out the bolt fittings, pretty sure if they can take the weight on the supplied stands they should be able to take the same weight with handles.
 
If anyone is having issues with leaking (JAG107?) from the union valve (not the threads that attach it to the bottom of the conical, but the joint on the bottom of the valve) check the valve itself.
The valve ball (the part that rotates inside) is tightened down with a threaded ring inside on the bottom of the ball that pushes up and creates a tight seal.
This insert piece can unthread when you loosen the outer ring when removing the ball, especially if you rotate the ball to unthread it . I opened mine and found this piece to move very easily.
Put some Teflon tape on its threads to stiffen it and it seems ok once seated. (must be done with empty vessel)
If you grab the red handle and feel any side to side play, this is the issue. Mine loosened so much that it was a steady stream flowing out the ball valve when it was in the closed position.

A key to remember is to keep the collection ball from rotating and only loosen the ring when removing.
 
Mine was not air tight either.. I sanded the top of the FF to allow for a flat, sealed connection but no luck... I wrapped the top threads with teflon also...

I then wrapped around the edge of the cap with electrical tape & not the blow off tube is bubbling...

Only thing that would work. Ugly but effective, FYI
 
Thought about this but it wouldn't be big enough to connect both ends and still have room for hands.


I doubt it would rip it in half, worst case it would rip out the bolt fittings, pretty sure if they can take the weight on the supplied stands they should be able to take the same weight with handles.

No doubt it can take the weight of the filled container (50 pounds or so) at the nubs. But it was designed to do this as a static load, or with no twisting. However, what is proposed, handles to carry the vessel from these nubs, will create a torqued load. This could cause the seems that run down the sides of the vessels to be under stress and could cause them to split. The only way to tell is to test. Please let us know how it goes. It would be nice to be able to do that. For me, I will keep using the ff straps until she one proves me wrong.
 
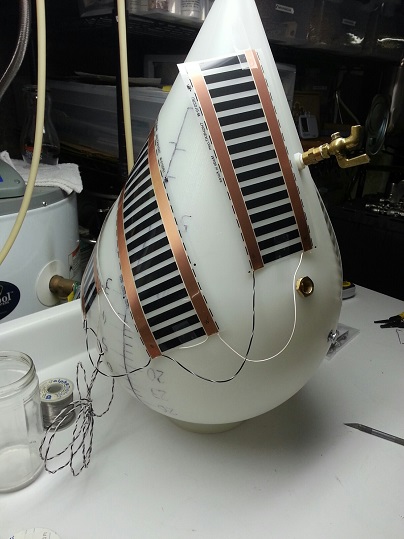
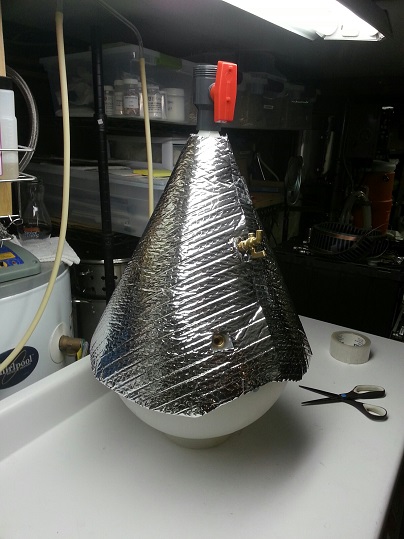
I used Heat Tape from Reptile Basics to make a heated blanket. The 4" material is 6 watts per foot, and I was able to fit 5 feet in 3 pcs. This gives 30 watts, a bit more than I need in my chambers (24 watt fans, alone) so should not be too much. Hoping to test it soon.
I'll add an outer wrap, maybe thin flashing, and a second reflectix layer, depending on the fit.

heaterwrap2.jpg


heaterwrap.jpg
 
If anyone is having issues with leaking (JAG107?) from the union valve (not the threads that attach it to the bottom of the conical, but the joint on the bottom of the valve) check the valve itself.
The valve ball (the part that rotates inside) is tightened down with a threaded ring inside on the bottom of the ball that pushes up and creates a tight seal.
This insert piece can unthread when you loosen the outer ring when removing the ball, especially if you rotate the ball to unthread it . I opened mine and found this piece to move very easily.
Put some Teflon tape on its threads to stiffen it and it seems ok once seated. (must be done with empty vessel)
If you grab the red handle and feel any side to side play, this is the issue. Mine loosened so much that it was a steady stream flowing out the ball valve when it was in the closed position.

A key to remember is to keep the collection ball from rotating and only loosen the ring when removing.

Any chance you are missing the o-ring? I don't mean the 1 that falls off when you remove the collection ball. I have been taking mine apart for cleaning & even with the handle (wrench) that ring is very hard to turn. If the o-ring is in place I don't believe the ring will turn that easy.
 
Taking gravity samples up until now has been a PITA. Should be a bit easier now :ban:. Will be testing it out this upcoming weekend :mug:

Hello GREM

Could you please share the info on how drilled a second hole for your sample port and what sized / type valve you used?

I am afraid to drill any new holes since I cant find silicon washers and gaskets that fit onto the thread size I hope to use (all are tapered )

The original theromwell port has been bored out and they added an insert, I assume you just drilled though.

Thanks

You need a 1/2 male coupling to connect whatever valve type you desire.

For a thermowell, drill a hole in the lid & add a stopper with a stainless thermowell.

Stainless Brewing sells a very economical version of one. It is just a 3/8" piece of stainless pipe with a compression adapter & plug on the end of it. It is long enough to reach all the way down into the wort.

11035627_10206079862465315_4168204249013852789_o.jpg
 
Cantrell00. The picture above looks great! I'm having a HUGE problem which I hope someone can help with in future batches. I made a Union Jack clone and it completely go clogged! So bad that even shoving a small rubber spatula couldn't get the clog out. It was a nightmare and I basically ruined the batch :(. I also sat my temp control probe in the thermowell and it fell out resulting in the heat lamp staying on and the wort to warm up to 90 degrees for 3 days! That was my fault though. The clog made this basically unusable. I did not strain my wort after boil and there were a lot of hop additions and dry hops. Mine looked like the picture above but NOTHING would come out. I wound up dumping the whole batch because it smelt awful from the heat any shoving random things up there to try and dislodge the clog. Even when I went to clean the fermenter the trub was packed so tight it was hard to get it out. Any recommendations that I can change in the future. I did purge the batch the next day after brewing then added the yeast but there was still soooo much sediment. This whole thing sucks because I just bought a kegerator setup and was really looking forward to using it!

Thanks for any help in advance
 
Update on leaks: I have not had any leaks in the past 4 batches now, including the current Belgian wit that's a week into primary. I haven't used any tool help to tighten, but sometimes need a little help from a pair of channel locks to loosen the big ring on the union. One problem though: upon installing the collection ball last week, BY HAND, the male threads on the ball sheared off! So glad FF shipped a second ball with my unit. Maybe I need to let them know and see if they'll replace the broken one? Anyway, be careful when you put your ball on, those male threads aren't very strong!
 
I have had a hard time getting the collection ball off on the two I have. I have run 2 batches through each. When doing my third in one I decided I would put some keg lube on the threads and not bring the nut up as tight. It looks like this has helped. I checked it yesterday and was able to unscrew it pretty easy.
 
Just got an email from them. They now have a 3mm rubber gasket available on their site for 2/$10. The email said that it will eventually be cheaper through resellers.
 
I picked up my seals early. I have been talking to them about my lid seals leaking for a couple of months. I fixed it with sanding and adding more of the old seals. Hopefully one of these will take care of that issue.

20150303_104047.jpg


20150303_104057.jpg
 
Really interested to see how those 3mm seals work. I just bought the FF from Northern Brewers this past weekend, should get it by Friday. Emailed up the guys at FF about trying to get a set of these seeing as I just ordered the fermenter. We'll see what they email me back with
 
I didn't drain any sediment before pitching the yeast and had pitched right away on the current batch. This was on the 22nd.

I got very little bubbling that stopped within about 2 days. I'm positive I have all good seals.

Is the yeast trapped under the trub do you think?
Can I just auger it out with a sanitized coat hanger?

Can I just dump the ball back into the fermenter?

Suggestions to save this batch?
 
Taking gravity samples up until now has been a PITA. Should be a bit easier now :ban:. Will be testing it out this upcoming weekend :mug:

Could one use this valve to purge the new collection ball of air with beer instead of some use CO2?
 
I didn't drain any sediment before pitching the yeast and had pitched right away on the current batch. This was on the 22nd.

I got very little bubbling that stopped within about 2 days. I'm positive I have all good seals.

Is the yeast trapped under the trub do you think?
Can I just auger it out with a sanitized coat hanger?

Can I just dump the ball back into the fermenter?

Suggestions to save this batch?

MrKelly,

Bubbles are a sign of fermentation but not the only one. Especially when there was is a lot of head room in a fermentation chamber. The ff is a 7.5 gallon vessel, so a 5 gallon vessel leaves 577 cubic inches for gasses to compress in.
The only true way to know if the batch fermented, is to take a hydrometer reading. Without a sampling port, I suggest you sterilize a turkey baster and draw a sample. If the SG is close to your prediction (1.010 or so) then it is done. Then I would remove the ball and put the drain hose in. If you keg, then I would shoot a little co2 up the hose to clear the path and discard the first cup or so. If you have no co2, its a little harder. I open the valve, with no attachment, very slowly. I have a bucket under it to catch up he material that is clogging the neck, then close it as soon as it clears.

If the SG is not where it needs to be, I would repitch without messing with the ball.


Remember beer is already rotten water, you can't make it worse. Or can you?
 
I didn't drain any sediment before pitching the yeast and had pitched right away on the current batch. This was on the 22nd.

I got very little bubbling that stopped within about 2 days. I'm positive I have all good seals.

Is the yeast trapped under the trub do you think?
Can I just auger it out with a sanitized coat hanger?

Can I just dump the ball back into the fermenter?

Suggestions to save this batch?

I don't dump the sediment prior to pitching. I'm a believer that the sediment has fermentables in it the yeasties can use to ferment and finish the beer.

If the yeast were under the trub at the beginning of fermentation, it wouldn't hinder the yeast from doing their thing. Once it's starts fermenting, it will stir up and churn the wort in the fermenter.

I would be willing to bet you may not have quite as good an air tight seal as you think??

Can you see a krausen ring on the inside of the fermenter?

Only real test is to take a gravity reading and see where it is.
 
I made the mistake of pitching the yeast with the valve open and it all dropped into the ball and fermented out in no time. The wort above the valve was untouched by the yeasties. I pulled the ball put a new one on and dumped it back in to the fermenter and all was good. I opened the valve once it was obvious the whole batch was fermenting. And a volcano ensued. Note to self - dont wait too long or open fill and close before pitching.
Also made the mistake of closing the valve before fermentation was done, pressure built up and you guessed it another mini volcano.
 
I don't dump the sediment prior to pitching. I'm a believer that the sediment has fermentables in it the yeasties can use to ferment and finish the beer.

If the yeast were under the trub at the beginning of fermentation, it wouldn't hinder the yeast from doing their thing. Once it's starts fermenting, it will stir up and churn the wort in the fermenter.

I would be willing to bet you may not have quite as good an air tight seal as you think??

Can you see a krausen ring on the inside of the fermenter?

Only real test is to take a gravity reading and see where it is.

I have done about 6 batches with the fastfermenter, 3 times I got lots of air bubble activity the other 3 no activity, once I repitched thinking it did not ferment. But in all cases fermentation was complete. I NEVER change the ball. Just leave it open everthing finishes in ball.
Cheers!
 
Back
Top