FastFerment conical fermenter??????

Homebrew Talk - Beer, Wine, Mead, & Cider Brewing Discussion Forum

Help Support Homebrew Talk - Beer, Wine, Mead, & Cider Brewing Discussion Forum:

This site may earn a commission from merchant affiliate links, including eBay, Amazon, and others.
I was reading back from some earlier posts about dry hopping in the thing, and I thought I would chime in with what I've been doing.

The technique I have been using (same as for keg dry hopping) is to take two coffee filters and put the hops and a stainless nut/washer/marble inside, then fold over the edges (1/2 inch or so) and staple it all around the edge and attach some dental floss so you can get it back. Then I spray it all down with Starsan to make myself feel like it is more sanitary, squeeze out as much air as I can, and toss it in with a few gravity points left to go (to scrub the oxygen in the pellets/filter/etc).

The coffee filters are big enough that I still seem to get good liquid penetration of the hop matter. For lots of hops, maybe use 2 or 3 of them.
 
I would just keg it. I doubt you are going to get much of a difference in the amount of suspended yeast in 24hr if you already waited weeks. My experience was like yours, lots of nice clean yeast collected at the end.

Did you taste the beer yet, and if so did you notice any yeast cleanup problems? That is the problem that I have been fighting with my beers (a pale ale and a pilsner), and I think it might be due to the structure of the collection ball isolating the yeast from the beer.

Did you do a heated diacetyl test (heat a sample to 150F for 15 min and check it)?

Hey Nate,

I am not sure if I have ever noticed diacetyl in any of the beers i have ever made. I wouldnt even know what it would taste like. (The buttery/slick on the tongue taste) Maybe I have just been lucky or my palate isnt sophisticated enough to detect it (most likely the latter).

A heated diacetyl test..........wow, never heard of doing that.

Everyone that drinks my beer seem to like it, (probably cause its cold and free). Mind you, alot of them drink Bud, so their palates are probably worse than mine.

Barney
 
I think this time I will try running the stuff out with the hose fitting and next time I'll try the ball. The air/CO2 going up through the liquid is going to stir the stuff back up in any case, but as some have stated, I'm sure that it will all settle back out reasonably quickly given some time. If some yeast does get kicked up, it shouldn't matter too much since I will gelatin the keg to clear it after some conditioning time in the fridge anyway.

With your lagers and pilsners, of which I have no experience, it's sounds like yeast contact is important. Maybe due to the lower fermenting temps and the less intense activity??

For top fermenting ale yeast, I would always leave the valve open from as soon as you rack your wort into the FF and throughout the primary & secondary. But for bottom fermenting lager yeast, maybe a slightly different approach is needed??

For lagers and pilsners, I would suggest giving this a try...

Leave the valve closed and rack your wort into the FF. Let the trub settle for a few hours, then pitch your yeast. Give the yeasties a day or two then open the valve for the remainder.

The yeast should sit on top of the trub even as the trub settles into the collection ball??
 
The method you suggest is what I tried the first time out, but I didn't have enough trub and stuff in there to keep the yeast above the ball. I think that what you say might be true if there was enough junk in the wort at pitching time to fill the ball up though.
 
Hey Nate n jbb3....
I'll let you know how things go, as I have a lager (kinda) in there now, with that John Q adams. It's been fermenting at about 55-60 degrees for the last 12 days, and I just emptied the trub the other day...but I had also emptied it prior to pitching the yeast, cos of the amount of hop debris in there. It had already slowed down to a crawl in activity when I dumped the trub this time, but it was never exacly a blow-off hose candidate to begin with. It's also my first attempt at a lager.
I haven't noticed any real difference in activity, but with this batch it's difficult to tell.

But to Nate's point, there WAS enough junk in the ball to keep the yeast above it in the FF during the active cycle. Could be something worth watching?

And ya for NH! I lived in Raymond for 20+ years before I moved out here to Kansas and became a defacto flatlander...LOL!
 
Do you whirlpool and let it settle before draining into the fermentor? I do, and then let it sit for 5-10 hr before taking the ball off with the trub/hops that got through, but it usually doesn't even fill up the ball all the way. Post ferment, the residual trub and yeast fill the ball about 3/4 of the way to the top and the stuff in there is VERY dense.
 
No....I didn't. after the wort had cooled down from my chiller, I transferred it into the FF with a siphon. The cooling with the chiller tends to keep stuff suspended, as I move it around alot to mazimize the cooling and minimize the time. I probably should have whirlpooled it afterwards, but didn't think of it...note to self...

The stuff I emptied from the ball on the first go was a lot of junk, but still very fluid. Like your experience, post ferment, it was very dense. It may have been just this batch had enough solids in it to keep the yeast above the ball. Well see how full it is at the end of the brew....
 
I use to do the same thing (before getting a fastferment) and would get 1-2 inches of junk in my carboys. For reference, now I chill with my immersion chiller, then when it is as cool as the water is going to get it (90F or so) I take out the chiller and give it a good spin with a big spoon. Once everything is swirling nicely, I pull the spoon and throw the top on the kettle and leave it for 30min to 2 hours before I run it into the fermentor. More often than not, it is closer to 2 hours. Doing that gave me a huge reduction in junk that went into the fermentor, maybe 1/2" in a carboy now.
 
I was reading back from some earlier posts about dry hopping in the thing, and I thought I would chime in with what I've been doing.

The technique I have been using (same as for keg dry hopping) is to take two coffee filters and put the hops and a stainless nut/washer/marble inside, then fold over the edges (1/2 inch or so) and staple it all around the edge and attach some dental floss so you can get it back. Then I spray it all down with Starsan to make myself feel like it is more sanitary, squeeze out as much air as I can, and toss it in with a few gravity points left to go (to scrub the oxygen in the pellets/filter/etc).

The coffee filters are big enough that I still seem to get good liquid penetration of the hop matter. For lots of hops, maybe use 2 or 3 of them.


Dental floss is the duct tape of the string world!!!!! Love it!!!

I have made 10 batches in my FF, all top fermenting Weizens, and have kept the valve closed entirely after having apparent attenuation problems on the first one ( read my earlier posts ).

Only once did the yeast jam up enough to not flow into the ball within an hour or two after opening it up, and that was an extremely trubby batch. I now purge the worst of the trub before pitching yeast.

Going to start some pressure tests on the FF next, I want to attach a ball lock gas post to the lid so I can pressure the beers through my filter without having to rack them to a keg first, which would be a HUGE victory!
 
If you add a gas post to the FFand do a pressure test, please post the results. I have been considering doing this so that I can put some CO2 pressure on the beer when it is done and I want to run the temperature down in the fermentor for lagering before kegging. Right now, I just keg it before dropping the temp back down after a diacetyl rest.
 
Yeah, I just looked at mine and there is still 1 thread showing (so about 3/16" less screwed in than yours). It is good to know that can happen, since they don't give a lot of guidance on how tight things should be when they are screwed together. For sure, I could twist mine on more if I tried but paranoia stopped me.
 
For those following the "use the ball" or "use the hose adapter" conversation that was going on earlier...

I ran out my batch of pilsner tonight using the hose adapter attached and found the following behaviour. When I first started running it I got some trub/yeast/gunk, maybe a pint of it or so. Then the beer ran clear from it but you could still see about 6" of stuff in the bottom of the conical. All the beer ran out of it into the keg clear (well, it was hazy like so many pale ales and IPAs out there). The stuff in the bottom didn't move until all the beer ran out, then the stuff in the bottom started running out. There was a really clean break between the three stages of the run off, so it was easy to put thing into a yeast collector and into the keg as appropriate.

When I went to clean it, the inside of the fermentor didn't have any excessive junk in the bottom, it had all run out after the beer was gone. It did run out slowly, maybe 10 minutes for it to all run out through the hose.
 
I haven't taken it apart since I put it on. So weird. I was lightly tapping the bottom of the conical with a rubber mallet when I noticed beer splashing out. Valve was closed. I didn't notice any stress on the part that cracked. The crack was smaller to begin with, I thought it had came lose and screwed it on a little tighter making the crack bigger. Not a part I thought would fail.
 
I think I've just found a decent method of making sure I don't add too much oxygen in starting secondary.
I often dry hop my IPA or add a hop tea just for aroma, and figured if I made the hop tea up and added it to the cleaned ball after removing the true/dead yeast then I add a good deal less oxygen and get the hop tea in without needing to open the top etc.

This is my first brew with the FF, so not sure if it's worked well or not, but other than a very small leak around the thermowell which I'll need to tape and sort AGAIN (done many times when leak testing and really thought I'd got it this time!), it's been great so far. I can see it saving me a lot of time in moving to secondary/bottling buckets etc.

Gary
 
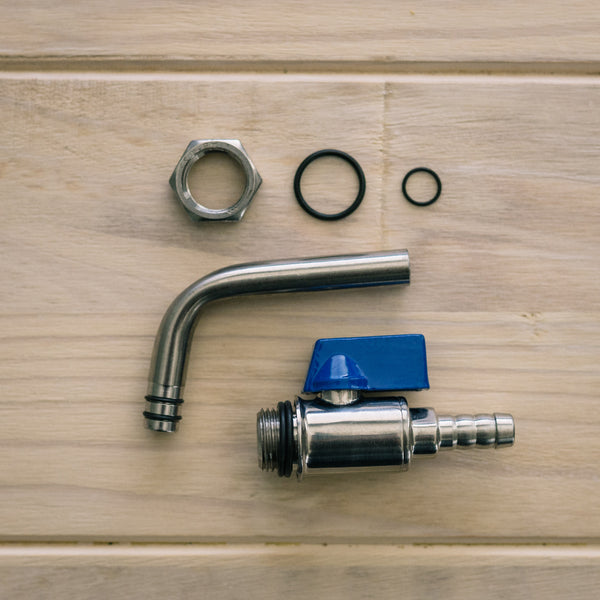
The two most annoying things about the FastFerments for me is the need to open the lid to take gravity readings/ samples, and getting less than clear beer out through the hose connection because of the yeast that gets stuck in the cone and doesn't settle into the collection ball. I think I may have found a solution in the racking arm for the SS Brewtech Brew Buckets. I'm thinking I'll buy one and it works I'll buy more for the rest of my FastFerments. Anyone see any reason why these wouldn't work on a FastFerment?

DSC_7417_grande.jpg
 
Back a ways in this thread is a solution using a tee on the thermotube fitting. I drilled mine for a bulkhead fitting. It works but not great.
 
Back a ways in this thread is a solution using a tee on the thermotube fitting. I drilled mine for a bulkhead fitting. It works but not great.

When you say its not great, what are the issues you have with yours, i.e. leaking, racking?
 
The two most annoying things about the FastFerments for me is the need to open the lid to take gravity readings/ samples, and getting less than clear beer out through the hose connection because of the yeast that gets stuck in the cone and doesn't settle into the collection ball. I think I may have found a solution in the racking arm for the SS Brewtech Brew Buckets. I'm thinking I'll buy one and it works I'll buy more for the rest of my FastFerments. Anyone see any reason why these wouldn't work on a FastFerment?

DSC_7417_grande.jpg

This looks like it could be a viable option. Now if there was only a way to get the price down. Spending 25% of the cost of the fermenter just for a racking port, seems a bit too much.
 
Hi guys,
Well, I had the John Q Adams lager in for about 6 weeks. I emptied the ball after a week, and then just let it sit with the valve open. The results were good. Clean, crisp batch. I checked the gravity twice a week for the last 3 weeks, and when I had no movement for 3 readings, I bottled. This time I drained the ff into a bottling bucket and used corn sugar instead of bottling from the ff and using fizz drops.
Before I drained the ff, I closed the valve and emptied the ball. No real trub...a lot of yeast. But the important thing is that I saw no yeast or cloudiness in the beer after I did this, which tell me most/all of the yeast was in the ball.
I did rap on the sides of the ff here and there during the ferment, and I saw a lot of evidence that this caused an internal landslide of sorts inside down to the ball.
Sg was where it should be and I noted no diacetyl taste in the test I did.
My conclusion? I can't see where the yeast being in the ball had any real negative effect on the completeness of the ferment.
Then again...this is a data point of one....lol...so it's suspect.
 
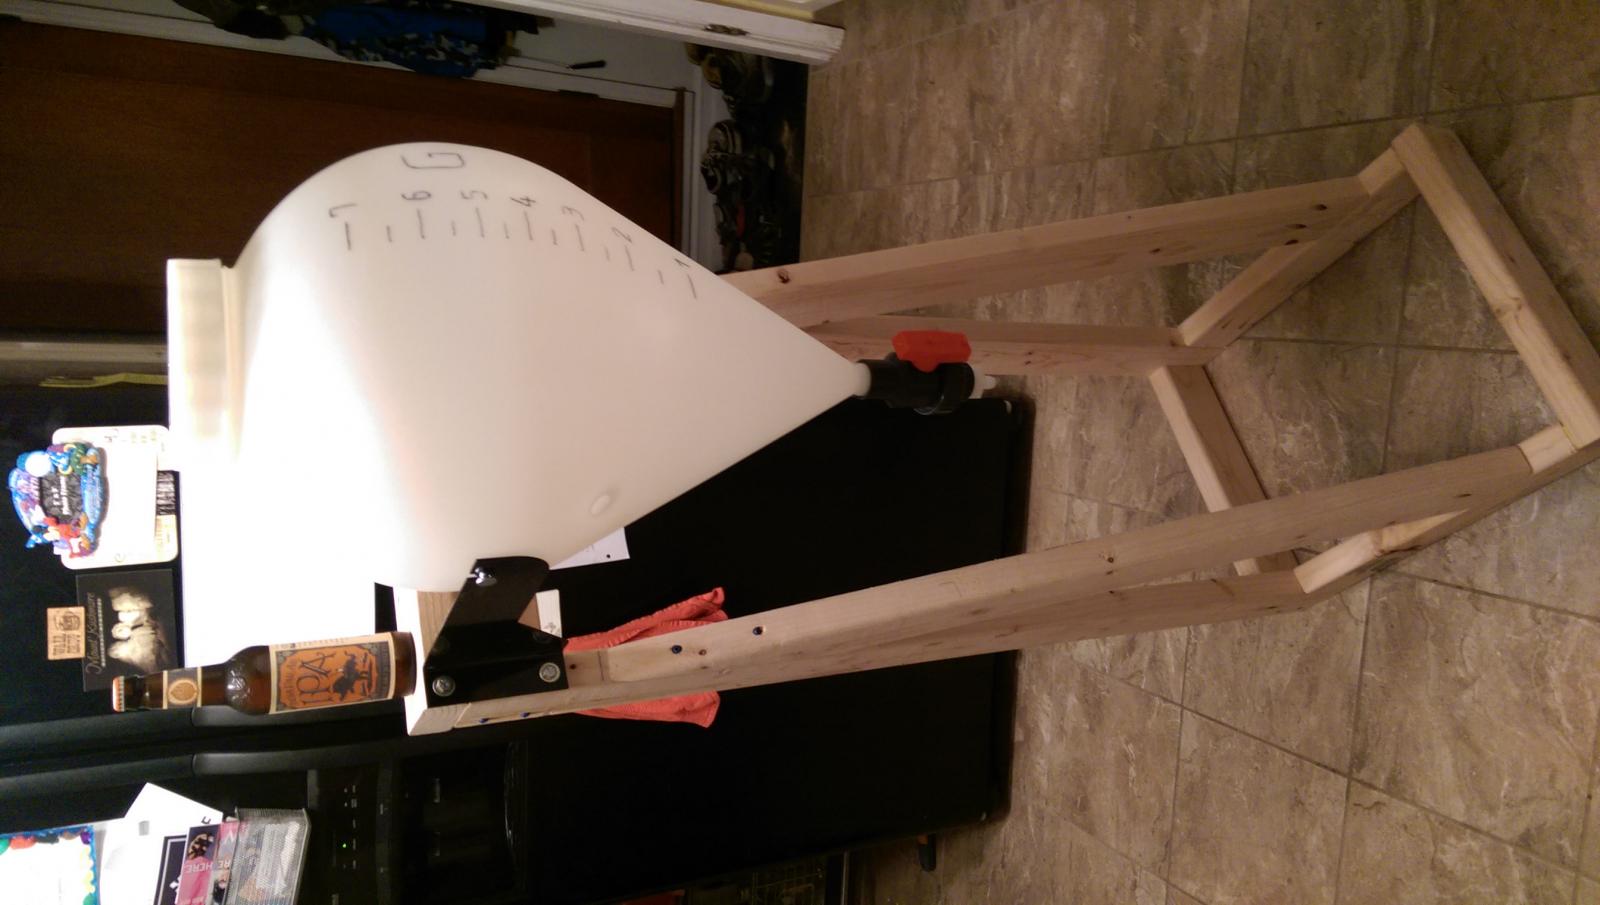
Just finished up this stand. I'm putting everything together tonight and brewing tomorrow. I really wanted to make this fancy but simple and quick will have to do for now. Not too bad for $8 I guess.

IMAG00025.jpg
 
Excuse the double post, there are 2 FF threads that really should be combined and I promised to post this in both

OK so my last batch finally dropped below 1015 but it took 3 weeks which is insane for a hefeweizen, (I used an elbow barb attached to a hose and coke bottle as an airlock so I could fit the entire FF, including stand and ball into my new keezer for precise temp control, in any case, I planned to do this a month ago and got a chance to test out all my tinkerings last night, so if anyone cares...

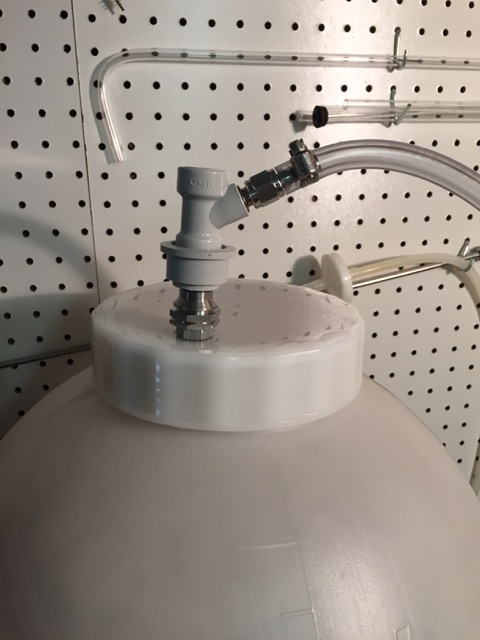
I have a second FF lid that I attached a ball lock adaptor and ball lock post to through the air lock hole with a gommet and it makes a nice airtight seal allowing me to add CO2 to the FF and pressurize it.

I used the silicone oring as well as 3 of the foam ones in the lid to make the seal hold.

I attached 3 short pieces of tubing, all with clamps and reducing couplers to get 1/2 ID tubing down to 1/4 inch ( this took a while and was leaky until I used the clamps and ran that into my filter then into my keg, but as you can see from the clean paper towel under the valve, no leaks!!!

IT WORKS

Ran about 3 - 4 PSI, no liquid leaks but the lid totally bulged outwards and that warped the seal enough to let a little bit of CO2 out, but held enough pressure to push the beer through a 1 micron filter in 10-15 minutes

all together, this was a fun experiment but a PITA, (it required way too many trips to HD and LHBS for parts and it took longer than just transferring to a keg and filtering from keg to keg)

Since I was trying to save time, and I did not, I won't do this in the future, besides, I think that letting it sit in the keg before filtering helps clear it, (that's what I did with the Kristalweizen that took 1st in class, second place best of show in Boston)

The thermowell in the top of the lid, however, works AWESOME, I use the temp controller to monitor the ambient in the keezer with some sticky foam insulation over it to balance the swings, and a second thermometer in the thermowell right in the middle of the wort so I can adjust the ambient accordingly without causing huge swings in keezer temp, it runs about 1.5 degrees warmer in the wort than in the keezer, ( which has 2 fans circulating air)

I have a video to show the pressure transfer, need to edit though b4 posting

IMG_9301.jpg


IMG_9302.jpg


IMG_9303.jpg


IMG_9304.jpg
 
Excuse the double post, there are 2 FF threads that really should be combined and I promised to post this in both

OK so my last batch finally dropped below 1015 but it took 3 weeks which is insane for a hefeweizen, (I used an elbow barb attached to a hose and coke bottle as an airlock so I could fit the entire FF, including stand and ball into my new keezer for precise temp control, in any case, I planned to do this a month ago and got a chance to test out all my tinkerings last night, so if anyone cares...

I have a second FF lid that I attached a ball lock adaptor and ball lock post to through the air lock hole with a gommet and it makes a nice airtight seal allowing me to add CO2 to the FF and pressurize it.

I used the silicone oring as well as 3 of the foam ones in the lid to make the seal hold.

I attached 3 short pieces of tubing, all with clamps and reducing couplers to get 1/2 ID tubing down to 1/4 inch ( this took a while and was leaky until I used the clamps and ran that into my filter then into my keg, but as you can see from the clean paper towel under the valve, no leaks!!!

IT WORKS

Ran about 3 - 4 PSI, no liquid leaks but the lid totally bulged outwards and that warped the seal enough to let a little bit of CO2 out, but held enough pressure to push the beer through a 1 micron filter in 10-15 minutes

all together, this was a fun experiment but a PITA, (it required way too many trips to HD and LHBS for parts and it took longer than just transferring to a keg and filtering from keg to keg)

Since I was trying to save time, and I did not, I won't do this in the future, besides, I think that letting it sit in the keg before filtering helps clear it, (that's what I did with the Kristalweizen that took 1st in class, second place best of show in Boston)

The thermowell in the top of the lid, however, works AWESOME, I use the temp controller to monitor the ambient in the keezer with some sticky foam insulation over it to balance the swings, and a second thermometer in the thermowell right in the middle of the wort so I can adjust the ambient accordingly without causing huge swings in keezer temp, it runs about 1.5 degrees warmer in the wort than in the keezer, ( which has 2 fans circulating air)

I have a video to show the pressure transfer, need to edit though b4 posting

Frankenfermenter! It's alive!! ;)

Looks cool and very inventive. But probably just as well it's too much trouble to repeat. The FF has some plastic components that would probably fail after a few pressure cycles.

But I get it. Sometimes once you get an idea in your head, you just have to see where it goes...

:mug:
 
I've been kegging for several months now and wanted to try cold crashing my beer prior to kegging to see if it helps the clarity. The problem is, there's not much room in the small refrigerator/freezer that I have. It's not a mini frig but certainly not a full size. It's probably around 7 cu ft.

Not so easily deterred, I carefully measured the interior dimensions of the frig and drew up several versions of a stand. To make matters worse, there is a hump in the back so the reason for the offset design I finally hit on. And I think it could very well be the smallest footprint for a FF stand possible??

Here is a side view of the stand with a 5 gallon batch on board. The one piece air lock was too tall when mounted in the top. So I rigged up a blow-off tube kind of arrangement with the one piece air lock on the end of the tubed and strapped to the side of the stand.

compact stand side view.jpg


Here it is inside the frig...

compact stand in frig.jpg


Like a glove!!

:D
 
I've been kegging for several months now and wanted to try cold crashing my beer prior to kegging to see if it helps the clarity. The problem is, there's not much room in the small refrigerator/freezer that I have. It's not a mini frig but certainly not a full size. It's probably around 7 cu ft.

Not so easily deterred, I carefully measured the interior dimensions of the frig and drew up several versions of a stand. To make matters worse, there is a hump in the back so the reason for the offset design I finally hit on. And I think it could very well be the smallest footprint for a FF stand possible??

Here is a side view of the stand with a 5 gallon batch on board. The one piece air lock was too tall when mounted in the top. So I rigged up a blow-off tube kind of arrangement with the one piece air lock on the end of the tubed and strapped to the side of the stand.

View attachment 296918


Here it is inside the frig...

View attachment 296919


Like a glove!!

:D

That is FANTASTIC, best stand I have seen, love the way the braces extend back but the way the load is channelled forward and keeps the whole thing standing!

If I had a clue of how to build things I would do this! Can you share some details of the sizes of the cuts and hardware?
 
Thanks guys! I'll see if i can post a drawing after i log into work tomorrow.
 
Thanks for the spec drawing for the stand. Any way you can post some more pics of the front and back of stand. Thanks a lot. Want to try to build my own this weekend. Thanks
 
Thanks for the spec drawing for the stand. Any way you can post some more pics of the front and back of stand. Thanks a lot. Want to try to build my own this weekend. Thanks

I don't have a rear view photo and the stand is in use/in the frig at the moment, but hopefully these will help.

Notice the short verticals at the top. The inside corners have to be beveled otherwise they hit the FF. That's how compact this stand is... ;)

compact stand frt view.jpg

compact stand side view2.jpg
 
Wow ! Fantastic specs too. Really think the folks at FF should talk to you about a collaboration. I'm off to Home Depot now to buy wood. Many thanks for sharing ! What program did you use for the specs by the way?
 
Wow ! Fantastic specs too. Really think the folks at FF should talk to you about a collaboration. I'm off to Home Depot now to buy wood. Many thanks for sharing ! What program did you use for the specs by the way?

Thanks! They can use my design for a small royalty... ;)

The program is AutoCAD.

BTW, if you don't have to have a compact stand (due to a confined space such as a compact frig) there are other DIY stands earlier in this thread that might be better for an everyday stand.

Post some photos when you're done.

:mug:
 
Taking gravity samples up until now has been a PITA. Should be a bit easier now :ban:. Will be testing it out this upcoming weekend :mug:

Any updates as to how this has turned out for you? Leakage etc?? Parts utilized? Thanks in advance.
 
Anyone had experience with the collection ball opening getting clogged? I went to move something to secondary today and now the ball won't fill up.
 
Back
Top