• Please visit and share your knowledge at our sister communities:
  • If you have not, please join our official Homebrewing Facebook Group!

    Homebrewing Facebook Group

Electric brewery plans - need help

Homebrew Talk

Help Support Homebrew Talk:

This site may earn a commission from merchant affiliate links, including eBay, Amazon, and others.
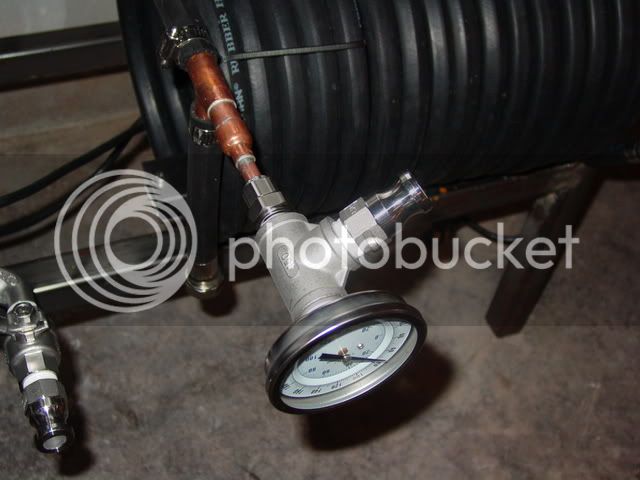
Just for fun, here's a video I took during the auto tune. Sorry if the quality sucks; I've never used photobucket to host a video before.

There really isn't much to see here, so you wouldn't be missing out on much if you didn't watch this vid.

[edit: vid removed]

Prost,
TB

EDIT: vid quality sucks from photobucket. Not even worth posting. Removed for your sake.

Nice Tiber, I've been doing my build one step behind yours just so I can follow along and it's been a great help. Thank you.
 
Showing the wiring for the elements:

DSC00267.jpg
I hope I'm wrong - However I need to ask - Is your electrical box made of plastic? If so you need to add an equipment ground point so that it is bonded to the kettle. Right now it appears to not exist.

If the box is cast Aluminum, I'll just go away.

Your whole build process is awesome.
 
I hope I'm wrong - However I need to ask - Is your electrical box made of plastic? If so you need to add an equipment ground point so that it is bonded to the kettle. Right now it appears to not exist.

If the box is cast Aluminum, I'll just go away.
Thanks for the concern, P-J. Those boxes are indeed aluminum weather proof boxes from McMaster-Carr, part no. 7219K26.

Your whole build process is awesome.
Thanks! Again, I really appreciate your help!

TB
 

You bet! :mug:

Did some finishing work on the plumbing this weekend.

Apply Teflon tape to the threads on the pump heads:
DSC00287.jpg


This is a 3/8" compression x 1/2 NPT adapter for the chiller. There's a similar one on both ends of the chiller. This will be used to adapt a thermometer and quick disconnect:
DSC00289.jpg


It looks a bit better than this now, but you get the idea:
DSC00293.jpg


This is the 90 deg street elbow that connects the hose to the female QD. I ground off the threads a bit with my angle grinder and had no problem getting the hose on it. Same with the female QD where I didn't use the elbow (didn't even grind the threads on the QD):
DSC00291.jpg

DSC00292.jpg


Wrapped my copper 1/2" tubing around a corny keg, and prepped it for the HLT:
DSC00298.jpg


Prepared the fittings for soldering onto the HERMS coil:
DSC00300.jpg


After soldering:
DSC00301.jpg


Then secure them into the compression fittings in the HLT:
DSC00320.jpg


[continued on next post]
 
And now we have a HERMS coil:
DSC00319.jpg


Testing the pumps at 50% open valve:
DSC00296.jpg


And fully open:
DSC00297.jpg


Shots of my brewery so far:
DSC00316.jpg


DSC00318.jpg


Still need to:
  • powder coat the frame
  • make a splash shield for the pumps
  • install my leveling feet to the stand legs
  • brew

Cheers,
TB
 
Tiber_Brew,

I just want to say that I'm standing in awe with your build. The whole project and documentation is just plainly magnificent!

I also really appreciate your jumping in on Gabrew's build about the E-stop. Good Job!

Thanks.
 
got any plans for your sparge arm?
For now, I'm going to just coil the return silicone hose in the MLT above the grain bed. That is, until I find a sparge system (or design) that I'm satisfied with. I've been toying with a few designs of my own on scratch paper, and doing some heavy research, but we'll see how the straight up tube in the tun goes for the first few batches...

Tiber_Brew,

I just want to say that I'm standing in awe with your build. The whole project and documentation is just plainly magnificent!

I also really appreciate your jumping in on Gabrew's build about the E-stop. Good Job!

Thanks.

Thanks, P-J! I appreciate the comments.

I also figure it's only right to pay it forward. Anything I can offer to others to keep this awesome brewing community going forward!

TB
 
I cut my power supply cord down to an appropriate length. Now don't have to wrap 8 ft of 50 amp cord around my control panel to plug it in. I'm hoping to do my rig's maiden brew this weekend. Wish me luck.

Any thoughts on a beer to break this thing's virginity?

TB
 
Good Luck!
Do you want to kick off your first brew with something memorable,
or something simple and easy to do on the first run through?
 
That's my current dilemma. I'd like to incorporate both aspects if I can. Perhaps I'll make a simple red ale & call it something like "Sparky's Virgin Red Ale" to allude to my first all electric brew.

I'll certainly report back with details whatever I choose to do.

Thanks,
TB
 
Honestly, you might want to make something simple and quick - So when the new system starts to get to know you and how you brew you can be ready for her :mug:
 
I haven't followed the whole thread, but this NPT to silicone hose connection you're doing is only for testing or something right? You're not going to leave it this way correct?

If that's the intent, you really need a NPT to barb fitting and hose clamp. Put the silicone hose on the barb fitting and secure it with the hose clamp (preferably a smooth band clamp as silicone hoses are fragile) and then use some teflon tape and screw the fitting to to the assembly.

Something like this:

IMG_5253_letters.jpg


The way you have it there is just an accident waiting to happen if ever the pressure builds up.

Kal
 
I haven't followed the whole thread, but this NPT to silicone hose connection you're doing is only for testing or something right? You're not going to leave it this way correct?

If that's the intent, you really need a NPT to barb fitting and hose clamp. Put the silicone hose on the barb fitting and secure it with the hose clamp (preferably a smooth band clamp as silicone hoses are fragile) and then use some teflon tape and screw the fitting to to the assembly.

Something like this:
image removed

The way you have it there is just an accident waiting to happen if ever the pressure builds up.

Kal


Kal,
There have been multiple threads that discuss the restricted flow when using barb fittings. One proposed solution it to streach silicone hose over a male threaded fitting just as TB has done. My guess is that it is pretty tight.

I drilled the ID of my barb fittings to enlarge but haven't gone this route. Looking at that picture, I agree it looks like the hose could streach and come off... but I have no idea if thats just the pic? For my own peace of mind, I would probably put a band clamp on as you suggest if there was any chance of the hose comng off.

Ed
 
There have been multiple threads that discuss the restricted flow when using barb fittings. One proposed solution it to streach silicone hose over a male threaded fitting just as TB has done. My guess is that it is pretty tight.

I drilled the ID of my barb fittings to enlarge but haven't gone this route. Looking at that picture, I agree it looks like the hose could streach and come off... but I have no idea if thats just the pic? For my own peace of mind, I would probably put a band clamp on as you suggest if there was any chance of the hose comng off.
Yup - the last thing you want is gallons of hot (possibly near boiling) wort or water pouring out, possibly all over yourself. I guess I'm just paranoid but a lot of my hose connections are at crotch height... I picture burning myself in all the wrong spots. ;)

I haven't followed any of the threads on resistricted flow... I'm 1/2" ID all around but you're right that the B3 barb fittings I use are more like 3/8" for the barb portion. Never noticed any flow restriction or problems pumping, in fact the flow rate's pretty crazy if I open up the pump valve all the way.

There's a guy making true 1/2" ID barb fittings over at brewershardware.com which shows the difference:

TFB58_BoreComp.jpg


Kal
 
Thanks for the concern, guys! :mug:

That, indeed, was for testing. It is part of my hose, and the other end of that street 90 is secured to a female QD. I took those pictures to show that it wasn't difficult to stretch the tubing over the threads. Since those pictures were taken, I've put on SS band clamps around the connection. I've ran about 8 tests so far with my system, with heat and everything, and no problems are poking their ugly heads out.

I'm glad people are paying attention! Thanks guys! :D

TB
 
Yup - the last thing you want is gallons of hot (possibly near boiling) wort or water pouring out, possibly all over yourself. I guess I'm just paranoid but a lot of my hose connections are at crotch height... I picture burning myself in all the wrong spots. ;)

I haven't followed any of the threads on resistricted flow... I'm 1/2" ID all around but you're right that the B3 barb fittings I use are more like 3/8" for the barb portion. Never noticed any flow restriction or problems pumping, in fact the flow rate's pretty crazy if I open up the pump valve all the way.

There's a guy making true 1/2" ID barb fittings over at brewershardware.com which shows the difference:

Kal

I did some pretty simple tests but don't have the numbers with me right now... I drained 10 gallons of water out of a kettle with a standard barb fitting on the valve and then with one I drilled (kinda like the one in the pic you posted).

As I recall, it was like a 30% improvement... it was enough that I just went ahead and drilled them all.

I'm using (and working on improvements) a plumbing manifold with a series of valves that will allow me to go the entire brew day without swapping a hose. My goal is "not a drop on the floor". A hose popping loose and spilling hot wort all over my crotch would mean I missed my goal... and then some. :cross:

Ed

I've read about similar experiments with similar results. That is mostly why I used the that setup in the picture (sans clamp). I actually had to thread the hose all the way on to the NPT, so with the clamp in place, I'm not worried a bit about leaks, or burning my balls.

Thanks guys,
TB
 
As I recall, it was like a 30% improvement... it was enough that I just went ahead and drilled them all.
Interesting. That's a big jump.

When do you pump that fast that this 30% makes a difference? Thinking about my process, the only time either of my pumps is open 100% is when I'm recirculating the HLT water to avoid stratification. It's already pumping crazy fast right now at 100% open, getting a faster rate won't help me at all.

Just curious!

Kal
 
Wouldn't the wort ride up the threads like a spiral staircase?
If it's not, I would imagine that you have to squeeze the silicone hard enough to squish it into the threads... Doesn't that cut the hose?
 
Interesting. That's a big jump.

When do you pump that fast that this 30% makes a difference? Thinking about my process, the only time either of my pumps is open 100% is when I'm recirculating the HLT water to avoid stratification. It's already pumping crazy fast right now at 100% open, getting a faster rate won't help me at all.

Just curious!

Kal

I won't speak for Ed, but for me, I wanted to reduce losses in the system to make pumping through .25" I'D chiller easier, etc. My pump has a hard time keeping a decent flow rate as it is, so any losses that I can eliminate help. (Anyone want to donate to the "Tiber's convoluted chiller" fund? :))

Wouldn't the wort ride up the threads like a spiral staircase?
If it's not, I would imagine that you have to squeeze the silicone hard enough to squish it into the threads... Doesn't that cut the hose?
I ground the threads down a bit with my angle grinder, so there's some flat parts for the hose to get a good seal when clamped down. No problems at all so far in any of my tests. I can't even pull this thing off the fitting if I try.

Thanks,
TB
 
Back
Top