ebay aquarium temp controller build

Homebrew Talk - Beer, Wine, Mead, & Cider Brewing Discussion Forum

Help Support Homebrew Talk - Beer, Wine, Mead, & Cider Brewing Discussion Forum:

This site may earn a commission from merchant affiliate links, including eBay, Amazon, and others.
What do you have going emjay? I am excited to see just how much more complicated it could be... Here i was thinking adding a cooling light, wiring up my temp probe through a mono jack, and adding an extra outlet was as uptown as it got!
 
This would be good to know if someone could chime in. I also soldered my keezer fan which is AC.

I wouldn't see how it could be bad but I don't know much about electricity. My only work with electricity was soldering chips onto boards in boy scouts and working on car radios and speakers.

I'm an electrician.. Soldering 110v spices went out with knob and tube wiring in the 20'-40's..

The problem is, if there is a short somewhere else, the current is enough to melt the solder and cause the splice to come loose.. Which means you need to use a wire nut or crimp splice anyways.. And if you're doing that, there's no need to solder..

My suggestion with wire nuts is to strip all the wires equal length, twist them together so that they form a very solid mechanical splice without the wire nut, then install the wire nut 'tight'.. 'very' tight... as tight as you can...

After installing the wire nut, try to pull each wire out of the spice,, You should not be able to, no matter how hard you pull...

Then tape the spice, wrapping the tape so that you are pulling against the wire nut in such a way that it would be tightening more...

You will have a splice that lasts a 'long time' that way..
 
I've made a couple of these temp controllers which I love. I'm looking to make one for someone as a gift and am trying to find a single outlet wall plate that's black or steel, only 2.25" wide or less, and preferably not too tall too. I'm having a hard time finding anything, I found something moderately acceptable but it's $15 and I'm not sure if it will work anyways.

Anyone have any ideas? On my personal controller boxes I've roughly cut out the hole for the outlet, forced it through, then covered the ugliness with various types of tape. I'd like to have it come out much cleaner while maintaining the small box size, if possible.

Anyone have any ideas?
 
mccumath said:
What do you have going emjay? I am excited to see just how much more complicated it could be... Here i was thinking adding a cooling light, wiring up my temp probe through a mono jack, and adding an extra outlet was as uptown as it got!

I'll post it when it's done :D

It's not super-complicated like some of the mash control panels, but I'm just adding a little bit of functionality and easy customizability. It employs a few relays/switches, quite a few lights (about a dozen), and the box itself can be unplugged from all the external cables.

And that's really just part of it, as I'm also doing a bit of work on the freezer to tie it all together. Yeah, it adds a fair bit of cost to a temp controller whose biggest draw is being so inexpensive, but it's still going to be cheaper than many of the more expensive controllers, while at the same time providing extra functionality and just far more bang for the buck.

And it's by far the most complicated electrical project I've taken on to date, so it's also been a valuable learning experience, and actually pretty fun.
 
At the very most, you just need to make sure your soldering isn't too thin anywhere. It's the same idea as wire gauge really... the minimum thickness increases as the power requirements do.

If you're just soldering wire leads to each other (eg instead of using wire nuts), there really shouldn't be an issue, as the wire itself is obviously sufficient... in this case, the solder is more useful as a mechanical joint than as an actual conductor anyways.

The box I'm working on is really more complicated than any that I've seen here, and soldering is pretty much necessary in my case. Soldering is definitely still appropriate for AC, and is often unavoidable, depending on what you're doing.

Thanks. I figured it wasn't bad but wanted to make sure.
 
r8rphan, Hey thanks for the info. Thats a great Idea. From the picture, they do look airtight! But maybe I'll give your idea a try. Thanks!

If you're worried about it, you could always use female adapter fittings and a reducer and nylon Barb.. But that just makes it less convenient and it's not necessary.. The seal is good enough for the purpose.. It motor boats like crazy in the star san containers.. And that's all the proof I need...
 
Well emjay, I will be curious to see what all you have planned. I have thought about putting in a power switch for ease of shutting down the unit when changing out my keg/stocking other beverages into the fridge, etc. so that it does not run continuously while the door is open. Only have 1 neon light for cooling, as this is what the controller will be primarily used for until I get the bright idea that I need a fermentation chamber. Right now, need a grain mill and a couple more kegs first...
 
mccumath said:
Well emjay, I will be curious to see what all you have planned. I have thought about putting in a power switch for ease of shutting down the unit when changing out my keg/stocking other beverages into the fridge, etc. so that it does not run continuously while the door is open. Only have 1 neon light for cooling, as this is what the controller will be primarily used for until I get the bright idea that I need a fermentation chamber. Right now, need a grain mill and a couple more kegs first...

The eBay controller I bought can be turned off by holding the power (top) button for a few seconds. This cuts power to everything except the outlet I wired to be always on.
 
Voltin - I know it does, but that takes away from the "bling" factor! It also lets me know when it heats and cools on the temp controller screen display, but I added a neon light for when the cooling comes on for kicks. Don't do much electrical work, so these projects are always fun!
 
Voltin - I know it does, but that takes away from the "bling" factor! It also lets me know when it heats and cools on the temp controller screen display, but I added a neon light for when the cooling comes on for kicks. Don't do much electrical work, so these projects are always fun!

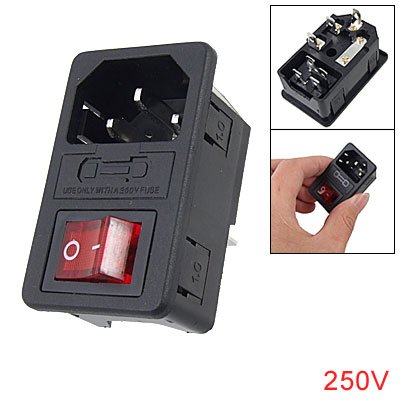
I can see that :). On my controllers I used a IEC320 C14 Inlet to connect the power. There is variant that includes a switch and/or a fuse:

41GW%2Bi16-uL.jpg
 
voltin said:
I can see that :). On my controllers I used a IEC320 C14 Inlet to connect the power. There is variant that includes a switch and/or a fuse:

I got one with a fuse.
 
First of thanks to the op and all other posters. I found the advice and diagrams in this thread very useful.

Just finished testing my unit and it works great. I followed the diagram that the OP posted and no problems. I wired everything relatively fast (the longest part of the build was cutting the holes in the project box with a steak knife).

Mine measured 0.7*C in crushed and I used the F4 function to calibrate it. I would recommend calibrating it with crushed ice before using to control a fermentation.

My fermentation chamber is a Sanyo 4.9 cu.ft fridge. To test the system I wrapped the probe with a plastic sandwhich bag and dipped it in small bucket of water (not sure how many gallons, but think of the small buckets used for car washing), set the temp to 18*C and the diferrential to 0.5*C. This keeps my temperature pretty constant, with he compressor running only 5-6 minutes every hour. The only problem i saw was that it overshot the temperature by 0.2*C making the final temperature 17.8*C instead of the 18.0*C I had set, but this probably wont be an issue with five gallons of beer. I also tried tapping the probe to the side of the bucket with some foam and bubble wrap for insulation. In this case I set the differential to 2.0*C since I notice that the insulation was not perfect and saw that this also maintained constant liquid temperature with similar cycling. I cant wait to try this setup on a batch of homebrew!
 
After reading through the forum I noticed that there are many questions that get repeated, mainly because the forum is quite large and key words are thrown around a lot. For the benefit of future readers I have decided to summarize a few of the idea rpesentes along with some links to the original posters. I hoe this helps.

Location of probe:
If you set the probe to air, a small differential may lead to a lot of short cycling as changes temperature quicker that wort/beer.

If you set it to the side of the carboy, make sure to insulate it.

If you put it in a jar of water, remember that during active fermentation beer will get warmer faster that the water in the jar.

Insulating probe stuck to a carboy:
aggezi suggested using poster putty: https://www.homebrewtalk.com/f51/ebay-aquarium-temp-controller-build-163849/index129.html

Others have suggested using bubble wrap, foam, or a papper towel over the probe to shiled it from the ambient air.

Thermowell:
Flowmaster suggest using a stainless steel thermowell. You can build your own as per his instructions: https://www.homebrewtalk.com/f51/eb...roller-build-163849/index106.html#post2748962
Or purchase one online
https://www.homebrewtalk.com/f51/ebay-aquarium-temp-controller-build-163849/index107.html.

Connecting temperature probe to a jack:

Yes, it is possible: https://www.homebrewtalk.com/f51/eb...roller-build-163849/index120.html#post2812966

https://www.homebrewtalk.com/f51/eb...roller-build-163849/index165.html#post3097262

Not to drag this on, here are some diagrams for different setups:

Original poster setup:
https://www.homebrewtalk.com/f51/ebay-aquarium-temp-controller-build-163849/
(the tab you need to break is this one https://www.homebrewtalk.com/f51/eb...roller-build-163849/index184.html#post3269397

Box with cooling/heating lights and fan:
https://www.homebrewtalk.com/f51/ebay-aquarium-temp-controller-build-163849/index19.html

Box with lights and dual receptacles and switch:
By ParadiseBeer
https://www.homebrewtalk.com/f51/ebay-aquarium-temp-controller-build-163849/index100.html

I know I left a lot out, but these are some answers to basic questions I had when I started. I hope this helps. Cheers
 
Problem with your post is, in one more page, it's going to start being overlooked just like everything else that gets overlooked every time somebody repeats a question. It's the kind of thing that's really only useful in the OP (or at least linked to by the OP.)
 
Or add all of your useful info to the wiki as a type of fermentation cabinet? Maybe add a Refrigerator/Freezer type cabinet and detail the setup of the cheap controller in there.

https://www.homebrewtalk.com/wiki/index.php/Fermentation_cabinet

I know that's what I'll do if I want to make a fermentation cabinet, just get a cheap used fridge or freezer and add this controller. Way less work and cheaper too.
 
Problem with your post is, in one more page, it's going to start being overlooked just like everything else that gets overlooked every time somebody repeats a question. It's the kind of thing that's really only useful in the OP (or at least linked to by the OP.)

This is true :( Hopefully, though, a new person performing a search with the key words in the post will tumble upon the latest post, which would be mine (until it too becomes just another page) and also find answers to other basic questions at the same time.

I fell there is a LOT of useful information in this thread and I wish there was an easier way to tap into all this knowledge without having to go through the hundreds of post that come up when doing a keyword search.

@tolonen That is a very good idea! Thanks for the suggestion. I would think that my fridge would count as a fermentation chamber and the info about this temperature controler would be useful.
 
Got my controller hooked up yesterday. So easy to do. Now my ferm chamber is complete, with brews in there chugging away, TADs carbing a lager, and a belgian ripening. **Sniff** **Sniff** so proud...
 
Whoop!!! Just finished wiring mine up and plugging it in. Have all the settings set and tested. One question. Has anyone used this for a period of time outside with varying temperatures and humidity? My ferm fridge is out under my carport and I'm worried about the longevity of the controller.
 
Add one more to the completed and working temp. controllers. Thanks for pointing us in the right direction. Now just need to start another brew.
 
Thanks for the offer. I found an old laptop charger that is 110v to 12v 1A. I am going to use that in place of the 220v transformer.

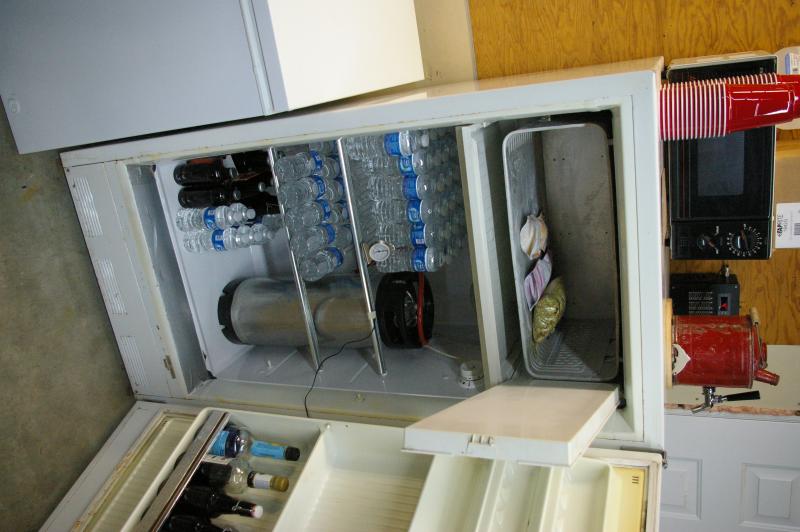
In response to the whole transformer issue. I too purchased the 220V version and decided to run an external transformer as opposed to resoldering one back on to the board. I hoard old electrical devises, a trait passed down from my Dad. I was able to recycle a headphone jack for my NCT temp probe from an old stereo, a 14/3 cord from an old microwave, and a 110V to 12V 1A power pack from an old laptop. I desoldered the 220V transformer from the board of Ebay controller and soldered the wires out of the laptop charger to the board on the output side of old tranformer. I have had this running in the garage for 6 weeks now and it is working well. I also scored the freezer for free!

DSCN2266.jpg


DSCN2267.jpg
 
so I can't find the answer in the thread (and I'm probably just showing my utter lack of grasp of electronics), but how exactly do I connect the wires to the RS relay to have a fan shut on and off with both cooling and heating?

Sorry for the stupid question, but I've been through the thread several times and google is failing me :(.

TIA.
Radio Shack sells many different types of relays. The only way to know how to wire yours is by using the data sheet that came with your relay. This will give you the "pinout".
There has already been one instance in this thread of someone using somebody else's schematic for what was supposedly an identical relay, only to find out the pinout was not the same.

If you are electronically challenged, why not just get another fan, and hook up separate fans to cooling and heating? Simpler, same functionality, and with a built in emergency spare. There are muffin fans hiding in all types of devices that get thrown out, and even if you have to buy one, it isn't much more than a relay.

thanks for the reply. Sorry I wasn't clear. I'm using this one from Radio Shack, and roughly approximating the diagram here. I'm just not sure how to physically attach the wires to the relay.

Thanks again for your help.
 
naiserie said:
so I can't find the answer in the thread (and I'm probably just showing my utter lack of grasp of electronics), but how exactly do I connect the wires to the RS relay to have a fan shut on and off with both cooling and heating?

Sorry for the stupid question, but I've been through the thread several times and google is failing me :(.

TIA.

I use a relay to do the same thing. But it sounds like you might not even have the correct type. The most common relay is known as a Form A or "normally open" (NO) relay, often described as either SPST, or DPST.

But that won't work for your purposes. Technically it's possible to use two of those though. But really, you want a non-shorting (break before make) changeover/transfer relay, which will be SPDT or DPDT.

And then on top of making sure it's the right kind of relay and using the datasheet to figure out the pinout, you need to make sure that not only are the contacts rated for the correct voltage and amps, but that the coil is properly rated as well, since a relay isn't necessarily controlled by the same voltage that it happens to be switching.

Only if you're sure about all of these should you go ahead with it...
 
RS = Radio Shack.
At least that is what I took it to mean. If he knew enough to know which tech jargon term to use for his relay, he would not need to ask how to wire it.

There was an earlier post, or another thread, where a schematic and parts list was given for a heat/cool single fan, relay based solution. I believe the relay spec'd was from Radio Shack. There was also an issue where a person bought, or thought he bought, the correct relay, but the pinout was not the same as the schematic.
 
sorry if I wasn't clear enough and thanks for your help, I've been waiting for a mod to approve my reply to cwi for a few hours. at least that's what the forum software told me...reposting now in case it was a glitch?

I know the pin layout etc, I'm just not clear on how to physically attach the wires to the relay.

relay:http://www.radioshack.com/product/index.jsp?productId=2049721

wiring diagram: http://www.ubermick.com/images/wiring_fermenter_full.gif

Like, is solder the only option? Is there a connector of some kind I can use?

Again, sorry for stupid questions and not spelling it out explicitly. Thanks for your help.
 
cwi said:
RS = Radio Shack.
At least that is what I took it to mean. If he knew enough to know which tech jargon term to use for his relay, he would not need to ask how to wire it.

I know that's what RS means, but I don't necessarily agree with you. I know what the jargon means, but if I don't have the proper datasheet, I'm going to be nearly as in the dark about how to wire it as somebody who knows almost nothing about relays.
 
I know that's what RS means, but I don't necessarily agree with you. I know what the jargon means, but if I don't have the proper datasheet, I'm going to be nearly as in the dark about how to wire it as somebody who knows almost nothing about relays.

This is what caused the confusion-
I've been waiting for a mod to approve my reply to cwi for a few hours. at least that's what the forum software told me...reposting now in case it was a glitch?

I think you were able to see his "unapproved" post somehow, whereas I was not. It just became visible to me while writing this post. Remove his intermediate post from the chain, and your post talks about the type of relay he is using based solely on "RS" from the original post. His original post was also the only post quoted in your post that talked about what type relay he was using, adding to the confusion.

Maybe I couldn't see it because I am on "double secret probation" for my smart ass attitude, or maybe your post count let you see it.

My rationale was that if he was describing which type of relay he had based on the inner workings, he would most likely know to look up the data sheet for the pinouts.
 
I use a relay to do the same thing. But it sounds like you might not even have the correct type. The most common relay is known as a Form A or "normally open" (NO) relay, often described as either SPST, or DPST.

But that won't work for your purposes. Technically it's possible to use two of those though. But really, you want a non-shorting (break before make) changeover/transfer relay, which will be SPDT or DPDT.

I followed his Radio Shack link, and it shows a DPDT 125VAC relay.
Was his link edited, and previously went to a different model?

That relay is more expensive than getting separate fans, even if you buy a DC fan and a transformer. Different strokes, I guess.
 
sorry if I wasn't clear enough and thanks for your help, I've been waiting for a mod to approve my reply to cwi for a few hours. at least that's what the forum software told me...reposting now in case it was a glitch?

I know the pin layout etc, I'm just not clear on how to physically attach the wires to the relay.

relay:http://www.radioshack.com/product/index.jsp?productId=2049721

wiring diagram: http://www.ubermick.com/images/wiring_fermenter_full.gif

Like, is solder the only option? Is there a connector of some kind I can use?

Again, sorry for stupid questions and not spelling it out explicitly. Thanks for your help.

You should be able to find some crimp quick connectors that fit the male lugs on the relay. Soldering may melt the plasticy bits on the relay.
This is turning into a lot of effort to avoid using two fans.
 
If you don't mind going really ghetto, you can thread the wire through the holes in the contacts and bend them around to get the wires relatively secure, and use electrical tape or heatshrink tubing to isolate the contacts and ensure the wire stays in place.

Crimp connectors are an option too. But personally, I would just take the opportunity to learn to solder.

As for why pay more to avoid using two fans, I would do the same. I got my relay for a bit cheaper, but still. I like to keep things neat and even flashy if I can, and using two fans just seems a bit ridiculous, not to mention it ends up using twice the space, and if you've got an ideal spot for a fan, you probably wanna use that for everything.
 
If you don't mind going really ghetto, you can thread the wire through the holes in the contacts and bend them around to get the wires relatively secure, and use electrical tape or heatshrink tubing to isolate the contacts and ensure the wire stays in place.
This method has a high probability of losing contact over time, either by physically loosening, or corrosion working its way into the interface due to the low contact pressure. How long it takes depends on how hostile the environment it is subjected to is. Works great for a quick fix, though.


Crimp connectors are an option too. But personally, I would just take the opportunity to learn to solder.

A small heat sink on the lug may be useful to avoid melting the casing, especially if this is going to be your first attempt at soldering.

As for why pay more to avoid using two fans, I would do the same. I got my relay for a bit cheaper, but still. I like to keep things neat and even flashy if I can, and using two fans just seems a bit ridiculous, not to mention it ends up using twice the space, and if you've got an ideal spot for a fan, you probably wanna use that for everything.
Twice the space? I thought we were talking about <4" inch fans and chest freezers. If an ideal spot existed and space was an issue, the two could be ganged together.

Something flashy would be adding a timer circuit to continue running for a bit after the cooling/heating shut off, and also periodically between cycles. This would be especially effective for cooling since the coils continue to cool for a few minutes after shutoff. Running the fan for a bit during long off periods can help keep faucets cool in keezers.
 
thanks for the info emjay and cwi, the crimp on connector is probably what I'll use for the time being.

money isn't the only factor involved in setting this up and I'll spare you the boring details as to why only one fan.

thanks again.
 
Has anyone tried a brewbelt for the heating cycle. Just wondering if it would work better than a heat light, or not
 
Wild Duk said:
Has anyone tried a brewbelt for the heating cycle. Just wondering if it would work better than a heat light, or not

I have. It works the same, since it's all enclosed anyways. The brewbelt only puts out something like 20W though.
 
And are guys using fans for just keezers, or fermentation fridges, or for both.... I just got my chest freezer off CL, got the controller, now just need to get it all together....I just plan on it to ferment and lager
 
Has anyone tried a brewbelt for the heating cycle. Just wondering if it would work better than a heat light, or not

Just keep in mind that they don't recommend using brew belts on a carboy. If you ferment in plastic on stainless, you should be good.
 
Back
Top