• Please visit and share your knowledge at our sister communities:
  • If you have not, please join our official Homebrewing Facebook Group!

    Homebrewing Facebook Group

ebay aquarium temp controller build

Homebrew Talk

Help Support Homebrew Talk:

This site may earn a commission from merchant affiliate links, including eBay, Amazon, and others.
Temp. Probe:
How are most attaching it to get the temp.... Taping it to the side/ submerging it in the wort....

If you tape it to the side, have you done a compare on the temp it reads with the actual temp of your wort????

Just wondering what works best.... Not sure how I would submerge it and still keep my brew bucket sealed
 
Wild Duk said:
Temp. Probe:
How are most attaching it to get the temp.... Taping it to the side/ submerging it in the wort....

If you tape it to the side, have you done a compare on the temp it reads with the actual temp of your wort????

Just wondering what works best.... Not sure how I would submerge it and still keep my brew bucket sealed

A lot of temp probes (generally the stainless steel kind) come threaded, allowing you to drill a hole in the side and insert it through there, if you want.

Both my controllers use SS probes... I got one of them off eBay cheap to replace the stock rubber one. But I just tape them to the side and cover with bubble wrap... it's very accurate.
 
Okay. Whats up with the bubble wrap? I tried that and the temp probe read super high... Maybe i need to let the bubble wrap cool down a bit more first... Just taped the probe to the wide metal portion of the rack. Seems to work okay for now. Would not stick to the inside of the wall of the fridge.

Having a hard time controlling my (cyclomatic - thinks thats the term) fridge at the moment. The old style with the freezer kinda built into the fridge, not seperated into two compartments and the cooling fins/wires on the outer backside of the fridge. The fridge temp probe keeps overriding the controller, and shuts the fridge off even though the fridge thermostat is set to the highest setting. The controller throws power to that outlet, but the fridge thermostat shuts down the compressor even tho it should be cooling. Have to move the fridge temp probe from the freezer into the fridge cavity, should fix that little problem, as the fridge probe mounts to the top of the freezer. Love DIY baby!

Anyway/otherwise temp controller was a fun build, works exactly as it should.

Ryan M.
 
... the fridge thermostat is set to the highest setting. The controller throws power to that outlet, but the fridge thermostat shuts down the compressor even tho it should be cooling...
Ryan M.

When you say the "fridge thermostat is set to the highest setting" you mean coldest setting right?
 
Here is my controller. Have to drill out a spot for the probe yet in the back of the freezer to run it inside; I hate loose wires everywhere. Otherwise working fine!

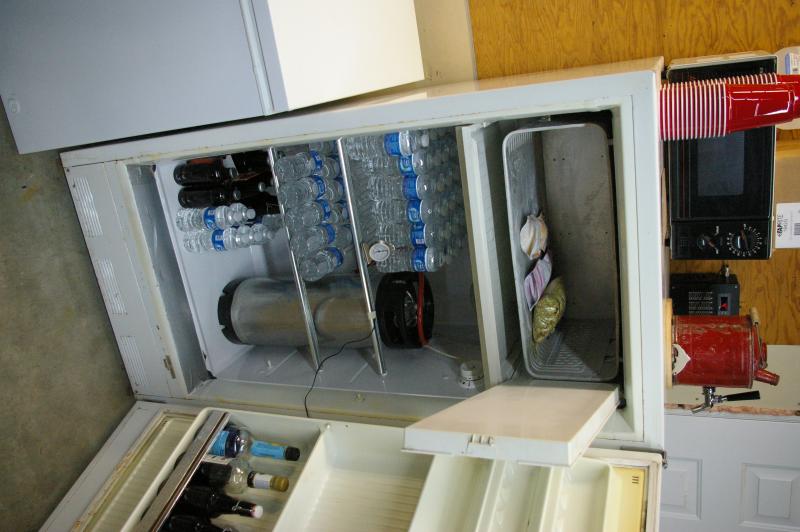
Also, a picture of the inside of the fridge. It takes a while for the controller/fridge to cool down again once you add a few items that are not cold, and again, the fridge thermostat keeps overriding the controller due to placement of the factory fridge probe (placed on the top part of the freezer). See previous post for more details. Therefore I moved the factory probe into the fridge cavity from the top of the freezer, and now it seems to be working much more efficiently. Only problem I see in the future is that it has to run every now and then, otherwise it defrosts a little and deposits water in the plastic drip tray that slides under the freezer. Will see how it works when the temp outside drops and the fridge does not have to run as often to maintain temps...

IMGP0004.jpg


IMGP0001.jpg


IMGP0003.jpg
 
Well I completed this build tonight. It doesn't look as good as others. I bought the wrong size project box so the outlet plate is too big...and I did a horrible job cutting the hole for the unit. But it works!!! I tested it using a plug in heater and ice pack. When it got too hot, the cold side turned on (I put a charger in it). When it got too cold, the heater turned on.

I'm no electrician so I'm just worried that this plastic box will catch fire. I soldered the 4 wires (coming from 1, 5, 7 and into the extension cord) and wrapped that in electrical tape instead of using a wire nut. I know I shouldn't be worried and someone can tell me to shut up and start using my newly built temp controller lol
 
I'm no electrician, but have done a lot of wiring around the house.... I don't feel that soldering 110v wiring is the best way to go.... Just use wire nuts.... Soldering is mostly used in DC applications

I could be wrong here, I'm sure others will chime in...
 
"quote"Have a couple more batches I can brew before it starts getting cold enough to worry about it though..."

r8rphan,
Nice job, But hey, how do you have your blow off tubes attached to your carboys? Interesting.

I have some 1 1/8 or 1 1/4 tubing thats just a little to small to shove in my 6 gal carboys and make a tight seal. Is that a pvc fitting and some larger clear tubing to slide over the carboy neck?

One and a half inch no hub couplings attach it all to the carboy necks.. In the other end of the no hub couplings, I have one and a quarter inch PVC Male Adapters.. The No Hub Hose Clamps hold it all together...

The tubing is just 1" ID clear tubing from the big box store... It will slide through the 1.25" fittings, and into the opening of the carboys.. I slide it a few inches down past the opening of the carboy.. Not an airtight seal, but close enough (semi airtight) that you don't have to worry about it... The ferment is always producing positive pressure... I've left it like that up to a month without issue... But I usually pull them out and switch to stoppers and airlocks after a week or so...

The stoppers fit nicely in the end of the PVC fittings... So I install the coupling and fitting before I even fill the carboys with wort... stick a blank #7 stopper in there and then carry them to the chamber where I pitch the yeast, stick them in the chamber, pull the #7 stoppers and install the tube...

Later I just pull the tube and stick in the #7 stopper with the airlock already installed and filled...
 
I'm no electrician, but have done a lot of wiring around the house.... I don't feel that soldering 110v wiring is the best way to go.... Just use wire nuts.... Soldering is mostly used in DC applications

I could be wrong here, I'm sure others will chime in...

This would be good to know if someone could chime in. I also soldered my keezer fan which is AC.

I wouldn't see how it could be bad but I don't know much about electricity. My only work with electricity was soldering chips onto boards in boy scouts and working on car radios and speakers.
 
At the very most, you just need to make sure your soldering isn't too thin anywhere. It's the same idea as wire gauge really... the minimum thickness increases as the power requirements do.

If you're just soldering wire leads to each other (eg instead of using wire nuts), there really shouldn't be an issue, as the wire itself is obviously sufficient... in this case, the solder is more useful as a mechanical joint than as an actual conductor anyways.

The box I'm working on is really more complicated than any that I've seen here, and soldering is pretty much necessary in my case. Soldering is definitely still appropriate for AC, and is often unavoidable, depending on what you're doing.
 
What do you have going emjay? I am excited to see just how much more complicated it could be... Here i was thinking adding a cooling light, wiring up my temp probe through a mono jack, and adding an extra outlet was as uptown as it got!
 
This would be good to know if someone could chime in. I also soldered my keezer fan which is AC.

I wouldn't see how it could be bad but I don't know much about electricity. My only work with electricity was soldering chips onto boards in boy scouts and working on car radios and speakers.

I'm an electrician.. Soldering 110v spices went out with knob and tube wiring in the 20'-40's..

The problem is, if there is a short somewhere else, the current is enough to melt the solder and cause the splice to come loose.. Which means you need to use a wire nut or crimp splice anyways.. And if you're doing that, there's no need to solder..

My suggestion with wire nuts is to strip all the wires equal length, twist them together so that they form a very solid mechanical splice without the wire nut, then install the wire nut 'tight'.. 'very' tight... as tight as you can...

After installing the wire nut, try to pull each wire out of the spice,, You should not be able to, no matter how hard you pull...

Then tape the spice, wrapping the tape so that you are pulling against the wire nut in such a way that it would be tightening more...

You will have a splice that lasts a 'long time' that way..
 
I've made a couple of these temp controllers which I love. I'm looking to make one for someone as a gift and am trying to find a single outlet wall plate that's black or steel, only 2.25" wide or less, and preferably not too tall too. I'm having a hard time finding anything, I found something moderately acceptable but it's $15 and I'm not sure if it will work anyways.

Anyone have any ideas? On my personal controller boxes I've roughly cut out the hole for the outlet, forced it through, then covered the ugliness with various types of tape. I'd like to have it come out much cleaner while maintaining the small box size, if possible.

Anyone have any ideas?
 
mccumath said:
What do you have going emjay? I am excited to see just how much more complicated it could be... Here i was thinking adding a cooling light, wiring up my temp probe through a mono jack, and adding an extra outlet was as uptown as it got!

I'll post it when it's done :D

It's not super-complicated like some of the mash control panels, but I'm just adding a little bit of functionality and easy customizability. It employs a few relays/switches, quite a few lights (about a dozen), and the box itself can be unplugged from all the external cables.

And that's really just part of it, as I'm also doing a bit of work on the freezer to tie it all together. Yeah, it adds a fair bit of cost to a temp controller whose biggest draw is being so inexpensive, but it's still going to be cheaper than many of the more expensive controllers, while at the same time providing extra functionality and just far more bang for the buck.

And it's by far the most complicated electrical project I've taken on to date, so it's also been a valuable learning experience, and actually pretty fun.
 
At the very most, you just need to make sure your soldering isn't too thin anywhere. It's the same idea as wire gauge really... the minimum thickness increases as the power requirements do.

If you're just soldering wire leads to each other (eg instead of using wire nuts), there really shouldn't be an issue, as the wire itself is obviously sufficient... in this case, the solder is more useful as a mechanical joint than as an actual conductor anyways.

The box I'm working on is really more complicated than any that I've seen here, and soldering is pretty much necessary in my case. Soldering is definitely still appropriate for AC, and is often unavoidable, depending on what you're doing.

Thanks. I figured it wasn't bad but wanted to make sure.
 
r8rphan, Hey thanks for the info. Thats a great Idea. From the picture, they do look airtight! But maybe I'll give your idea a try. Thanks!

If you're worried about it, you could always use female adapter fittings and a reducer and nylon Barb.. But that just makes it less convenient and it's not necessary.. The seal is good enough for the purpose.. It motor boats like crazy in the star san containers.. And that's all the proof I need...
 
Well emjay, I will be curious to see what all you have planned. I have thought about putting in a power switch for ease of shutting down the unit when changing out my keg/stocking other beverages into the fridge, etc. so that it does not run continuously while the door is open. Only have 1 neon light for cooling, as this is what the controller will be primarily used for until I get the bright idea that I need a fermentation chamber. Right now, need a grain mill and a couple more kegs first...
 
mccumath said:
Well emjay, I will be curious to see what all you have planned. I have thought about putting in a power switch for ease of shutting down the unit when changing out my keg/stocking other beverages into the fridge, etc. so that it does not run continuously while the door is open. Only have 1 neon light for cooling, as this is what the controller will be primarily used for until I get the bright idea that I need a fermentation chamber. Right now, need a grain mill and a couple more kegs first...

The eBay controller I bought can be turned off by holding the power (top) button for a few seconds. This cuts power to everything except the outlet I wired to be always on.
 
Voltin - I know it does, but that takes away from the "bling" factor! It also lets me know when it heats and cools on the temp controller screen display, but I added a neon light for when the cooling comes on for kicks. Don't do much electrical work, so these projects are always fun!
 
Voltin - I know it does, but that takes away from the "bling" factor! It also lets me know when it heats and cools on the temp controller screen display, but I added a neon light for when the cooling comes on for kicks. Don't do much electrical work, so these projects are always fun!

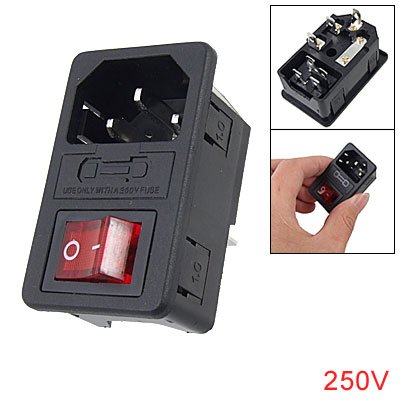
I can see that :). On my controllers I used a IEC320 C14 Inlet to connect the power. There is variant that includes a switch and/or a fuse:

41GW%2Bi16-uL.jpg
 
voltin said:
I can see that :). On my controllers I used a IEC320 C14 Inlet to connect the power. There is variant that includes a switch and/or a fuse:

I got one with a fuse.
 
First of thanks to the op and all other posters. I found the advice and diagrams in this thread very useful.

Just finished testing my unit and it works great. I followed the diagram that the OP posted and no problems. I wired everything relatively fast (the longest part of the build was cutting the holes in the project box with a steak knife).

Mine measured 0.7*C in crushed and I used the F4 function to calibrate it. I would recommend calibrating it with crushed ice before using to control a fermentation.

My fermentation chamber is a Sanyo 4.9 cu.ft fridge. To test the system I wrapped the probe with a plastic sandwhich bag and dipped it in small bucket of water (not sure how many gallons, but think of the small buckets used for car washing), set the temp to 18*C and the diferrential to 0.5*C. This keeps my temperature pretty constant, with he compressor running only 5-6 minutes every hour. The only problem i saw was that it overshot the temperature by 0.2*C making the final temperature 17.8*C instead of the 18.0*C I had set, but this probably wont be an issue with five gallons of beer. I also tried tapping the probe to the side of the bucket with some foam and bubble wrap for insulation. In this case I set the differential to 2.0*C since I notice that the insulation was not perfect and saw that this also maintained constant liquid temperature with similar cycling. I cant wait to try this setup on a batch of homebrew!
 
After reading through the forum I noticed that there are many questions that get repeated, mainly because the forum is quite large and key words are thrown around a lot. For the benefit of future readers I have decided to summarize a few of the idea rpesentes along with some links to the original posters. I hoe this helps.

Location of probe:
If you set the probe to air, a small differential may lead to a lot of short cycling as changes temperature quicker that wort/beer.

If you set it to the side of the carboy, make sure to insulate it.

If you put it in a jar of water, remember that during active fermentation beer will get warmer faster that the water in the jar.

Insulating probe stuck to a carboy:
aggezi suggested using poster putty: https://www.homebrewtalk.com/f51/ebay-aquarium-temp-controller-build-163849/index129.html

Others have suggested using bubble wrap, foam, or a papper towel over the probe to shiled it from the ambient air.

Thermowell:
Flowmaster suggest using a stainless steel thermowell. You can build your own as per his instructions: https://www.homebrewtalk.com/f51/eb...roller-build-163849/index106.html#post2748962
Or purchase one online
https://www.homebrewtalk.com/f51/ebay-aquarium-temp-controller-build-163849/index107.html.

Connecting temperature probe to a jack:

Yes, it is possible: https://www.homebrewtalk.com/f51/eb...roller-build-163849/index120.html#post2812966

https://www.homebrewtalk.com/f51/eb...roller-build-163849/index165.html#post3097262

Not to drag this on, here are some diagrams for different setups:

Original poster setup:
https://www.homebrewtalk.com/f51/ebay-aquarium-temp-controller-build-163849/
(the tab you need to break is this one https://www.homebrewtalk.com/f51/eb...roller-build-163849/index184.html#post3269397

Box with cooling/heating lights and fan:
https://www.homebrewtalk.com/f51/ebay-aquarium-temp-controller-build-163849/index19.html

Box with lights and dual receptacles and switch:
By ParadiseBeer
https://www.homebrewtalk.com/f51/ebay-aquarium-temp-controller-build-163849/index100.html

I know I left a lot out, but these are some answers to basic questions I had when I started. I hope this helps. Cheers
 
Problem with your post is, in one more page, it's going to start being overlooked just like everything else that gets overlooked every time somebody repeats a question. It's the kind of thing that's really only useful in the OP (or at least linked to by the OP.)
 
Or add all of your useful info to the wiki as a type of fermentation cabinet? Maybe add a Refrigerator/Freezer type cabinet and detail the setup of the cheap controller in there.

https://www.homebrewtalk.com/wiki/index.php/Fermentation_cabinet

I know that's what I'll do if I want to make a fermentation cabinet, just get a cheap used fridge or freezer and add this controller. Way less work and cheaper too.
 
Problem with your post is, in one more page, it's going to start being overlooked just like everything else that gets overlooked every time somebody repeats a question. It's the kind of thing that's really only useful in the OP (or at least linked to by the OP.)

This is true :( Hopefully, though, a new person performing a search with the key words in the post will tumble upon the latest post, which would be mine (until it too becomes just another page) and also find answers to other basic questions at the same time.

I fell there is a LOT of useful information in this thread and I wish there was an easier way to tap into all this knowledge without having to go through the hundreds of post that come up when doing a keyword search.

@tolonen That is a very good idea! Thanks for the suggestion. I would think that my fridge would count as a fermentation chamber and the info about this temperature controler would be useful.
 
Got my controller hooked up yesterday. So easy to do. Now my ferm chamber is complete, with brews in there chugging away, TADs carbing a lager, and a belgian ripening. **Sniff** **Sniff** so proud...
 
Whoop!!! Just finished wiring mine up and plugging it in. Have all the settings set and tested. One question. Has anyone used this for a period of time outside with varying temperatures and humidity? My ferm fridge is out under my carport and I'm worried about the longevity of the controller.
 
Add one more to the completed and working temp. controllers. Thanks for pointing us in the right direction. Now just need to start another brew.
 
Back
Top