Homebrew Talk - Beer, Wine, Mead, & Cider Brewing Discussion Forum

Help Support Homebrew Talk - Beer, Wine, Mead, & Cider Brewing Discussion Forum:

This site may earn a commission from merchant affiliate links, including eBay, Amazon, and others.
The following steps are how I made a immersion chiller for cooling my brew fast for pitching yeast. No need to to pay $100 bucks.
Things you will need:
  1. Standard head screw driver
  2. 25' 3/8" copper tubing (some use 50' and you would follow the same steps)
  3. 4 hose clamps
  4. 3/8" ID clear plastic hose. About 2-4 ft per side. Suit to your needs.
  5. Hose adapter or faucet adapter, depending on whether you're brewing in the house or outside.
*Recommended* Pipe bender (they have cheap spring-style pipe benders at your local hardware store)
How I did it:
First thing, wait for a sale on 3/8" copper tubing. Approx. 25'. I got this at Lowe's pretty cheap. If you're patient, either Lowe's or Home Depot will have a sale. I payed around $20 bucks for mine.
1-291.jpg

Carefully stretch out the flat coil so you can begin wrapping it into a spring-style coil.
2-292.jpg

Find a round tube, cylinder, bucket or even a homebrew beer keg. It's best to find something that is smaller than the inside diameter of your brew pot. I used a shipping tube that my banner material comes in. Fits my pot perfectly!
3-293.jpg

Next, tighten the copper tube around the cylinder object until it looks like a giant slinky.
4-294.jpg

Now carefully straighten the inlet and outlet of the coil. The bottom should be long enough to come over the top of your brew pot. What I did was put the coil on its side and hold down one of the ends, then roll back (unwind) the coil to the desired length. I did this for both the inlet and outlet side of the coil.
I also made sure that the bottom outlet was lined up with the top so they were easier to clamp together. Itdoesn'timprove the function of the chiller, it's more for looks. There is no "set in stone" way of doing this, so if you require the bottom opening to end up on the opposite side of the coil, no big deal. Do what works best for you.
5-295.jpg

Now for the tricky part.
Carefully bend both tubes up to the top at about a 90 degree angle (or at least close to). Be careful! You can kink the copper tubing very easily.
I would suggest getting a cheap pipe bending tool or coil. I got mine for $10 bucks at Lowe's. Even if you never use it again, it will be worth it.
6-296.jpg

Use non-corrosive hose clamps to hold the tubes together where they meet at the top and attach your plastic tubing to both ends of the pipe. Now you can hose clamp your inlet adapter to fit your sink or garden hose/spigot. Mine is a garden hose end with a screw-on faucet adapter. This way I can use it inside and outside.
Oh, if you look at the bottom right side of the pic below, you can see the spring-style pipe benders I got a Lowe's. They are like a sleeve. You choose the size with the closest fit, slide it over the copper tube, and bend. NO KINKS!
7-297.jpg

Submerge the wort chiller in your boiling brew about 15 minutes before you are done boiling to sanitize the copper. Finally, connect one end of the plastic tube to the faucet and the other to your drain. I used hot water to test mine and to also check for leaks. It cooled the water down to pitching temp in less than an hour.
8-298.jpg

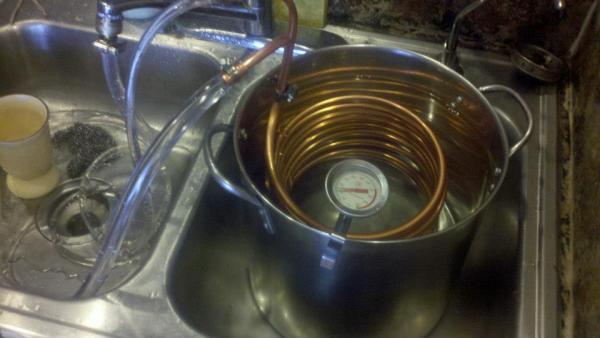
There it is! The whole build took me about 30 minutes. I hope this helps someone who would like to save money and build their own immersion wort chiller.
8-298.jpg
 
Awesome write up. After reading this, I'm not sure why anyone would buy a premade cooler!
 
@michael_mus
Thanks,
The best thing to do is check the prices regularly for copper tubing at HD or Lowes. Everything else is real cheap
 
to take this one step farther: I've been using a pond pump to pump ice water through the chiller. I can get 5.5 gallons of wort from 212 to 65 in about 30 minutes.
 
@jeremy0209
Nice!! I'm going to be brewing outside this weekend and I live in Florida so the water temps are sucky. I'm going to try that. Thanks for the info
 
@michael_mus Completely agree. Really nice chiller. Thanks for sharing tone_s!
 
you can sweat solder 3/8" copper fittings to 1/2" soft copper tubing...I made an immersion chiller out of a 50', 1/2" soft copper (refrigerant) tubing (I sometimes boil 10 gallon batches in keggles so I needed a larger chiller). Instead of futzing with a tube bender, I just soldered 3/8" ell's where my tubing was to bend at a 90 degree. (I believe that you can solder 1/4" fittings to 3/8" tubing; but finding 1/4 fittings is tough.)
 
I went one step further. I wove copper wire between the coils to hold it together and slightly separate the coils. I also ran the tubing from the bottom up through the inside (not the outside)of the coil and attached a copper wire handle to remove it from the brew pot easier.
 
Cool. Keep up the updates. I love hearing everyone's mods. I would like to try the sweat solder method once I go to 10 gal batches
 
This is exactly like what my LHBS sells. I use this and also bought a second coil of copper from Home Depot and built a pre-chiller. During the summer in TX my faucet water is 80F or higher so it is impossible to cool the wort down to 80. I connect a hose from the faucet to the pre chiller. I immerse the pre-chiller in a pot of ice water. Then the outlet on the pre-chiller goes to the wort chiller. This setup cools my wort in 20 minutes while using a much smaller volume of water.
 
@steveholehan
Like that. I think I will build a pre chiller for the Florida summer. Thanks for the Idea
 
Frozen copper tubing will hold the tubes structure without crimping:
I've had issues with crimping when you tighten it around your template or object used for the template, but yours seems to be fine, can't tell. I found that if you freeze water in the tubing before stretching it, the pipe will keep its full round structure without crimping. I also found a cheap copper tube bender that works great for 90 degree bends.
Thanks for sharing your DIY project, looks really good.
 
According to my internet, 20 foot sections are available, not 25. Would you say that is enough tube?
 
@jabumbo
yes 20' will work. I've done both. It's really not much of a time difference If you're using a 5-8 gallon brew kettle. warmer water temps will make more of a time difference. It will still cool in less than 40mins.
 
Good job! Thanks for posting the pictures. I made a similar one years ago. My brewing area was near the clothes washer, so I put the hot waste water into the clothes washer. If you monitor the water temperature at the outlet, you can vary the flow rate. Run the cold water faster at first, then slower as the outflow water absorbs less heat. The outflow water will be really hot at the beginning, then start to get less hot as the wort chills to inlet water temp. I wound my copper tubing around a 1 gallon paint can, so I could get more tubing into the coil, and still have it fit in a 5 gallon batch.
Keep up the good work!
 
Good work. It looks a lot like mine! I like the idea of the clip-on thermometer. I think I'll use mine next time instead of using an instant read one every couple of minutes so I can make it simpler.
 
instead of copper try this http://www.nybrewsupply.com/plumbing-fittings-tubing/tubing/stainless-steel-tubing-coil.html
 
@certaut copper is a much better conductor of heat than stainless
 
Hey All,
Forgive me for being the city dweller that I am, but I have a seemingly novice question. I am looking at copper on Home Depots site right now and every length and diameter of soft copper tubing says "Resists temperatures up to 150 degrees Fahrenheit". If we add this tubing to our wort boiling at 212 for fifteen minutes and then it takes another twenty to thirty minutes to get it down to 65 or 70, that's a long time for it to be overexposed to heat it isn't meant to handle. Do they use a different copper for commercial immersion chillers? Like piping or something? The 1/2" tubing I am looking at is only rated to 100!
My Dad DIYed his immersion chiller, but I'm not sure what kind of tubing or piping he used. I know it did not impart any off flavors. But this stuff looks coated or something. Any ideas?
**Update** Just looked at copper piping. While that is rated to 400 degrees, the minimum working temp is 100. So that would probably not bode well for getting it down to 65.
Thanks,
Scott
 
I just put the boiling pot on the step of the swimming pool.
 
Remember to drop your creation into the boil for the last 10 minutes or so, don't want to introduce anything foreign!
 
@WastedCider
Scott, the tubing is exposed to heat at around 250 for sterilization, but the internal temp of the copper is constantly being cooled off by the running water during wort chilling. Plus its never direct heat by a flame
 
We have a 25' 3/8 copper chiller we got from the lhbs for $40. We noticed if we stir constantly we go from 212 to 85 in 9-11 minutes. That is with cold Michigan water but everybody should be able to get similar results.
 
Excellent build tone_s.
One comment on operation that I always pass on to brewers is to shake the coil while chilling to increase effectiveness.
When the wort in the kettle nearest the coil is chilled there is minimal mixing of the hot and cold (cooled)wort and efficiency drops. If you were to feel the temp of the waste water and then give the chiller a shake it will jump up considerably and the more heat in the waste water, the less in the brew.
The science is based on Laminar Flow and it must be disturbed to get the hot wort back on to the coils. http://en.wikipedia.org/wiki/Laminar_flow
 
Great post, tones! I started out with an immersion chiller and it worked great - although mine wasn't nearly as nice and leaked like a sieve.
One thing I would recommend (maybe not immediately, but eventually) is to move to a counter-flow chiller. It requires little more than a garden hose more than this initial project, wastes much much much much less water, and it will come out the optimal temperature for pitching (upon proper adjustments).
All you do is before coiling the copper tubing, slide it through a garden hose. Then coil it in the same fashion as you would have for the immersion chiller. You slide two copper T-joints over the copper tube, but under the garden hose. Seal off the other end of the T with JB Weld around the copper tube and connect the third T-end to a garden hose wi. Do this to both sides and voila! you have a CFC! Here are some pictures to clear up what it should look like.
http://www.flickr.com/photos/66620213@N05/8430418352/in/photostream
http://www.flickr.com/photos/66620213@N05/8429332257/in/photostream
 
I can throw my brew pot in an ice bath in the sink and cool it to 65 degrees in about 30 minutes. Unless you have a brew pot that is too big for your sink or can't move it for some reason what real benefit does the chiller have over an ice bath. I mean sure if you could drop the temperature down in under 5 minutes I see the benefit. But 30 minutes just seems like a waste of time, material and effort.
 
My brew pot is over 8 gallons and like to brew outside.
I can chill to temp and open valve which runs to primary quickly without moving, lifting or disturbing anything.
Ice bath will work if you have the room
 
I just made mine last night and mine was basically just like it. A very simple and easy chiller. I was messing around with it and was wondering something. Will the chiller cool fast if the water is going fast OR slow through the tubing? ????????
 
@dannylerch
Thought copper is a better conductor you'll find that most the stainless steel tubing has a much thinner wall then the copper tubing that is available and therefor its ability to transfer heat will be equal, if not better. This was brought up in a HERMS coil discussion over at theelectricbrewery.com. SS however tends to be more expensive and more difficult to work with and that is why my HERMS coil is copper :)
 
UK brewers - buy 10mm annealed copper tubing as you can bend it by hand and it doesn't kink.
 
@Tekn0ph1sh
re: I can throw my brew pot in an ice bath in the sink and cool it to 65 degrees in about 30 minutes. Unless you have a brew pot that is too big for your sink or can't move it for some reason what real benefit does the chiller have
over an ice bath. I mean sure if you could drop the temperature down in under 5 minutes I see the benefit. But 30 minutes just seems like a waste of time, material and effort.
-----
great points and this is my question as well... my pot fits in the sink and I'll usually empty my ice tray and add cold water around it. I would think the lid staying on my pot would also be beneficial to cut down on contamination with this method as well.
any reason I should go to the chiller method?
 
Speed, not having to prepare ice every batch, and less heavy lifting. But the chillers waste more water and you most likely have to be outside. Each has their trade offs.
 
@aswistak
I just had it int he sink for testing for leaks in picture. Yes you can throw it in a sink of ice if you like.
***If you have a 8-10 gallon kettle or Doing AG brewing on a rig outside, you wouldn't want to be lifting it and carrying it to your sink.*** With a immersion wort chiller you leave it in place on the burner and screw it to your hose or faucet and let it cool in place. It's safer and effective no mess and no chance of contamination.
It's your hobby though. If you like the sink method, do the sink method. There are many ways in Home brewing to get the same result. If you choose to build a chiller, her's how
 
Great article. Thanks for sharing. Did you get the hose adapter and screw on faucet adapter at Home Depot? A friend of mine told me he used stainless steel hose clamps to connect the hoses and to hold the rising necks together.
 
@kacey1973
I got a bag of stainless steel hose clamps from Lowes for a few bucks. I used the rest of them for my mash tun braided filter.
 
Back
Top