Closed-system pressurized fermentation technique!

Homebrew Talk - Beer, Wine, Mead, & Cider Brewing Discussion Forum

Help Support Homebrew Talk - Beer, Wine, Mead, & Cider Brewing Discussion Forum:

This site may earn a commission from merchant affiliate links, including eBay, Amazon, and others.

What do you guys think about pressure fermentations? Time for a poll.

  • I've done it and I liked it just fine!

  • I've done it, nothing wrong with it, but prefer normal fermentation techniques.

  • I've done it, hate it, and never will do it again!

  • I've never done it, but it is on my list!

  • I've never done anything. I only brew beer in my mind.


Results are only viewable after voting.
nbspindel said:
hey wortmonger,
would you be able to expand on the section on reusing the yeast cake? i understand how you pour pre-boiled water onto the cake, re-tap, and then clean using the provided link. Have you ever just poured new wort directly onto the remains in your secondary keg?
I haven't due to me wanting to collect the yeast and clean my fermenter due to the same things you were worried about later in this response. I don't see a problem with it though as long as you are ready for a fast fermentation, and only doing it once (you don't want to overpitch that much)!!!
nbspindel said:
I'm thinking the next two brews i'll do will use the same yeast. after transferring brew 1 from the secondary to the serving keg, i would be boiling brew 2 to pour right onto what's left in the used secondary keg. What i worry about here is any junk left around the sides of the keg giving off flavors. Or does anyone think it's possible to put a second brew right onto the yeast and trub left over in the primary? I think that's a worse idea because of the trub.

thanks for your thoughts.
It is worth a shot, just be sure to slowly release your pressure prior to washing or reusing your yeast cake. Kaiser pointed out that the fast release of pressure from the yeast makes the cell walls rupture. I gradually release my pressure now over a couple of days and haven't had any problem. Then again, I only worry every now and then about harvesting. I harvest, build a starter from my bank, and through the spent yeast away until I need more now. But that isn't saying using a yeast cake wouldn't work. ;)
 
Man aarondrich, I hope you are OK. I let my beer ramp up overnight once uncontrolled, never again. Foam, foam, and more foam!!! Nevermind the fear from a 30 psi gauge that was maxed out for half a day after starting to release the pressure. Always, always, always have it controlled when doing this technique (unless you know your gravity and close the keg for carbonation). Glad you weren't hurt. Brew On!!!
 
i've got an idea that might be able to be adapted to using sankeys. using the aussie no-chill (https://www.homebrewtalk.com/f13/exploring-no-chill-brewing-117111/ ), i'm considering no-chilling in a sankey.

what worries me is the 'shrinkage' (for lack of a better word) of the wort in the keg. (post 29 from above link notes that the wort will become about 4% smaller as it cools.) I know these kegs are meant for outward pressure and might collapse under inward pressure. I'm thinking that i could put the spear in, tap it, and pump some co2 into the keg to accomplish a few tasks: 1. removing the o2 from the headspace (by purging it multiple times) 2. increase the pressure so as to counteract the shrinkage of the wort as it cools.

1. do you think this is possible?
2. how much pressure of co2 do you think is necessary?
3. if co2 is applied to the wort, would the simple shaking/rocking of the wort later to expose it to o2 just prior to pitching would suffice, or would an air pump be necessary to aerate the wort at pitching temps?

i know thats a lot, but these thoughts always come at once, ya know.
 
Good questions! I am wanting to do the same, but I think the keg will hold the vacuum nicely. I am actually working out a mechanism to hold my starter (maybe using another keg), and once connected to the Sanke fermenter and tapped would fill with the vacuum. This way I could stay completely sealed up. My questions revolve around aeration mainly. The P-ferment is tried and true enough in my brewery, but change one thing and this might not be so. I have been so happy with aerating on the way to the fermenter with a simple venturi, but not having to do so and being able to no-chill would be awesome. I really, really want to try this technique with no-chill very badly. Any comments toward this way of thought would be greatly appreciated.
 
well, as long as we're going to discuss this here as another dimension to work out for p-fermentation, lets go:
after reading the first 31 pages (about 2 1/2 hours) of the no-chill thread, i decided to change todays brew to just that, a no chill. I hate using all the water and was limited on time anyway. Aeration is really stumping me now, though. i let gravity feed my wort into my keg, then topped it off with a layer of CO2. I put a #11 bong in there with a dry airlock on top. I stuffed the airlock with some cotton balls wet with sanitizer. This way the keg can breath, but the air it gets has to pass through the sanitized cotton. Sounded logical, something like a filter???

But how to aerate tomorrow? there's not much air in there (thanks to the co2 layer that i feel necessary) so even if i shake it, aeration won't improve much. i could pump it to another keg and add the (recently discovered) venturi method, but priming the pump will be tricky, at best. A 5 micron airstone might be hard to find tomorrow, so i think i'll be running to wallyworld for an aquarium aerator, remove the included stone, and just pump extremely large bubbles of air into the wort for a while. My next HBS order will have to include an airstone. I've done a bit of reading on the value of different aeration methods. For the price, basically a one time investment, it seems this is the best way to go, and maybe rock the keg a bit afterwards too.

I was also thinking about the vacuum issue. Not even having thought about it, I normally fill my kegs with hot water straight from the hot water heater. And it's hot. I put some oxiclean in there, seal it, and shake it around. Then leave it. It never crossed my mind that I should worry about the keg imploding, and yet it never did. Granted, the temp of my hot water is not 212, but i dont think its that far off. Maybe next time i'll just seal it; that is, if i can figure out a good way to aerate the wort this time.
 
I just read the the New Brewer article Ray Daniels posted about. It appears there is another benefit to pressurized fermentation:

  • Limits foaming during fermentation by slowing the evolution of C02.

Full Sail Brewery mentioned they use this technique in place of silica gels (e.g. FermcapS) to control foaming and prevent product loss through the blowoff port.

I updated my original advantages/disadvantages post.
 
Yep lamarguy, I posted this in my very first post in this thread ;). Guess that's what happens when a thread gets this long... people don't read the whole thing, lol. :)
 
Has anyone gotten around to doing no chill with a sankey? I've got my first batch of pressurized fermentation going right now, and depending on how this works out I might make the next batch a no-chill. I'll probably give it a try either way in another week or two, and make sure to post my results. The only thing I'm worried about is if the liquid and gas seals on the sankey spear will seal if the keg is lower pressure than the exterior. AFAIK, the liquid out on a spear is spring loaded and the seal is assisted by the pressure in the keg, if this pressure is reversed, will outside air slowly leak into the keg as the wort cools? Is it time for a science experiment with some boiling water?
 
will outside air slowly leak into the keg as the wort cools?

You'll have to eventually equalize the [negative] pressure before you pitch the yeast. What difference does it make if the equalization is slow or fast? :confused:
 
i've done no-chill in a sankey, but not with the spear in. That was my next step depending on how the no-chill turns out.

regarding the use of a spunding valve, i had an idea. If you've got multiple kegs pressure-fermenting, you would need multiple spunding valves. But that can get expensive. What if one keg was designated for a spunding valve and others branched into it? I would plan on keeping the one keg empty so that the CO2 from different beers, and possibly blowoff, wouldn't taint the flavor of any other beers. From that I would use a splitter to attach all other gas-out (normally gas-in) tubes from the kegs that are fermenting. They would then all pump their CO2 into the empty keg which would then release the pressure through the SV. And since there's positive pressure in the other fermenting kegs, there shouldnt be concern of flavors/smells mixing through some backflow. For only 2 fermenters, this might not save money, but I had 4 kegs fermenting in Dec/Jan and had to use blow-off tubes but wanted to do pressure.

For 4 kegs, basically i'd have to buy a 5th keg, but wouldn't have to build 3 more Spunding valves. I'd say there's some savings there. You guys think it's an idea worth developing further (or does it even need further development), or is it dumb?
 
Why would it have to be a keg? Any pressure holding vessel with the proper fittings (or even specialized fittings for a different approach) would work. I had talked about using a keg before for this very same thing, only now I am thinking about a different type of rig. It would be quite a bit less expensive if you think about it. Tap connection fittings are expensive compaired to other things similar, and since you would only utilize one adjustable pressure relief valve on your control container it would be even less money. Barbed nipple to tap tailpiece connections would be all that is required off the tap, and your control bottle/mini keg/whatever could be plumbed with small valves and barbed connections on a single manifold. Meaning, your control would only have two holes (one exit only for the SV, and one for your multi-valved manifold). With check valves on your gas expulsion lines, you wouldn't even have to worry about there being different pressures in the different kegs.

Now... what to use other than a keg? Anyone... Anyone... Anyone? Perhaps a long enough section of larger diameter steel pipe would work? With threaded end caps and teflon tape. Then have one of the caps with the two threaded holes of desired diameter. You could run a dip tube on the manifold side to the bottom of the pipe and have the SV side open just like a keg would be. Then fill the pipe with just enough water to have your CO2 bong through it in the case of a krausen blow-off. No mess then! Over fill your kegs and you could even utilize it as a top-cropping yeast collector :)

Come on ideas, I know there are more!
 
i simplified it to a keg as a control container (spunding container?). I thought i would actually use one of my cutouts and build a box around it to use existing pieces (keg top, spear, existing spunding valve on coupler). However, a large enough pipe to use as both manifold and spunding container is a great idea. I think if you were to put a 90* on the pipe turning up, with the pressure relief valve on the top of that high point, you'd be set and wouldnt have to worry about liquid in your valve.

You could run a dip tube on the manifold side to the bottom of the pipe and have the SV side open just like a keg would be. Then fill the pipe with just enough water to have your CO2 bong through it in the case of a krausen blow-off. No mess then! Over fill your kegs and you could even utilize it as a top-cropping yeast collector :)
i think a dip tube might be overkill, and i'm not sure i follow the need for liquid in there for blow-off. If you got blow-off into a dry spunding container, it would just dry and be nasty, but could be cleaned like all things with oxyclean. Other downsides? How would you use that as a yeast collector? you'd have krausen from multiple beers, hence varied yeasts, right? unless you only use one yeast strain, but then you'd have to worry about sanitizing the lines constantly. I'd let 'em get dirty without worry, as long as they're clean from the keg to the check valve.

I imagine a wall in my basement now with a large diameter pipe mounted on it with a SV on one end and numerous kegs hooked up to it, all pressure-fermenting beautiful beer! :ban:
 
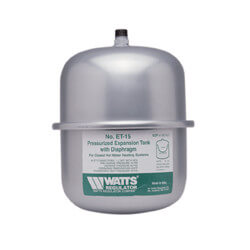
Why not use a pressure relief tank used on hydronic heating systems. They are about 4 gal in volume, run about 38 bucks and can handle pressure to 60psi
watts-et-expansion-tank.jpg


I love this and will be converting my rig to this method. I love the mixture of science, engineering, and art.
 
This doesn't envole heating anything. I'm not sure where you are coming from. Maybe I am missing something. The tank you mention has a schrader valve and another small opening in the top. I don't think that would work for beer.:confused:
 
that could serve as a substitute for the spunding keg like i had suggested, but i think using a pipe with multiple connections for hooking a multitude of pressurized fermenters to it would be ideal both in size and financial investment. Paying $38 for that thing is probably more costly than a few feet of pipe and fittings. Either way you'll have to buy fittings for your kegs to vent into the container/pipe, so that's irrelevant in the equation.

I was thinking of setting up 2 pipes actually, both with the same number of nipples (QDs would be best) to tap into the fermenter. One pipe would be set for spunding. The other would be low pressure (5 psig or so). Ferment until done, switch the tube used for fermenting from the spunding pipe to the pressurized pipe, then transfer your beer to a secondary keg, all without moving it or a CO2 tank around too much. Do the same to get to a serving keg, then force carb still in place (but this would require raising the pressure of the pressurized pipe).

This stuff is all way in the future for me, but could be a good system for a brewery intent on producing, but only in 1/2 barrel quantities at a time. I.e. I don't have the funds for larger kettles, but wouldnt mind purchasing kegs that will get used in distribution at some point anyway.
 
Correct on use of the relief tank, however I see your point using pipe to accomplish this. Would you use gas pipe and tap/thread your QD's into it? Or would you use some other type of pipe i.e. pvc? My point was it's cheaper than a keg with all the hardware to create a larger pressure relief unit.
 
i thought gas pipe would be best. Either tap my own QDs into it, or put Ts on the pipe with reducers/adapters to get down to fit the QD without tapping it myself.

I get your point. It's valid. WortMonger made me realize that (for me) some sort of pipe layout would be better. Thanks for the input.
 
Would there be a difference in getting the glycol filled regulator in terms of performance (in the fridge) or longevity. Would this prevent any schmutz from the krausen from getting in there? Not sure how these work so much or if I should care.

Also, would a stainless ball valve be a whole lot easier to sanitize or does it really matter? Can the regular ones be boiled?
 
Do you mean gauge or regulator?

I think it is a longevity issue with liquid filled gauges over normal ones. The gauges will eventually rust anywhere that isn't stainless (like the two little screws on the backs of them). Even in a kegerator, where the gauge is inside the fridge, I would not scrimp on the gauge. It cost more in the long run to keep replacing them, so why not get a good one at the start. As for krausen getting in them, a good stainless one can be cleaned out easy. The whole point of pressurized fermentation is to keep the krausen down using pressure. If you slowly release the pressure with the spunding valve, you really shouldn't have any foam/gunk/krausen coming anywhere near your equipment. I started out with a little funk in my stuff. Now, I have very clean ferments and just have to rinse my equipment because it was used, not because it is dirty.

You can boil the brass ones, but I would always go with stainless given the option. Just my opinion though. Stainless is just so easy to clean and makes me think it is clean. Brass, even clean, looks dirtier to me.
 
Yeah, I meant gauge. So you recommend the regular stainless dry macmaster gauges? Why go with the 60 PSI? Why wouldn't a 30 be better and offer more precision? Same goes with the adj. pressure relief valve? How bout doing 30 on both? Also, is that one robust enough to boil too?

I'd like to know how little headspace you've been able to achieve doing this. I have a converted sanke fermenter with a 4" triclamp top with ball lock disconnects like a corny. I am hoping that with this method I can get as close to a 15 gal ferment as possible.

Sorry if you've answered these already. I've read the whole thread, but my head hurts:drunk:!
 
SankePankey said:
Yeah, I meant gauge. So you recommend the regular stainless dry macmaster gauges? Why go with the 60 PSI? Why wouldn't a 30 be better and offer more precision? Same goes with the adj. pressure relief valve? How bout doing 30 on both? Also, is that one robust enough to boil too?
No, I recommend the liquid filled (but... get the all stainless ones for outside rust issues). I chose a 60 because a 30 isn't high enough for when you take your temperature and pressure higher for carbonation. At cooler temperatures 30 would work just fine, since the pressure would be lower. But... at 70*F 30 psi isn't a lot. My guage was unusable at carbonation temperatures and I didn't even put it back on until I was crash cooling. 30 will work, but you'll need to guess more. As for the relief valve I had... it only went to 20 psi. I needed at least +30 psi, and the next one up was the newest one I bought. I want to be able to control my pressure at whatever temperature I may be at.

SankePankey said:
I'd like to know how little headspace you've been able to achieve doing this. I have a converted sanke fermenter with a 4" triclamp top with ball lock disconnects like a corny. I am hoping that with this method I can get as close to a 15 gal ferment as possible.
I have still only done 12.5 gallons due to my kegging procedures, but I feel it is possible to do 15 gallons with Fermcap.:ban:
 
Just traded stuff for a half barrel keg, so I ordered parts to build my spunding mechanism. I'll post pics when I get it setup. I'm going to run an air line from the tap to a tee with the valve and gauge so I can monitor it outside of the lagerator. :D On the beer out side I'm going to add a picnic tap so I can draw gravity samples to see how the ferment is progressing, and to give me an easy way to harvest the yeast after racking.

Looking forward to doing 10 gallon batches of two week light American lager.
 
FWIW, I've been using this adjustable RV posted earlier itt and it's been working fine. The graduations on the outside are not even close to accurate but the valve itself works fine. I'm just using it for carbing.

I'm sure you mentioned it earlier Wortmonger but how much carb are you getting with ales at room temp? Sorry if I posted this earlier but here is a thread on ProBrewer about capping/spunding and they led me to believe I shouldn't go above 15 psi and that I should only shoot for ~1 volume CO2 with ales. I usually get close to full carb with lagers though. EDIT: I also like the idea of using the RV to 'regulate' the closed-transfer rate mentioned at the end.
 
spanish castle,
that's the same RV that i'm using (maybe you got it from my post?) and also find it to work just right. I agree though, the graduations are off a bit and it takes some experimenting every time to get the pressure just right. It would be nice if there existed a set pressure relief valve with a setting of like 5psi or so. That would eliminate ever altering it.
 
Yep, got it from your post. I ordered them one day before leaving for work and they were on my doorstep the next day! Grainger and McMaster always seem to ship amazingly quick (they've saved my ass at work more than a few times).

I used a silver Sharpie to mark the black handle (just generic marks) and that makes it a little easier to dial it in.
 
Really wish they made a digital adjustable pressure relief valve like the digital pressure regulator I just bought. Man that would make everything a hell of a lot easier wouldn't it.

Spanish, I let my ales ramp up to room temp when there are just a couple of points shy from finish. I do this completely sealed, since I haven't attached the new stuff I bought for spunding and I can't control above 20 psi release. I get full carbonation, and sometimes a little more than wanted. I don't worry since the yeast has already done the majority of the work and think of it as if it were already done and I was just bottling it. When I crash I set my wanted release pressure again, then I don't worry about anything until the transfer. Sometimes I don't try to adjust pressure at all until I am transfered and at a specific temperature to control it better. There are so many variables, but the main point is that those last couple of gravity points don't off-flavor and work great for carbonation.
 
I have a 1/4 bbl keg, and I'm estimating that I need to cut 1/2" off the spear instead of the 3/4" stated by OP. AFAIK, it shouldn't be 1/2 of the 3/4" bc the width of the keg changes according to depth at the bottom of the keg. Does anyone have an idea if this is reasonable?
 
I've pieced my spunding valve together and I'm excited to brew up my first batch under pressure. I do have a question regarding setting pressures for releases. Did any of you do any bench testing on your pressure gauge and relief valve setup? I'm thinking it would be great to preset my initial pressure relief setting before I start fermenting.

What have you guys done in the past?
 
Flananuts,

I just connected my pressure relief system to my CO2 regulator, and adjusted it based on the output gauge reading.

One other thing to think about, if you haven't already designed it into the system, is that you should place a "trap" between keg connection and the regulator. I'm using a 20oz soda bottle. I have a flare fitting installed in the cap, which connects to a piece of tubing inside the bottle, and extends approx. half the length of the bottle. The adjustable regulator is connected to a manifold that I've placed in the upper portion of the bottle. The idea being that if krausen gets into the hose, it will need to fill the bottle before getting high enough to foul the regulator.
 
if you haven't already designed it into the system, is that you should place a "trap" between keg connection and the regulator.

Keep in mind, a "trap" is unnecessary if you're fermenting under pressure. The top pressure keep the krausen low, very similar to a silicon anti-heading agent like fermcap.
 
lamarguy's right, assuming you have head space. you probably aren't filling your keg to the top, so that should be fine. This has been a great development IMHO for homebrewers that want to fiddle w the process more!
 
I just put my rig together. I realized I bought a pressure gauge that is too high, so mcmaster carr is shipping a low pressure gauge and the high pressure is on it's way back. I'm going to hold off making my next ale until I get my freezer turned ferm chamber in order in order to do it under pressure and exactly within the temps my yeast prefers. The recipe will be the same as the pale ale I'm currently sipping away with my SWMBO.
 
Great to see more people trying this. I keep checking in from time to time and am very happy to see more people to add to the research of the technique.
 
Keep in mind, a "trap" is unnecessary if you're fermenting under pressure. The top pressure keep the krausen low, very similar to a silicon anti-heading agent like fermcap.

I'm using 5gal cornies, filled with ~4.8gal of beer. I was getting a little bit of krausen coming over into the system when doing hefe's. It was a simple fix to make a trap from a bottle and some brass fittings.
 
I'm using 5gal cornies, filled with ~4.8gal of beer.

Ah, that makes sense for an undersized fermenter. You'll probably want to consider a 1/4 barrel or 1/2 barrel sanke keg at some point in the future. They're cheap and work well.
 
I am liking the idea more and more of a krausen collector for yeast banking. This is the most viable yeast, right? If you used a smaller fermenter on purpose in conjunction with a collector, wouldn't that be the best yeast for saving for a bank or future starter?
 
If you used a smaller fermenter on purpose in conjunction with a collector, wouldn't that be the best yeast for saving for a bank or future starter?

It would certainly be healthy yeast (99+% viability when collected) but not necessarily a good cross-section of the yeast (e.g., heterogeneous mixture).

That said, an adjustable racking cane (retracted) and some CO2 pressure is probably the easiest method to top crop in sanke kegs.
 
I'm interested in doing this and am wondering if anyone can comment on the extent of ester reduction? Are we talking major suppression or barely detectable or what? I ask because I do alot of pale ales and IPAs with 1056 and 1272 and even when I ferment at ~62*F, I detect banana-ish notes in both flavor and aroma (more so with 1272). If it makes a major difference, I'd definitely like to do this asap.
 
Back
Top