Cheap and easy aeration gadget

Homebrew Talk - Beer, Wine, Mead, & Cider Brewing Discussion Forum

Help Support Homebrew Talk - Beer, Wine, Mead, & Cider Brewing Discussion Forum:

This site may earn a commission from merchant affiliate links, including eBay, Amazon, and others.
Great post guys...

I was thinking, what if you were to put the venturi near the kettle and before the chiller... would the 200 or so degree wort have a chance of sterilizing the tiny air bubbles before they and the wort are cooled by the chiller... Any stray yeast wouldn't survive the hot temperature, if there were several feet of hose before the chiller. I can't see that the oxygen would be harmed by the hot wort since there is no place for it to gas off to inside the hose before it would be cooled and in the carboy. This would also give the air much more contact time with the wort.

What do you think?
 
Aerating should be done after the wort is cooled. Oxygen in hot wort is chemically bonded causing oxidation. It makes for bad beer.

How to Brew: Aeration is Good, Oxidation is Bad

Now a system of kettle to inline chiller (CFC or plate) to venturi to long tube would be sweet, as long as the wort came out at the proper temp in one pass through the chiller.
 
I got this to work with the pump. I squished the copper pipe at the hole a little bit to make the flow faster there. I covered the hole with another piece of silicone tubing such that I can move it on and off to bubble or not (I stick the end of the tubing back into my boil kettle and don't want it to bubble while i recirculate to sanitize everything).

I do have to make sure I have a good flow going from the pump before I open up the small hole or it will spray out the hole. Also I didn't get any foam in my carboy, but probably because of the FermCap foam control. Bubbling away in the fermefreezer with Nottingham now.
 
Hmmm, I'm thinking I need to make another Venturi then, right after my Therminator. I just wish this would work into a sealed keg. I haven't tried it but it seems like the pressure of the wort inside the keg would start to back up enough to make the Venturi holes squirt. I had always oxygenated with a O2 wand in my grant before sending it through the pump to a sealed up keg, prior to making mine. Now it looks like I will be transferring into a open Sanke Keg :(.
 
I am not good at buying the right tubing or drilling holes the right size, is it possible to just pop a hole in the tubing that i cover up when not needed? or maybe sometimes when the bend in the siphon isnt tight it creates air bubbles, maybe loosen that up even more to let more air in?
 
I am not good at buying the right tubing or drilling holes the right size, is it possible to just pop a hole in the tubing that i cover up when not needed? or maybe sometimes when the bend in the siphon isnt tight it creates air bubbles, maybe loosen that up even more to let more air in?

That should work just fine. Several posters in this thread have had good luck with just putting a small hole in some tubing, although it works better if you have a restriction of some kind to accelerate flow past the hole.

Nothing fancy. Heat up a paperclip in a flame and melt a hole, or grab a small drill bit or whatever. It's a very forgiving gadget.
 
You need a constriction in the line at the point where the hole is located. This can be done by using a short section of smaller diameter tubing or by clamping the tube partially closed at this point. See this page for an explanation of why this works:
Venturi effect - Wikipedia, the free encyclopedia

I use a short (about 1.5 inch) piece of 5/16 I.D. tubing with a hole in it jammed into my 3/8" siphon hose, with an 18 inch length of 3/8 tubing on the exit end of the 5/16 tubing. When I want to siphon without aerating, I just remove the 5/16 and short 3/8 pieces.

I do the same except my siphon is 5/16". So 5/16" hose, short piece 1/4" with hole, 5/16".

I used a needle to make my hole. It appears to make bubbles so I'm assume it works. The smaller hole prevents wort from spraying all over the place. I had that problem when the hole was bigger.

Mike
 
I finally got to use mine. It was terrible. Wort everywhere. Huge dissapointment. Why? I drilled too big of a hole. I made a new one with a wickedly smaller hole. Tested it out with water. This one work well.
 
I've tried this twice, once by poking holes in the clear tubing with a sanitized push pin and another time by melting holes in a plastic racking tube with a lighter & paper clip. The first one worked, the second one didn't. I liked the first one but was concerned about using it too many times, it seems like tiny holes would be hard to clean.

Yesterday I tried using my auto-siphon ($10 at my homebrew store) to aerate, after it was done moving liquid I "pumped" air into the bottom of the carboy by lifting the intake out of the liquid and pumping for about a minute. It seemed to work well and it started fermenting in less than a day.
 
My way of thinking is to get some clear vinyl tubing of the diameter to your liking or needs, a hardware store item. Heat it with a heat gun or over a gas stove or propane burner until it becomes soft in one narrow area. When soft pull on it to create a hour glass or venturi center section around 1 1/2" long and 1/2 to 2/3 the original diameter. Cool water under the sink while holding it straight until it is hard and stiff as the normal tubing is. Tale a small as you can get sewing needle and heat it to almost red hot and poke as many holes as you think you need thru this venturi area. Have these holes aimed downward at a 45 degree to prevent the wort from coming out of these hole plus it helps to pull in the air. Simple easy and cheap to make. You will be surprised how much you can pull heated tubing and the diameter reduction you can make. Go practice as many diferent venturi forms can be created due to how hot or how wide of a heated area, caution do not burn the tubing, no brown spots just hot and soft. Just my 2 cents.
 
It would be interesting to see just how small you can make the hole(s) and still pull air into the line. It seems that at some point surface tension will overcome the venturi effect.
 
If you want to get fancy take that hour glass I posted above and cut off the tubing at the ends 2" to 3" beyond at the normal diameter area. Inside these tubing ends press in a 1" long piece of brass tubing that will have a press fit at both ends, (hardware or hobby section has thin wall model brass tubing). This to prevent the tubing from getting compressed to a smaller diameter at the next step. Add a tight fitting piece of tubing 1" long over the main hour glass piece at each end.
Over the full length of the whole hour glass part plus over the 1" pieces added to the ends of the hour glass add a piece of tubing that fits tightly around the 1" long end sleeves, later there will be clamps added but not yet. At the hour glass center section there should be a space between the reduced hour glass tubing and the outside tubing covering the whole hour glass over the full length. Take a thin head brass screw like a 10-32 thread (0.1960" OD) then solder on a small brass washer allowing for a larger head diameter, (this to prevent pulling the brass headed screw thru the vinyl tubing hole). This screw with a 3/8" long thread with the center drilled with a 0.030" hole thru the center. Cut or burn a small hole for this brass screw to pass from the inside of the outside tube with the thread sticking out. Off this outside thread add a brass fitting with a 10-32 thread at one end with a brass washer plus drilled thru the center with a 0.030" diameter hole. On the other end a nipple to the diameter to your liking then add the end clamps. Use a regulator with low pressure O2 off a bottle with the pressure set less than what you your pump pressure will be to prevent O2 from backing up stream against the pump. This way you will inject 100% O2 into the wort vs sucking 20.95% oxygen, 78.08% nitrogen, .038% carbon dioxide plus other rare earth gases and crap. Which gas would you like your little yeasties to feed off? Call me cheap or a DIY person. I'm off my podium now unless you can afford a sight glass with a O2 injection system for your wort or go back to basics with a stainless steel stone, tubing and O2 from a welding bottle.
 
When soft pull on it to create a hour glass or venturi center section around 1 1/2" long and 1/2 to 2/3 the original diameter. Cool water under the sink while holding it straight until it is hard and stiff as the normal tubing is. Tale a small as you can get sewing needle and heat it to almost red hot and poke as many holes as you think you need thru this venturi area.

great idea - any chance you can post a pic of that so I can visualize better?

I did a simple small diameter tube between larger sections and drilled holes with a small bit. worked well, but any improvement is welcome..

results:
DSC00114_38.jpg


Should I shoot for better than this? Or is that good?
 
Ok so 1/16 inch was still too big. Next time gonna try smaller vinyl tube in a bigger vinyl tube. and make holes with push pin.
 
I've run into this only slightly, but from the looks of the venturi tube i might have more of an issue here. Theres bound to be an overflow of foam. should i just let it overflow? is that what ya'll do?
 
wedward said:
Should I shoot for better than this? Or is that good?


Yeah, you got it down. That's some beautiful bubbles.

Dextersmom said:
I've run into this only slightly, but from the looks of the venturi tube i might have more of an issue here. Theres bound to be an overflow of foam. should i just let it overflow? is that what ya'll do?

Don't fear the foam, lol. Well I'm not talking about Star-San here! The little bit of beer that comes with the bubbles at this point would be insignificant. Let it flow out and then cap off your fermenter afterwords.
 
hah i still fear the star-san foam a little.

but ok thanks I was figuring it would be ok just to let the foam run out. Just gotta make sure I have some towels down.
 
i had a thought today (which is rare) and it was as follows:

couldn't we use flyguy's cheap T-siphon and just leave the top of the 'T' open to allow air to flow in as the wort passes through the straight portion of it? the 'T' reduces the flow diameter and there's an open hole already to allow the oxygen to be sucked in.

sorry if someone already mentioned this.

https://www.homebrewtalk.com/f11/flyguys-t-siphon-3-replacement-autosiphon-25774/
 
couldn't you just plug it until the siphon gets going and then release your thumb to let the air flow in? maybe the hole is too big.
 
A siphon works via suction. If you open up a hole, you no longer have suction. So, either your siphon would stop, or you would be siphoning out of both holes. At least, that's what I believe will happen. Give it a try and see, but I'd test it with water first before chancing wasting beer.
 
i had a thought today (which is rare) and it was as follows:

couldn't we use flyguy's cheap T-siphon and just leave the top of the 'T' open to allow air to flow in as the wort passes through the straight portion of it? the 'T' reduces the flow diameter and there's an open hole already to allow the oxygen to be sucked in.

sorry if someone already mentioned this.

https://www.homebrewtalk.com/f11/flyguys-t-siphon-3-replacement-autosiphon-25774/

Yes this does work. See my post a few pages ago. Just be sure to cover the open T-leg when starting the siphon.
 
Doing some research I've found that venturi provides between 5 and 7.5 ppm DO

which is still good enough for me. That just means a couple seconds of shaking to reach the 8ppm DO

Going to drill a small hole in my spare racking cane, how far back from the mouth should I drill it ?
 
If you want to get fancy take that hour glass I posted above and cut off the tubing at the ends 2" to 3" beyond at the normal diameter area. Inside these tubing ends press in a 1" long piece of brass tubing that will have a press fit at both ends, (hardware or hobby section has thin wall model brass tubing). This to prevent the tubing from getting compressed to a smaller diameter at the next step. Add a tight fitting piece of tubing 1" long over the main hour glass piece at each end.
Over the full length of the whole hour glass part plus over the 1" pieces added to the ends of the hour glass add a piece of tubing that fits tightly around the 1" long end sleeves, later there will be clamps added but not yet. At the hour glass center section there should be a space between the reduced hour glass tubing and the outside tubing covering the whole hour glass over the full length. Take a thin head brass screw like a 10-32 thread (0.1960" OD) then solder on a small brass washer allowing for a larger head diameter, (this to prevent pulling the brass headed screw thru the vinyl tubing hole). This screw with a 3/8" long thread with the center drilled with a 0.030" hole thru the center. Cut or burn a small hole for this brass screw to pass from the inside of the outside tube with the thread sticking out. Off this outside thread add a brass fitting with a 10-32 thread at one end with a brass washer plus drilled thru the center with a 0.030" diameter hole. On the other end a nipple to the diameter to your liking then add the end clamps. Use a regulator with low pressure O2 off a bottle with the pressure set less than what you your pump pressure will be to prevent O2 from backing up stream against the pump. This way you will inject 100% O2 into the wort vs sucking 20.95% oxygen, 78.08% nitrogen, .038% carbon dioxide plus other rare earth gases and crap. Which gas would you like your little yeasties to feed off? Call me cheap or a DIY person. I'm off my podium now unless you can afford a sight glass with a O2 injection system for your wort or go back to basics with a stainless steel stone, tubing and O2 from a welding bottle.

This seems like it should work just fine, except that I tend to shoot for "Cheap and Easy" in my brewing process. A chunk of otherwise-trashed racking cane and a paperclip are cheap and easy. A pump and O2 system may be easy, but they ain't cheap.
 
I have taken a similar approach to oxygenating wort. Instead of drilling a hole in the siphon tube as folks in this thread are discussing, I use a hypodermic syringe needle, with a 1 micron sterile filter connected to the back end of the needle.

My counterflow chiller exit is 3/8” copper tubing. I connect it to a six inch piece of 3/8” OD straight copper tubing with a 1.5” section of 3/8" ID vinyl tubing. The second piece of copper tube drains into my fermenter. The needle gets inserted at an angle into the vinyl section between the two copper tubes. I have used an aquarium pump to push air through the needle, and also just let the flowing wort aspirate filtered air through the needle. Both seem to produce lots of bubbles.

The hypo needle is a medium diameter, I’m guessing 21 gauge since I don’t have it here. This produces a stream of very fine bubbles of air mixed well into the wort. When I fill a 6 gallon carboy, I get about 4.5 gallons of wort in before the foam starts to overflow, so I’m getting lots of air bubbles. I tape or wire the assembly to the chiller to keep my klutziness from knocking the needle out of the tubing during use. It is impossible to get the needle back exactly into the original hole (no comments please) if it does come out.

Advantages are sterile filtered air, fine bubbles for good mixing of O2 and wort, comnpact, and simple to add to an existing chiller set up. I use a new needle and new piece of vinyl connector tubing each time, so no fears of infection from the needle or tubing. I keep the sterile filter in a sanitized pill bottle between uses. I beg the syringe needles and filters from my lab buddies in exchange for the occasional beer.
 
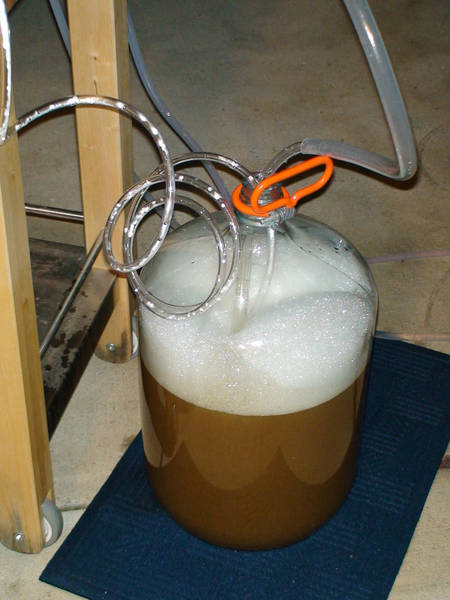
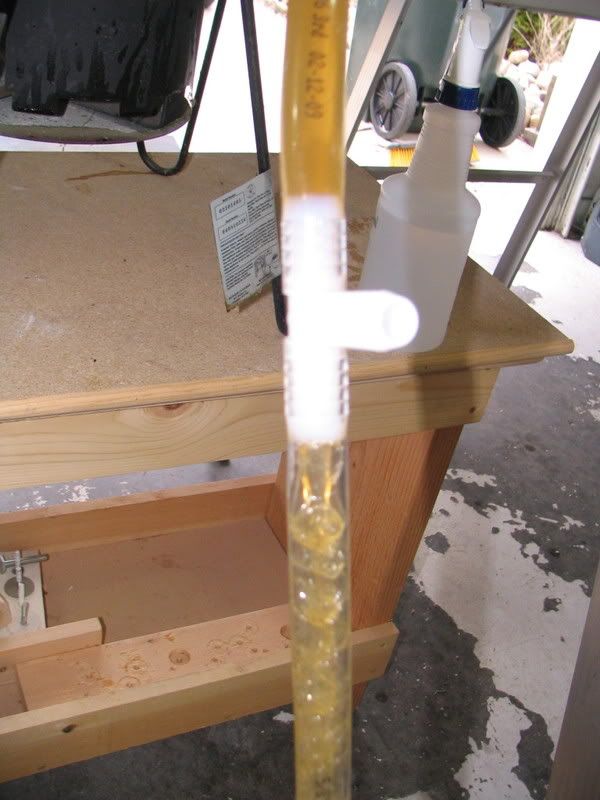
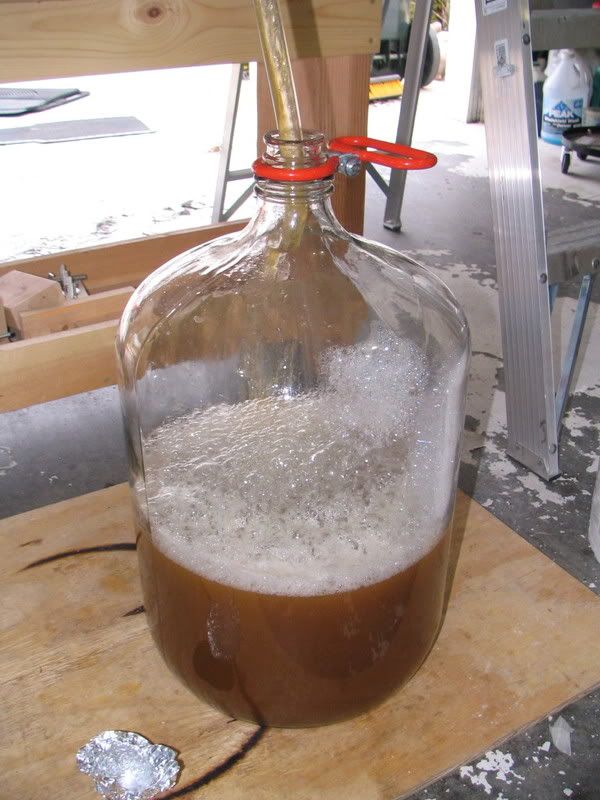
thanks to hammacks for first suggesting the idea earlier in this thread, but i thought folks might be interested to see how the plastic 'T' works. i didn't need to plug the 'T' hole or anything, it worked like a charm, the siphon went right on through, reducing the diameter of flow and you could hear the air getting sucked in and the resulting bubbles let me know it was working properly. there is star san foam on the right side of the pic, further up the wall of the carboy, but the rest are all a result of the venturi. sorry for the fuzzy pic of the T.

IMG_3455.jpg


IMG_3456.jpg
 
This looks awesome. Definitely going to give it a try.

Anyone use an electric beater put directly in the flow from the plastic tube or cane?
 
I've used this method with the nylon T and so far it's working great. However, the two beers I've done this on, I've had to pitch at a later time trying to get my temps down below 60F. How long do you think the oxygen/air stays in the wort? Would I be okay or would I need to reaerate?
 
how long are you having to wait? i'd definitely at least pour it back and forth between buckets or vigorously stir.
 
Since I've read so much discussion of æration, I'm surprised there aren't published figures on the effectiveness of particular methods of placing O2 into solution in wort. This is particularly interesting since (according to Palmer, I believe) the max dissolved oxygen using air in water is 8ppm (parts per million), and he indicates that several popular methods of æration will achieve this- but without detailing the actual methodology used to arrive at this conclusion. He does indicate that oxygen injection systems (used routinely by commercial brewers- understandably, because of the large volumes) can place up to 25ppm in solution, although experiments with this amount by homebrewers have indicated a negative effect on the finished beer.
There seems to be quite a variation in reported results on various forms of æration. Personally, I use the "pour back & forth" method. I pour the cooled wort into my fermentation bucket, pour it back into the brewpot, then back into the bucket. I've almost invariably got a good ferment going by the next morning, and I get good-tasting beer. Until I get better information on the benefits of a particular method of æration, I'm sticking to my method.
 
Actually, leaving your wort longer would make it more aerated, I think. The whole reason to stir or bubble or shake is to increase surface area so more O2 is moving from the air to the liquid. If you have to leave your wort for a while, it's going to (slowly) continue to absorb O2 from the air.

Now, if you hit it with pure O2 and superoxygenate it to a higher level than the air around it, then it would lose O2.
 
I'm sorry if someone has already asked this and I just missed it, but why not just use an aerator like one finds on a kitchen or bathroom sink? I mean, just take one of those and stick it on the end of your hose?
 
I am still a fan of this technique but I have simplified it slightly.
I now use half inch auto siphon / hose and racking cane.
A small 1/16 hole drilled in the hose just before it attaches to the racking cane allows me to aerate or not (by sliding the hose over the hole) for stronger siphoning near end of a rack.

Cheers
BeerCanuck
 
As you can tell, I'm very new to brewing as well as this forum so if I'm offering an old idea, sorry. I've read this whole thread and haven't seen it mentioned though so here goes.
In the aquarium hobby there is a type of pump called a Power Head that includes a venturi in the pump. It is designed to pull water through the gravel and a false bottom and up a tube, it then injects air through the venturi and pumps the aerated water out at the surface.
I'm thinking it would be very simple to modify one of these power heads to pull the wort out of the brew kettle and into the fermenter aerating the heck out of it along the way.
Any thoughts?
 
new b brewer
That sounds like a good idea but those power heads spray the water quite a bit, I don't know if it would be as effective if you attach a hose to it, or if the pump is sanitizable or food grade.
 
Back
Top